OPTICLIMATE REVOMAX PRO3 Manuel d'utilisation

Engineered & Designed in Holland
www.opticlimate.com
INSTALLATION
& USER GUIDE
opticlimate.com
THE FUTURE OF COOLING
JUST GOT COOLER.
SMART REMOTE CONTROLLER
PRO3/PRO4 MANUAL

INSTALLATION
The Smart Remote Controller ensures that you can operate your OptiClimate(s) remotely (from anywhere in the world).
This means that your climate system can be controlled at all times. The Smart Remote Controller is placed near the
OptiClimate(s) and connected to the OptiClimate(s) with a cable. A computer or smartphone (remotely) communicates
via the internet with the Smart Remote Controller, which controls the OptiClimate(s).
Connecting the Smart Remote Controller
Power
Connect the power supply and USB connector from the remote cable to the Smart Remote controller.
USB to
connect remote
Power supply
from adapter
HDMI to connect
monitor (view only)
Ethernet
Connections
At the back of the Smart Remote Controller you find the USB, HDMI, Ethernet and power supply connections.
2
EN
blank

INSTALLATION
Control 1 Opticlimate remotely:
An Opticlimate Pro3 or Pro4 needs installation of an Interlink Adapter (Art. 1-597 ) on the communication-port in the
Opticlimate Pro3 or Pro 4.
Installation of the Interlink Adapter Pro 3/4:
OPTICLIMATE PRO 3/4
OPTICLIMATE PCB OPTICLIMATE PCB OPTICLIMATE PCB
INTERLINK
ADAPTER PRO 3/4
INTERLINK
ADAPTER PRO 3/4
CONNECT TO THE
OPTICLIMATE REPEATER BOX 8
OR
CONNECT DIRECTLY TO
SMART REMOTE CONTROLLER OR
PC/LAPTOP BY USING OPTLICLIMATE
USB INTERLINK ADAPTER (ART. 1598)
Control 1 Opticlimate remotely: Connect the USB Interlink Adapter to the USB-port at the Smart Remote Controller
(or Computer). Use a Black Interlink Cable and install an Interlink Adapter PRO3/4 in your Opticlimate to connect the
USB Interlink Adapter with your Opticlimate PRO3 or PRO4.
What do you need to connect 1 Opticlimate:
• Article 1-7801 EU or 1-7801 UK Revomax Smart Remote Controller
• Article 1-598 USB to Interlink Adapter
• 1 pc interlink cable correct length for distance between Smart Remote Controller and OptiClimate
• 2-363 Interlink Cable Black 5mt
• 2-364 Interlink Cable Black 10mt
• 2-365 Interlink Cable Black 20mt
• For longer lengths, the interlink cables can be connected with:
• 2-367 Interlink Coupler standard (not waterproof)
• 2-368 Interlink Coupler waterproof
• Article 1-597 Interlink Adapter Pro 3/4
OPTICLIMATE PRO 3/4
WITH INTERLINK ADAPTER PRO 3/4
SMART REMOTE
CONTROLLER
INTERLINK CABLE
USB INTERLINK
ADAPTER
OR COMPUTER
3
EN
blank

INSTALLATION
Control 2 or more Opticlimates remotely:
Connect your Smart Remote Controller (or Computer) with a Repeater Box 8. A Repeater Box distributes the communication
from the Smart Remote Controller over 8 channels. Because of this it is possible to control up to 8 OptiClimates. Connect the
USB Interlink Adapter to the USB-port of the Smart Remote Controller (or Computer). Use a Black Interlink Cable to connect
the USB Interlink Adapter with your Repeater Box 8 at the RS485-port.
What is the distance between the Repeater Box and the Smart Remote Controller?
Less than 5mt: connect with supplied USB cable 5mt
More than 5mt: connect with a black Interlink cable + USB Interlink Adapter
• 2-364 Interlink Cable Black 10m
• 2-365 Interlink Cable Black 20mt
SMART REMOTE
CONTROLLER
REPEATER BOX 8
INTERLINK CABLE
USB INTERLINK
ADAPTER
RS485
OR COMPUTER
A black Interlink cable is required per OC to connect the OC to the Repeater Box. What is the
distance between the Repeater Box and each (separate) OC?
• 2-363 Interlink Cable Black 5mt
• 2-364 Interlink Cable Black 10mt
• 2-365 Interlink Cable Black 20mt
For larger lengths, the interlink cables can be connected with:
• 2-367 Interlink Coupler standard (not waterproof)
• 2-368 Interlink Coupler waterproof
If an OptiClimate PRO3 or PRO4 is connected, there must be an interlink adapter on each OC must be mounted in order
to connect the interlink cable to the OC.
• 1-597 - Interlink Adapter Pro 3/4
The black Interlink cable plugs directly into the OptiClimate Revomax, so a Interlink Adapter not necessary.
Installation of the Interlink Adapter Pro 3/4:
OPTICLIMATE PRO 3/4
OPTICLIMATE PCB OPTICLIMATE PCB OPTICLIMATE PCB
INTERLINK
ADAPTER PRO 3/4
INTERLINK
ADAPTER PRO 3/4
CONNECT TO THE
OPTICLIMATE REPEATER BOX 8
OR
CONNECT DIRECTLY TO
SMART REMOTE CONTROLLER OR
PC/LAPTOP BY USING OPTLICLIMATE
USB INTERLINK ADAPTER (ART. 1598)
4
EN
blank

INSTALLATION
This is what the complete connection should look like:
USB INTERLINK
ADAPTER
INTERLINK CABLE
SMART REMOTE
CONTROLLER
REPEATER BOX
INTERLINK CABLE
CONNECT UP TO 6 REVOMAX’S
OPTICLIMATE PRO 3/4
WITH INTERLINK ADAPTER PRO 3/4
OPTICLIMATE PRO 3/4
WITH INTERLINK ADAPTER PRO 3/4
INTERLINK CABLE
More information is available in the user manual of the Repeater Box 8
What do you need to connect 2 to 8 Opticlimates:
• Article 1-7801 EU or 1-7801 UK Revomax Smart Remote Controller
• Article 1-592 EU or 1-592-UK Repeater Box (incl 5mt USB cable)
• Article 1-597 Interlink Adapter Pro3/4 , number equal to number OC Pro3/4
• Interlink cable per OC connection
Correct length for distance between Repeater Box and each individual OptiClimate
• 2-363 Interlink Cable Black 5mt
• 2-364 Interlink Cable Black 10mt
• 2-365 Interlink Cable Black 20mt
• For longer lengths, the interlink cables can be connected with:
• 2-367 Interlink Coupler standard (not waterproof)
• 2-368 Interlink Coupler waterproof
Optional:
• Article 1-598 USB to Interlink Adapter
if the distance between the Smart Remote Controller and Repeater Box more than 5 metres.
• 2-364 Interlink Cable Black 10mt
• 2-365 Interlink Cable Black 20mt
Choose the right length for the interlink cable to connect the Repeater Box and Smart Remote Controller as
the distance is more than 5 meters.
5
EN
blank

USING PRO3/PRO4 APPLICATION
Controlling PRO3/PRO4 Aircos
The Smart Remote Controller has also a application installed to control PRO3/PRO4 aircos. To start the PRO3/PRO4 application
you have to do the following steps.
If you start the Smart Remote Controller, you will see the main screen of Revomax application.
main screen
Press the ‘menu’ button to go to the menuscreen.
main screen with menu-button highlighted
Press the ‘about’ button to open the about-screen
menu screen with about button
6
EN
blank

USING PRO3/PRO4 APPLICATION
Press the button ‘switch app’ to switch to the PRO3/PRO4 application
about screen with switch-app button
Confirm the warning message to accept switching to the PRO3/PRO4 application
warning dialog if you really want to switch to the other application
Some error messages may be displayed. You don't have to do anything. The revomax application will eventually close.
A warning message that the application is shutting down
After accepting the error, the Smart Remote Controller will restart. Restarting will take some time, so be patience. (Some background
processes will be stopped, but this isn’t visible for the user).
The PRO3/PRO4 application will start after about 20 seconds.
7
EN
blank
USING PRO3/PRO4 APPLICATION
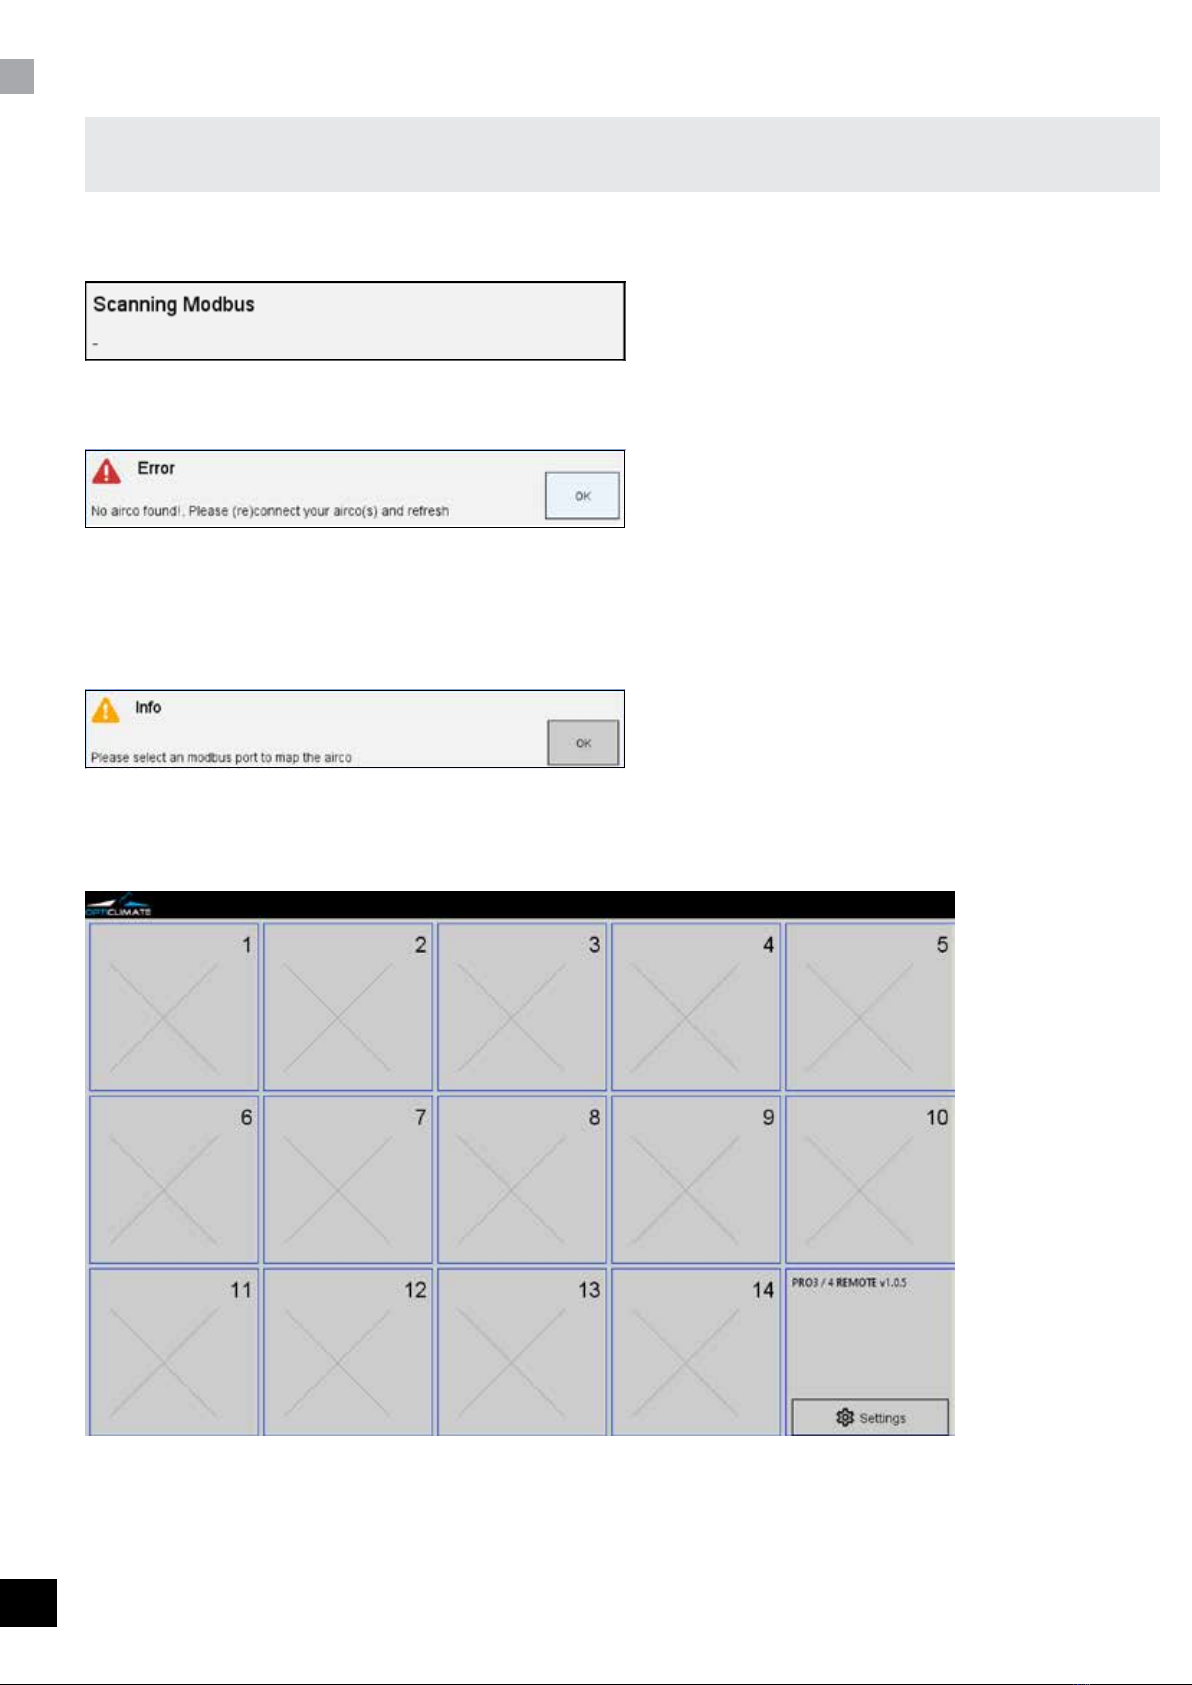
PRO3/PRO4 application
PRO3/PRO4 aircos are connected by a network called modbus. At start of the application, the application will scan the modbus to
detect connected aircos.
The scanning dialog
When no aircos are found, an error will be displayed
An error dialog, no aircos found
If no aircos are found, check the cabling, and also if the aircos are turned on.
No message will appear when everything went fine.
When the application is started the first time, the application will not know how to address the aircos. So an info message will appear
An info dialog to tell the user to map the airco(s)
To map an airco, you have to select one of the 14 tiles and set the modbus-port of the airco. The selected tile will be the placeholder
of the airco
Mainscreen with 14 titles
8
EN
blank

USING PRO3/PRO4 APPLICATION
By selecting a tile, the mappings dialog will appear.
airco map dialog
At this dialog you can selection the modbus-port and set the airco name. Use the 'help' button to show the possible
dip-switch setting of the airco. You can set the modbus-port-address with the dipswitch of the airco.
Help window with dipswitch settings
When the mapping went OK, a small remotecontrol representation will appear in the selected tile.
9
EN
blank

USING PRO3/PRO4 APPLICATION
PRO3/PRO4 application
When the application is started with airco’s connected, the mainscreen tiles will be filled with a small representation of a airco remote
control.
You can see the status of each airco at a glance.
Mainscreen with 14 titles
When pressing a title with an airco, a dialog will appear to control the selected airco.
dialog with a selected airco
10
EN
blank
Ce manuel convient aux modèles suivants
1
Table des matières
Manuels Télécommande populaires d'autres marques

Panasonic
Panasonic EUR7622KB0 Manuel utilisateur

Bang & Olufsen
Bang & Olufsen Beo4 Manuel utilisateur

Sunwave Tech.
Sunwave Tech. RemoteComm SRC-7000 Manuel utilisateur

Multiplex
Multiplex PROFI TX 9 Manuel utilisateur

One Remote
One Remote RMB4 Manuel utilisateur

FUTABA
FUTABA 9ZAP - PART2 Manuel utilisateur


