One Forall SV-1715 Manuel utilisateur

Instructi on Manua .............................4
Bedienungsan e itung .......................10
Mode d'emp oi .................................16
Guía de usario .................................22
Manua de instruções .......................28
Istruzioni per 'uso ...........................34
Gebruik saanwijzi ng .........................40
Brugsanvisni ng ................................46
Bruksanvisning ................................52
Bruksanvisning ................................58
Käyttöohje .......................................64
√
√‰
‰Ë
ËÁ
Á›
›Â
˜
˜ ¯
¯Ú
Ú‹
‹Û
ÛÂ
ˆ
ˆ˜
˜
. . . . . . . . . . . . . . . . . . . . . . . . . . . . . . . .
70
Инструкция пользователя . . . . . . . . . . . . . . . . . . . . .
76
Kullanım kılavuzu
. . . . . . . . . . . . . . . . . . . . . . . . . . . . . .
82
Instrukcja obsługi
. . . . . . . . . . . . . . . . . . . . . . . . . . . . . .
88
Návod k použití
. . . . . . . . . . . . . . . . . . . . . . . . . . . . . . . . .
94
Használati útmutató
. . . . . . . . . . . . . . . . . . . . . . . . .
100
SV 1715
English
Deutsch
Français
Español
Português
Italiano
Nederlands
Dansk
Norsk
Sverige
Suomi
EEÏÏÏÏËËÓÓÈÈÎο¿
Русский
T
T
ü
ü
r
r
k
k
ç
ç
e
e
P
P
o
o
l
l
s
s
k
k
i
i
Č
Č
e
e
s
s
k
k
y
y
M
M
a
a
g
g
y
y
a
a
r
r
SV_1715_AV_Sender 17 talen:SV_1715_AV_Sender 17 talen 25-05-2007 09:18 Pagina b

2
SV_1715_AV_Sender 17 talen:SV_1715_AV_Sender 17 talen 25-05-2007 09:18 Pagina c

1
4
2
RECEIVER
RECEIVER
TRANSMITTER
RECEI ER
WWW.ONEFORALL.COM 3
5
3
TRANSMITTER
TRANSMITTER
RECEIVER
TRANSMITTER
RECEIVER
TRANSMITTER
OFF OFF
ON ON
SV_1715_AV_Sender 17 talen:SV_1715_AV_Sender 17 talen 25-05-2007 09:18 Pagina 3

4
- This product should only be used with the AC power adapters
included or a type that complies with safety standard EN60065 and
that has the following specification: 9 olt DC / 300mA.
- This product should not be exposed to high temperatures.
- This product should not be used in damp places or close to water.
- The AC power adapters should only be connected to a power supply
of 220-240 AC / 50Hz.
- This product should not be covered.
- Inadequately protected or sensitive electronic equipment may be
affected by the use of this product. This interference can lead to
damage to either equipment. Before you start, please check whether
or not this product can affect surrounding equipment.
Note that the antennas cannot rotate freely over 360º, when
resistance is felt stop rotating otherwise you will damage the
unit permanently.
Safety Precautions
The Product . . . . . . . . . . . . . . . . . . . . . . . . . . . . . . . . . . . . . . . . . . . . . . . . . . . . . . . . . 5
Installation . . . . . . . . . . . . . . . . . . . . . . . . . . . . . . . . . . . . . . . . . . . . . . . . . 6
Getting started . . . . . . . . . . . . . . . . . . . . . . . . . . . . . . . . . . . . . . . . . . 7
Trouble Shooting . . . . . . . . . . . . . . . . . . . . . . . . . . . . . . . . . . . . . . . . . . . . . . . . . . . . 8
Table of Contents
English
SV_1715_AV_Sender 17 talen:SV_1715_AV_Sender 17 talen 25-05-2007 09:18 Pagina 4

5
The Audio ideo Sender (S -1715) is a solution for distributing audio and
video signals to every place in the house without the need of wires. The A
Sender gives you the possibility to view any video source (satellite receiver,
video recorder, camcorder, D D player, digital or analogue Set-Top Box or
Pay-T decoder box) on your second T in your home.
The One For All A Sender (S -1715) package contains:
-TRANSMITTER unit
-RECEI ER unit
- Infra-red (IR) Eye
-Two Power adapters
-Two “A ” cables
The TRANSMITTER sends the audio and video signals from the source
device ( CR, D D, SATELLITE/ CABLE BOX, CAMCORDER, etc) by 2.4 GHz to
the RECEI ER that is connected to the destination device. The built in
Remote Control Extender sends the IR signal in the opposite direction
(from RECEI ER unit to TRANSMITTER unit) at a frequency of 433.92 MHz.
TRANSMITTER unit
The TRANSMITTER operates on 9 olts DC 300mA that is supplied by the
AC/DC Adapter (included in package). Connecting from the audio or video
device to the TRANSMITTER is done by the included A cable labelled
"transmitter"). The Audio and/or video signals are transformed to a 2.4GHz
frequency that will be sent via the built-in antenna.
Furthermore the TRANSMITTER transforms the Remote Control Extender
signal (at 433.92 MHz) back to an IR command.
RECEIVER unit
The RECEI ER operates on 9 olts DC 300mA that is supplied by the AC/DC
Adapter (included in package). Connecting from the audio or video device
to the RECEI ER is done by the included A cable "Receiver". The high
frequency signal (2.4GHz) received by this unit are captured by
the built-in antenna of the RECEI ER unit and will be transformed into the
original audio and video signals.
Secondly the RECEI ER has a built in remote control extender. When an
infra red signal is Received by the RECEI ER, it will transform the IR
command to 433.92 MHz and can be sent through walls and ceilings.
Please note that this feature is only accessable for devices that are
controlled via IR (infra-red) signals at a frequency of 30 - 60 kHz
This feature does not support the 2-way IRDA waveform. If you are unsure
of the details of the remote control (IR) output please refer to the manual
of the original device or contact your cable supplier.
The Product
SV_1715_AV_Sender 17 talen:SV_1715_AV_Sender 17 talen 25-05-2007 09:18 Pagina 5

6
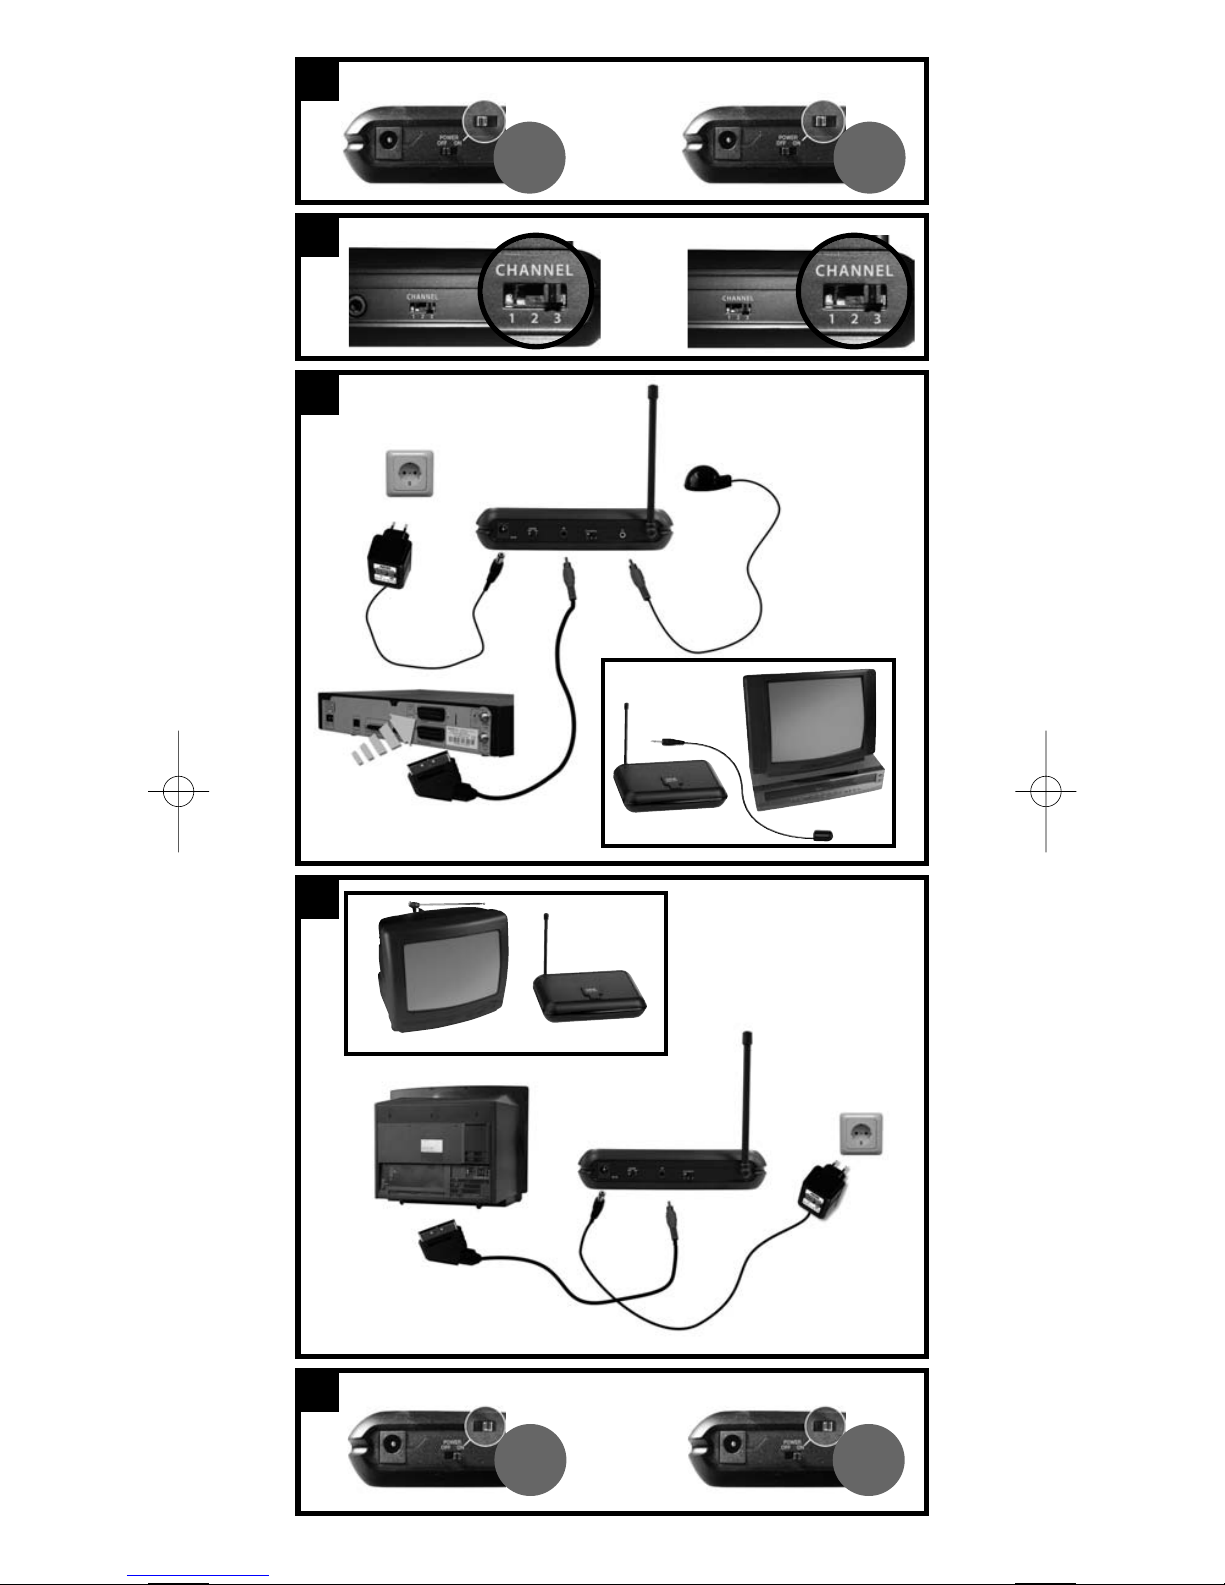
Make sure that both the TRANSMITTER and RECEI ER
are switched off.
Put both "RECEI ER" and "TRANSMITTER" on the same
channel by using the slide switch on the back side of the units
Connecting the TRANSMITTER unit
Use the A cable labeled “TRANSMITTER” to Connect the
TRANSMITTER UNIT to the source devic (e.g. CR). Make sure that
the SCART is connected to the correct Output of the device,
normally called “Line Out”.
If you wish to remotely control the source device (satellite receiver, video
recorder, camcorder, D D player, digital or analogue Set-Top Box or Pay-T
decoder box) from another room, for example to change channels on your
satellite receiver, you will need to:
Place the TRANSMITTER next/close to the source device and connect
the IR eye to the TRANSMITTER. Place the IR eye directly on the IR
receiver window on the front-side of the source device OR place the
IR eye in front of the source device (make sure there is no interfe-
rence of the IR Eye signal going to the IR receiver of
the source device).
Now, insert the adapter plug into the connector on the backside.
Connecting the RECEIVER unit
Use the A cable labeled “RECEI ER” to Connect the
RECEI ER UNIT to the destination devic (e.g. T ). Make sure that
the SCART is connected to the correct Input of the device,
normally called “Line In”.
Insert the adapter plug into the connector on the backside.
If you want to control the source device, place the RECEI ER on top or
beside the destination device where it is able to catch the IR command
from your remote control.
Now that both units are connected you can switch ON the units
using the ON/OFF switch. The red LED on the front should light up.
Place the units as high as possible to avoid interference of any kind.
Installation
See page 3 (fold-out page)
1
2
3
4
5
SV_1715_AV_Sender 17 talen:SV_1715_AV_Sender 17 talen 25-05-2007 09:18 Pagina 6

7
The following paragraphs contain a few examples.
EXAMPLE 1:
Play video on the VCR (source) in the living room and watch
the picture on the TV (destination) in the bedroom.
Connect the TRANSMITTER to the CR and the RECEI ER to the T in the
bedroom. Switch on the video and insert a tape. Place the IR eye on / in
front of the IR receiver of the CR. Switch on the T in the bedroom.
Select the mode on the T for “Line In” (A , EXT or channel 0). Aim the
CR remote control to the RECEI ER unit and press play. The video should
start playing and picture and sound should appear on your bedroom T
screen.
EXAMPLE 2:
If you do not have coax cable connection with the TV in the
bedroom you can tune in the channels on your VCR (source) in
the living room and watch the picture on the TV (destination) in
the bedroom.
You may need the manual of your CR to tune in the T channels.
Once all channels are tuned in, you are able to watch your T channels
through your A channel. Connect the TRANSMITTER to the CR and the
RECEI ER to the T in the bedroom. Switch on the video. Place the IR eye
on / in front of the IR receiver of the CR (see B). Switch on the T in the
bedroom. Select the mode on the T for “Line In” (A , EXT or channel 0).
You can take the remote of your CR to your bedroom to control your T
channels tuned in your CR.
EXAMPLE 3:
Also, if you do not have coax cable connection with the TV in
the bedroom, the AV Sender gives the possibility to view your
Satellite Receiver (source) programs also on the TV (destination)
in the bedroom.
You probably already tuned in the channels on your Satellite Receiver. If
not, you may need the manual of your Satellite Receiver to tune in the T
channels. Once all channels are tuned in, you are able to watch your T
channels through your A channel (or other output channel). Connect the
TRANSMITTER to the Satellite Receiver and the RECEI ER to the T in the
bedroom. Switch on the Satellite Receiver. Place the IR eye on / in front of
the IR receiver of the Satellite Receiver. Switch on the T in the bedroom.
Select the mode on the T for “Line In” (A , EXT or channel 0). You can
take the remote of your Satellite Receiver to your bedroom to control your
T channels tuned in your Satellite Receiver.
Getting Started
SV_1715_AV_Sender 17 talen:SV_1715_AV_Sender 17 talen 25-05-2007 09:18 Pagina 7

8
Problem & Solution
If your house has a heavy metal construction or is equipped with a
PC network, it can disturb the radio signal. Even moving the units a
few inches can improve the performance. If this doesn’t work try
to move the TRANSMITTER and RECEIVER to another place in the
house. If you experience problems, try placing the units away from
electrical appliances.
• No picture on second TV.
- Make sure that the TRANSMITTER and RECEI ER are switched ON.
- Make sure that both TRANSMITTER UNIT and RECEI ER UNIT are set to
the same channel.
- Select “EXT” or “A ” on second T .
- Make sure that all cables are connected correctly.
- Make sure that the video source (satellite receiver, video recorder,
camcorder, D D player, digital or analogue Set-Top Box or Pay-T
decoder box) is switched on.
- Make sure to use the correct SCART connector (e.g. EXT1 or EXT2) of the
video source (check manual of video source).
• Bad picture/ sound quality on second TV.
- Try to find out if the way the cables are placed cause interference.
- Make sure that the distance between the TRANSMITTER and RECEI ER
unit is less than 100 ft (30 m).
• Picture of selected TV channel disappears (snow-picture).
- Disable the auto standby mode of the CR (check the manual of the CR
how to do this).
• The picture on your second TV is not correct.
- Select “EXT” or “A ” on second T .
- Make sure that the video source is switched on.
• Using a remote control, you cannot control the video source from
your second TV.
- Aim the remote control directly at the RECEI ER unit and ensure that
there are no obstacles in between.
- Ensure that there is no other wireless device (wireless headphones,
speakers, RF control signals) interfering with the remote control.
- Make sure that TRANSMITTER and RECEI ER are more than 16 ft (5 m)
apart.
- Make sure to use the remote control of the video source.
- Reposition the IR Eye on the video source OR place the IR Eye 2 - 4 inch
(5 - 10 cm) in front of the video source.
• Buzzing sound when using the remote control
- With some types of T you will not be able to solve this problem.
• S-VHS video shows no colour pictures (only black and white).
- Select C BS video output format for your S- HS CR
• DVD player gives no pictures on either main- or second TV.
- Select C BS video output format for your D D player (check the D D
player’s user manual.
Trouble Shooting
SV_1715_AV_Sender 17 talen:SV_1715_AV_Sender 17 talen 25-05-2007 09:18 Pagina 8

9
Declaration of Conformity
We, Universal Electronics Inc., 6101 Gateway Drive, Cypress, CA 90630,
U.S.A., and its
subsidiaries
Universal Electronics B , Institutenweg 21, 7521 PH Enschede, Netherlands,
ONE FOR ALL GmbH, Fabrikstra_e 3, 48599 Gronau, Germany,
ONE FOR ALL UK Ltd, Institutenweg 21, 7521 PH Enschede, Netherlands,
ONE FOR ALL FRANCE S.A.S., Rue Paul Séramy 17, 77300 Fontainebleau,
France,
ONE FOR ALL IBERIA S.L., Ctra. Hospitalet, 147-149, 08940 Cornellá de
Llobregat, Barcelona, España,
ONE FOR ALL ARGENTINA S.R.L., A . Las Heras 2126, 5th Floor (Suite “C”)
ZC 1111, Recoleta, Buenos Aires, Argentina
Declare under sole responsibility that the ONE FOR ALL Wireless
Audio/ ideo Sender (S -1715)
is in conformity with the essential requirements as described in Directive
1999/5/EC and satisfies
all the technical regulations to the product within this directive.
EN 300 440 (2001-09)
EN 301 489 (2002-08)
EN 300 220 (2000-09)
IEC 60065 (1998)
Enschede, 25 January 2006
Paul J. Bennett
As Managing Director of Universal Electronics B
0678
SV_1715_AV_Sender 17 talen:SV_1715_AV_Sender 17 talen 25-05-2007 09:18 Pagina 9

10
- Benützen Sie dieses Produkt bitte nur mit den mitgelieferten oder
gleichwertigen 9 olt DC / 300 mA AC Netzadaptern die den
Sicherheitsstandard EN 60065 erfüllen.
- Dieses Produkt sollte nicht an hohen Temperaturen ausgesetzt
werden.
- Das Produkt soll nicht in feuchten Plätzen oder nahe zu Wasser
verwendet werden.
- Der AC Netzadapter sollte nur an eine Energieversorgung mit 220-240
AC / 50 Hz angeschlossen werden.
- Dieses Produkt soll nicht durch etwas bedeckt werden.
- Unzulänglich geschützte oder empfindliche elektronische Geräte
können bei Benutzung dieses Produktes beeinflusst werden. Dieses
kann zu Beschädigungen an den Geräten führen. Bevor Sie anfangen,
prüfen Sie bitte nach, ob dieses Produkt von den umgebenden
Ausrüstungen (oder auch umgekehrt) beeinflusst werden kann.
Bitte beachten Sie, dass die Antennen nicht frei um 360° drehen
können. Sobald Sie Widerstand spüren, hören Sie auf zu drehen,
da Sie sonst die Antenne dauerhaft beschädigen.
Sicherheitsvorkehrungen
Das Produkt . . . . . . . . . . . . . . . . . . . . . . . . . . . . . . . . . . . . . . . . . . . . . . . . . . . . . . . . 11
Installation . . . . . . . . . . . . . . . . . . . . . . . . . . . . . . . . . . . . . . . . . . . . . . . 12
Es kann Losgehen . . . . . . . . . . . . . . . . . . . . . . . . . . . . . . . . . . . . 13
Problemlösung . . . . . . . . . . . . . . . . . . . . . . . . . . . . . . . . . . . . . . . . . . . . . . . . . . . . . 14
Inhaltsverzeichnis
Deutsch
SV_1715_AV_Sender 17 talen:SV_1715_AV_Sender 17 talen 25-05-2007 09:18 Pagina 10
Autres manuels pour SV-1715
1
Ce manuel convient aux modèles suivants
1
Table des matières
Langues :
Autres manuels One Forall Récepteur

One Forall
One Forall SV1810 Manuel utilisateur

One Forall
One Forall SV-1715 Manuel utilisateur

One Forall
One Forall SV 1730 Manuel utilisateur

One Forall
One Forall SV-1725 Manuel utilisateur

One Forall
One Forall SV 1730 Manuel utilisateur

One Forall
One Forall SV 1725 Manuel utilisateur

One Forall
One Forall SV1820 Manuel utilisateur