OMA E30 Manuel utilisateur

1
Owner’s Manual
Retain this owner’s manual for future reference
Read and follow all instructions in this owner’s manual
Version A

2
Thank you
Thanks for purchasing this product. The product will help you exercise your muscles in
the correct way and to improve your fitness – and all this in a familiar environment.
Precautions
WARNING: This elliptical trainer has been designed and constructed to provide maximum
safety. Nevertheless, certain precautions should be taken when using exercise equipment.
Read the whole manual before assembling and using the elliptical trainer. The following
safety precautions should also be observed:
◆It is the responsibility of the owner to ensure that all users of the elliptical trainerare
adequately informed of all precautions. Use the elliptical trainers only as described in
this manual.
◆Keep children and pets away from this equipment at all times. DO NOT leavethem
unsupervised in the room where this elliptical trainer is kept.
◆Inspect and assemble all parts regularly. Replace and worm parts immediately.
◆Place the elliptical trainer on a level surface, with at least 1.0 m of clearance on each
side of elliptical trainer. To protect the floor or carpet from damage, place a mat under
the ellipticaltrainer.
◆Keeptheellipticaltrainerindoors,awayfrommoistureanddust.Maintaintheusing
place ventilation. DO NOT use it in the airless place.
◆Don’t put any sharp things around the ellipticaltrainer.
◆Wear appropriate clothes while exercising; do not wear loose clothes that could
become caught on the elliptical trainer. Always wear athletic shoes for foot protection
whileexercising.
◆Donotusethisproductifmorethan150kgofweights.Pleasechooseourotherseries
of elliptical trainers.
◆Do not put your hands on the moving parts to preventinjures.
◆Keep your pedaling speed in a controlledway.
◆If you find your elliptical trainer works abnormal, do not use itimmediately.
◆No more than one person should operate the elliptical trainer at onetime.
◆If you feel pain or dizziness while exercising, stop exercising immediately and askfor
adoctor.

3
Safety notice
When you are remedial or have below symptoms, after discussing with your doctor, then
could use this elliptical trainer.
1. Waist paining now and leg, waist, neck hurt before, legs, waist, neck and hand numbly
please do notuse.
2. Have anamorphic arthritis, rheumatic andgout.
3. Have osteoporosis and otherabnormality.
4. Have perfunctory system obstacle (heart disease, blood obstacle, hypertension).
5. Have breathobstacle.
6. Using the manpower pulse adjust machine or insert into the bodymachine.
7. Havesarcomata.
8. Have thrombus or othersymptoms.
9. Have diabetes or be caused by diabetes feelingobstacle.
10. Have skintrauma.
11. Hyperpyrexia caused by sick(38 ℃or over 38 ℃).
12. Abnormal back bone or back bonebending.
13. Pregnant orcatamenia.
14. Feel physical abnormality, needconvalesce.
15. Body condition is not verywell.
16. The aim is tohealing.
17. Except the upper symptoms, feel other physicalabnormality.
----Maybe cause the accident or the poor body condition.
Before beginning any exercise program, consult your physician. This is especially
importantforpersonsoverage35orpersonswithpre-existinghealthproblems.To
reduce the risk of serious injury, read all important precautions and instructions in
this manual and all warnings on your elliptical trainer before using your elliptical
trainer.

4
Pre-assembly Notes
Open the boxes:
Makesuretoinventoryallthepartsthatareincludedinthebox.Checkthehardwarechart of a full
count of the number of parts included for proper assembly . If any of the parts are
missing, contact with thedealer.
33 M4×16-14
34 M4×10-4
38 ST4×16-2
37 M6×15-2
35 Φ10×45×M6×20-2
26 M10×70×20-4
27 Φ10-4 28 Φ10-4
36 Φ6-2 31 Φ8.5*Φ20*t1.5-4
L5S-A
L5-B
L6
39 M12×60-2
29 M8*20-4
101 ST4×12-4
E30
103 Φ17-2

5
NO.
NAME
SPECIFICATION
QUANTITT
Y
26
Allen C.K.S. half thread screw
M10×70×20
4
27
Spring washer
Φ10
4
28
Flat washer
Φ10
4
29
Allen C.K.S. half thread screw
M8×20
4
31
Flat washer
Φ8.5×Φ20×t1.5
4
33
Philips pan head full thread screw`
M4×16
14
34
Philips pan head full thread screw
M4×10
4
35
Allen C.K.S. hollow screw
Φ10×45×M6×20
2
36
Flat washer
Φ6
2
37
Allen C.K.S. full thread screw
M6×15
2
38
Phillips C.K.S self-tapping screw
ST4×16
2
39
Allen flat head set-bolt
M12×60
2
101
Phillips C.K.S self-tapping screw
ST4×12
4
103
Curve washer
Φ17
2
L shape wrench
5×40×110
1
L shape wrench
5×80×80S(with a cross)
1
L shape wrench
6×66×140
1
GATHER YOUR TOOLS
Before starting the assembly of your unit,gather the necessary tools. Having all of the
equipment at hand will save time and make the assembly quick and hassle-free.
CLEAR YOUR WORK AREA
Make sure that you have cleared away a large enough space to properly assemble the
unit. Make sure the space is free from anything that may cause injury during assembly.
After the unit is fully assembled, make sure there is a comfortable amount of free area
around the unit for unobstructed operation.
NOTE: Each step number in the assembly instructions tells you what you will be doing.
Read and understand all instructions thoroughly before assembling the treadmill.

6
Product instruction
Handlebar
Console
Handle pulse
Bottle holder
Main frame
Upper upright post
Wheel
Front stabilizer
Pedal
Technical information:
Rear stabilizer
PRODUCT NO.
E30
DIMENSION
Unfold:1660×720×1580mm
MAX LOAD
150KG
SPEED RATIO
10.3
FLYWHEEL
Double way,Φ280/9kg
RESISTANCE
FRAGMENT
1-32
STRIDE LENGTH
420×200
*WE RESERVE THE RIGHT TO AMEND THE PRODUCT WITHOUT PRIOR NOTICE.
7
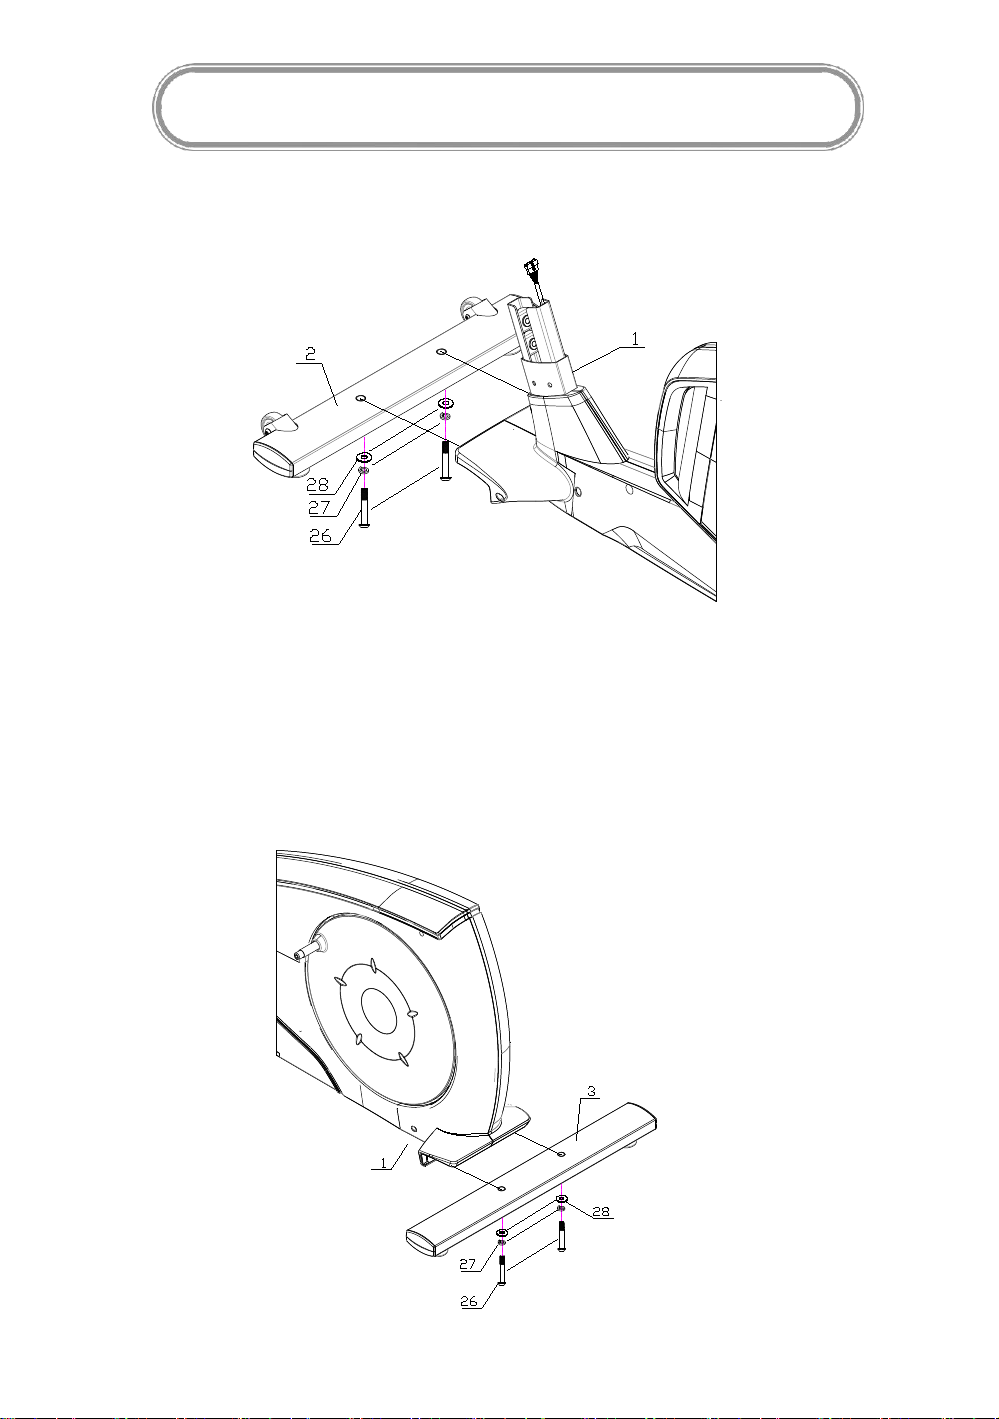
ASSEMBLY INSTRUCTIONS
Step 1: Attach the front stabilizer (2) to the main frame (1) with curved washer(28), spring
washer(27) and Allen C.K.S. half thread screw(26).
Step 2: Attach the rear stabilizer (3) to the main frame (1) with curved washer(28), spring
washer(27) and Allen C.K.S. half thread screw(26)

8
Step 3:
1. Connect motor communication wire(11) and upright post communicationwire(12).
2. Attach upper upright post(4) to the main frame(1). Firstly take out the hole plug (102).
Lock with Allen flat head set-bolt (39). Then cover the hole with holeplug(102)
(Notice: The screws on upright post need to be tightened together, when finished
tightening one screw, then start on the other screw in turn until tightened the upright post)
3. Attached Axle(25) to the upper upright post(4).
Step 4:
1. Firstly, set the curve washer (103) to the both side of the Axle (25). Then
assembleBodyarm-L(5)totheleftofAxle(25).Bodyarm-R(6)totherightofAxle(25). Lock with
flat washer(31) and Allen C.K.S. full threadscrew(29).
2. Assemble Body arm cover (17) and Body arm cover (16) to the Body arm-left(5) with
Phillips pan head full thread screw(33).
3. Same as above way to assemble Body arm cover (17) and Body arm cover (16) to the
Body arm-right(6)

9
Step 5:
1.Attach the axle sleeve of left rear pedal supporter(7) to the axle of main frame(1) with
Flat washer (31) and Allen C.K.S. full threadscrew(29).
2.Attachtheaxlesleeveofleftfrontpedalsupporter(7)toleftbodyarm(5)withAllen
C.K.S. hollow screw(35), flat washer(36) and Allen C.K.S. full thread screw(37).
3.Attach the rear cover of pedal supporter(20/21) to left pedal supporter(7) with Philips
pan head full thread screw(33). Attach the front cover of pedal supporter(18/19) to left
pedal supporter(7) with Philips pan head full thread screw(34) and Philips C.K.S. self-
tappingscrew(38).
4.Install right pedal supporter(8) with the sameway.

10
Step 6:
1. Fixed the handlebar (9). Through handle pulse connection wire(13) out of the upper
upright post(4). Then through T shape knob(41) out of the handlebar front cover (40).
Rotate inside. Notice: T shape don’t rotate tightlyfirstly.
2. Attach bottle holder(24) to upper upright post(4) with Philips pan head full thread
screw(33).
Step 7:
1.Connect console communication wire(12) with the interface of back console. Connect
handle pulse communication wire (13) with consoleoutset(14).
2.Attach console(10) to upper upright post(4) with Philips C.K.S. full threadscrew(100).
Table des matières
Manuels vélo elliptique populaires d'autres marques

Weslo
Weslo Momentum 4.0 Elliptical Manuel d'utilisation et d'entretien

Progear Fitness
Progear Fitness Air elliptical pro 1307 Manuel utilisateur

Torque Fitness
Torque Fitness XPLLP Manuel utilisateur

Octane Fitness
Octane Fitness PRO3700C Manuel utilisateur

Xterra
Xterra FS5.8e Manuel utilisateur

Bodyguard
Bodyguard E-40 Manuel utilisateur

Bonn Germany
Bonn Germany Concept 2.2 Manuel utilisateur

Precor
Precor Resolute RSL 620 Manuel utilisateur

NordicTrack
NordicTrack E 9.2 Elliptical Manuel utilisateur

Vision Fitness
Vision Fitness X6600iNetTV Manuel utilisateur

Matrix
Matrix MX-A5x Manuel utilisateur

SportsArt Fitness
SportsArt Fitness ECO-NATURAL Elite E874 Manuel utilisateur


