Oberheim DMX Manuel utilisateur


DMX OWNER'S MANUAL
By
DANIEL SOFER
Third Edition June 1982
Copyright 1982 Oberheim Electronics, Inc.
Oberheim Electronics, Inc.
2250 South Barrington Avenue
Los Angeles, California 90064 USA

CAUTION:
To prevent fire or shock hazard do not expose this appliance to
rain or moisture. Do not remove cover. No user serviceable
parts inside. Refer servicing to qualified service personnel.
WARNING:
This equipment generates and uses radio frequency energy and if
not installed and used properly, i.e., in strict accordance with
the instruction manual, may cause harmful interference to radio
communications. It has been tested and found to comply with the
limits for a Class A computing device pursuant to Subpart J of
Part 15 of FCC Rules, which are designed to provide reasonable
protection against such interference when operated in a
commercial environment.
Operation of this equipment in a residential area is likely to
cause interference in which case the user at his own expense will
be required to take whatever measures may be required to correct
the interference.

TABLE OF CONTENTS
---------------------------------------------------------------------------
1. INTRODUCTION......................................................1
2. HOOKUP........................................................... 2
3. OPERATION........................................................ 3
Selecting A Sequence 3
Playing A Sequence 3
Recording A Sequence 3
Overdubbing 4
Erasing 4
Tempo 5
Metronome 6
Length 6
Signature 6
Quantize 8
Step 9
Swing 9
Copying Sequences 10
Appending Sequences 11
3. COMBINING SEQUENCES INTO SONGS...................................12
Playing A Song 12
Recording A Song 13
Erasing A Song 15
4. ABOUT THE DMX VOICES.............................................16
The Sounds 16
Tuning 16
5. CASSETTE INTERFACE ..............................................17
Connections 17
To Record Programs Onto Tape 17
To Play Programs From Tape 18
To Check Tapes 19
Possible Causes Of Data Transfer Errors 20
6. DMX SOFTWARE REVISIONS...........................................21
7. BATTERY BACKUP.................................................. 21
8. INTERFACING THE DMX..............................................22
Synchronizing The DMX and The DSX 22
Sync To Tape 23
Synchronizing The DMX And Other Sequencers 24
Controlling The DMX With External CVs And Gates 24
Footswitches and Pedals 25
9. THE DMX FACTORY SEQUENCES........................................26
List of Programmed Sequences 27
List of Programmed Songs 28
10. A WORD ABOUT DIGITAL AUDIO.......................................29
11. GLOSSARY........................................................ 30
12. SPECIFICATIONS...................................................31

1
INTRODUCTION
---------------------------------------------------------------------------
CONGRATULATIONS!
You have just purchased a most powerful tool for synthesizer
composition and performance. The Oberheim DMX programmable
Digital Drum Machine represents a new concept in electronic
sound. The DMX has been designed by the Oberheim staff with the
idea of giving you better sound, and more intimate control of it,
than has been previously available in a percussion synthesizer.
The DMX generates the sounds of real drums. Recordings of real
drums are digitized, stored in computer memory, and are made
available at the touch of a button. A drumbeat may be recorded
in realtime at any speed, remembered, and edited to make any beat
of any length, tempo, or style—in short, any drum beat that you
hear in your head, you can create on the DMX. After you have
created your drumbeats, you can save them on tape for future use.
The DMX even has a battery to keep the memory on when the power
is off.
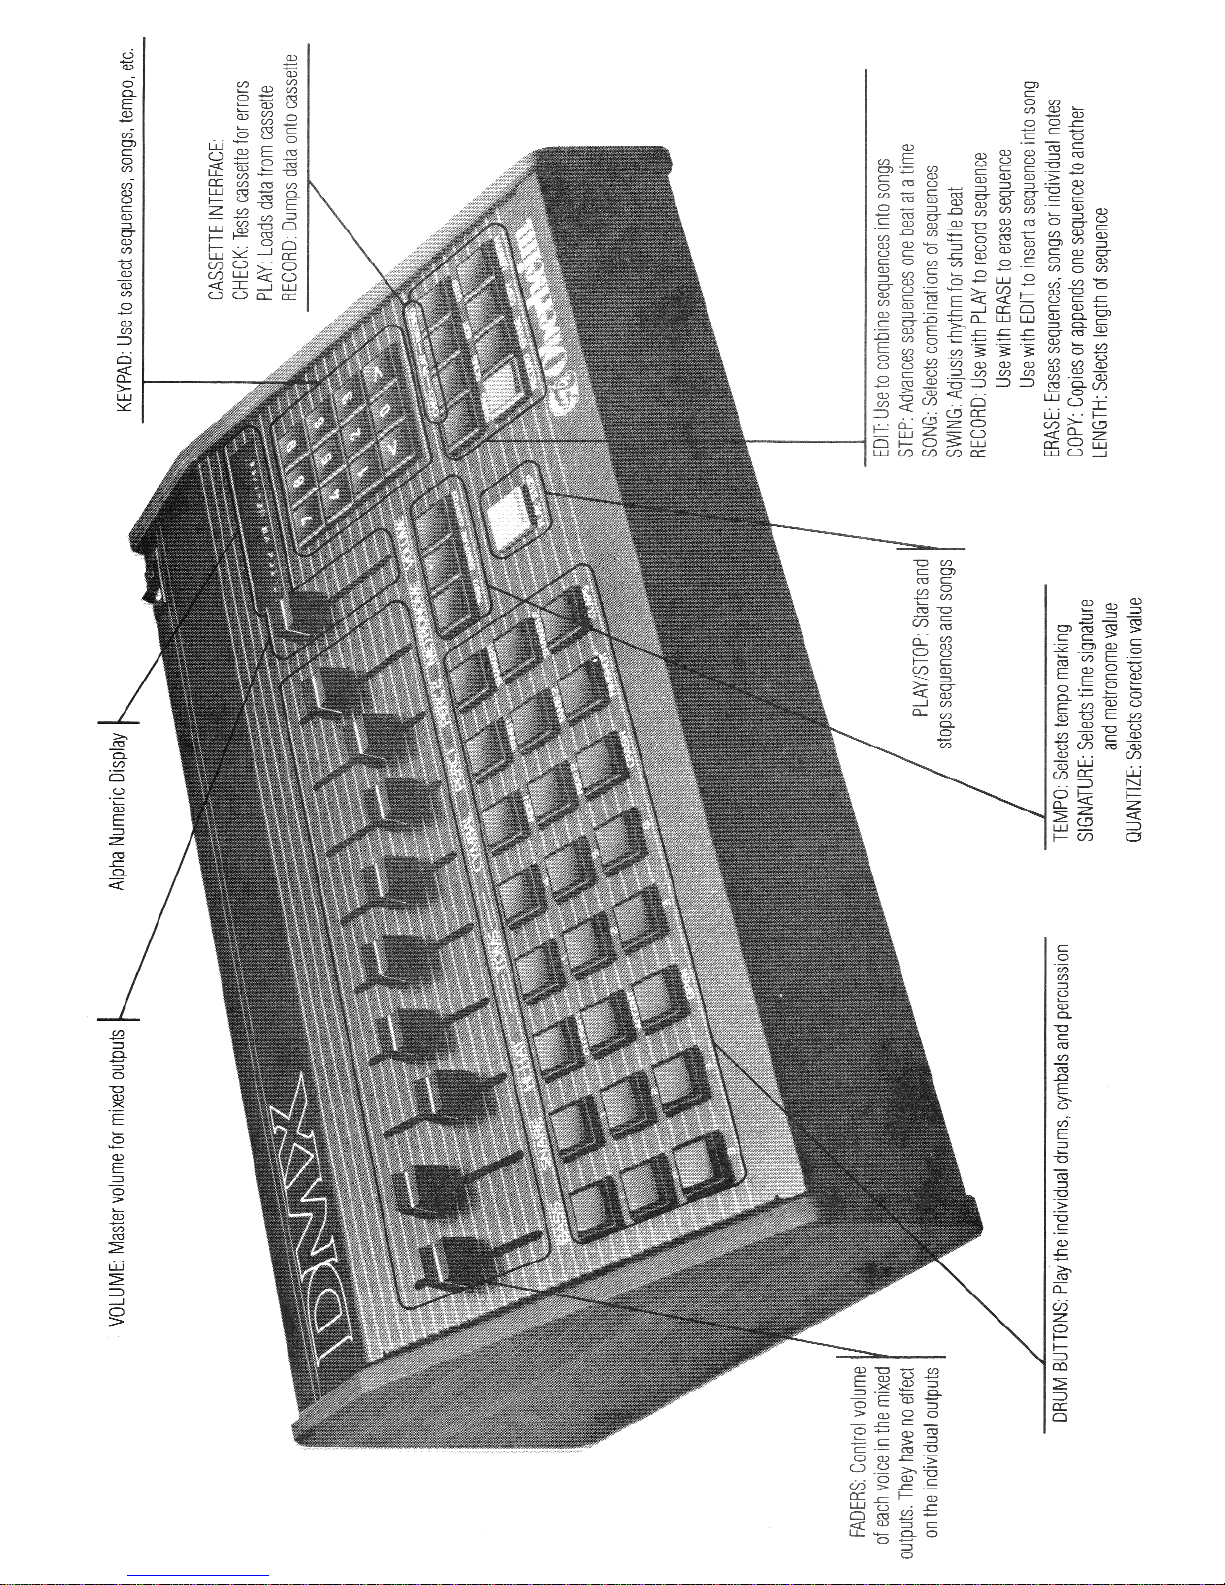
The DMX operates like a tape recorder: press RECORD and Record
your rhythms; then press PLAY and hear it back. But there's more
to it than that. There are many more features that are
incorporated into the DMX to actually give you much more control
over your music than a tape recorder gives you.
And isn't more control what synthesizers are all about?


2
HOOKUP
--------------------------------------------------------------------------
POWER The DMX comes from the factory set to operate on 115 Volts. If the
local power is 220-240 Volts, you will need to change the power
selection switch inside the DMX. Remove the two screws at the
front of the chassis and then lift up the front panel. You will
find the power selection switch on the right side, behind the
transformer.
For 100-120 Volt operation, switch it to "115". For 220-240 Volt
operation, set the switch to "230". Close the lid and replace the
screws.
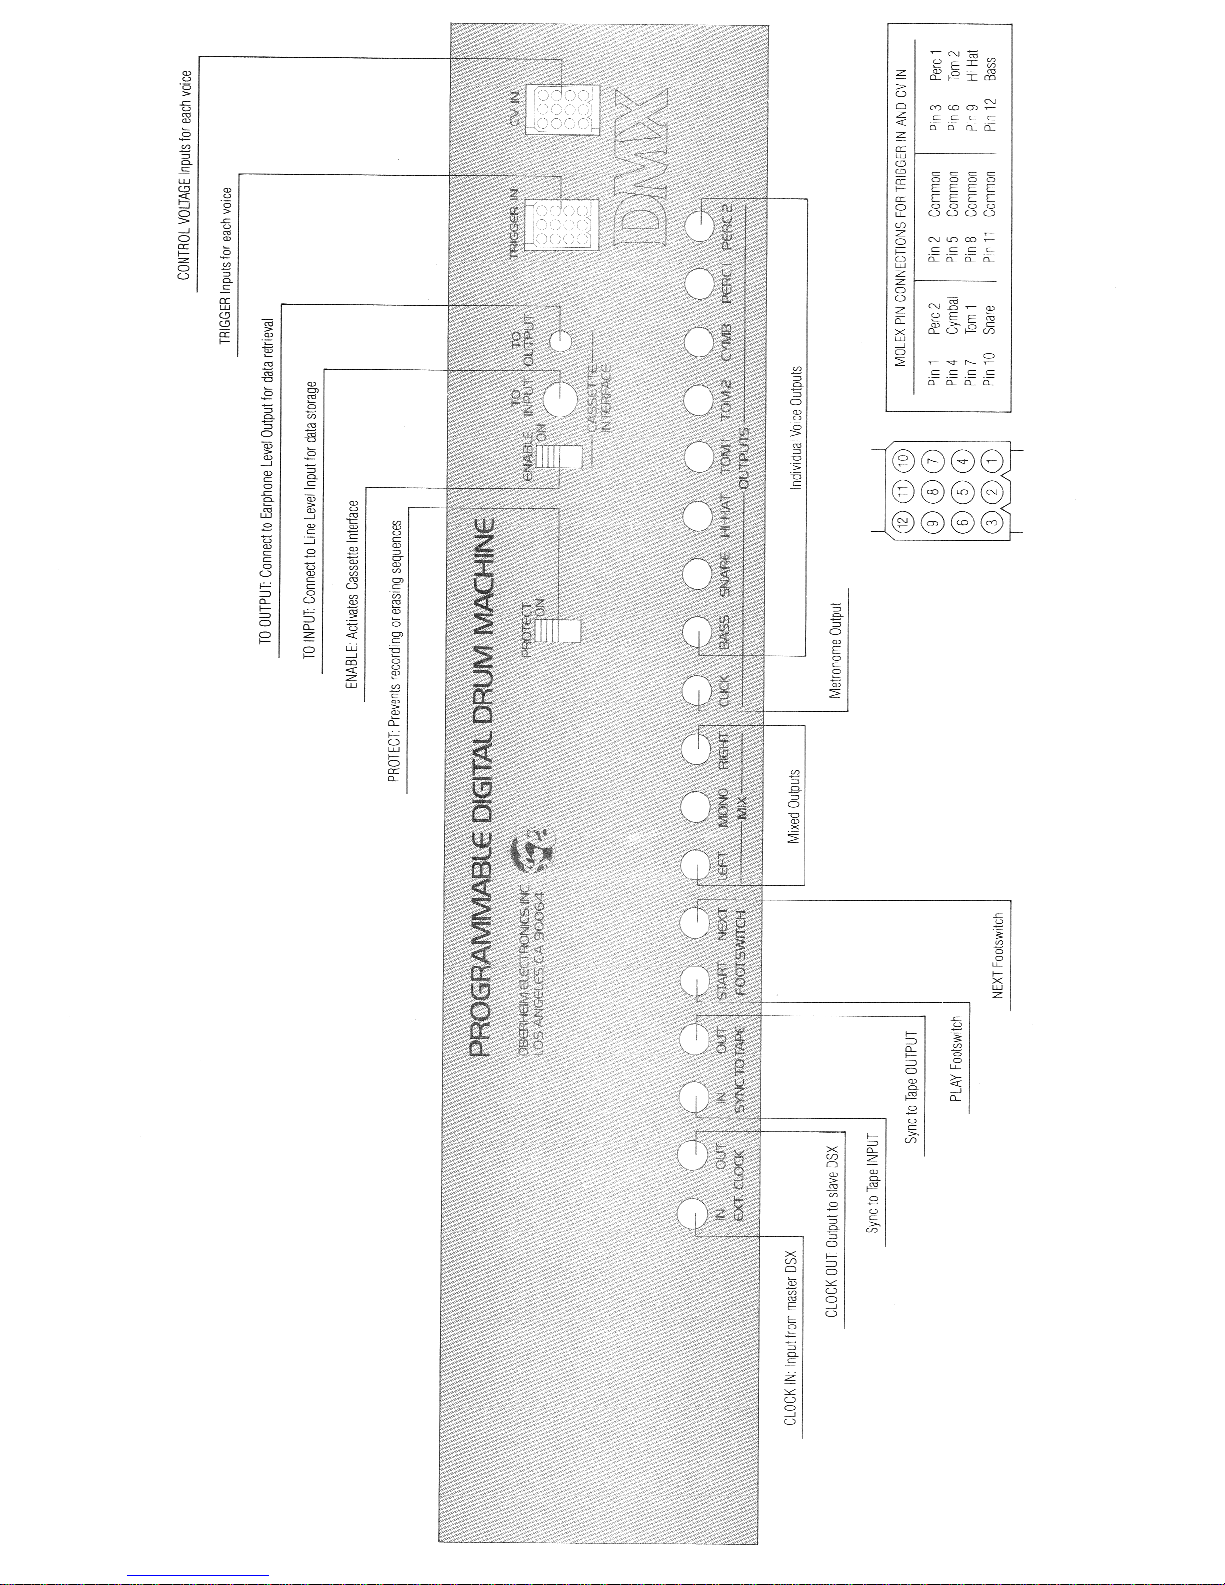
SIGNAL Connect either the LEFT and RIGHT, or the MONO outputs to your
amplifier or mixer. The slide pots on the front panel control the
relative volumes of each drum voice in the mixed outputs. Each
voice has its own output as well; these are useful if you are
connecting the DMX to an external mixer. The volume controls have
no effect on the level of the individual outputs, so it is possible
to use the SNARE and BASS individual outputs, for example, and the
mixed outputs for the other voices (turning the SNARE and BASS
VOLUME controls to minimum to remove them from the mixed outputs).

3
OPERATION
--------------------------------------------------------------------------
SELECTING A SEQUENCE
The DMX can store up to 100 drum sequences, numbered 00 thru 99.
Select one by pressing two numbers. The display will show you which
sequence you have selected.
PLAYING A SEQUENCE
Press PLAY. The sequence will play over and over until you press
STOP. You may also select another sequence while playing and the
DMX will play it immediately after the first sequence has finished.
RECORDING A SEQUENCE
There are two ways to record on the DMX: REALTIME and SINGLE STEP.
In REALTIME, the sequence plays over and over and you simply press
the buttons where you want the drums to sound. In SINGLE STEP, the
sequence advances one beat each time you press a button for a note
or a rest, which allows you to record your drum beat very slowly.
The REALTIME mode of recording is explained below. The SINGLE STEP
mode of recording is explained in the section entitled STEP.
Press and hold RECORD and then press PLAY. The Metronome will click
in eighth notes and the DMX will record over and over on two
measures (you can change the length of the sequence—see "LENGTH").
In RECORD, the DMX does not ERASE, so you can build your drumbeat as
it loops over, playing the cymbal first, the bass drum, then the
snare, etc., until you are finished. Then press STOP.
** NOTE **
The DMX will not enter RECORD, ERASE, COPY, or
STEP modes if the MEMORY PROTECT switch on the
rear panel is ON. The display will read "MEM.
PROTECTED" and the unit will "beep". In
addition, the length or time signature of a
sequence may not be changed although they may
be examined.
Example 1: Recording on Sequence 00
OPERATION PRESS DISPLAY READS
----------------------------- --------------- ----------------
Select Sequence 00 00 SELECT SEQ 00
Start Recording RECORD (hold) SELECT SEQ 00
PLAY * RECORD SEQ 00
(the “*” flashes at the beginning of the sequence)
(play drums)
Stop Recording STOP SELECT SEQ 00
----------------------------------------------------------------

4
OVERDUBBING
--------------------------------------------------------------------------

OVERDUBBING
Overdubbing is the process of recording more parts in synchronization
with parts already played. With the DMX, overdubbing is the same as
normal recording. Whenever you press RECORD and PLAY, the DMX simply
adds whatever you play to what has already been recorded. In RECORD,
the DMX does not erase. ERASE is a separate process.
ERASING
If you have made a mistake, or would like to record over again,
press and hold ERASE and while holding ERASE press RECORD. Your
previous recording will be erased, and you may record again from
scratch. The DMX will "beep" when the erasure actually takes place.
The volume of the beep is controlled by the metronome volume
control.
Example 2: Erasing Sequence 00
OPERATION PRESS DISPLAY READS
----------------------------- --------------- ----------------
Erase Sequence 00 ERASE (hold) ERASE SEQ 00
RECORD ERASE SEQ 00
The DMX will "beep" and then display: SELECT SEQ 00
-----------------------------------------------------------------

There are several other Erase Modes:
You can erase any single drum (or cymbal) from the entire sequence.
Hold ERASE and then press the drum you wish to erase.
Example 3: Erasing Crash Cymbal from Sequence 00
OPERATION PRESS DISPLAY READS
----------------------------- --------------- ----------------
Erase Crash Cymbal ERASE (hold) ERASE SEQ 00
CRASH ERASE SEQ 00
The DMX will "Beep" and then display: SELECT SEQ 00
-----------------------------------------------------------------

You can erase individual notes "on-the-fly" while in RECORD:
pressing any drum button while holding ERASE will remove that drum
note from the sequence. The drum button must be played in time with
the note you wish to erase.
It is also possible to erase individual notes while in the STEP mode
(See "STEP").
If you want to erase all of the sequences and songs, press ERASE and
while holding ERASE, press both of the ARROW buttons simultaneously.
Autres manuels pour DMX
1
Table des matières