NTI SPLITMUX-DVI-4RT Manuel utilisateur

MAN157 Rev Date 3-12-14
SPLITMUX-DVI-4RT
Quad Screen Video Splitter
Installation and Operation Manual
SPLITMUX®Series

MAN157 Rev Date 3-12-14
TRADEMARK
SPLITMUX is a registered trademark of Network Technologies Inc in the U.S. and other countries.
COPYRIGHT
Copyright © 2007, 2014by Network Technologies Inc. All rights reserved. No part of this publication may be
reproduced, stored in a retrieval system, or transmitted, in any form or by any means, electronic, mechanical,
photocopying, recording, or otherwise, without the prior written consent of Network Technologies Inc, 1275 Danner
Drive, Aurora, Ohio 44202.
CHANGES
The material in this guide is for information only and is subject to change without notice. Network Technologies Inc
reserves the right to make changes in the product design without reservation and without notification to its users.
FIRMWARE VERSION
1.00b
WARRANTY INFORMATION
The warranty period on this product (parts and labor) is two (2) years from the date of purchase. Please contact
Network Technologies Inc at (800) 742-8324 (800-RGB-TECH) or (330) 562-7070 or visit our website at
http://www.networktechinc.com for information regarding repairs and/or returns. A return authorization number is
required for all repairs/returns.

SPLITMUX - Installation and Operation Manual
TABLE OF CONTENTS
TABLE OF CONTENTS
III
INTRODUCTION 1
FEATURES 1
TECHNICAL SPECIFICATIONS 3
SAFETY GUIDELINES 4
HARDWARE 5
- FRONT PANEL 5
- LED indicators 5
- Buttons 6
- Additional button functions 7
- REAR PANEL 9
- Power / Ports 9
INSTALLATION 11
CONNECTING UNIT TO POWER 11
CONNECTING CONSOLE (MONITOR, KEYBOARD, MOUSE, TOUCH SCREEN, TRACKBALL) 11
CONNECTING SOURCES / COMPUTERS 12
CONNECTING USB DEVICES 12
POWERING UP THE SYSTEM 12
CONNECTING AUDIO 13
ON SCREEN DISPLAY 14
OSD - OVERVIEW 14
OSD - MAIN MENU WINDOW 16
OSD - NAVIGATION 17
OSD SYSTEM - HDCP 18
- HOTKEY 19
- HOTMOUSE 20
- QUAD MODE 21
- WIN MODE 22
- OSD POSITION 23
- OSD LANGUAGE 23
- SECURITY 24
- DISABLE CHANNEL 27
- CONTROL - DCP control 28
- Example of DCP control 29
- DCP synchronize 29
- Example of DCP synchronization 30
- Security Levels 31
OSD MODE - CURRENT 32
- START 32
- PIP 33
- WIN 37
- TEST PATTERN 38
OSD CONFIGURATION - BACKUP 39
- RECALL 39

SPLITMUX - Installation and Operation Manual
TABLE OF CONTENTS
TABLE OF CONTENTS
IV
- FACTORY RESET / DEFAULTS 40
OSD CONSOLE - VIDEO OUTPUT 42
- KEYBOARD 43
- TOUCH SCREEN 44
- FADE 47
- MULTI MONITOR 48
- BACKGROUND 49
- EDID 50
OSD VIDEO - INPUT STATUS 51
- DVI/VGA 52
- ROTATION 53
- CROPPING 54
- BRIGHTNESS / CONTRAST 55
- HORIZONTAL/VERTICAL POSITION 56
- SCREEN WIDTH 57
- PHASE 57
- FORMAT 58
OSD COMPUTER - CHANNEL MAPPING 60
- AUDIO 61
- NAME 1-4 62
- KEYBOARD 63
- MOUSE 64
- RESET PS/2 65
- EDID/DDC 65
OSD USB DEVICE 1-4 - USB PORT STATUS 69
- SWITCHING MODE 70
- CHANGE DEVICE NAME 71
OSD HELP - ABOUT/HOTKEY/CONTACT 72
HOTMOUSE 73
ACTIVATING HOTMOUSE CURSOR 73
HOTMOUSE CURSOR IN FULLSCREEN MODE / QUAD MODE 74
HOTMOUSE CURSOR IN PIP MODE 75
HOTMOUSE CURSOR IN WIN MODE 77
HOTMOUSE MENU - ACTIVATING / OPERATING 79
- MODE - QUAD 80
- FULL 80
- PIP 81
- WIN 82
SERVICE 83
MAINTENANCE AND REPAIR - TECHNICAL SUPPORT 83
- MOUSE 47

SPLITMUX - Installation and Operation Manual
TABLE OF CONTENTS
TABLE OF CONTENTS
V
ANNEX 84
DECLARATION OF CONFORMITY 84
FCC DECLARATION 85
KEYBOARD COMMANDS 86
DEVICE CONFIGURATION PROGRAM 89
FIRMWARE UPDATE 93
SERIAL CABLE 95
DCP-XML REMOTE CONTROL 96
SUPPORTED TOUCH SCREEN CONTROLLER 97
SUPPORTED VIDEO INPUT 98
SUPPORTED VIDEO OUTPUT 99
CASCADING
100
BOX CONTENTS
103

SPLITMUX - Installation and Operation Manual
INTRODUCTION
1
Thank you for choosing SPLITMUX-DVI-4RT from NTI. This product represents the latest state-of-the-art tech-
nology in keyboard-video-mouse (KVM) switching. The key advantage of the SPLITMUX-DVI4-RT (SPLITMUX)
over conventional KVM switches is it allows you to simultaneously display and manage 4 computers on a single con-
sole. It combines key features of a high-end KVM switch and a digital multiviewer, scaling and converting videos
at both inputs and output.
DISPLAY MODES
Quad mode u
In this mode, the screen is split into four fields of equal
size; each displaying the entire screen contents of one
source.
tFullscreen mode
In Fullscreen mode, one of the four sources
is displayed in full screen size and maximum
resolution.
PiP mode (Picture in Picture) u
Using this feature, the full screen display of one of the
four video sources is accompanied by one to three small
images (thumbnails) of the other video sources which
are displayed on the right hand side of the screen allowing
simultaneous monitoring.
FEATURES
tWin mode
In Win mode each video source is displayed in its own
separate, detached window. Each of these windows
can be freely positioned and their height and width
can be adjusted. Transparency can be set. Positioning
is done using either the Hotmouse function, the front
panel or the touch screen. Presets of the window
positioning can be saved.

SPLITMUX - Installation and Operation Manual
INTRODUCTION
2
DVI & VGA
SPLITMUX supports resolutions of up to 1920 x 1200 @ 60 Hz for both DVI and VGA.
Any combination of VGA and DVI at all standard resolutions is possible at inputs and output. Analog video input
is converted to digital. If an analog display is connected, SPLITMUX converts the digital signal to analog
at the output. Internally, SPLITMUX processes video purely digital guaranteeing superior digital image
quality.
USB & PS/2 for keyboard / mouse / touch screen / trackball
Use either PS/2 or USB ports on the computer to connect keyboard and mouse to SPLITMUX. It supports
any combination. To connect the console, SPLITMUX features two USB ports for mouse, keyboard,
touch screen or trackball connection.
Transparent USB 2.0
SPLITMUX features a transparent high speed USB 2.0 matrix: USB 2.0 devices (e.g. printer, external
memory, memory stick,webcam, 3D mouse, finger printer) can be switched to computers connected.
Operation
There are six ways to operate SPLITMUX, switch channels, and select display modes:
1. Using the buttons on the front of the unit
2. Using configurable hotkeys (default HOTKEY is <Ctrl> + <Alt>)
3. Using the unit’s external configuration software on a remote computer
4. Via a serial port using the protocol DCP XML
5. Using mouse functions (Hotmouse)
6. Using a touch screen
The configuration of SPLITMUX is carried out by means of an On Screen Display (OSD) that can be
opened and navigated either with keyboard commands, front panel buttons or remotely via ConfDev on an
external PC.
The LEDs on the front panel indicate the unit’s current status.
Use the serial (RS232) or USB port for remote control and firmware updates.
FEATURES

SPLITMUX - Installation and Operation Manual
INTRODUCTION
3
TECHNICAL SPECIFICATIONS
Casing: Desktop or 19“, black (RAL 9005)
Dimensions WxDxH: 43.6 x 23.4 x 4.4 cm
Weight: 2.9 kg
Operating controls: Front panel: 4 channel selection buttons, 1 Fullscreen mode button, 1
Quad mode button, 1 PiP mode button, 1 Win mode button
Rear panel: One Power On/Off switch
Indicators: Four active channel indicator LEDs, 1 Fullscreen mode LED, 1 Quad mode
LED, 1 PiP mode LED, 1 Win mode LED
Computer ports: 4 DVI-I (analog and digital), 4 PS/2, 4 USB
Console ports: 1 DVI-I, 2 USB for keyboard and mouse
USB 2.0 ports: 4 transparent high-speed USB 2.0
Audio: 3,5mm analog stereo jack, digital cinch connector, TOSLINK optical audio
Maximum distance: Video (DVI / VGA) up to 20 meters; keyboard / mouse up to 5 meters
Input and
output resolution: up to 1920 x 1200 @ 60 (DVI and VGA) *
EDID adjustments: EDID at each input port customizable
Supported
keyboard layouts: German, English, French, Italian, Spanish, Japanese
OSD languages: German, English, Spanish
Power supply: Internal AC adapter, 100 to 240V 50/60 Hz
Power consumption: 40 watts
Operating temperature: 5 to 45°C
Storage temperature: -10 to 60 °C
Rel. humidity: 5 to 65% non-condensing
*(at WUXGA: reduced blanking only - WUXGAr)

SPLITMUX - Installation and Operation Manual
INTRODUCTION
4
WARNING:
To avoid risk of electric shock do not open the device or remove any part of the casing. Please contact our
technical support if the device requires servicing.
Please read this manual carefully before putting the device into operation.
Observe all warnings and instructions on the device and in the operation manual. Keep this user manual for
future reference.
Power supply:
Only connect the device to a grounded power supply.
Installation:
Ensure that the device is disconnected from the mains before performing any installation work.
Unplug the device or disconnect the power supply.
Cables:
Only use the cables supplied by NTI with the device.
Damage resulting from the use of third-party cables is not covered by warranty.
Beware of tripping hazards when laying cables.
Location:
Electronic devices should never be placed on the ground between the cables.
Never obstruct any vents the device may have.
Ensure adequate ventilation.
Maintenance:
This device is maintenance-free.
Never open the casing.
No settings can be made inside the device.
SAFETY GUIDELINES

SPLITMUX - Installation and Operation Manual
INTRODUCTION
5
FRONT PANEL
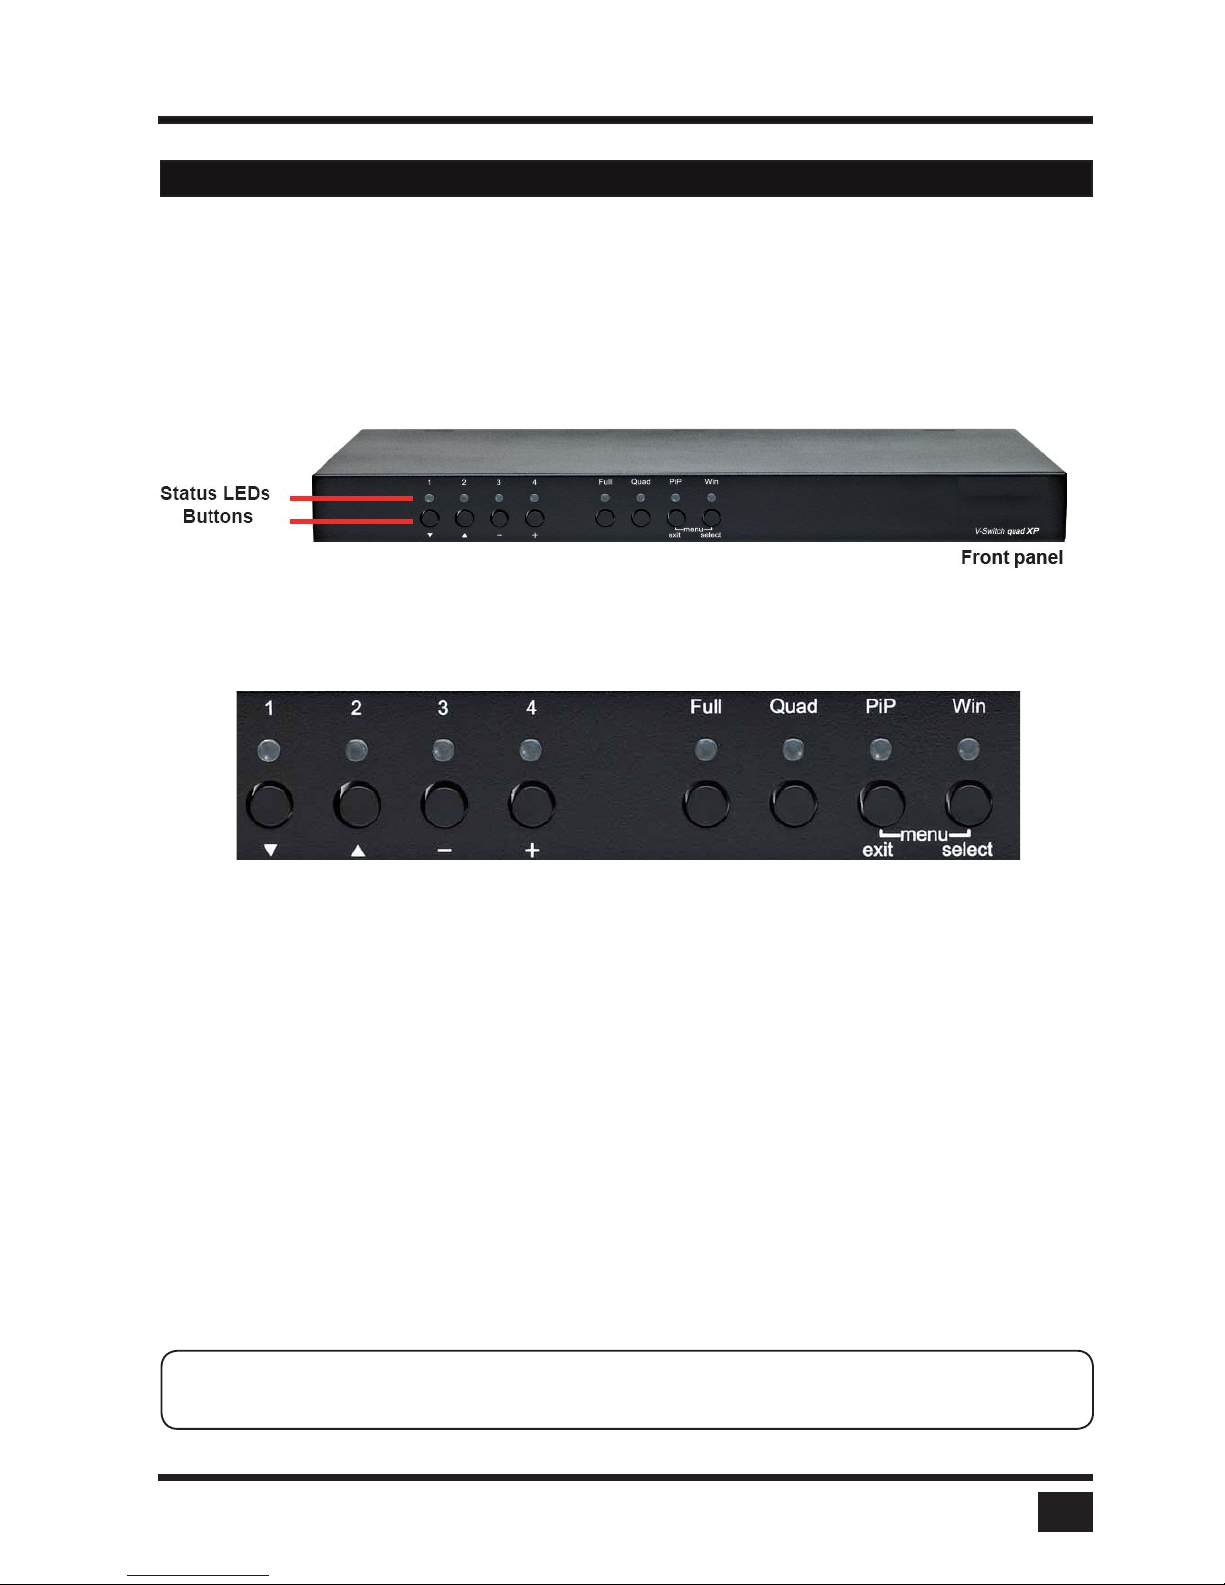
The SPLITMUX front panel has eight status indicators (LEDs) and eight buttons.

Buttons 1 to 4 switch between channels, LEDs 1 to 4 indicate the status of the individual channels. Full, Quad,
PiP and Win buttons LEDs are used to switch and indicate display modes and other functions, e.g. opening the
OSD menu.
LED indicators
- LEDs 1 to 4:When these LEDs light up green, the corresponding channel (computer port) has
been selected and is available for keyboard and mouse access. When a LED flashes
green, there is no signal at the video input of the selected channel.
An LED lights up yellow when there is a signal at the video input, but another channel
has been selected.
When the LED is dark, there is no signal at the video input and another channel has
been selected.
The LEDs light up blue when Win Mode preset window configuration is being selected.
- LED Full: This LED lights up green when the unit is in Fullscreen mode.
- LED Quad:This LED lights up green when the unit is in Quad mode.
- LED PiP:This LED lights up green when the unit is in PiP mode.
- LED Win:This LED lights up green when the unit is in Win mode.
Note: While the OSD menu is open, the active computer can still be operated by mouse or touch screen.
HARDWARE
Status LEDs
Front panel
Buttons
Table des matières
Autres manuels NTI Accessoires

NTI
NTI ENVIROMUX-STSP-7 Manuel utilisateur

NTI
NTI VOPEX Series Manuel utilisateur

NTI
NTI ENVIROMUX-AV-LC-E7 Manuel utilisateur

NTI
NTI ENVIROMUX Series Instructions d'installation

NTI
NTI XTENDEX VOPEX-C5SV-x Manuel utilisateur

NTI
NTI enviromux-imd-taa2 Manuel utilisateur

NTI
NTI SPLITMUX-USBHD-4RT Manuel utilisateur

NTI
NTI VOPEX-USBV-2 Manuel utilisateur

NTI
NTI ENVIROMUX Series Manuel utilisateur

NTI
NTI ENVIROMUX Series Manuel utilisateur