
Nortek 2GIG GC3e Guide d'installation

2GIG® GC3/GC3e Security & Automation System
Installation and Programming Guide
10023748 B
WARNING: OWNER’S INSTRUCTION NOTICE
Not to be removed by anyone except occupant

Copyright © 2019 Nortek Security & Control LLC
2
Copyright © 2019 Nortek Security & Control LLC. All Rights Reserved. U.S. Patent D727,857. Australian Patent No. 357098. Additional Patents Pending.
The 2GIG, GC3, GC3e, GoControl, and Linear logos are registered trademarks of Nortek Security & Control LLC in the United States and/or other countries. Other Nortek
Security & Control trademarks may also appear in these materials. Other names or brands may be claimed as the property of others. For more information, contact your
2GIG alarm dealer for pricing or visit www.nortek.com, www.nortekcontrol.com, or www.2gig.com.
This document utilizes the Cue gestural icon system by P.J. Onori, which is available under a Creative Commons Attribution-ShareAlike 3.0 United States (CC-BY-SA-3.0)
license.
Information in this document is subject to change without notice. The availability of particular products, services, and features may vary by region. Please check with your
local dealer for further details and availability of language options.
No part of this publication may be reproduced, stored in a retrieval system, or transmitted in any form or any means electronic or mechanical, including photocopying and
recording for any purpose other than the purchaser's personal use without the written permission of Nortek Security & Control.
Nortek Security & Control
5919 Sea Otter Place, Suite 100
Carlsbad, CA 92010
USA
800-421-1587
Contents
Introduction. . . . . . . . . . . . . . . . . . . . . . . . . . . . . . . . . . . . . . . . . . . . . . . . . . . . . . . . . . . . . . . . . . . . . . . . . . .5
About this Guide . . . . . . . . . . . . . . . . . . . . . . . . . . . . . . . . . . . . . . . . . . . . . . . . . . . . . . . . . . . . . . . . . . . . . . . . . . . . . . 5
Introduction to Smart Areas™ . . . . . . . . . . . . . . . . . . . . . . . . . . . . . . . . . . . . . . . . . . . . . . . . . . . . . . . . . . . . . . . . . . . . 5
Document Conventions. . . . . . . . . . . . . . . . . . . . . . . . . . . . . . . . . . . . . . . . . . . . . . . . . . . . . . . . . . . . . . . . . . . . . . . . . 6
Technical Support . . . . . . . . . . . . . . . . . . . . . . . . . . . . . . . . . . . . . . . . . . . . . . . . . . . . . . . . . . . . . . . . . . . . . . . . . . . . . 6
Planning the Installation . . . . . . . . . . . . . . . . . . . . . . . . . . . . . . . . . . . . . . . . . . . . . . . . . . . . . . . . . . . . . . . .7
System Features and Capabilities . . . . . . . . . . . . . . . . . . . . . . . . . . . . . . . . . . . . . . . . . . . . . . . . . . . . . . . . . . . . . . . . 7
Internal Components. . . . . . . . . . . . . . . . . . . . . . . . . . . . . . . . . . . . . . . . . . . . . . . . . . . . . . . . . . . . . . . . . . . . . . . . . . . 9
Additional Accessories . . . . . . . . . . . . . . . . . . . . . . . . . . . . . . . . . . . . . . . . . . . . . . . . . . . . . . . . . . . . . . . . . . . . . . . . . 10
Important Information . . . . . . . . . . . . . . . . . . . . . . . . . . . . . . . . . . . . . . . . . . . . . . . . . . . . . . . . . . . . . . . . . . . . . . . . . . 11
Create the Installation Plan . . . . . . . . . . . . . . . . . . . . . . . . . . . . . . . . . . . . . . . . . . . . . . . . . . . . . . . . . . . . . . . . . . . . . . 11
Installation Steps. . . . . . . . . . . . . . . . . . . . . . . . . . . . . . . . . . . . . . . . . . . . . . . . . . . . . . . . . . . . . . . . . . . . . . . . . . . . . . 15
Installing the System . . . . . . . . . . . . . . . . . . . . . . . . . . . . . . . . . . . . . . . . . . . . . . . . . . . . . . . . . . . . . . . . . . .16
Install the GC3 Cellular Radio Module . . . . . . . . . . . . . . . . . . . . . . . . . . . . . . . . . . . . . . . . . . . . . . . . . . . . . . . . . . . . . 16
Install/Replace the Cellular Radio Module . . . . . . . . . . . . . . . . . . . . . . . . . . . . . . . . . . . . . . . . . . . . . . . . . . . . . . . . . . 16
Mount the GC3 Panel’s Backplate . . . . . . . . . . . . . . . . . . . . . . . . . . . . . . . . . . . . . . . . . . . . . . . . . . . . . . . . . . . . . . . . 21
Connect an External Alarm Sounder . . . . . . . . . . . . . . . . . . . . . . . . . . . . . . . . . . . . . . . . . . . . . . . . . . . . . . . . . . . . . . . 23
Connect the Hardwire Loops. . . . . . . . . . . . . . . . . . . . . . . . . . . . . . . . . . . . . . . . . . . . . . . . . . . . . . . . . . . . . . . . . . . . . 24
Connect the Power Wires . . . . . . . . . . . . . . . . . . . . . . . . . . . . . . . . . . . . . . . . . . . . . . . . . . . . . . . . . . . . . . . . . . . . . . . 25
Control Panel Wiring Diagram. . . . . . . . . . . . . . . . . . . . . . . . . . . . . . . . . . . . . . . . . . . . . . . . . . . . . . . . . . . . . . . . . . . . 27
Terminal Blocks Wiring Diagram . . . . . . . . . . . . . . . . . . . . . . . . . . . . . . . . . . . . . . . . . . . . . . . . . . . . . . . . . . . . . . . . . . 28
Connect the Backup Battery . . . . . . . . . . . . . . . . . . . . . . . . . . . . . . . . . . . . . . . . . . . . . . . . . . . . . . . . . . . . . . . . . . . . . 29
Hang the GC3 Panel . . . . . . . . . . . . . . . . . . . . . . . . . . . . . . . . . . . . . . . . . . . . . . . . . . . . . . . . . . . . . . . . . . . . . . . . . . . 29
Ethernet Module Installation (Optional). . . . . . . . . . . . . . . . . . . . . . . . . . . . . . . . . . . . . . . . . . . . . . . . . . . . . . . . . . . . . 29
Install the Retaining Wall Bracket and Connect the AC Power Supply . . . . . . . . . . . . . . . . . . . . . . . . . . . . . . . . . . . . . 30
Update the GC3 Panel Firmware . . . . . . . . . . . . . . . . . . . . . . . . . . . . . . . . . . . . . . . . . . . . . . . . . . . . . . . . . . . . . . . . . 31
Navigate to the Installer Toolbox . . . . . . . . . . . . . . . . . . . . . . . . . . . . . . . . . . . . . . . . . . . . . . . . . . . . . . . . . . . . . . . . . . 32
Broadband. . . . . . . . . . . . . . . . . . . . . . . . . . . . . . . . . . . . . . . . . . . . . . . . . . . . . . . . . . . . . . . . . . . . . . . . . . . . . . . . . . . 32
Attaching to a Wireless Network . . . . . . . . . . . . . . . . . . . . . . . . . . . . . . . . . . . . . . . . . . . . . . . . . . . . . . . . . . . . . . . . . . 33
Selection Buttons . . . . . . . . . . . . . . . . . . . . . . . . . . . . . . . . . . . . . . . . . . . . . . . . . . . . . . . . . . . . . . . . . . . . . . . . . . . . . 33
Wired (Ethernet) . . . . . . . . . . . . . . . . . . . . . . . . . . . . . . . . . . . . . . . . . . . . . . . . . . . . . . . . . . . . . . . . . . . . . . . . . . . . . . 34
Programming Sensors and Peripherals. . . . . . . . . . . . . . . . . . . . . . . . . . . . . . . . . . . . . . . . . . . . . . . . . . . .37
Navigate to the System Confi guration Menu. . . . . . . . . . . . . . . . . . . . . . . . . . . . . . . . . . . . . . . . . . . . . . . . . . . . . . . . . 37
Program a Wireless Zone . . . . . . . . . . . . . . . . . . . . . . . . . . . . . . . . . . . . . . . . . . . . . . . . . . . . . . . . . . . . . . . . . . . . . . . 37
Next Steps. . . . . . . . . . . . . . . . . . . . . . . . . . . . . . . . . . . . . . . . . . . . . . . . . . . . . . . . . . . . . . . . . . . . . . . . . . . . . . . . . . . 41
Program a Wired Zone . . . . . . . . . . . . . . . . . . . . . . . . . . . . . . . . . . . . . . . . . . . . . . . . . . . . . . . . . . . . . . . . . . . . . . . . . 42
Program a Keyfob . . . . . . . . . . . . . . . . . . . . . . . . . . . . . . . . . . . . . . . . . . . . . . . . . . . . . . . . . . . . . . . . . . . . . . . . . . . . . 45

Copyright © 2019 Nortek Security & Control LLC 3
Program a Keypad . . . . . . . . . . . . . . . . . . . . . . . . . . . . . . . . . . . . . . . . . . . . . . . . . . . . . . . . . . . . . . . . . . . . . . . . . . . . 49
Next Steps. . . . . . . . . . . . . . . . . . . . . . . . . . . . . . . . . . . . . . . . . . . . . . . . . . . . . . . . . . . . . . . . . . . . . . . . . . . . . . . . . . . 53
Reset a Zone, Keyfob, or Keypad to the Factory Default Settings . . . . . . . . . . . . . . . . . . . . . . . . . . . . . . . . . . . . . . . . 53
Panel Programming . . . . . . . . . . . . . . . . . . . . . . . . . . . . . . . . . . . . . . . . . . . . . . . . . . . . . . . . . . . . . . . . . . . .54
Q1: Enter installer code (4 digits) . . . . . . . . . . . . . . . . . . . . . . . . . . . . . . . . . . . . . . . . . . . . . . . . . . . . . . . . . . . . . . . . . 54
Q2: Lock installer programming . . . . . . . . . . . . . . . . . . . . . . . . . . . . . . . . . . . . . . . . . . . . . . . . . . . . . . . . . . . . . . . . . . 54
Q3: Lock default programming . . . . . . . . . . . . . . . . . . . . . . . . . . . . . . . . . . . . . . . . . . . . . . . . . . . . . . . . . . . . . . . . . . . 54
Q4: Exit delay, in seconds (45-120) . . . . . . . . . . . . . . . . . . . . . . . . . . . . . . . . . . . . . . . . . . . . . . . . . . . . . . . . . . . . . . . 54
Q5: Entry delay 1, in seconds (30-240). . . . . . . . . . . . . . . . . . . . . . . . . . . . . . . . . . . . . . . . . . . . . . . . . . . . . . . . . . . . . 54
Q6: Entry delay 2, in seconds (30-240). . . . . . . . . . . . . . . . . . . . . . . . . . . . . . . . . . . . . . . . . . . . . . . . . . . . . . . . . . . . . 55
Q7: Remote services provider. . . . . . . . . . . . . . . . . . . . . . . . . . . . . . . . . . . . . . . . . . . . . . . . . . . . . . . . . . . . . . . . . . . . 55
Q8: 2-way voice . . . . . . . . . . . . . . . . . . . . . . . . . . . . . . . . . . . . . . . . . . . . . . . . . . . . . . . . . . . . . . . . . . . . . . . . . . . . . . 55
Q9: Disable siren after two-way audio . . . . . . . . . . . . . . . . . . . . . . . . . . . . . . . . . . . . . . . . . . . . . . . . . . . . . . . . . . . . . 55
Q10: Police emergency key . . . . . . . . . . . . . . . . . . . . . . . . . . . . . . . . . . . . . . . . . . . . . . . . . . . . . . . . . . . . . . . . . . . . . 56
Q11: Fire emergency key . . . . . . . . . . . . . . . . . . . . . . . . . . . . . . . . . . . . . . . . . . . . . . . . . . . . . . . . . . . . . . . . . . . . . . . 56
Q12: Emergency key. . . . . . . . . . . . . . . . . . . . . . . . . . . . . . . . . . . . . . . . . . . . . . . . . . . . . . . . . . . . . . . . . . . . . . . . . . . 56
Q13: Quick arming . . . . . . . . . . . . . . . . . . . . . . . . . . . . . . . . . . . . . . . . . . . . . . . . . . . . . . . . . . . . . . . . . . . . . . . . . . . . 56
Q14: Auto stay. . . . . . . . . . . . . . . . . . . . . . . . . . . . . . . . . . . . . . . . . . . . . . . . . . . . . . . . . . . . . . . . . . . . . . . . . . . . . . . . 56
Q15: Exit delay restart. . . . . . . . . . . . . . . . . . . . . . . . . . . . . . . . . . . . . . . . . . . . . . . . . . . . . . . . . . . . . . . . . . . . . . . . . . 56
Q16: Allow quick exit . . . . . . . . . . . . . . . . . . . . . . . . . . . . . . . . . . . . . . . . . . . . . . . . . . . . . . . . . . . . . . . . . . . . . . . . . . . 57
Q17: Quick bypass . . . . . . . . . . . . . . . . . . . . . . . . . . . . . . . . . . . . . . . . . . . . . . . . . . . . . . . . . . . . . . . . . . . . . . . . . . . . 57
Q18: Alert on disarm with keyfob after alarm . . . . . . . . . . . . . . . . . . . . . . . . . . . . . . . . . . . . . . . . . . . . . . . . . . . . . . . . 57
Q19: Keyfob arm/disarm confi rmation. . . . . . . . . . . . . . . . . . . . . . . . . . . . . . . . . . . . . . . . . . . . . . . . . . . . . . . . . . . . . . 57
Q20: Keyfob/remote arming mode on system not ready. . . . . . . . . . . . . . . . . . . . . . . . . . . . . . . . . . . . . . . . . . . . . . . . 57
Q21: Z-Wave feature. . . . . . . . . . . . . . . . . . . . . . . . . . . . . . . . . . . . . . . . . . . . . . . . . . . . . . . . . . . . . . . . . . . . . . . . . . . 57
Q22: Smart Home Controls require master code . . . . . . . . . . . . . . . . . . . . . . . . . . . . . . . . . . . . . . . . . . . . . . . . . . . . . 57
Q24: Temperature display units. . . . . . . . . . . . . . . . . . . . . . . . . . . . . . . . . . . . . . . . . . . . . . . . . . . . . . . . . . . . . . . . . . . 58
Q25: Swinger shutdown count (1-6) . . . . . . . . . . . . . . . . . . . . . . . . . . . . . . . . . . . . . . . . . . . . . . . . . . . . . . . . . . . . . . . 58
Q26: Cross sensor zones 99-100 . . . . . . . . . . . . . . . . . . . . . . . . . . . . . . . . . . . . . . . . . . . . . . . . . . . . . . . . . . . . . . . . . 58
Q27: Cross sensor timeout, in seconds (10- 120). . . . . . . . . . . . . . . . . . . . . . . . . . . . . . . . . . . . . . . . . . . . . . . . . . . . . 58
Q28: Siren supervision time . . . . . . . . . . . . . . . . . . . . . . . . . . . . . . . . . . . . . . . . . . . . . . . . . . . . . . . . . . . . . . . . . . . . . 58
Q29: CS lack of usage notifi cation time, in days (0-255) . . . . . . . . . . . . . . . . . . . . . . . . . . . . . . . . . . . . . . . . . . . . . . . 59
Q30: Radio modem network failure time, in minutes (0-255) . . . . . . . . . . . . . . . . . . . . . . . . . . . . . . . . . . . . . . . . . . . . 59
Q31: Radio network failure causes trouble . . . . . . . . . . . . . . . . . . . . . . . . . . . . . . . . . . . . . . . . . . . . . . . . . . . . . . . . . . 59
Q32: Radio network failure reports . . . . . . . . . . . . . . . . . . . . . . . . . . . . . . . . . . . . . . . . . . . . . . . . . . . . . . . . . . . . . . . . 59
Q33: Broadband network failure time in minutes . . . . . . . . . . . . . . . . . . . . . . . . . . . . . . . . . . . . . . . . . . . . . . . . . . . . . 59
Q34: Broadband network failure causes trouble . . . . . . . . . . . . . . . . . . . . . . . . . . . . . . . . . . . . . . . . . . . . . . . . . . . . . . 59
Q35: Broadband network failure reports . . . . . . . . . . . . . . . . . . . . . . . . . . . . . . . . . . . . . . . . . . . . . . . . . . . . . . . . . . . . 60
Q36: Periodic test, in days (0-255) . . . . . . . . . . . . . . . . . . . . . . . . . . . . . . . . . . . . . . . . . . . . . . . . . . . . . . . . . . . . . . . . 60
Q37: Alarm cancel time, in minutes (5-255) . . . . . . . . . . . . . . . . . . . . . . . . . . . . . . . . . . . . . . . . . . . . . . . . . . . . . . . . . 60
Q38: Alarm cancel display. . . . . . . . . . . . . . . . . . . . . . . . . . . . . . . . . . . . . . . . . . . . . . . . . . . . . . . . . . . . . . . . . . . . . . . 60
Q39: Alarm abort window transmission delay . . . . . . . . . . . . . . . . . . . . . . . . . . . . . . . . . . . . . . . . . . . . . . . . . . . . . . . . 60
Q40: Burglary bell cutoff time . . . . . . . . . . . . . . . . . . . . . . . . . . . . . . . . . . . . . . . . . . . . . . . . . . . . . . . . . . . . . . . . . . . . 60
Q41: Fire bell cutoff time . . . . . . . . . . . . . . . . . . . . . . . . . . . . . . . . . . . . . . . . . . . . . . . . . . . . . . . . . . . . . . . . . . . . . . . . 60
Q42: Trouble doesn’t sound at night . . . . . . . . . . . . . . . . . . . . . . . . . . . . . . . . . . . . . . . . . . . . . . . . . . . . . . . . . . . . . . . 61
Q43: Z-Wave siren mode . . . . . . . . . . . . . . . . . . . . . . . . . . . . . . . . . . . . . . . . . . . . . . . . . . . . . . . . . . . . . . . . . . . . . . . 61
Q44: Open collector #1 output . . . . . . . . . . . . . . . . . . . . . . . . . . . . . . . . . . . . . . . . . . . . . . . . . . . . . . . . . . . . . . . . . . . 61
Q45: Open collector #2 output . . . . . . . . . . . . . . . . . . . . . . . . . . . . . . . . . . . . . . . . . . . . . . . . . . . . . . . . . . . . . . . . . . . 61
Q46: Time to detect AC loss, in minutes . . . . . . . . . . . . . . . . . . . . . . . . . . . . . . . . . . . . . . . . . . . . . . . . . . . . . . . . . . . . 62
Q47: Random AC loss report time . . . . . . . . . . . . . . . . . . . . . . . . . . . . . . . . . . . . . . . . . . . . . . . . . . . . . . . . . . . . . . . . 62
Q48: Programming mode entry reports to CS. . . . . . . . . . . . . . . . . . . . . . . . . . . . . . . . . . . . . . . . . . . . . . . . . . . . . . . . 62

Copyright © 2019 Nortek Security & Control LLC
4
Q49: Trouble reports to CS . . . . . . . . . . . . . . . . . . . . . . . . . . . . . . . . . . . . . . . . . . . . . . . . . . . . . . . . . . . . . . . . . . . . . . 62
Q50: Trouble restore reports to CS . . . . . . . . . . . . . . . . . . . . . . . . . . . . . . . . . . . . . . . . . . . . . . . . . . . . . . . . . . . . . . . . 62
Q51: Manual bypass reports to CS . . . . . . . . . . . . . . . . . . . . . . . . . . . . . . . . . . . . . . . . . . . . . . . . . . . . . . . . . . . . . . . . 62
Q52: Bypass restore reports to CS . . . . . . . . . . . . . . . . . . . . . . . . . . . . . . . . . . . . . . . . . . . . . . . . . . . . . . . . . . . . . . . . 62
Q53: AC loss reports to CS . . . . . . . . . . . . . . . . . . . . . . . . . . . . . . . . . . . . . . . . . . . . . . . . . . . . . . . . . . . . . . . . . . . . . . 62
Q54: AC restore reports to CS . . . . . . . . . . . . . . . . . . . . . . . . . . . . . . . . . . . . . . . . . . . . . . . . . . . . . . . . . . . . . . . . . . . 63
Q55: System low battery reports to CS. . . . . . . . . . . . . . . . . . . . . . . . . . . . . . . . . . . . . . . . . . . . . . . . . . . . . . . . . . . . . 63
Q56: System low battery restore reports to CS. . . . . . . . . . . . . . . . . . . . . . . . . . . . . . . . . . . . . . . . . . . . . . . . . . . . . . . 63
Q57: RF low battery reports to CS . . . . . . . . . . . . . . . . . . . . . . . . . . . . . . . . . . . . . . . . . . . . . . . . . . . . . . . . . . . . . . . . 63
Q58: Sensor low battery restore reports to CS . . . . . . . . . . . . . . . . . . . . . . . . . . . . . . . . . . . . . . . . . . . . . . . . . . . . . . . 63
Q59: System disarmed reports to CS . . . . . . . . . . . . . . . . . . . . . . . . . . . . . . . . . . . . . . . . . . . . . . . . . . . . . . . . . . . . . . 63
Q60: System armed reports to CS . . . . . . . . . . . . . . . . . . . . . . . . . . . . . . . . . . . . . . . . . . . . . . . . . . . . . . . . . . . . . . . . 63
Q61: Alarm restore reports to CS . . . . . . . . . . . . . . . . . . . . . . . . . . . . . . . . . . . . . . . . . . . . . . . . . . . . . . . . . . . . . . . . . 63
Q62: Smart test reports. . . . . . . . . . . . . . . . . . . . . . . . . . . . . . . . . . . . . . . . . . . . . . . . . . . . . . . . . . . . . . . . . . . . . . . . . 64
Q63: RF jam causes trouble . . . . . . . . . . . . . . . . . . . . . . . . . . . . . . . . . . . . . . . . . . . . . . . . . . . . . . . . . . . . . . . . . . . . . 64
Q64: System tamper causes trouble. . . . . . . . . . . . . . . . . . . . . . . . . . . . . . . . . . . . . . . . . . . . . . . . . . . . . . . . . . . . . . . 64
Q65: Auto unbypass for manual bypass . . . . . . . . . . . . . . . . . . . . . . . . . . . . . . . . . . . . . . . . . . . . . . . . . . . . . . . . . . . . 64
Q66: Force bypass reports . . . . . . . . . . . . . . . . . . . . . . . . . . . . . . . . . . . . . . . . . . . . . . . . . . . . . . . . . . . . . . . . . . . . . . 64
Q67: Event log . . . . . . . . . . . . . . . . . . . . . . . . . . . . . . . . . . . . . . . . . . . . . . . . . . . . . . . . . . . . . . . . . . . . . . . . . . . . . . . 64
Q68: Allow backlight always on (demo mode) . . . . . . . . . . . . . . . . . . . . . . . . . . . . . . . . . . . . . . . . . . . . . . . . . . . . . . . 64
Q69: Smart Areas . . . . . . . . . . . . . . . . . . . . . . . . . . . . . . . . . . . . . . . . . . . . . . . . . . . . . . . . . . . . . . . . . . . . . . . . . . . . . 64
Q70: Main Panel Sounder Follows . . . . . . . . . . . . . . . . . . . . . . . . . . . . . . . . . . . . . . . . . . . . . . . . . . . . . . . . . . . . . . . . 65
Q71: Security pin code length . . . . . . . . . . . . . . . . . . . . . . . . . . . . . . . . . . . . . . . . . . . . . . . . . . . . . . . . . . . . . . . . . . . . 65
Restore the Factory Default Settings . . . . . . . . . . . . . . . . . . . . . . . . . . . . . . . . . . . . . . . . . . . . . . . . . . . . . . . . . . . . . . 65
System Confi guration Reference . . . . . . . . . . . . . . . . . . . . . . . . . . . . . . . . . . . . . . . . . . . . . . . . . . . . . . . . .66
Sensor Programming Reference. . . . . . . . . . . . . . . . . . . . . . . . . . . . . . . . . . . . . . . . . . . . . . . . . . . . . . . . . . . . . . . . . . 66
Panel Programming Reference. . . . . . . . . . . . . . . . . . . . . . . . . . . . . . . . . . . . . . . . . . . . . . . . . . . . . . . . . . . . . . . . . . . 71
Features to Limit False Alarms . . . . . . . . . . . . . . . . . . . . . . . . . . . . . . . . . . . . . . . . . . . . . . . . . . . . . . . . . . . . . . . . . . . 75
Image Sensor . . . . . . . . . . . . . . . . . . . . . . . . . . . . . . . . . . . . . . . . . . . . . . . . . . . . . . . . . . . . . . . . . . . . . . . . . . . . . . . . 76
Smart Home Settings Menu. . . . . . . . . . . . . . . . . . . . . . . . . . . . . . . . . . . . . . . . . . . . . . . . . . . . . . . . . . . . . .76
Smart Home Settings Menu . . . . . . . . . . . . . . . . . . . . . . . . . . . . . . . . . . . . . . . . . . . . . . . . . . . . . . . . . . . . . . . . . . . . . 76
Navigate to the Smart Home Settings Menu. . . . . . . . . . . . . . . . . . . . . . . . . . . . . . . . . . . . . . . . . . . . . . . . . . . . . . . . . 76
Add a New Device. . . . . . . . . . . . . . . . . . . . . . . . . . . . . . . . . . . . . . . . . . . . . . . . . . . . . . . . . . . . . . . . . . . . . . . . . . . . . 77
Remove a Device . . . . . . . . . . . . . . . . . . . . . . . . . . . . . . . . . . . . . . . . . . . . . . . . . . . . . . . . . . . . . . . . . . . . . . . . . . . . . 78
Check the Network . . . . . . . . . . . . . . . . . . . . . . . . . . . . . . . . . . . . . . . . . . . . . . . . . . . . . . . . . . . . . . . . . . . . . . . . . . . . 79
Rediscover the Network . . . . . . . . . . . . . . . . . . . . . . . . . . . . . . . . . . . . . . . . . . . . . . . . . . . . . . . . . . . . . . . . . . . . . . . . 79
View All Devices . . . . . . . . . . . . . . . . . . . . . . . . . . . . . . . . . . . . . . . . . . . . . . . . . . . . . . . . . . . . . . . . . . . . . . . . . . . . . . 80
Associating Z-Wave Devices. . . . . . . . . . . . . . . . . . . . . . . . . . . . . . . . . . . . . . . . . . . . . . . . . . . . . . . . . . . . . . . . . . . . . 84
Reset the Controller . . . . . . . . . . . . . . . . . . . . . . . . . . . . . . . . . . . . . . . . . . . . . . . . . . . . . . . . . . . . . . . . . . . . . . . . . . . 85
Learn Controller . . . . . . . . . . . . . . . . . . . . . . . . . . . . . . . . . . . . . . . . . . . . . . . . . . . . . . . . . . . . . . . . . . . . . . . . . . . . . . 86
Testing the Installation. . . . . . . . . . . . . . . . . . . . . . . . . . . . . . . . . . . . . . . . . . . . . . . . . . . . . . . . . . . . . . . . . .87
Disable the Piezo Sounder . . . . . . . . . . . . . . . . . . . . . . . . . . . . . . . . . . . . . . . . . . . . . . . . . . . . . . . . . . . . . . . . . . . . . . 87
Perform a Walk Test . . . . . . . . . . . . . . . . . . . . . . . . . . . . . . . . . . . . . . . . . . . . . . . . . . . . . . . . . . . . . . . . . . . . . . . . . . . 87
Verify the Radio Status . . . . . . . . . . . . . . . . . . . . . . . . . . . . . . . . . . . . . . . . . . . . . . . . . . . . . . . . . . . . . . . . . . . . . . . . . 88
Adding a Demo Video . . . . . . . . . . . . . . . . . . . . . . . . . . . . . . . . . . . . . . . . . . . . . . . . . . . . . . . . . . . . . . . . . .88
Demo Mode. . . . . . . . . . . . . . . . . . . . . . . . . . . . . . . . . . . . . . . . . . . . . . . . . . . . . . . . . . . . . . . . . . . . . . . . . . . . . . . . . . 88
Limited Warranty . . . . . . . . . . . . . . . . . . . . . . . . . . . . . . . . . . . . . . . . . . . . . . . . . . . . . . . . . . . . . . . . . . . . . .91
Waste Electrical and Electronic Equipment (WEEE) Statement . . . . . . . . . . . . . . . . . . . . . . . . . . . . . . . . . . . . . . . . . . 91
WARNINGS . . . . . . . . . . . . . . . . . . . . . . . . . . . . . . . . . . . . . . . . . . . . . . . . . . . . . . . . . . . . . . . . . . . . . . . . . . .91
Limitations of Alarm Products . . . . . . . . . . . . . . . . . . . . . . . . . . . . . . . . . . . . . . . . . . . . . . . . . . . . . . . . . . . . . . . . . . . . 91
Risk of Noise Induced Hearing Loss . . . . . . . . . . . . . . . . . . . . . . . . . . . . . . . . . . . . . . . . . . . . . . . . . . . . . . . . . . . . . . . 91

Copyright © 2019 Nortek Security & Control LLC 5
Introduction
Before you get started, review this information.
About this Guide
This guide applies to the GC3 and GC3e security panels. All references to the GC3 panel, unless otherwise noted, apply
to both the GC3 and GC3e.
This guide is designed for distributors, alarm dealers, and professional installers of the GC3 Security & Automation
System. It provides general system information, safety precautions, and step-by-step instructions for installing and
setting up the system. It is intended for use only by professional installers who are employed by or under contract with an
authorized 2GIG alarm dealer.
For a list of 2GIG alarm dealers and distributors in your area, visit: http://www.nortekcontrol.com or http://www.2gig.com.
Introduction to Smart Areas™
Smart Areas is 2GIG’s new partitioning solution. Partitioning is the process of dividing security sections of a home or
building into smaller areas so that users can arm some sections of the house while leaving other areas disarmed. This
provides home and building owners both security and convenience, as it allows them to walk through their structure
without concern of tripping alarms for areas they’d like to keep secure and armed. Some examples of partitioning use
cases include:
»Arming a section of a room that contains a safe that contains gun collections or valuables. These areas may not be
accessed as frequently as the other areas in the room.
»Having a portion of the home designated for use by others, such as guests or property rentals. Partitioning enables
the homeowner to arm some sections of the house they’d like to be ‘off limits’ to other people.
»Disarming the garage while the homeowner is at work to allow a package to be delivered and stored safely on the
premises.
»Secure swimming pool or spa area to help reduce the risk of drowning accidents. In California, it is now required
that newly-built pools and spas include at least one safety measure, including an alarm.
Smart Areas was designed for ease of setup and everyday use. For installation, the process for adding device enrollments
has been simplifi ed. All smart area parameters are displayed on the screen for quick scanning. This reduces time for the
installer, who with legacy partitioning systems would have to memorize the codes and work fl ow, in addition to working
through each parameter in a list to verify them. With the addition of Smart Areas, the GC3 becomes a self-contained
partitioning panel, complete with user interface, controller, wireless transceiver, and communicator (cell radio and/or Wi-Fi)
all-in-one package. This reduces complexity for the installer. All of the equipment is self-contained; there are no modules
that require additional set up procedures.
For the end user, Smart Areas is a one-touch solution that provides Global System Access. They can now access any
partition/Smart Area with appropriate authorization. ‘Arm/Disarm’ and ‘Emergency/Panic’ functions can be accessed
quickly. No matter where in the menu a user fi nds themselves, all they need to do is press the ‘Home’ button and they
immediately return to the ‘Arm/Disarm’ screen. Past partitioning examples required users to swipe from screen to screen.
This added time, complexity and confusion for the user. The simplifi ed user interface will reduce confusion and frustration
for those who may not interact with their security system every day. With the common tasks up front, it’s easy to select
without having to memorize.

Copyright © 2019 Nortek Security & Control LLC
6
Document Conventions
This section describes the document conventions used in this guide.
Safety Precautions and Notations
It is imperative that you observe all of the safety precautions documented in this guide. For your safety and the safety of
others, the following table details how this guide calls special attention to information intended to safeguard life, health,
and property.
DANGER!!! This notation is used to indicate hazardous
situations which, if not avoided, will result in serious injury
or death.
WARNING!! This notation is used to indicate potentially
hazardous situations which, if not avoided, could result in
serious injury or death.
CAUTION! This notation is used to indicate a potentially
hazardous situation which, if not avoided, could result in
minor or moderate injury.
IMPORTANT: This notation is used to indicate a situation
which, if not avoided, could result in property damage,
equipment damage, or data loss.
NOTE: This notation is used to call attention to notable
information that should be followed when installing,
servicing, or using this product.
TIP: This notation is used to call attention to helpful hints
related to using the product.
Touchscreen Navigation
This table describes the action words used to inform users of methods for touchscreen navigation.
Glyph Action Word Glyph Action Word
Tap (or single tap) Swipe left
Touch and hold Swipe right
Swipe down Swipe up
Technical Support
Should you require support services for this system, contact 2GIG Technical Support at Nortek Security & Control.
For support in the USA and Canada, contact 2GIG Technical Support at Nortek Security & Control:
»Telephone: 855-2GIG-TECH
»Email: [email protected] Dealer Site: dealer.2gig.com
»Websites: www.nortekcontrol.com and www.2gig.com
For support outside of the USA or Canada, contact your regional 2GIG distributor. For a list of distributors in your region,
visit the websites above.
Copyright © 2019 Nortek Security & Control LLC 7
Planning the Installation
System Features and Capabilities
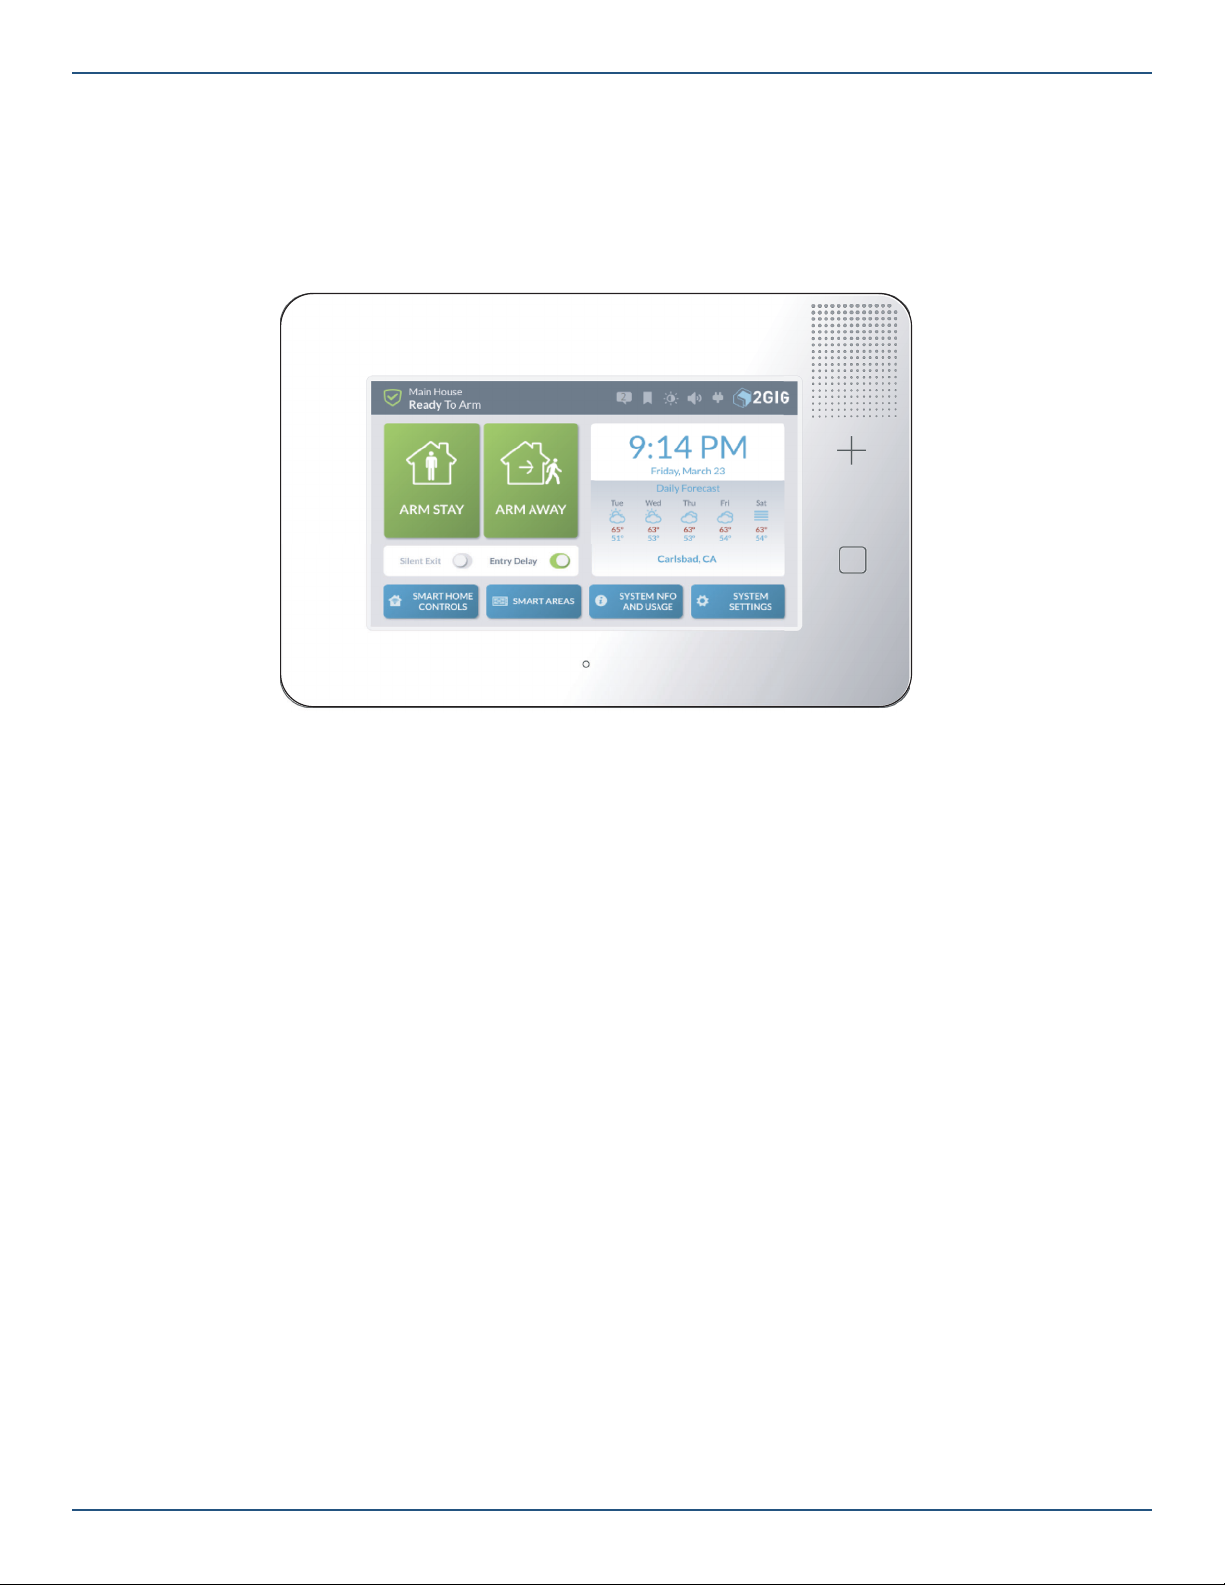
If you’re familiar with other 2GIG Control Panels, you’ll notice the new GC3 Panel from Nortek Security & Control off ers
the very best components of the GC2 Panel and has been transformed by a major visual upgrade— off ering a larger
touchscreen and an intuitive user interface featuring convenient, gesture-based navigation.
GC3 Control Panel - Front View
Features
The system includes:
»Touchscreen Display: A large, full-color, 7-in (17.8 cm) diagonal touchscreen with an intuitive, gesture-based user
interface.
»Piezo Sounder and Internal Speaker: An 85 dB Piezo Sounder sounds external alarms. An internal speaker to
delivers voice annunciations, chimes, other system notifi cations.
CAUTION! Long or repeated exposure to sounds at or above 85 dB can lead to Noise-Induced Hearing Loss (NIHL).
»Alarm Button/LED Indicator: Tap this button to show Panic, Fire, and Emergency buttons. For more information,
see the GC3 Security & Automation System Fingertip Guide.
»Home Button/LED Indicator: A button to wake the touchscreen and give users the ability to return to the
touchscreen’s Home screen. For more information, see the GC3 Security & Automation System Fingertip Guide.
»Removable Faceplate: A removable faceplate concealing a door lock for the Cellular Radio Module bay.
»Microphone and Speaker: A built-in microphone and speaker provide clear 2-Way Voice communication during
alarm events between users at the GC3 Panel and operators at the Central Station.
»Cellular Radio Module with Internal Antenna: A snap-in Cellular Radio Module with an internal antenna that fi ts
neatly in the side panel.
»24-Hour Backup Battery: A 24-hour backup battery to support the GC3 Panel during temporary AC power failures
and outages.
»USB Port: A convenient USB port at the top of the GC3 Panel that can be used with a USB thumb drive (not
supplied) to update the system’s fi rmware. See “Update the GC3 Panel Firmware.”
»WiFi: The built-in WiFi module allows the system to be connected to a WiFi network for dual path communication,
OTA updates, and connection with secondary keypads.
»Ethernet: (optional) An Ethernet module can be added to the system to allow for a hardwired connection to a local
network for dual path communication, OTA updates, and connection with secondary keypads.
»Access Point: The built-in Access Point allows for a direct connection with secondary keypads via WiFi without
the need to connect to a local network.

Copyright © 2019 Nortek Security & Control LLC
8
Capabilities
The system includes these capabilities:
»Smart Areas: Smart Areas allows for partitioning the system. Partitioning is the process of dividing security
sections of a home or building into smaller areas so that users can arm some sections of the house while leaving
other areas disarmed. This provides home and building owners both security and convenience, as it allows them to
walk through their structure without concern of tripping alarms for areas they’d like to keep secure and armed.
»Security Codes: The system supports a maximum of 100 unique, programmable, security codes for accessing
system functions. You are provided with one (1) Master User Code, one (1) Duress Code, and one (1) Installer
Code (reserved for use by 2GIG alarm dealers and installers), and the ability to create 98 additional user codes for
accessing the system.
»Z-Wave® and Z-Wave Plus™ Compatibility: Installers (and end users, if confi gured on the system) can add up
to 232 smart home devices to communicate with the GC3 Panel using the Z- Wave and Z-Wave Plus wireless
communication protocol. The GC3 Panel can be included and operated in any Z-Wave network with other Z-Wave
certifi ed devices from other manufacturers and/or other applications. All non-battery operated nodes within the
network will act as repeaters regardless of vendor to increase reliability of the network. This device is a security
enabled Z-Wave Plus product that is able to use encrypted Z-Wave Plus messages to communicate to other
security enabled Z-Wave Plus products.
»2-Way Voice: (Optional) Operators at the Central Station can communicate directly with end users through the
GC3 Panel . Operators can also silently listen-in after receiving a user duress report.
»Date, Time, and Weather Forecasts1: Users can view the current date, time, and weather forecast in an easy-to-
read format.
»System Vocabulary/Voice Descriptors: A list of vocabulary words integrates with the on-screen user interface
and audio announcements. This lets installers customize the sensor names that display on the GC3 Panel , as well
as for the audible system announcements. For example, when someone opens the front door, the system can be
set up to announce “front door.”
1 Date, Time and Weather Forecasts are supported by most Remote Service Providers in most regions. Consult your provider to determine if this feature is enabled.

Copyright © 2019 Nortek Security & Control LLC 9
Internal Components
This illustration details the GC3 Panel’s internal components.
GC3 Panel - Internal Components
Callout Component Description
A Backup Battery A backup battery used with the GC3 Panel to extend service during a power
outage.
B Cellular Radio Module An on-board digital communicator transmits alarms and trouble alerts to the
Central Station, and also supports 2-Way Voice communication.
C Terminal Block Two terminal blocks with screw-terminal positions for connecting the GC3
Panel to electrical power (PWR+/PWR1), hardwire loops/wired zones (ZONE1/
ZONE2), solid state output (BELL+/BELL-), and an open collector output (OCL1/
OCL2).
NOTE: Terminals are still marked as 2 Wire Smoke but 2 Wire smoke is not
supported
D Third Hand Hanging
Strap
A durable hanging strap provides installers with an extra hand when installing
and servicing the GC3 Panel.
E Receiver Board The main receiver board.
F Piezo Sounder An internal 85-dB Piezo Sounder.
G GC3 Panel Siren/
Speaker
An internal speaker that sounds loud, clear alarms, navigation tones, alert
tones, and supports 2-Way Voice communication.
H WLAN Card A Wireless LAN card to support the GC3 system’s self-contained Wi-Fi network.
I USB Port A built-in USB port for updating the panel’s fi rmware.

Copyright © 2019 Nortek Security & Control LLC
10
Additional Accessories
The installer typically sets up the system to communicate with a variety of wired and/or wireless sensors. Some sensors
are visible on the wall or ceiling. For example, Wireless Smoke/Heat/Freeze Alarms and Wireless Carbon Monoxide
Detectors. Others may be hidden in door jambs . For example, Recessed Door/Window Contacts. Sensors might also be
installed in additional locations. For example, a Glass Break Detector and a Passive Infrared Motion Detector.
NOTE: A variety of 2GIG and GoControl branded devices are compatible with the GC3 Security & Automation
System. Sensors manufactured by other companies may also be compatible with the system. For information, visit
dealer.2gig.com
IMPORTANT: This notation is used to indicate a situation which, if not avoided, could result in property damage,
equipment damage, or data loss.
IMPORTANT: To ensure that the system’s sensors are operating properly, it is important for 2GIG alarm dealers
and system owners to ensure sensor batteries and wireless signals are tested at least once a year.
Depending on the specifi c installation, systems may also be installed with one or more of the following 2GIG accessories:
Kits & Keypads
»2GIG Control Panel Desktop Kit
»2GIG SP1 Keypad
»2GIG SP2 Keypad
»2GIG PAD1
Radios & Antennas
»2GIG Cellular Radio Module
»2GIG External Attic Mount Antenna
Sensors & Peripherals (
eSeries sensors are only
compatible with the GC3e panel
)
»2GIG Thin Door/Window Surface Contact
»2GIG Recessed Door/Window Contact
»2GIG Passive Infrared (PIR) Motion Detector
»2GIG Glass Break Detector
»2GIG Smoke/Heat/Freeze Alarm
»2GIG Smoke/Heat Detector
»2GIG Panic Button Remote
»2GIG Carbon Monoxide Sensor
»2GIG Takeover Module
»2GIG Doorbell
»Universal Garage Door Receiver
»2GIG Tilt Sensor
»2GIG Bypass Sensor
»2GIG Flood Sensor
»2GIG Repeater
Z-Wave Smart Home Controls
Consult your 2GIG alarm dealer for information about
installing a wide variety of compatible Z-Wave smart home
controls including:
»Lights
»Locks
»Thermostats
»Garage Door Controllers
Ce manuel convient aux modèles suivants
4
Table des matières
Autres manuels Nortek Système de sécurité


Manuels Système de sécurité populaires d'autres marques


EDM
EDM Solution 6+6 Wireless-AE Manuel utilisateur

Highway Safety Group
Highway Safety Group EA401 Manuel utilisateur

Siren
Siren LED GSM Manuel utilisateur

Detection Systems
Detection Systems 7090i Instructions de montage

Se-Kure Controls
Se-Kure Controls MicroMini SK-4841 Manuel utilisateur

Siemens
Siemens FDM273 Manuel utilisateur