Nitta FP-200 Manuel utilisateur

GM-NIT-13006E
Follow this manual when using the Finger Puncher.
Please pass this manual to the Finger Puncher users for a safe and trouble-free
operation.
F
Fi
in
ng
ge
er
r
P
Pu
un
nc
ch
he
er
r
F
FP
P-
-2
20
00
0
OPERATOR'S MANUAL

- 1 -
Table of Contents
1. Precautions for the Safety ............... 2
2. Confirmation of Product .................. 4
3. Specification ..................................... 4
4. Operation Environment .................... 5
5. Storage Environment ....................... 5
6. Name of each parts .......................... 6
7. How to Make a Finger Joint ............. 7
8. Troubleshooting ............................... 9
9. Parts List ........................................... 9
10. Maintenance ...................................... 9
11. Inspection ........................................ 12
12. Parts List ......................................... 13
13. Warranty and after-sales service .. 15

- 2 -
1. Precautions for the Safety
Please go over these safety precautions carefully to secure a correct and safe
operation of the Finger Puncher FP-200
Disregarding instructions marked with this symbol may lead
to death or serious injury.
Disregarding instructions marked with this symbol may lead
to injury or property damage.
WARNING
Do not use the Finger Puncher for any application other than the
intended purpose of making belts endless.
Use for any unintended purpose may cause an unexpected accident.
A person with experience and skills should always operate,
maintain and inspect the Finger Puncher.
Handling by an inexperienced person may cause injury.
Do not dismantle or remodel the Finger Puncher under any
circumstance. Please note the Finger Puncher uses a sharp
blade.
Dismantling or remodeling the Finger Puncher may cause
physical injury.
For repair or inspection, please contact Nitta, your local distributor or
agent in your area.
Use a dry cloth for cleaning the Finger Puncher. To prevent fire,
do not use alcohol, benzine, thinner or any other inflammable
solvent.
CAUTION
WARNING
WARNING
WARNING
WARNING
WARNING

- 3 -
This machine is not intended for the physical, sensory or mental
handicapped persons use. They must have the supervision of a
person responsible for their safety, if they use this machine.
Failure to do this may cause injury.
Do not allow the child to handle this machine. Keep this machine
in the place where child's hand does not reach.
Failure to do this may cause injury.
Caution
Do not use the Finger Puncher under the following conditions:
・ Under a corrosive gas environment
・ Under an ambient temperature of 5℃ or below
・ Under an ambient temperature of 40℃ or above
・ Under a high humidity environment (humidity surpassing 85%)
・ In places exposing the puncher to steam or water drops
To prevent physical injury, use the Finger Puncher on a stable
working bench or table that will not collapse.
Before using the Finger Puncher, be sure to inspect the puncher
in accordance with the procedure described on page 12 to help
prevent injury.
CAUTION
CAUTION
CAUTION
WARNING
WARNING

- 4 -
2. Confirmation of Product
Thank you for choosing our Finger PuncherFP-200
Check that the product is exactly what you have ordered. Use
of the wrong product may cause injury.
2-1)Confirmation of Product
Confirm the following items upon accepting delivery of your order. Contact Nitta,
your local distributor or agent in your area if you find any deficiency or defect in
your item.
① Are descriptions on the face plate the same as those of your order item?
Please confirm the model type.
② Has the product been damaged during transportation?
③ Has a nut or screw slackened?
2-2)How to Read Face Plate
2-3)Inquiries
When making inquiries, please inform our sales representative of the model type
and the production serial number.
3. Specifications
3-1)Outline of Finger Puncher
①The Finger Puncher is exclusively designed for manually punching finger
splice able NITTA’s Carryflex CFTG belts with a cutting blade assembly.
②The Finger Puncher is compatible with the following endless specifications:
Finger geometry 200mm length×10mm pitch
Belt wide 60mm
Belt thickness 3.9mm or less
3-2)Major Specifications of Finger Puncher
Type FP-200
Outer Dimension 232 mm W x380 mm Lx385 mm H
Weight 21.0kg
②Production serial number
FP-200
110001
CAUTION
①Model type

- 5 -
4. Operation Environment
Ambient Temperature 5-40℃ (no condensation)
Ambient Humidity 15-85%RH
Place of Use Indoors (free from dust, water)
Environment No inflammable, combustible or corrosive gas; no steam
Use the Finger Puncher under the above conditions.
5. Storage Environment
Ambient Temperature 5-40 ℃ (no condensation)
Ambient Humidity 15-85%RH
Place of Use Indoors (free from dust, water)
Environment No inflammable, combustible or corrosive gas; no steam
When the Finger Puncher is not in use, it should be stored under the above
conditions.
CAUTION
CAUTION
- 6 -
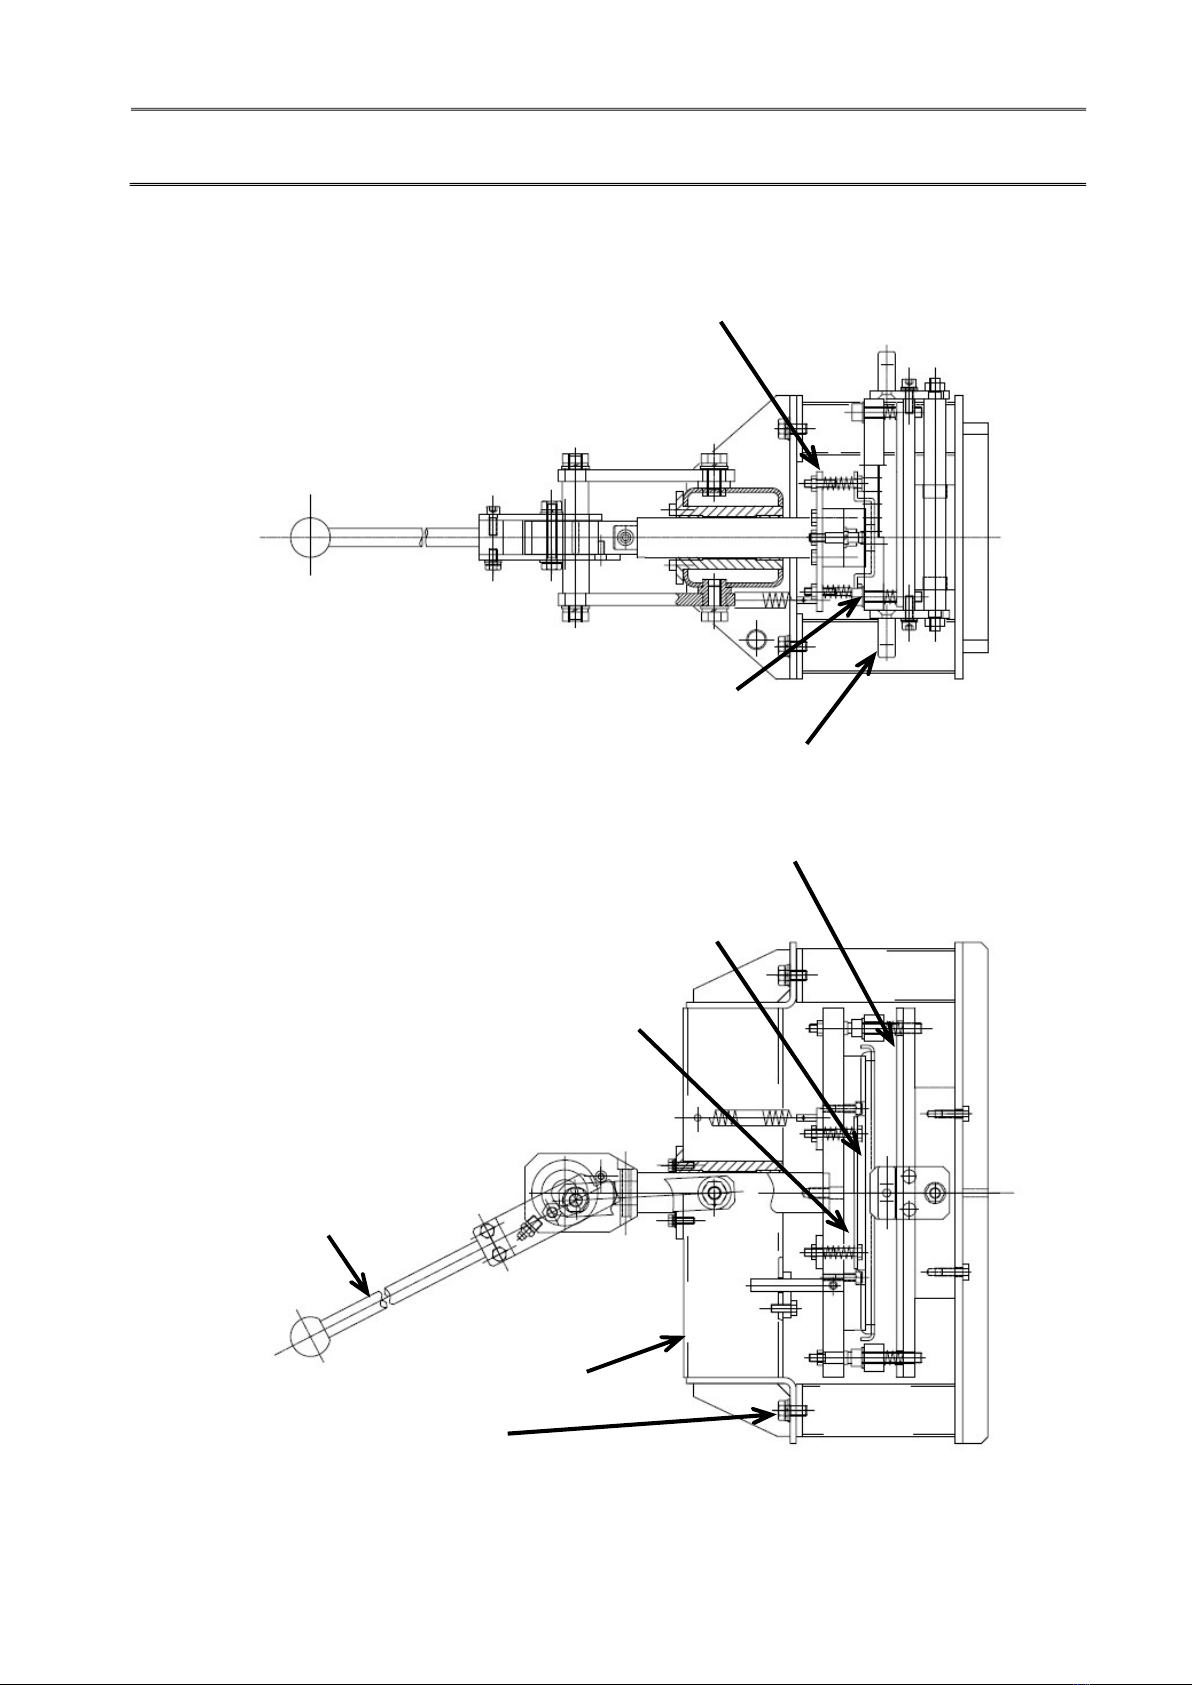
6. Name of Each Parts
EJECT PLATE
HANDLE BAR
BOLT
CUTTING BLADE
BELT CLAMP BAR
T type HANDLE
TOP FRAME
CUTTING SHEET
SPRING

- 7 -
7. How to Make a Finger Joint
7-1) Required Tool (tool prepared in advance)
a. Finger Puncher
b. Tape Measure or Ruler
(for measurement of belt length)
c. Ballpoint Pen or Felt Pen (for marking)
d. Hexagon Wrench
7-2) How to Measure Belt Length
Measure belt length and mark on the belt.
1) Measure Length from cut end.
2) Measure length from finger end
(For continuous measuring)
① The first mark 240mm from the edge of
the belt. (See diagram to left.)
② Based on the first mark, make a
second mark at the ending point of the
required belt length -5mm. (Put both
marks on the front side, i.e. on the
operator side.)
③ When consecutively making endless
belts, obtain required belt length and
from the second mark made at the
preceding finger joint, measure out the
required belt length and make another
mark. Repeat the above process. By
doing this, punching can always be
made at the right position and there
will be no wasted belt.
a
b
c
Markings
Required length -5mm
Belt end
Markings
40mm
240mm
Clamping part 40mm
Required length -5mm
d

- 8 -
7-3) How to Make a Finger Joint
① Loosen bolt on clamping bar and insert a
belt end in one side of finger puncher.
② Place the belt to coincide marks on the
belt and the table.
③ Fasten the bolts on both clamps with a
wrench to secure the belt position.
※Do not tighten bolts tight. (2 N · m or less)
④ Continuous punching
After punching one end of a belt, pull out the
Belt through clamping bar until next
punching position.
⑤ Both ends cut belt
Each ends must be insert from opposite
side clamping bar and place the same side
edge of groove of the clamping bar.
⑥ Align the support table so that guide pins
on the cutter line up with a set of
alignment holes on either end of the
clamps.
⑦ Push downward on the handle carefully to
check the alignment of the pins.
⑧ Return the handle and move the support
table over so the next set will accept the
guide pins.
⑨ Repeat step ⑥-⑧.
Clamp bars Cutting Sheet
Belt
Mark 200 ㎜ joint length on the table.
Set both belt ends to same side of the clamp
200 ㎜
NO

- 9 -
8. Troubleshooting
If there are any finger joints which are not cut out properly when a belt is punched,
follow the directions described in the “Maintenance” section on pages 9-11.
If the problem is not solved after following these directions, please contact Nitta,
your local distributor or agent in your area for advice.
9. Spare parts
1. Cutting sheet
2. Cutting blade
10. Maintenance
10-1) How to Perform Maintenance
If the handle bar does not move smoothly, Grease is injected from the grease
nipple.
You can change the position of the cutting sheet and both sides of the cutting
sheet can be used. Adjusting the position may solve any problems where a
portion of the finger joint is not cut out.
The cutting sheet and the cutting blade are consumable. Specify the cutting sheet
and the cutting blade for Finger Puncher when you order a new one.
10-2-1)How to Grease cam holder
①Grease is injected from the grease nipple.
Table des matières
Autres manuels Nitta Équipement industriel

Nitta
Nitta NPS-1205C Manuel utilisateur

Nitta
Nitta SOFTmatics Manuel utilisateur

Nitta
Nitta CFTG-60FS-4.5 Manuel utilisateur

Nitta
Nitta FP-200T Manuel utilisateur

Nitta
Nitta Carryflex CFTG-60SG-30 Manuel utilisateur

Nitta
Nitta SOFTmatics GR20QA-V3A Manuel utilisateur

Nitta
Nitta SEB Manuel utilisateur

Nitta
Nitta PolySprint FP70-10-50 Manuel utilisateur

Nitta
Nitta NITTAOMEGA type M165-K Manuel utilisateur


