Niryo One Manuel utilisateur

Niryo One
User Manual
21/02/2019

2
Summary
1. Introduction....................................................................................................................... 4
1.1 Purpose...................................................................................................................................................... 4
1.2 Safety precautions ................................................................................................................................. 4
1.3 Software versions ................................................................................................................................... 4
1.4 How to update Niryo One software................................................................................................ 4
2. Niryo One - Physical external interfaces......................................................................... 6
2.1 Overview.................................................................................................................................................... 6
2.2 Panel connector...................................................................................................................................... 7
3. Get started with Niryo One .............................................................................................. 9
3.1 Niryo One Studio.................................................................................................................................... 9
3.1.1 Overview........................................................................................................................................... 9
3.1.2 How to launch Niryo One Studio?.......................................................................................... 9
3.1.3 Left menu ......................................................................................................................................... 9
3.2 Power ON and power OFF the robot............................................................................................10
3.2.1 Power ON the robot...................................................................................................................10
3.2.2 Power OFF the robot..................................................................................................................11
3.3 Meaning of the LED color .................................................................................................................12
3.4 Top button..............................................................................................................................................13
3.5 Wi-Fi connection ..................................................................................................................................14
3.5.1 Connect to the robot in “hotspot mode” (LED is blue).................................................15
3.5.2 Connect to the robot using an Ethernet cable ................................................................15
3.5.3 Connect the robot to a Wi-Fi network................................................................................17
3.5.4 Connect to the robot in “connected mode” (green LED) ............................................18
3.5.5 Make the robot go back to “hotspot mode”....................................................................19
3.5.6 Use another IP address (custom) ..........................................................................................19
3.5.7 Give a custom name to the robot.........................................................................................20
3.6 Robot Calibration.................................................................................................................................20
3.6.1 Auto-calibration...........................................................................................................................21
3.6.2 Manual calibration (recommended) ....................................................................................21
3.6.3 Require a new calibration ........................................................................................................23
4. Command the robot........................................................................................................24
4.1 State section and learning mode ...................................................................................................24

3
4.2 Move the robot.....................................................................................................................................25
4.3 Use the tools..........................................................................................................................................27
4.3.1 Overview.........................................................................................................................................27
4.3.2 How to plug the tools? .............................................................................................................28
4.3.3 Select a tool...................................................................................................................................30
4.3.4 Control a tool................................................................................................................................31
4.4 Digital I/O panel ...................................................................................................................................31
4.5 Saved positions.....................................................................................................................................33
4.5.1 Overview.........................................................................................................................................33
4.5.2 Save a position.............................................................................................................................34
4.5.3 How to use a saved position? ................................................................................................34
4.6 Niryo Blocks............................................................................................................................................35
4.7 Sequences...............................................................................................................................................39
4.7.1 Save a sequence..........................................................................................................................39
4.7.2 Save a sequence from Niryo Blocks.....................................................................................41
4.8 Use the top button to trigger a (set of) sequences.................................................................42
4.9 Use a joystick controller to move the robot ..............................................................................44
4.9.1 Connect and enable the joystick controller ......................................................................44
4.9.2 Use the joystick controller .......................................................................................................45
5. Settings.............................................................................................................................46
5.1 Raspberry Pi 3B settings....................................................................................................................46
5.1.1 ROS logs (advanced users)......................................................................................................46
5.1.2 Shutdown the robot...................................................................................................................47
5.2 Software versions .................................................................................................................................47
5.3 Hardware Status ...................................................................................................................................48
5.3.1 Overview.........................................................................................................................................48
5.3.2 Motor connection problem.....................................................................................................49
5.3.3 What to do if you have a hardware problem?.................................................................49
5.4 Debug and logs ....................................................................................................................................50
5.4.1 Overview.........................................................................................................................................50
5.4.2 Debug motors one by one ......................................................................................................51
6. Going further ...................................................................................................................52

4
1. Introduction
1.1 Purpose
This manual describes the functions available for Niryo One, and shows you how to control the
robot from Niryo One Studio.
You can find more documentation on our website.
1.2 Safety precautions
⚠In order to avoid possible damages or injuries:
Do not use Niryo One outside
Do not put the robot on a not stable surface
Do not put the robot on a non-flat and non-horizontal surface
Do not put the robot in a humid environment, or near water
Do not let children use the robot alone
Do not disassemble the robot if it is still powered on
Respect all the electrical rules and warnings that you can find on this manual
1.3 Software versions
There are 3 software layers when you use Niryo One. From higher to lower:
Niryo One Studio (desktop app)
Niryo One Raspberry Pi image (robot software)
Niryo Stepper (motors firmware)
When you receive a Niryo One, the versions of the 3 layers are all compatible between them.
⚠If you update one of those software layer, you may have to update the other layers (in this
case you’ll get a warning on Niryo One Studio when you connect to the robot).
⚠This manual is valid for the following versions:
Niryo One Studio : 2.X.X
Niryo One Raspberry Pi image : 2.X.X
Niryo Stepper : 2.X.X
1.4 How to update Niryo One software
You can use those 3 tutorials:


6
2. Niryo One - Physical external interfaces
2.1 Overview
There are many physical interfaces at the back of Niryo One. Here is an overview and some
warnings about things you should be careful about.
The functionalities related to each interface will be covered throughout this manual.
1. Top button
2. Ethernet port of the Raspberry Pi 3B
3. USB port * 4.
4. LED.
5. CAN bus connection for Niryo Steppers * 2. Not used yet.
6. Dynamixel XL-320 connector. Used for the vacuum pump
7. Dynamixel XL-430 connector. Not used yet
8. 12 V switch output * 2. Actionable through software

7
9. GPIO panel * 2. Total 6 digital pins, actionable through software. You can use GPIO1 and
GPIO2 pins as 5V digital pins (mode: input or output, state: high or low).
10. Power switch
11. Power adapter connector
⚠Ensure your power adapter has a 12V output and is able to provide 6A. Lower output
voltage and current may cause the robot to fail to move correctly. Higher output voltage and
current may permanently damage the robot, and can be a cause of fire.
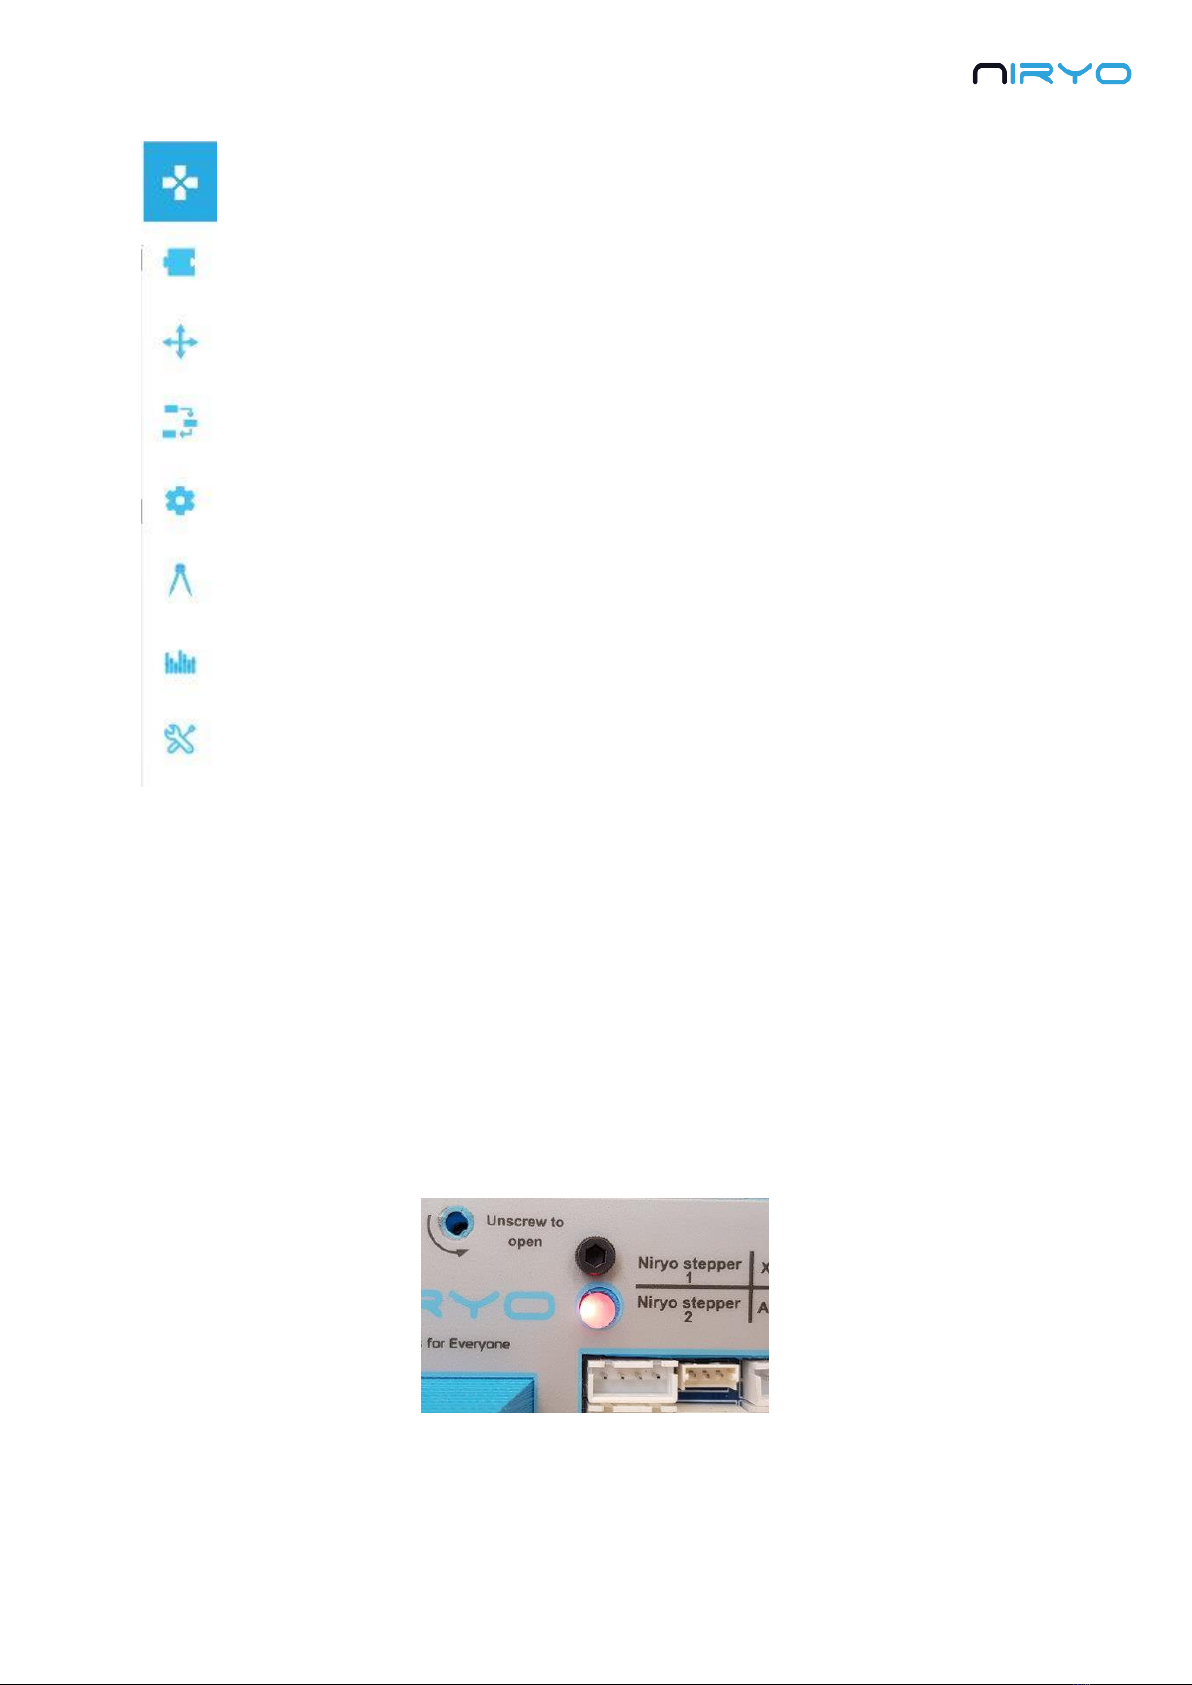
2.2 Panel connector
Here is a more detailed view of the panel connector:
⚠Electrical rules and warnings for the panel connector:

8
The XL-320 (Dxl-Data1) interface should only be used to connect XL-320 motors.
The XL-430 (Dxl-Data2) interface should only be used to connect XL-430 motors.
Do not make a short circuit between the GND and 12V pins of the switches (SW1 and
SW2) and do not connect the switches together.
The SW* interfaces can provide 500 mA maximum.
The device you connect to GPIOs pins must operate at 5V, not more, not less. Add a
voltage divider if needed.
Do not make a short circuit between GND, 5V, and any other GPIO pin.
Not respecting these rules may lead to various damages on the electronics boards or motors.

9
3. Get started with Niryo One
3.1 Niryo One Studio
3.1.1 Overview
Niryo One Studio is the desktop application (Windows - MacOS - Linux) for controlling Niryo
One. You can use it to setup the robot, change some settings, move the robot, program a
sequence, etc. In this manual we’ll cover all the available functionalities.
3.1.2 How to launch Niryo One Studio?
Once you’ve downloaded the .zip file from niryo.com, you need to extract the archive. Then go
into the new created folder and search for an executable named “NiryoOneStudio”. Double
click on the executable to start the application. You don’t need to install anything on your
computer.
3.1.3 Left menu
10
The left menu allows you to switch between all the different panels. From top
to bottom:
Robot command (arm, tool, digital I/Os)
Niryo blocks
Saved positions
Saved sequences (+ sequence autorun)
Settings (Wi-Fi, Raspberry Pi, software versions)
Calibration
Hardware status
Debug and logs
All the panels will be explained throughout this manual.
3.2 Power ON and power OFF the robot
3.2.1 Power ON the robot
⚠Before powering on the robot, first make sure that:
The robot is on a flat and stable surface
The power switch is turned off (position 0)
The robot has enough space to move without hitting something or someone
To power on the robot, simply plug the power adapter and switch on the switch button. The
LED on the back of the robot will become red.
⚠Do not unplug or power off the robot now, you may damage the Raspberry Pi 3B inside
the robot, or the micro SD card inside the Raspberry Pi 3B.
Table des matières
Autres manuels Niryo Robotique

Manuels Robotique populaires d'autres marques

STEMCenter USA
STEMCenter USA Pi-Bot v2.00 Manuel utilisateur

SunFounder
SunFounder PiDog Manuel utilisateur

Universal Robots
Universal Robots UR5 Manuel utilisateur

Universal Robots
Universal Robots E Series Manuel utilisateur

YASKAWA
YASKAWA MOTOMAN-MPL80 II Manuel utilisateur

EFORT
EFORT ECR5 Manuel d'instructions


