Nightfox SWIFT 2 Manuel utilisateur


1
English
Table of Contents
1. Package contents..................................................... 2
2. Basic operation of the Nightfox Swift 2 & Swift 2 Pro .......... 3
3. Charging the battery................................................. 4
4. Powering on and off.................................................. 5
5. Adjusting the IR, Exposure and Backlight levels................. 5
6. Important tips for using the infrared LEDs ....................... 6
7. VIDEO mode (Swift 2 Pro only) ..................................... 6
8. PLAYBACK mode (Swift 2 Pro only) ................................ 8
9. SETTINGS mode....................................................... 8
10. Downloading videos to a computer...............................10
11. Watching your downloaded videos................................10
12. Tactical helmet mounting..........................................11
13. Using the head mount ..............................................11
14. Memory card (Swift 2 Pro only) ...................................12
15. Troubleshooting......................................................13
16. Battery safety and replacement ..................................14
17. Technical specifications ............................................16

2
1. Package contents
Nightfox Swift 2
or
Nightfox Swift 2 Pro
Neck strap
USB-C cable
Head mount accessories
Dovetail mount adaptor
Pre-installed 3200mAh
rechargeable 18650 lithium-ion
battery
Swift 2 Pro only
Pre-installed 32GB memory card

3
2. Basic operation of the Nightfox Swift 2 & Swift 2 Pro
Topside view
①POWER/▼
②ZOOM/OK
③REC/MENU
④ ↑ (increase)
⑤ ↓ (decrease)
Underside view
⑥ Focus wheel
⑦ Microphone (Swift 2 Pro
only)
⑧ Battery compartment
Powering on
•Long press POWER/▼ ① for two seconds to turn the Swift 2 on and
off.
Adjusting IR,
Exposure and
Backlight
•Short press POWER/▼ ① to switch between adjusting IR, Exposure
and Backlight levels.
•Press ↑ ④ and ↓ ⑤ to increase/decrease the level of the selected
function.
•See section 5 for further instructions.
①
②
③
④
⑤
POWER / ▼
ZOOM / OK
REC / MENU
↑
↓
⑥
⑧
⑦

4
Focusing the
picture
•The Swift 2 has a manual focus camera lens. The picture will be
blurred if not manually focused.
•To sharpen the image, use the focus wheel ⑥ on the underside of
the unit.
Zoom
•Press ZOOM/OK ② to zoom in at multiple magnification levels. After
reaching 3x, press again to return to 1x zoom.
Recording
footage
•For the Swift 2 Pro model only: short press REC/MENU ③ to
start/stop video recording.
Switching
modes
•Long press REC/MENU ③ to switch between these modes:
oSwift 2: VIDEO mode, SETTINGS mode.
oSwift 2 Pro: VIDEO mode, PLAYBACK mode and SETTINGS
mode.
•Only the Swift 2 Pro can record video footage.
Microphone
•When recording in VIDEO mode, the Swift 2 Pro can record audio via
the microphone ⑦ located on the unit’s underside.
Battery
•The 18650 lithium-ion battery is pre-installed and located in the
underside compartment ⑧.
3. Charging the battery
•The Swift 2 charges just like a phone or tablet, using a USB-C
interface.
•To charge the battery, plug the provided USB-C cable into a
USB port. This could be a USB port on your laptop or computer,
or phone charger.
•Open the USB cover:
•Plug the provided USB-C cable into
the charging port:
•When the Swift 2 is charging, progress is shown through a
green battery icon on the lower right-hand corner of the LCD
screen.
•The charge time from flat is 3 to 4 hours from a USB socket
with a 1A output.

5
4. Powering on and off
•Press and hold POWER/▼ for two seconds to turn the Swift 2
on and off.
5. Adjusting the IR, Exposure and Backlight levels
•The Swift 2 allows quick adjustment of the:
oInfrared (IR): A higher number means a brighter LED, and
therefore a better viewing range – but keeping the
number lower improves battery life (see section 6).
Note: when set to “IR:OFF”, the Swift 2 can be used in
daylight, while the Swift 2 Pro can also record daylit
footage. This is different to "IR:0", the setting named
"Lunarsight" (see section 6). Additional levels range from
1 to 5.
oExposure: This adjusts the sensitivity of the lens. A
higher value is better for dark environments. Levels
range from -2 to 3.
oBacklight: This adjusts the brightness of the LCD screen.
Levels range from 1 to 5.
•At the bottom of the LCD screen, the ▼ icon and red text
indicate which feature is currently selected:
•Press POWER/▼ to switch between adjusting Infrared,
Exposure and Backlight levels:

6
•When a feature is selected, use ↑ and ↓ to adjust the value.
6. Important tips for using the infrared LEDs
•The Swift 2 has two infrared (IR) LEDs: a 940nm wavelength
for stealth, and an 850nm wavelength for range.
•All IR LEDs produce a red glow, visible to the human eye.
940nm LED produces less glow than 850nm LED, but 850nm
provides a longer viewing range than 940nm.
•The Swift 2’s default factory setting uses 940nm for IR levels
1-3, and 850nm for IR levels 4-5. However, you can switch to
using exclusively 940nm or 850nm in the SETTINGS mode (see
section 9).
•Important: other night vision devices can detect the
infrared light emitted by the Swift 2.
•In dark environments with some ambient light, use the
“Lunarsight” setting (IR:0) to use no infrared LED at all.
•Reducing usage of the infrared LEDs saves battery.
7. VIDEO mode (Swift 2 Pro only)
•There are two Nightfox Swift 2 models: the Swift 2 and the
Swift 2 Pro. While in VIDEO mode, the Swift 2 Pro can record
video footage onto the unit’s memory card.
•VIDEO mode is the default mode when you turn on the Swift 2
Pro.

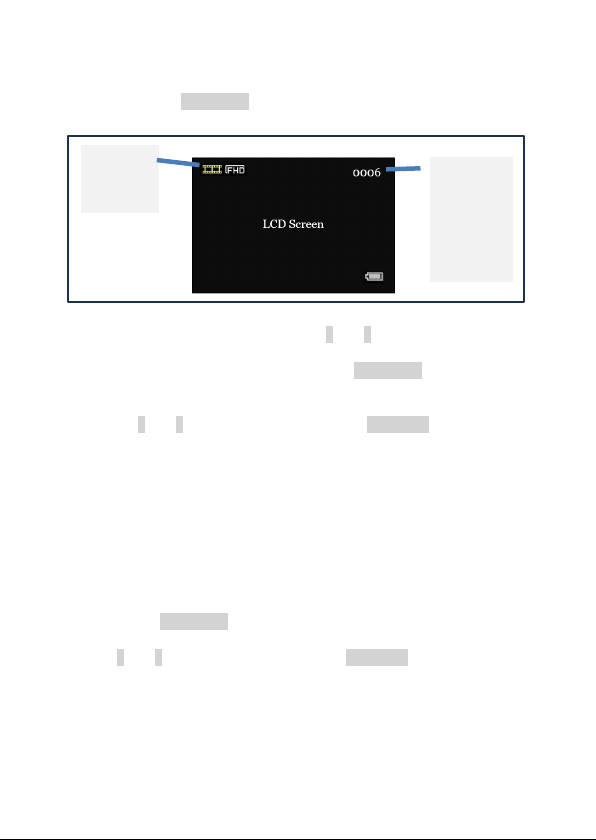
7
•LCD Screen display when in VIDEO mode:
•When in VIDEO mode, short press REC/MENU to start
recording. A red recording symbol will flash at the top of the
screen.
•Press REC/MENU again to finish recording. The video will
automatically save.
•You can watch footage recorded on the Swift 2 Pro in
PLAYBACK mode (see section 8), or download the footage to
watch on a computer or other device.
Displays
amount of
recording time
remaining
(HH:MM:SS)
When
recording,
shows the
length of the
current video
Indicates a
memory card is
installed
Battery level
indicator
IR / Exposure / Backlight
levels. See section 5 for
further instructions
VIDEO mode
symbol. Press
REC/MENU to
start recording
Lunarsight / 850nm / 940nm icon. Indicates whether
ambient light only is being used (“Lunarsight”), or the
850nm / 940nm infrared LED is in use
850nm
8
8. PLAYBACK mode (Swift 2 Pro only)
•Long press REC/MENU to enter PLAYBACK mode.
•To scroll through your videos, use ↑ and ↓.
•To view the current video, short press REC/MENU. A menu will
appear. The menu options are Play, Delete, Delete all, Exit.
•Use ↑ and ↓ to navigate the menu. Press ZOOM/OK to select a
menu option.
•Please note:Videos recorded by the Swift 2 Pro include audio
recorded by the unit’s microphone, but you must view the
videos on a computer to hear the audio. The Swift 2 Pro does
not have an integrated speaker.
9. SETTINGS mode
•Long press REC/MENU to reach the SETTINGS mode.
•Use ↑ and ↓ to navigate the menu. Press ZOOM/OK to select a
menu option.
•NOTE: Some of the settings below relate to recording video
footage and therefore only appear on the Swift 2 Pro model.
PLAYBACK
mode
symbol
Video
number. For
example,
0006 is the
6th video
recorded

9
Setting
Description
Night filter
Choose to enable a green screen filter during night-time use.
IR settings
The default setting “940nm+850nm” indicates that the Swift 2
will use 940nm on the lower power settings (IR1-3) and 850nm
on the higher (IR4-5).
Choose “940nm only” or “850nm only” to use the selected
wavelength on IR levels 1-5.
Select “No IR” to disable the IR and avoid accidental
activation.
See section 6 for more about the trade-offs between the
different wavelengths.
Autohide
icons
To minimize distractions in VIDEO mode, you can autohide all
the icons from the screen after no button has been touched for
3 seconds.
Format SD
card
Delete all files currently on the micro SD card.
Power save
Set the device to power off after a period of non-use. If
enabled, the options are 30min or 60min.
Date
The date is in a YYYY / MM / DD format.
Use ↑ and ↓ to flick between YYYY, MM or DD. Press ZOOM/OK
to edit. The selected number will appear in red.
Use ↑ and ↓ to adjust number. Once the date is correct, press
ZOOM/OK again to save.
At any time, press REC/MENU to return to the list of settings.
Time
The time is in an HH / MM / SS format.
Use ↑ and ↓ to flick between HH, MM or SS. Press ZOOM/OK to
edit and the number will appear in red.
Use ↑ and ↓ to adjust the number. Once the time is correct,
press ZOOM/OK again to save.
At any time, press REC/MENU to return to the list of settings.
Flicker
The device will arrive with the correct setting for your
geographical area.
Date / Time
tag
Choose whether a date and time stamp will be visible on your
recorded videos.
Frame rate
Pick the frame rate of the AVI video recordings produced. A
higher frame rate may improve video quality but will increase
the video size.
Factory
reset
Restores all settings to factory defaults.
Version
Shows the current firmware version.
Ce manuel convient aux modèles suivants
1
Table des matières
Langues :
Autres manuels Nightfox Monoculaire


Manuels Monoculaire populaires d'autres marques


Night Vision
Night Vision NOXM50 Manuel utilisateur

ATN
ATN Night Vision Spotting Scope Night Storm-HPT Manuel utilisateur

ATN
ATN Night vision Monocular MO-4 Manuel utilisateur

Leica
Leica Monovid 8x20 Manuel utilisateur

StellaX
StellaX ZoomX X-003 Manuel utilisateur

AGM
AGM ASP-MICRO TM160i Manuel utilisateur


