NETGEAR PS121 - USB Mini Print Server Mode d’emploi

Start Here
Follow these instructions to set up your PS121 USB Mini Print Server.
Verify Printer and Network Readiness
Assure that the following are available:
• You have a working Ethernet network running TCP/IP with at least one
Windows 98SE, Me, 2000, or XP PC.
• You have a printer with a USB port.
• You may also need to have your printer driver software handy. For most popular
printers, Windows already has the printer driver software available.
First, Connect the PS121
1. CONNECT THE PS121 TO YOUR PRINTER.
a. Connect the supplied USB cable (A) from the PS121 to your printer.
b. Turn on your printer.
Your PS121 and printer are now connected to your network!
1. INSTALL THE PS121 SOFTWARE.
a. Power on your PC, let the operating system boot up completely, and log in as
needed.
b. Insert the Resource CD for the PS121 into your CD-ROM drive. The CD
main page shown below will load. Click Install Software.
c. Follow the InstallShield Wizard steps, and click Finish when done.
2. RUN THE NETWORK PRINT SERVER SETUP WIZARD
Note: The factory default network setting for initial setup of the PS121 is to
automatically get its TCP/IP network configuration via DHCP. If your network
does not use DHCP, you can refer to Reference Manual on the PS121 Resource
CD for help with manually the configuring the PS121.
a. When your computer restarts, you will be prompted to run the Print Server
Setup Wizard. Click Finish to finish the software installation. The Print
Server Setup Wizard screen will display.
b. Click Next to proceed. The Print Server Wizard will now search your
network for the PS121.
If the Print Server Setup Wizard cannot find your PS121, check the USB
cable connections, the network cable connections, and the status lights on
the PS121. Then, click the Refresh button.
c. Click Next to proceed to the device name screen. Change the print server
name to a more descriptive name if you like. Click Next to proceed.
d. The Print Server Setup Wizard displays the TCP/IP address information
automatically assigned to it by your network PS121. Click Next to proceed.
Note: Failure to set a valid fixed IP address for the PS121 will prevent it
from functioning reliably. The Print Server Setup Wizard suggested IP
address will usually work fine. The Reference Manual explains this fully.
e. Click Finish to end the Print Server Setup Wizard.
3. RUN THE ADD PRINTER PORT WIZARD FOR EACH PC
Warning: Print manager software from Epson and from some HP printers can
block communications between your PC and the PS121. Uninstall such print
manager software before proceeding with the Add Printer Port Wizard.
86%0LQL3ULQW6HUYHU36
,QVWDOODWLRQ*XLGH
363ULQW6HUYHU
5RXWHU6ZLWFKRU+XE &RPSXWHUV
3ULQWHU
3686%3RUW
3ULQWHU
A
5RXWHU6ZLWFKRU+XE 3ULQWHU
36
(WKHUQHW3RUW
(WKHUQHW&DEOH
C
B
b. Insert the other end (C) into the Ethernet port on the PS121.
c. Connect the 9v power cord to the PS121, and plug it into a power source.
d. Check the PS121 status lights and verify the following:
•ACT light: When the print server is powered on, the ACT light will blink
then turn solid green.
•ERROR light: The ERROR light should be off.
2. CONNECT THE PS121 TO YOUR NETWORK.
a. Insert one end of an Ethernet cable (B) into an open Ethernet port in the
network device like a hub, switch, or router.
Now, Install and Configure the PS121 Software
a. When the Print Server Setup Wizard finishes, you are prompted to run the
Add Printer Port Wizard. Click Yes to proceed.
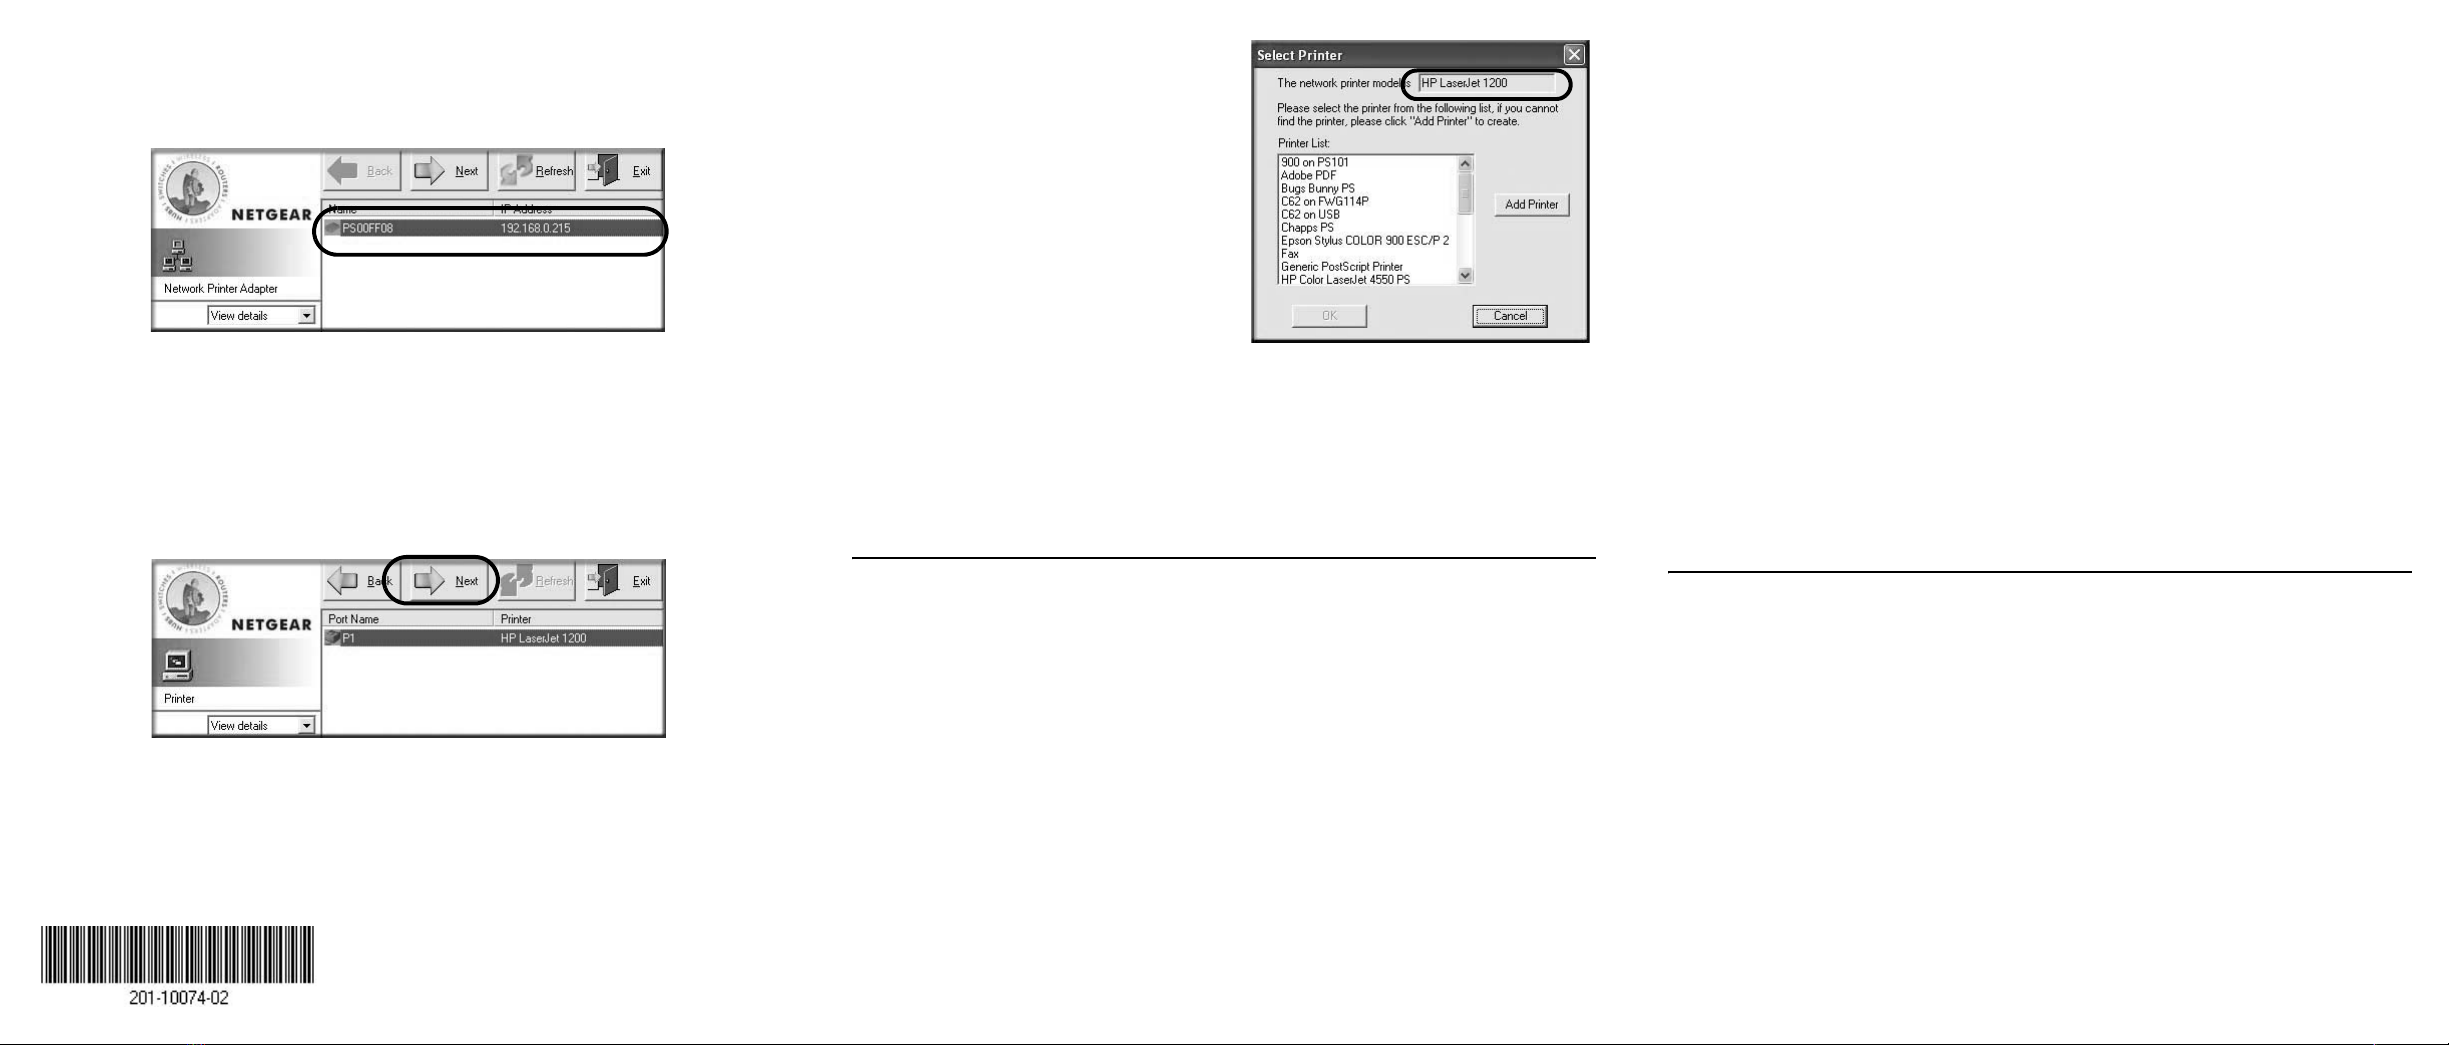
b. The Add Printer Port Wizard searches your network for the PS121.
If the Print Server Setup Wizard cannot find your PS121, check the USB
cable connections, the network cable connections, and the status lights on
the PS121. Then, click the Refresh button.
c. Click Next to proceed to the Port/Printer name screen. Take note of the
printer model number listed.
d. Click Next to proceed to the Select Printer screen.
If you see the exact printer model
number in the list, click it to select
it from the list.
If your printer model is not on the
list, click the Add Printer button
and follow the Windows add
printer wizard prompts to complete
the installation of your printer. If
you need help with the Windows
wizard, please see the Reference
Manual on the PS121 Resource
CD.
e. If prompted, print a test page to verify operation of the printer and the
PS121. Keep the test page for future reference. Then, close any remaining
Add Printer Port Wizard or Windows Add Printer Wizard windows.
Use the PS121 Resource CD to run the Add Printer Port Wizard to set up each
PC on you network that you want to use with the PS121.
Troubleshooting Tips
• No lights are lit on the print server
It takes a few seconds for the status light to be lit. Wait a minute and check the
status light on the print server.
• The printer is printing "garbage" characters
If the printer does not match the printer driver in the operating system, then run
the Add Printer Port Wizard.
• A Windows error message appears when printing
Consult Windows help.
• The print server is not found
See if you can access it from other computers on your network. If so,
troubleshoot your computer or network connectivity.
If you are running a software firewall, disable it. This includes the Windows XP
firewall — which may have been turned on during Windows upgrade or
installation without you being aware of it.
• Nothing is printing
– Try printing from another computer. If this is successful, then there is a
problem with your computer configuration, not the print server. Consult the
computer and operating system documentation.
– If the printer does not match the printer driver in the operating system, then
run the Add Printer Port Wizard.
– Disable the printer's bidirectional feature, if it is turned on.
– If printer manager software is installed, uninstall it.
– Consult the troubleshooting section of the Reference Manual on the PS121
Resource CD.
• I am using a DHCP server, and the Print Server gets an IP Address conflict
This problem can happen when the PS121 uses a static IP Address in the range
used by the DHCP server. If so, use another address outside of the range used by
the DHCP server. Typically IP addresses between 200 to 250 are outside the
range of DHCP servers found on home networks.
Technical Support
Thank you for selecting NETGEAR products.
To register your product, go to: http://www.NETGEAR.com/register
Go to http://www.NETGEAR.com/support for additional support information.
©2004 by NETGEAR, Inc. All rights reserved.
NETGEAR is a registered trademark of NETGEAR, Inc. in the United States and/or
other countries.
Other brand and product names are trademarks or registered trademarks of their
respective holders. Information is subject to change without notice.
February 2004
Autres manuels pour PS121 - USB Mini Print Server
4
Autres manuels NETGEAR Serveur


