NESO Technology LD 500V Manuel utilisateur

1
User Manual
LD 500/500V
15” TFT Color LCD Monitor
Copyright NESO Technology Inc., 2002. All rights reserved.
IBM and VGA are registered trademarks of International Business Machines Corporation.
Microsoft, Windows, Windows NT, and the Windows logo are registered trademarks of Microsoft Corporation in
the United States and other countries.
VESA is a registered trademark of the Video Electronics Standards Association. DPMS and DDC are trademarks
of VESA.
ENERGY STARis a registered trademark of the U.S. Environmental Protection Agency (EPA).
Disclaimer: NESO Technology Inc. shall not be liable for technical or editorial errors or omissions contained
herein; nor for incidental or consequential damages resulting from furnishing this material, or the performance or
use of this product.
In the interest of continuing product improvement, NESO Technology Inc. reserves the right to change product
specifications without notice. Information in this document may change without notice.

LD 500/500V User Manual
- 2 -
Federal Communications Commission (F.C.C.) Statement
This equipment has been tested and found to comply with the limits for a class B digital
device, pursuant to Part 15 of the FCC rules. These limits are designed to provide
reasonable protection against harmful interference in a residential installation. This
equipment generates, uses and can radiate radio frequency energy and, if not installed
and used in accordance with the instructions, may cause harmful interference to radio
communications. However, there is no guarantee that interference will not occur in a
particular installation. If this equipment does cause harmful interference to radio or
television reception, which can be determined by turning the equipment off and on, the
user is encouraged to try to correct the interference by one or more of the following
measures:
Relocate the receiving antenna
Increase the separation between the equipment and receiver
Connect the equipment into an outlet on a circuit different from that to which the
receiver is connected.
Consult the dealer or an experienced radio/TV devices technician for help.
Use only shielded cables or connect I/O devices to this equipment.
You are cautioned that changes or modifications not expressly approved by the party
responsible for compliance could void your authority to operate the equipment.

LD 500/500V User Manual
- 3 -
Table of Contents
Federal Communications Commission (F.C.C.) Statement ................................................... 2
Safety Precautions .................................................................................................................. 4
Control and Connectors..........................................................................................................5
Quick Installation Guide ........................................................................................................6
Illustration .............................................................................................................................. 7
Operation................................................................................................................................ 9
Front Panel Buttons................................................................................................................ 9
About Auto Adjustment ....................................................................................................... 10
Description of OSD Functions ............................................................................................. 12
Specifications (LD 500) ....................................................................................................... 13
Specifications (LD 500V) .................................................................................................... 14
Standard Timing Table ......................................................................................................... 15
Pin Assignment .................................................................................................................... 15
Troubleshooting.................................................................................................................... 16
DDC Plug & Play................................................................................................................. 17
Cleaning the LCD Monitor .................................................................................................. 18

LD 500/500V User Manual
- 4 -
Safety Precautions
Please read following instructions before use:
1. Do not apply pressure to the LCD screen. Excess pressure may cause permanent
damage to the display.
2. Do not scratch or press on the panel with any sharp objects, such as a pen or pencil, as
this may result in damage to the panel.
3. Store the LCD monitor at a temperature of –20°C ~ 60°C (or –4°~ 140°F).
4. Avoid exposing the monitor to direct sunlight and ensure the area around the monitor
is free from moisture. Never allow any liquid to get inside the monitor.
5. Do not place any objects on the case.
6. Never place the monitor near a heat source such as a radiator.
7. Do not open the case of the monitor, as doing so may expose you to dangerously high
voltage levels. Never attempt to perform repairs on the monitor yourself, but refer all
servicing to qualified personnel.
8. Disconnect the monitor from the power outlet when the monitor is not in use for
extended periods of time.
9. To increase the life of the LCD Panel, make sure to turn off the power or reduce its
brightness when the monitor is not in use.
10. The monitor is equipped with a three-wire grounding-type plug. For safety, this device
should only be used with a grounding-type power outlet. If your outlet is not of this
type, contact your electrician for replacement. Never use a 3-to-2 prong adapter.
Safety requirements may differ. Please select a suitable power cord depending on the
particular area where you are located:
A. North America: Please select a UL listed and CSA certified power cord.
B. Germany: Please select VDE certified power cord.
C. Nordic countries: Please select a power cord certified by SEMKO, NEMKO,
DEMKO or FEMKO
D. Other areas: Please select a power cord suitable to the local power system and
power outlet.
Usually when this product is sold, a suitable power cord is provided by the
manufacturer. However, this product may sometimes be resold or transported to
another area with a different power system and safety requirements. Please pay
attention to the selection of a suitable power cord.
The plug on the power cord is intended to serve as the disconnect device, the
socket-outlet shall be installed near the equipment and shall be easily accessible.
11. This monitor can only be connected to the following adapter:
Brand: LINEARITY Type: LAD6019AB4
Brand: LIEN CHANG Type: LCA01F
12. This monitor is designed with a universal power supply that accommodates 100 – 240
VAC and frequency of 50 – 60Hz.

LD 500/500V User Manual
- 5 -
Thank you for your purchase of a NESO LD 500/500V TFT Color LCD monitor. Your
NESO LD 500/500V package includes:
LD 500/500V LCD monitor
AC adapter
Power cord
DVI Video Cable (Optional)
Signal cable
Audio cable
Installation disk
This user manual
Please contact your local distributor if any of these items is missing.
Important!
You may wish to save the original box and packing materials for future use in
shipping the monitor.
Control and Connectors
Front
Power Switch
Auto (+)
Menu (↵)
Mute (-)
Rear
Line-in
DC-in
DVI Input connector
(optional)
D-Sub mini 15 pin Input
Connector
Security Lock – allows for the
connection to Kensington’s
MicroSaver security system.

LD 500/500V User Manual
- 6 -
Quick Installation Guide
PC Setting
Before connecting your PC to the LD 500/500V LCD monitor, change the display screen
settings (resolution and frequency) to match those below.
fH:30kHz-61kHz fV:56Hz–75Hz
Important:
The maximum resolution of this LCD monitor is 1024 x 768 at a maximum
frequency of 75Hz
Using the LCD monitor with Windows95/98
A monitor information file can be found on the installation disk included in the package.
This file includes information to ensure the best performance when the monitor is used with
Windows 95/98. Please install the enclosed utility and select “LD 500/500V” from the
monitor list in Windows 95/98. Refer to the readme.txt file in the Monitor Installation Disk.
Connecting the Cables
1. Be sure that both the PC and the LCD monitor are turned OFF.
2. Place the LCD monitor as shown below to remove the connector cover. (Please refer to
illustration .) When removing the connector cover, push in the buttons gently, and lift
the cover up. To protect the LCD panel from scratching, it is recommended that a soft
cloth or cushion be placed underneath the LCD panel.
3. Plug the signal cable into the D-Sub or DVI (optional) socket at the rear of
the monitor. When connecting the signal cable, check that the shape of the cable connector
matches the shape of socket on the LCD monitor. (Please refer to illustration .)
4. Plug the other end of the signal cable into the video connector at the rear of the PC.
5. Plug the power cord into the power connector at the rear of the LCD monitor.
(Please refer to illustration .)
6. Plug the other end of the power cord into a power outlet.
7. Plug one end of the audio cable into the line-in port of the LCD monitor and the
other end into the speaker-out port on the PC. (Please refer to illustration .)
8. After connecting all cables, fit the cables into the grooves to secure them and ensure that
they can be extend out of the sides of the connector cover. (Please refer to illustration )
9. Using your left hand, press the spring latch to the left, while using your right hand to pull
the T-bar support strut into position. Then, release the spring latch. (Please refer to
illustration )
10. Reattach the connector cover (Please refer to illustration .)
11. Adjust the viewing angle (Please refer to illustration .)
Important:
While pulling out the T-bar support strut, be sure to press the spring latch to the left.
Otherwise, damage may be caused to the monitor.

LD 500/500V User Manual
- 7 -
Illustration
Removing the connector cover
Connecting the cables
Pulling down the T-bar support strut

LD 500/500V User Manual
- 8 -
Attaching the connector cover
Adjusting the viewing angle

LD 500/500V User Manual
- 9 -
Operation
This section explains how to fine-tune your monitor's screen image to suit your personal
preferences, or to adapt it for different applications or lighting conditions.
Front Panel Buttons
Power Switch with LED indicator
Auto (+) button — Used for automatic adjustment of the display size to full-screen
mode or to increase the selected values.
Menu button (↵)— Brings up the OSD control menu
Mute (-) button — Mutes the audio or decreases the selected values
In the power-saving mode, the functions accessed by the control buttons described above will
be modified as follows:
Auto (+) buttons — Raises the volume.
Menu button (↵)— Mute
Mute (-) buttons — Lowers the volume.
Important:
The Auto adjustment function is intended for use on Macintosh computers, or PCs
running Windows. It may not function properly if any of the following applies:
1. The PC is running MS-DOS (not Windows).
2. The background color for the “wallpaper” or “desktop” pattern is set to black or dark.
3. A graphics board that is not completely compatible is installed in the PC.

LD 500/500V User Manual
- 10 -
About Auto Adjustment
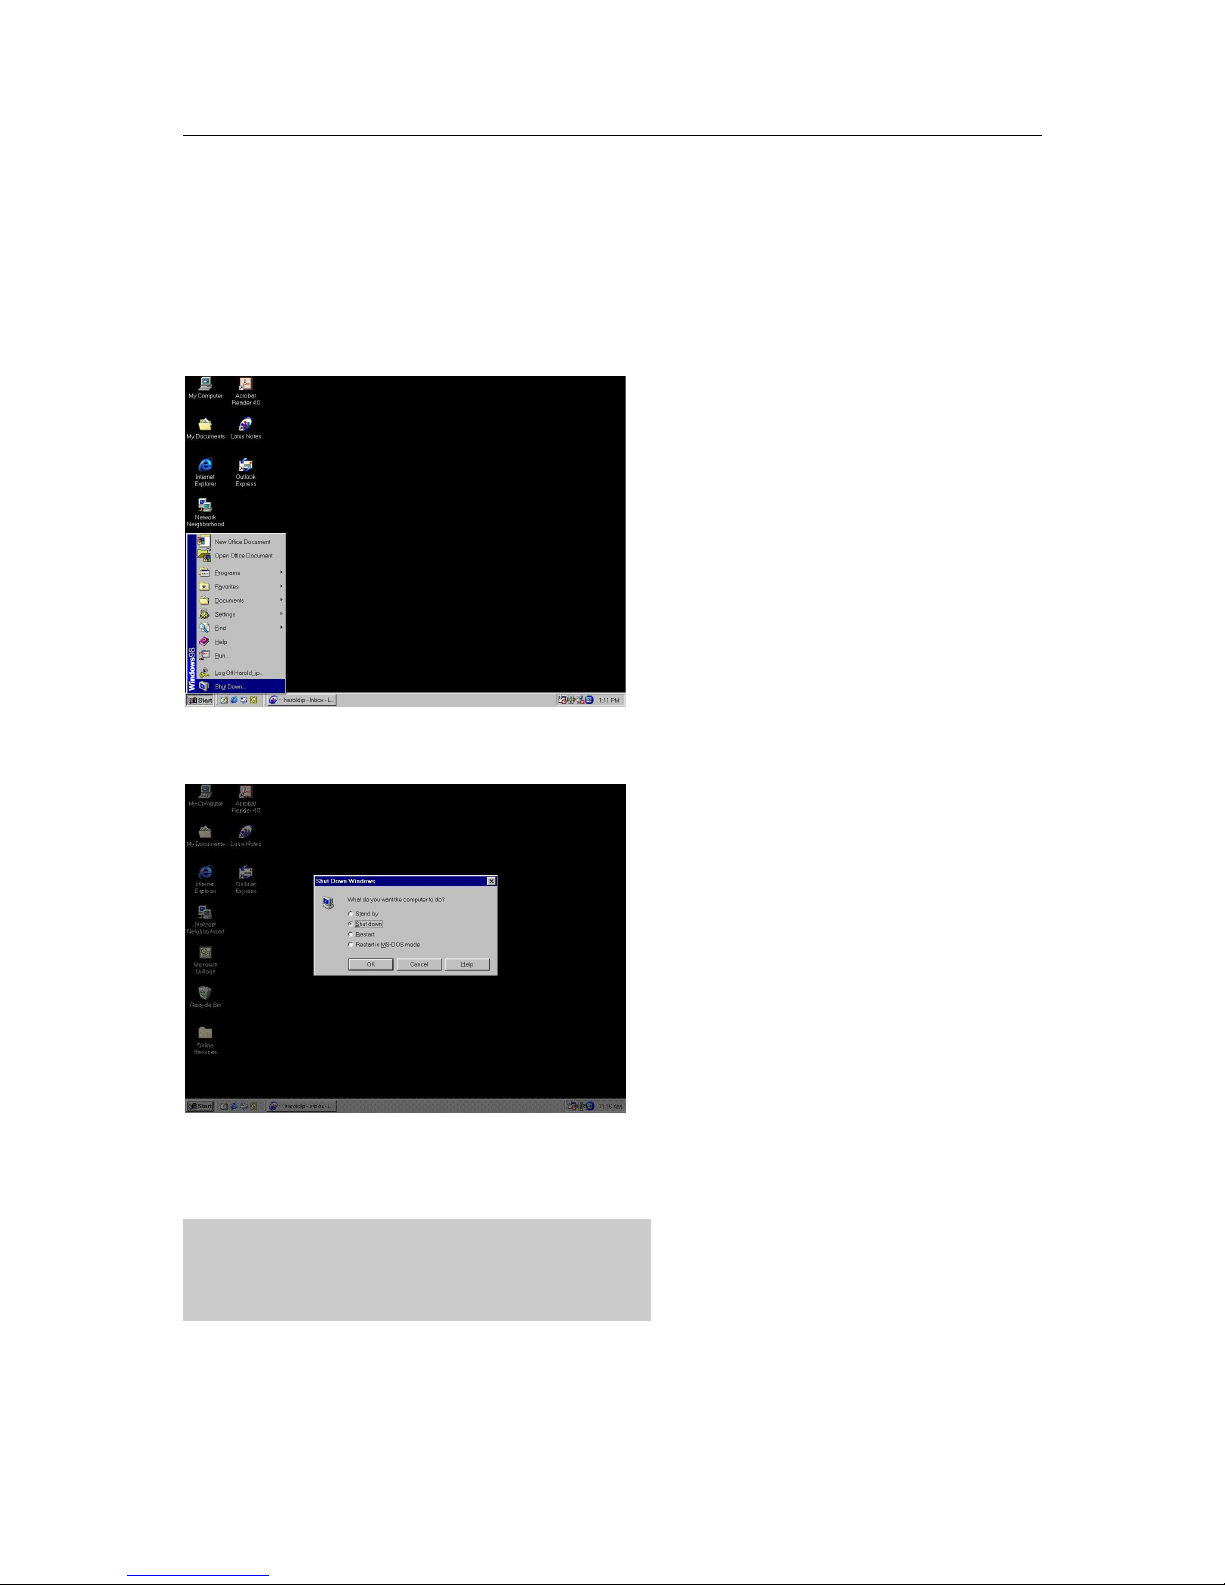
The Auto Adjustment is best performed at Windows “Shut Down” mode. Follow the steps as
below:
1) From the “Start” menu, select “Shut Down”
The following dialogue will appear.
2) Press Auto (+) on the front bezel, the following message will appear.
Auto adjusting …
3) Wait until it finish all the adjustment and then select “Cancel” to return to Windows.
Table des matières
Autres manuels NESO Technology Moniteur

NESO Technology
NESO Technology Pomona FD 770A Manuel utilisateur

NESO Technology
NESO Technology Pomona FD 910G Manuel utilisateur

NESO Technology
NESO Technology Pomona FD 570A Manuel utilisateur

NESO Technology
NESO Technology Pomona FD 786G Manuel utilisateur

NESO Technology
NESO Technology LD 500/500V 15" Manuel utilisateur

NESO Technology
NESO Technology Trinitron Manuel utilisateur