NEO 15301 Guide de dépannage

15301-ML002 REV01 ECN 5789
15301 Betmakers Bench Mount & Pedestal Kiosk (SST)
USER SERVICE MANUAL

15301-ML002 REV01 ECN 5789 Page 2
Version History
Dec. 2021 V 0.1 Release Version
ISSUE NUMBER DATE ECN COMMENTS APPROVED
01 01-12-2021 5789 INITIAL RELEASE L..DICKSON

15301-ML002 REV01 ECN 5789 Page 3
Who Should Use This Manual
This guide is intended for those responsible for the installaon and use of the Kiosk.
It contains informaon on:
• Installaon and set-up instrucons
• Operaonal requirements
• Kiosk Hardware Component Overview
Noces 4
1. Safety Informaon 4
Danger Noces 5
Cauon Noces 6
Electronic Emission & Safety Noces 6
Electrostac Discharge (ESD) 6
2. Product Descripon 7
2.1 Physical Specicaons ,Operang Environment 7
2.1.1 Mechanical 7
2.1.2 Environmental 7
2.1.3 Electrical 7
2.2 Power Connecon / Cable Access 7
3. Replacing the Printer Module 8
4. Replacing the MSR Module 10
5. Replacing the BNA Cash Box Module (Bench Mount) 12
6. Replacing the BNA Cash Box Module (Floor Pedestal) 14
7. Removing the BNA Bill Validaon Module 15
8. Replacing the Power Supply 16
9. Replacing the Proximity Sensor 19
10. Replacing the NFC Reader 20
11. Replacing the LCD Screen 21
Contents

15301-ML002 REV01 ECN 5789 Page 4
Noces
Note: For any safety-related incident that occurs related to this machine, the eld personnel involved must immediately
follow regular Safety Incident Reporng and contact the following department:
Neo Products Pty Ltd.
62-66 Pacic Drive
Keysborough, VIC 3173
Phone (03) 9701 1511
The System Services Representave (SSR) should check the following:
1. Ensure that the Kiosk is plugged into a properly grounded outlet.
2. Ensure that the ground wires are properly secured at each end and not pinched.
Neo Products believes the informaon provided below is accurate, but except the extent required by law, makes no
commitment, armaon, or cercaon with respect to any of the informaon. Rather, Neo Products provides all such
informaon “AS IS”, without any express or implied warranty of any kind. Neo Products reserves the right to make
improvements and/or changes in the product and/or programme described in this publicaon without advance noce if
Neo Products believes it is appropriate to do so. Changes will be incorporated in new edions of the publicaon and
replaces all previous releases.
Neo Products may use or distribute any of the informaon you supply in any way it believes appropriate without incurring
any obligaon to you.
Any references in this informaon to non-Neo Products Web sites are provided for convenience only and do not in any
manner serve as an endorsement of those Web sites. The materials at those Web sites are not part of the materials for
this product and use of those Web sites is at your own risk.
SAVE THESE INSTRUCTIONS
Read the following informaon before operang the equipment.
Denions of Hazard Levels:
The word DANGER indicates the presence of a hazard that has the potenal of causing death or serious personal injury.
The word CAUTION indicates the presence of a hazard that has the potenal of causing moderate or minor personal
injury.
Chapter 1 - Safety Informaon – READ THIS FIRST

15301-ML002 REV01 ECN 5789 Page 5
Danger Noces
DANGER: To prevent a possible shock from touching two surfaces with dierent protecve ground (earth), use one hand,
when possible, to connect or disconnect signal cables.
DANGER: Overloading a branch circuit is potenally a re hazard and a shock hazard under certain condions. To avoid
these hazards, ensure that your system electrical requirements do not exceed branch circuit protecon requirements.
Refer to the informaon that is provided with your device or the power rang label for electrical specicaons.
DANGER: An electrical outlet that is not correctly wired could place hazardous voltage on the metal parts of the system or
the devices that aach to the system. It is the responsibility of the customer to ensure that the outlet is correctly wired and
grounded to prevent an electrical shock.
DANGER: When working on or around the system, observe the following precauons:
Electrical voltage and current from power, telephone, and communicaon cables are hazardous.
To avoid a shock hazard:
• If Neo Products supplied a power cord, connect power to this unit only with the Neo Products provided power cord.
Do not use the Neo Products provided power cord for any other product.
• Do not open or service any power supply assembly.
• Do not connect or disconnect any cables or perform installaon, maintenance, or reconguraon of this product
during an electrical storm.
• The product might be equipped with mulple power cords. To remove all hazardous voltages, disconnect all power
cords.
• Connect all power cords to a properly wired and grounded electrical outlet. Ensure that the outlet supplies proper
voltage and phase rotaon according to the system rang plate.
• Connect any equipment that will be aached to this product to properly wired outlets.
• When possible, use one hand only to connect or disconnect signal cables.
• Never turn ON any equipment when there is evidence of re, water, or structural damage.
• Sharp edges, corners and joints may be present in and around the system. Use care when handling equipment to
avoid cuts, scrapes and pinching.
• Route all cords away from sharp edges, corners and points, moving parts and heated surfaces, to prevent damage to
the cable insulaon. Never route cables through openings that do not have smooth well-rounded surfaces or with
bushings.
• Protect all cords against physical damage. Never allow objects to be placed on or against the cords, or on surfaces
that contact the cords. Ensure cords are posioned not to be stepped on, tripped over, or subjected to damage or
stress.
• Inspect the power cord thoroughly and periodically. Do not use the Kiosk if the cord is damaged.
• Grasp the plug to remove it from the outlet. Do not unplug by pulling on the cord.
• Never handle equipment by its cord.
• Fully insert the plug into the outlet.
DANGER: The AC main power cord from the Kiosk is the disconnect means from AC mains.
DANGER: The AC mains power cord of the Kiosk is used as the disconnect means of the AC disconnect box. Disconnect this
cord before servicing the AC disconnect box.
DANGER: Hazardous voltage present. Voltages present a shock hazard, which can cause severe injury or death.
DANGER: Heavy equipment – personal injury or equipment damage might result if mishandled. Before liing the unit consult
the manual to determine the weight of the equipment and then perform a risk assessment to determine the most
appropriate method for liing / transporng the equipment.
DANGER: Professional movers are to be used for all relocaon acvies. Serious injury or death may occur if systems are
handled and moved incorrectly.
DANGER: Serious injury or death can occur if loaded li tool falls over or if a heavy load falls o the li tool. Always
completely lower the li tool load plate and properly secure the load on the li tool before moving or using the li tool to li
or move an object.
Chapter 1 - Safety Informaon

15301-ML002 REV01 ECN 5789 Page 6
Cauon Noces
CAUTION: Servicing of this product or unit is to be performed by trained service personnel only.
CAUTION: Energy hazard present. Shorng might result in system outage and possible physical injury. Remove any
jewellery before servicing.
CAUTION: For safety when running the printer test, make sure hair is pulled back and personal arcles such as
es, necklaces, or bracelets do not get caught in the moving print head.
CAUTION: Hazardous moving parts nearby.
CAUTION: Turn o or remove the fan’s connecon to power before aempng to service the fan. Ensure the fan
has stopped moving before servicing.
CAUTION: The socket-outlet must be installed near the equipment and must be easily accessible.
CAUTION: This product is equipped with a 3-wire (two conductors and ground) power cable and plug. Use this
power cable with a properly grounded electrical outlet to avoid electrical shock.
Electronic Emission & Safety Noces
Neo Products cannot accept responsibility for any failure to sasfy the protecon requirements resulng from a non-
recommended modicaon of the product.
Properly shielded and grounded cables and connectors must be used in order to meet emission limits. Neo Products is
not responsible for any radio or television interference caused by using other than recommended cables and
connectors or by unauthorized changes or modicaons to this equipment.
Unauthorized changes or modicaons could void the user’s authority to operate the equipment.
Cable Ferrite Requirement
All cable ferrites are required to suppress radiated EMI emissions and must not be removed.
Electrostac Discharge (ESD)
Aenon: ESD damage can occur when there is a dierence in charge between the part, the product, and the service
person. No damage will occur if the service person and the part being installed are at the same charge level.
ESD Damage Prevenon
Anyme a service acon involves physical contact with logic cards, printed circuit boards (PCBs), modules, back-panel
pins, or other ESD sensive (ESDS) parts, the service person must be connected to an ESD common ground point on the
product through the ESD wrist strap and cord. The ESD ground clip can be aached to any frame ground, ground braid,
green wire ground, or the round ground prong on the AC power plug. Coax or connector outside shells can also be used.
Handling Removed Cards
Logic cards removed from a product should be placed in ESD protecve containers. No other object should be allowed
inside the ESD container with the logic card. Aach tags or reports that must accompany the card to the outside of the
container.

15301-ML002 REV01 ECN 5789 Page 7
2.1 Physical Specicaons and Operang Environment
The Kiosk is designed to be installed in an indoor, temperature controlled environment.
2.1.1 Mechanical
2.1.2 Environmental
Temperature: Storage: 32°F to 122°F
Operang: 32°F to 86°F
Relave Humidity: Storage: 8% to 80% non-condensing
Operang: 20% to 80% non-condensing
2.1.3 Electrical
• Mains Input: Mains Input to 100-240V AC, 50-60Hz, 4A (Maximum)
• A dedicated circuit for each Kiosk is not required.
• A grounded power outlet with IEC cable for connecon to the Kiosk Pedestal is required.
Kiosk
Dimensions 23" (L) x 20" (W) x 32" (H) Bench Mount
27" (L) x 27" (W) x 55" (H) Floor Pedestal
Net Weight 103lbs (Bench Mount) / 176lbs (Floor Pedestal)
Weight (including pallet) 125lbs (Bench Mount) / 198lbs (Floor Pedestal)
Chapter 2 - Product Descripon
2.2 Power connecon / Cable Access
The Kiosk is connected to power using and
earthed IEC cable provided.
Power and Network connecon for the Bench
Mount & Floor Pedestal can be accessed by the
following locaons:
Bench Mount—rear of unit:
Ethernet connecon
Power on/o switch
Bench Mount
Floor Pedestal
Floor Pedestal—rear of unit:
Ethernet connecon
Power on/o switch

15301-ML002 REV01 ECN 5789 Page 8
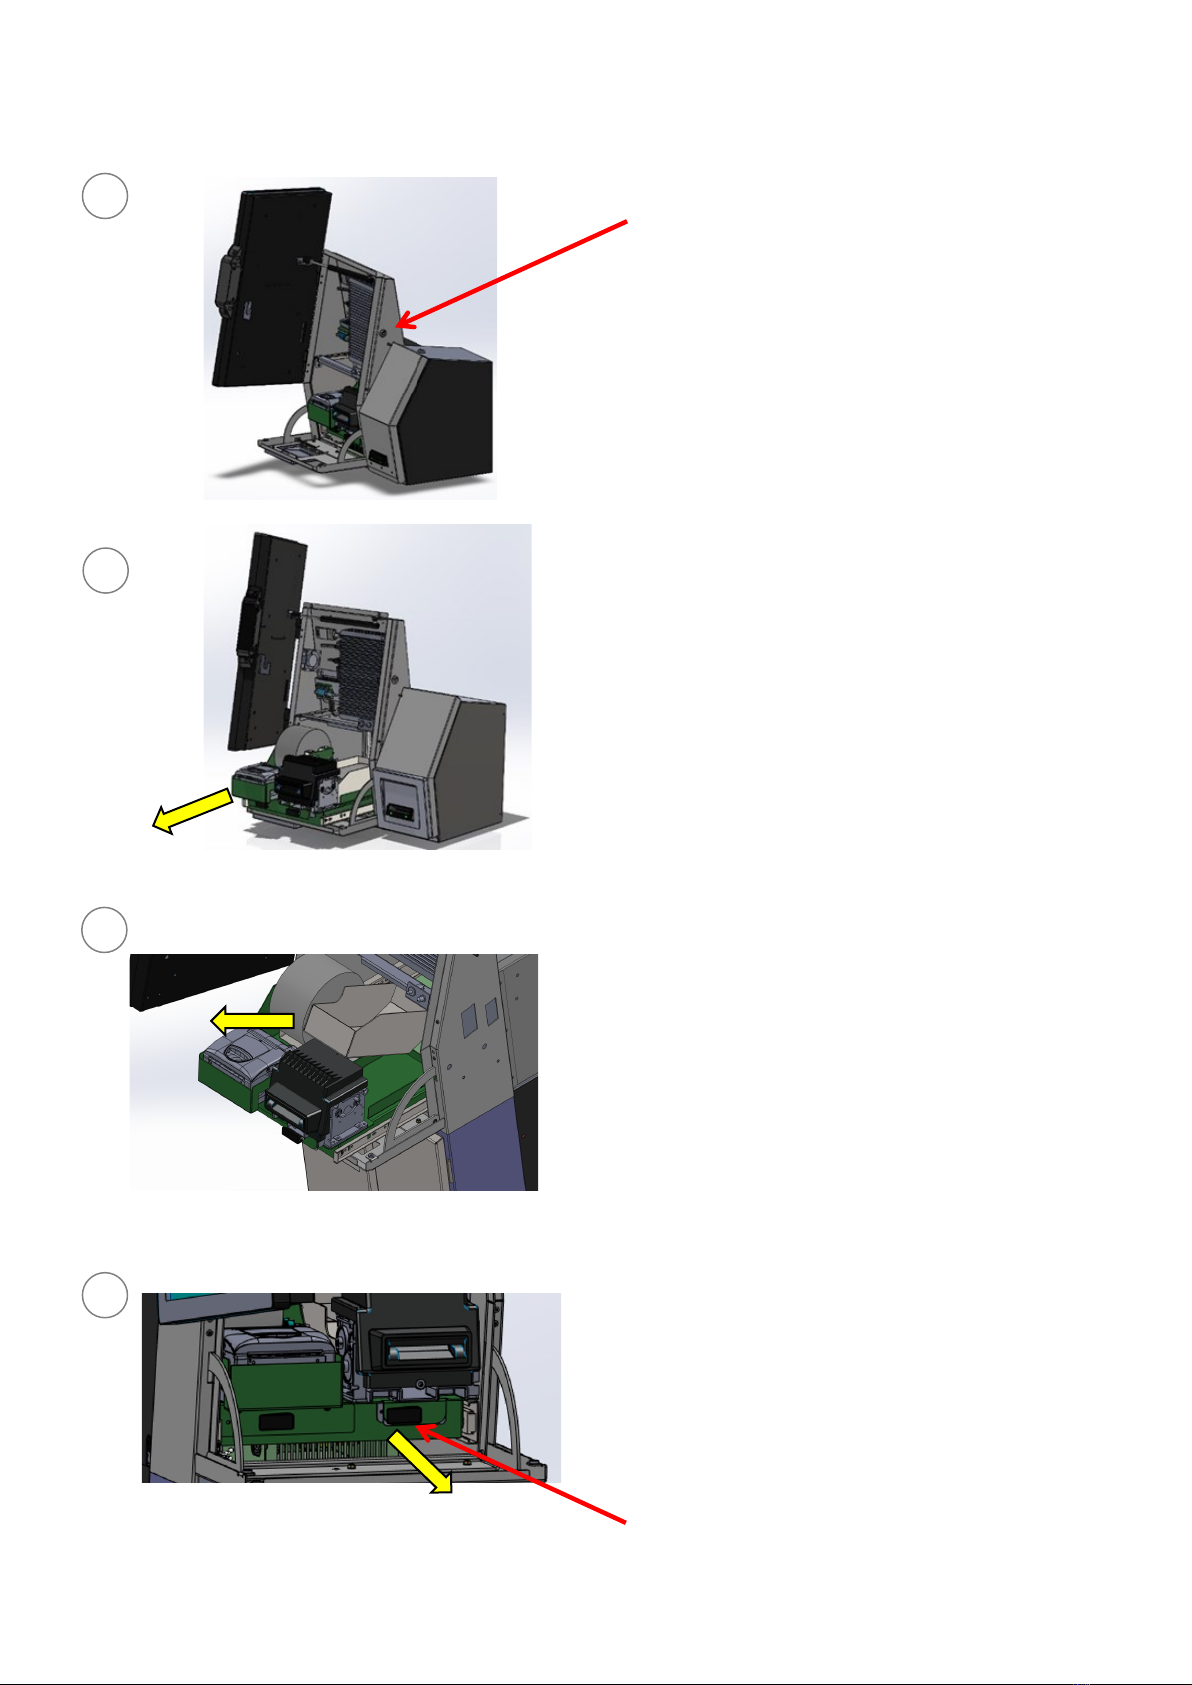
Chapter 3 - Printer Module
STEP 2 Pull out the peripheral tray towards
the operator.
STEP 1 Unlock and open the LCD Screen
Door and Lower Door by unlocking the
Lock at the Right-hand side of the Kiosk
using the key provided.
STEP 3 Remove the paper spindle & paper
roll from the roller supports and un-feed
from the Printer.
STEP 4 Undo the Latch Swell to disengage
the green Printer tray.
CAUTION: Servicing of this product or unit is to be
performed by trained service personnel only.
4
3
2
1
Replacing the Printer Module (Bench Mount & Floor Pedestal)
Latch Swell.

15301-ML002 REV01 ECN 5789 Page 9
CAUTION: Servicing of this product or unit is to be per-
formed by trained service personnel only.
STEP 5 Parally slide out the Printer tray from
the peripheral tray as the Printer loom will
limit complete removal.
The Printer loom can be accessed aer paral
slide—refer to next Step.
5
Chapter 3 - Printer Module
Replacing the Printer Module (Bench Mount & Floor Pedestal)
STEP 6 Unclip the 2x Cable Tie Twist Locks
located at the back of the Printer Tray as
shown.
6
STEP 7 Remove the 1x Power Connector
located at the back of the Printer Tray.
Unclip the 2x Cable Tie Twist Locks located
on the side of the Printer Tray as shown.
Use Side Cuer Pliers to remove the cable
es from the wiring loom back to the USB
port.
Remove the plug (shown) from the USB
Port & loom clips.
The Printer Module can then be removed
from the Kiosk.
To re-install the replacement Printer
Module, follow Steps 1 to 7 in reverse.
7
15301-ML002 REV01 ECN 5789 Page 10
Chapter 4 - MSR
STEP 2 Pull out the peripheral tray towards
the operator.
STEP 1 Unlock and open the LCD Screen
Door and Lower Door by unlocking the
Lock at the Right-hand side of the Kiosk
using the key provided.
STEP 3 Remove the Betslip Tray.
STEP 4 Undo the Latch Swell to disengage
the green MSR Module.
CAUTION: Servicing of this product or unit is to be
performed by trained service personnel only.
4
3
2
1
Replacing the MSR Module (Bench Mount & Floor Pedestal)
Latch Swell.
Table des matières
Autres manuels NEO Affichage numérique


