Necespow N7576 Manuel utilisateur

Learn more about NECESPOW,
please check out https://www.necespow-tech.com/
Power Station N7576
User Manual

CONTENTS
.........................................................
.......................................................
......................................................
.........................................................
.......................................................
English
Deutsch
Français
Italiano
Español
01-13
14-26
27-39
40-52
53-65

EN-01
For further assistance, do not hesitate to contact
Learn more about NECESPOW, please check out
https://www.necespow-tech.com/
This product is intended for emergency situations
and cannot replace AC power in household
appliances or digital products. The actual power
outlet and adapter may vary depending on the
customer's location.
NECESPOW Customer Service
Warm Tips

EN-02
Product Details
Fan Air Inlet Hole
LED Light
USB Power Button
Type-C Input/Output Interface
Type-C Output Interface
QC 3.0 USB Output Interface
AC Power Button
AC Power Output Interface
Fan Air Outlet Hole
LED Display
Main Power Switch
LED Ligh Button
DC Input Interface
DC Power Button
DC Output Interface
Cigarette Lighter Interface
2
11
9
10
11
12
13
14
15
16
1
3
4
5
6
7
8

EN-03
1. This product is versatile and suitable for indoor and outdoor use.
Function Introduction
4. This product has a built-in high-capacity battery, which makes
it suitable for outdoor activities. It is also equipped with a high
brightness LED, which has several modes like adjustable-brightness
lighting, flashing, emergency light and SOS signal.
2. This product has 230V/110V AC inverter function which can
supply power to low-power appliances, such as lights, laptop,
mini fan, mini cooker ect.
3. This product has a DC output interface, cigarette lighter interface,
USB fast charging 3.0 ports and PD charging ports. DC output
function allows it to power digital products such as mobile phones,
GPS units, DVD players and small mobile devices.
Long-Distance Travel Outdoor Camping Wild Exploration
High-Capacity Battery Emergency Light Outdoor Power Supply
Mini Fan Mini Cooker Lamps
Laptop Tablet PC GPS units

EN-04
1. On/Off
Press the main power switch for 2 seconds to turn the product
on and off.
Using Instruction
After switching on, the display will show the current product
power level and the fan will start to self-test for 3 seconds (the
fan icon will illuminate on the display).
Double-click the main power switch to turn off the LED display
(press any button to awaken the LED display). The device still
supplies power even when the LED display is off.
Auto-off function
- There is an auto-off function in 3 minutes, when all keys are off.
- There is an auto-off function in 24 hours, when either function
is in operation.
- To run the device over 24 hours, you can cancel the auto-off
function by pressing the AC and USB buttons simultaneously
for 5 sec (No.3 & 7 in Product Details Page) until “AC” flashes
on the display. Please note that once the auto-off function is
cancelled, the device will continue to run until the power is
exhausted. To restore factory settings, turn off and reboot the
device.
Battery Capacity Display
Main Power Button
Fan Icon
(1)
(2)
(3)
(4)

EN-05
2. LED Light
After the product is switched on, short press the LED light button
(No.12 in Product Details Page) to switch on the light (the bulb
symbol will illuminate on the display).
The brightness is adjustable by long press LED light button.
The brightness adjustment follows a one-way cycle - first long
press to brighten up until it's brightest, second long press to
lower brightness.
Short press the LED light button to change the mode in turn,
adjustable-brightness lighting, flashing, slow flashing, SOS
signal, switch off the light.
LED Light
LED Light Button
Bulb Symbol
(1)
(2)
(3)

EN-06
To use the USB output interface, switch on N7576 first. Then
activate the USB interface by short pressing the USB power
button. The N7576 starts charging for digital products as soon
as they are connected to the N7576 with a USB cable.
To use the DC output interface, switch on N7576 first. Then
activate the USB interface by short pressing the DC power button.
The N7576 starts charging for digital products as soon as they
are connected to the N7576 with a cable.
When the USB / Type-C / DC / Cigarette lighter interface is in
operation, the corresponding icon and the total output power
are shown on the display.
Type-C output
USB-A output
Interface icon
Total DC output
DC power button
DC output
Cigarette lighter interface
USB power button
3. DC Function
The Type-C output interface supports automatic loading. Once
digital products are connected with N7576 via Type-C cable,
N7576 switches on automatically and starts to charge for digital
products. There is no need to switch on the device or press the
USB button in advance.
(1)
(2)
(3)
(4)

EN-07
4. AC Output Function
Switch on the N7576;
Press the AC power button to enter AC mode first;
Plug the power cable of AC appliance into N7576's AC outlet;
When using the AC function, the AC output icon and the real-time
AC output power are shown on the display;
When not using the AC function, short press the AC power button
to switch it off;
When the AC output power is more than 400W or the internal
operating temperature exceeds the set-point, the fan will start
automatically and the fan icon will appear on the display.
Notes: Make sure the power of the connected AC appliance is
less than 700W...
AC output power
AC output power icon
Fan icon
AC power button
AC output socket
(1)
(2)
(3)
(4)
(6)
(5)
EN-08
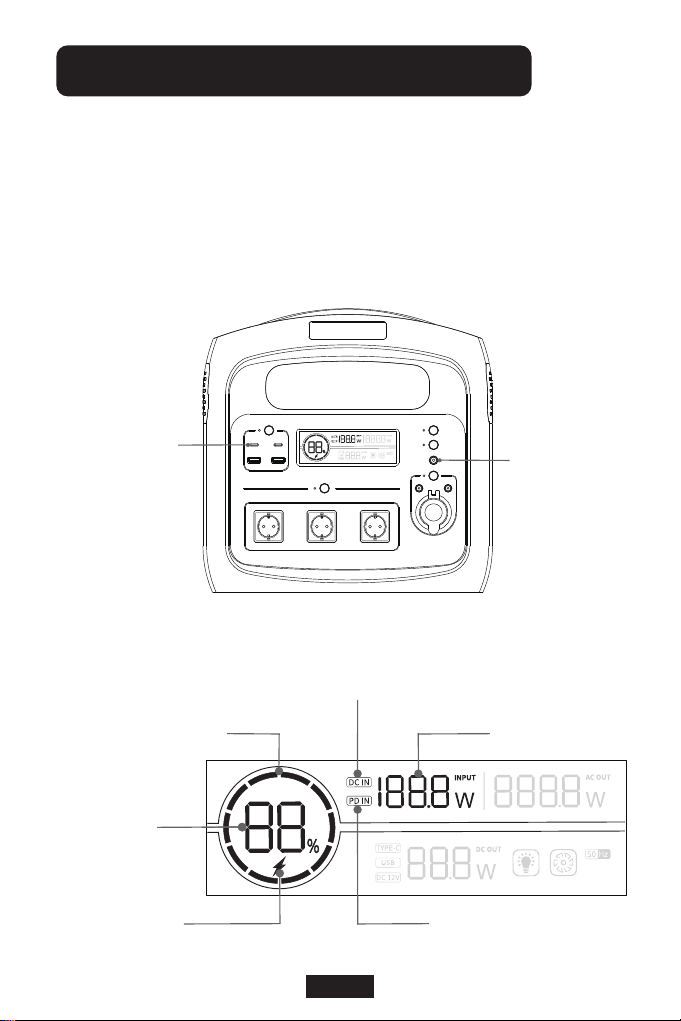
When it is charging through the DC or Type-C interface, the
corresponding icon will be shown in the display. Meanwhile, the
display will show the battery capacity, the flashing battery capacity
pie chart and real-time input power.
Methods of Charging the Device
DC Input Interface
Type-C
Input/Output Interface
DC input symbol
Real-time input power
PD input symbol
Fast charge symbol
Battery capacity
Battery capacity pie chart
Table des matières
Langues :


