Navionics GEONAV 5 Manuel

1
User and Installation Guide
GEONAV 5
•••••••••
••••••••••••••••••••••••••••••••••••••••••••••••••••••••••••••••••••••••••••••
E

3
READTHISWARNINGBEFOREUSINGTHEGEONAV 5
WARNING!
THE ELECTRONIC CHART IS AN AID TO NAVIGATION DESIGNED
TO FACILITATE THE USE OF AUTHORIZED GOVERNMENT
CHARTS, NOT TO REPLACE THEM.
ONLY OFFICIAL GOVERNMENT CHARTS AND NOTICES TO
MARINERS CONTAIN ALL INFORMATION NEEDED FOR THE
SAFETY OF NAVIGATION AND, AS ALWAYS, THE CAPTAIN IS
RESPONSIBLE FOR THEIR PROPER USE.
TheuseoftheGEONAV5impliesknowledgeandacceptanceofthis
warningbytheuser.
4
•••••••••••••••••••••••••••••••••••••••••••••••••••••••••••••••••
Characteristics ••
CHARACTERISTICS
• New compact design
• Self contained GPS Plotter system (Plotter + GPS receiver +
Antenna)
• Built-in world map
• 32 bit RISC processor
• Upgradable software
• Monochrome transflective Liquid Crystal Display (LCD) 5”
with high visibility under sunlight
• Compatible with NAVIONICS Nav-Chart™ cartridges
• Input voltage: from 9.8 to 18 VDC, with reverse polarity and
overvoltage protection
• Splash-proof, specifically designed for open boats
• Low power consumption: 2.5 W
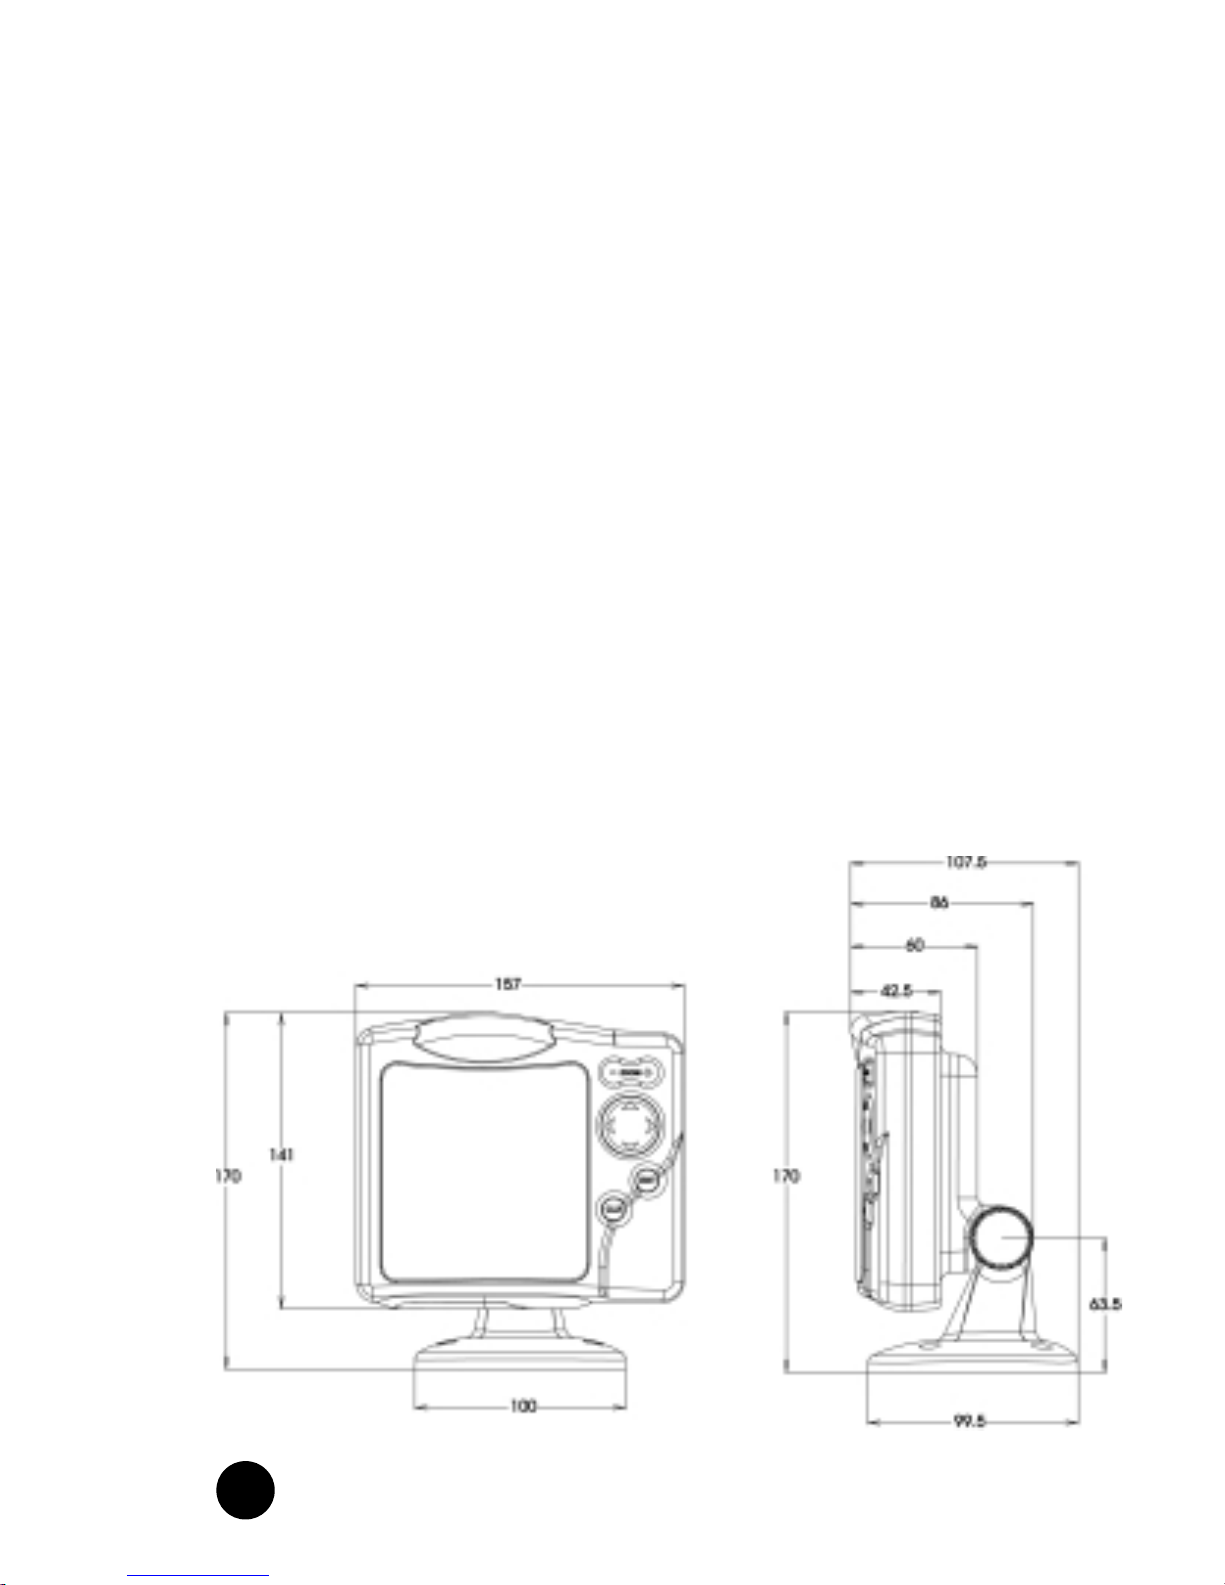
• Weight: approx. 0.7 kg
• Size: 141 x 157 x 42.5 mm

5
•••••••••••••••••••••••••••••••••••••••••••••••••••••••••••••••••••••••••••••••••••••••••••••••••••••••
• Operating temperature: 0 to 60 °C, humidity 93%
• Storage temperature: -20 to 70 °C, humidity 93%
• High sensitivity GPS receiver
• Satellite acquisition time 2 minutes (cold)
15 minutes (first fix)
• GPS position accuracy: 15 m (with S.A. disabled)
• CE standard compliant
• Quick-locking bracket
Accessories
• Mounting bracket for fixed installation on boat
• Rubber gasket and drilling template for panel mounting
• Removable bracket with high strength suction cup for
installation on cars
• Power supply cable and car lighter plug
• User guide
• Carrying case
• Protective cover
Memory
• 1 route
• 5 waypoints

6
•••••••••••••••••••••••••••••••••••••••••••••••••••••••••••••••••••••••
Introduction ••
INTRODUCTION
The GEONAV 5 is a graphic GPS plotter that displays your
boat’s current position with respect to an electronic chart.
The GEONAV 5 can use up to 12 satellites simultaneously.
By using a GEONAV 5 and a NAVIONICS electronic chart you
will never get lost even in bad weather conditions such as fog
or rain because your plotter will always display where you are
and where your are heading to!
The ROUTE function will allow you to plan a trip. NAVIONICS
chart cartridges are available for all busy boating areas
around the world and can be used in addition to your official
paper charts. NAVIONICS chart cartridges are available from
NAVIONICS authorized dealers and outlets around the world.
See your local marine electronics dealer for more information.
The GEONAV 5 unit is equipped with accessories for
installation in your boat and car.
The GEONAV 5 can be used also for land applications: the
GPS receiver and the new NAVIONICS land charts will allow
displaying easily your position with respect to the most
popular roads and city names. The installation of the
GEONAV 5 in your car takes only a few seconds: just position
the plotter on the dashboard with the proper bracket and fix
the suction cup to the front window, then connect the power
cable to the lighter. Enjoy your trip!

7
•••••••••••••••••••••••••••••••••••••••••••••••••••••••••••••••••••••••••••••••••••••••••••••••••••••••
Should any new function be available in the future, the
software of your GEONAV 5 can be updated in a very short
time. See your local marine electronics dealer for more
information.

8
••••••••••••••••••••••••••••••••••••••••••••••
Installation and Precautions
INSTALLATION AND PRECAUTIONS
When installed on a boat, in order to avoid electromagnetic
interference, the GEONAV unit must be positioned at least
0.35 m away from a magnetic compass or a flux-gate sensor,
such as those used on autopilots and remote electronic
compasses.
The GEONAV is water resistant, but not waterproof. It is
essential that the rubber cover on the lower side of the unit is
firmly inserted in the cartridge slot; the rubber cover should
be removed only when the Nav-Chart™ has to be inserted or
replaced and, in this case, the unit must be perfectly dry. To
avoid continuous exposure to water, a protective cover is
supplied with the GEONAV: the cover should always be used
when the unit is turned off, in order to protect the unit from
direct sunlight and water.
For best satellites reception, mount your unit outside in an
open area to allow the best sky visibility to the built-in
antenna located on the upper side of the instrument. If the
instrument is installed so as to permit full horizon visibility,
the best performance will be ensured.
Panelmounting
A drilling template is supplied with the plotter to properly
locate holes and areas that have to be cut out of the
instrument panel.
A neoprene adhesive gasket is supplied with the unit and
must be applied to the rear of the plotter to avoid moisture
penetration and to reduce vibrations.
Mounting screws must be 4 mm in diameter and maximum 5
mm in length, plus the thickness of the instrument panel.

9
••••••••••••••••••••••••••••••••••••••••••••••••••••••••••••••••••••••••••••••••••••••••••••••
We advise you against tightening the screws too much, in
order not to break the screw seats.
Fixedinstallation
The plotter may be mounted on any surface using the
mounting bracket provided with the unit (see figure below).
Use the 4 flat-head screws (5mm in diameter) to fix the
bracket on to the desired mounting surface. The bracket does
not allow any left or right rotation, therefore make sure that
the unit is properly installed for the best viewing angle.
If you wish to connect the power cable directly to the boat’s
battery, cut the car lighter adapter off; we recommend that
you install a 1A fuse between the power source and the plotter
to protect the instruments against overvoltage and/or
overcurrent.
Since the unit has no start pushbutton, make sure that the
unit is supplied by a line controlled from the switchboard or
separate switch. If you make use of the car lighter plug,
remember to unplug the adapter after use so as to switch the
unit off.

10
••••••••••••••••••••••••••••••••••••••••
Installation and Precautions
Car installation
To allow an easy installation on your
car, the GEONAV is supplied with an
additional bracket that ends with a
suction cup. When the unit is installed,
make sure that your car front window
has enough space to allow proper road
visibility.
Installation procedure is the following:
1. Locate a flat surface on the window
that allows you to position the
bracket base on the dashboard as
well as allows the internal GPS to
have the best sky visibility (the GPS needs to track
satellites, hence needs to be able to see the sky).
2.Clean the entire front window area you wish to use for unit
installation. Use a good window cleaner and paper towels
and dry the area completely.
3.Verify that the GEONAV does not interfere with levers,
airbags and other car facilities.
4.Push the lever back on the suction cup.
5.Place the suction cup firmly on the clean, flat glass surface
and push the lever forward to adhere to the glass.
6.Make sure that the unit is firmly secured and correctly
positioned and that it will not fall off the window. This step
is very important to ensure safe operation while driving.
Test the connection between the unit and the window
several times after installation and during use.
7.Place the mounting bracket on top of the dashboard and
orientate the plotter to the best position for the internal
GPS antenna.
8. Plug the power cord into the lighter adapter.
11
••••••••••••••••••••••••••••••••••••••••••••••••••••••••••
Connections
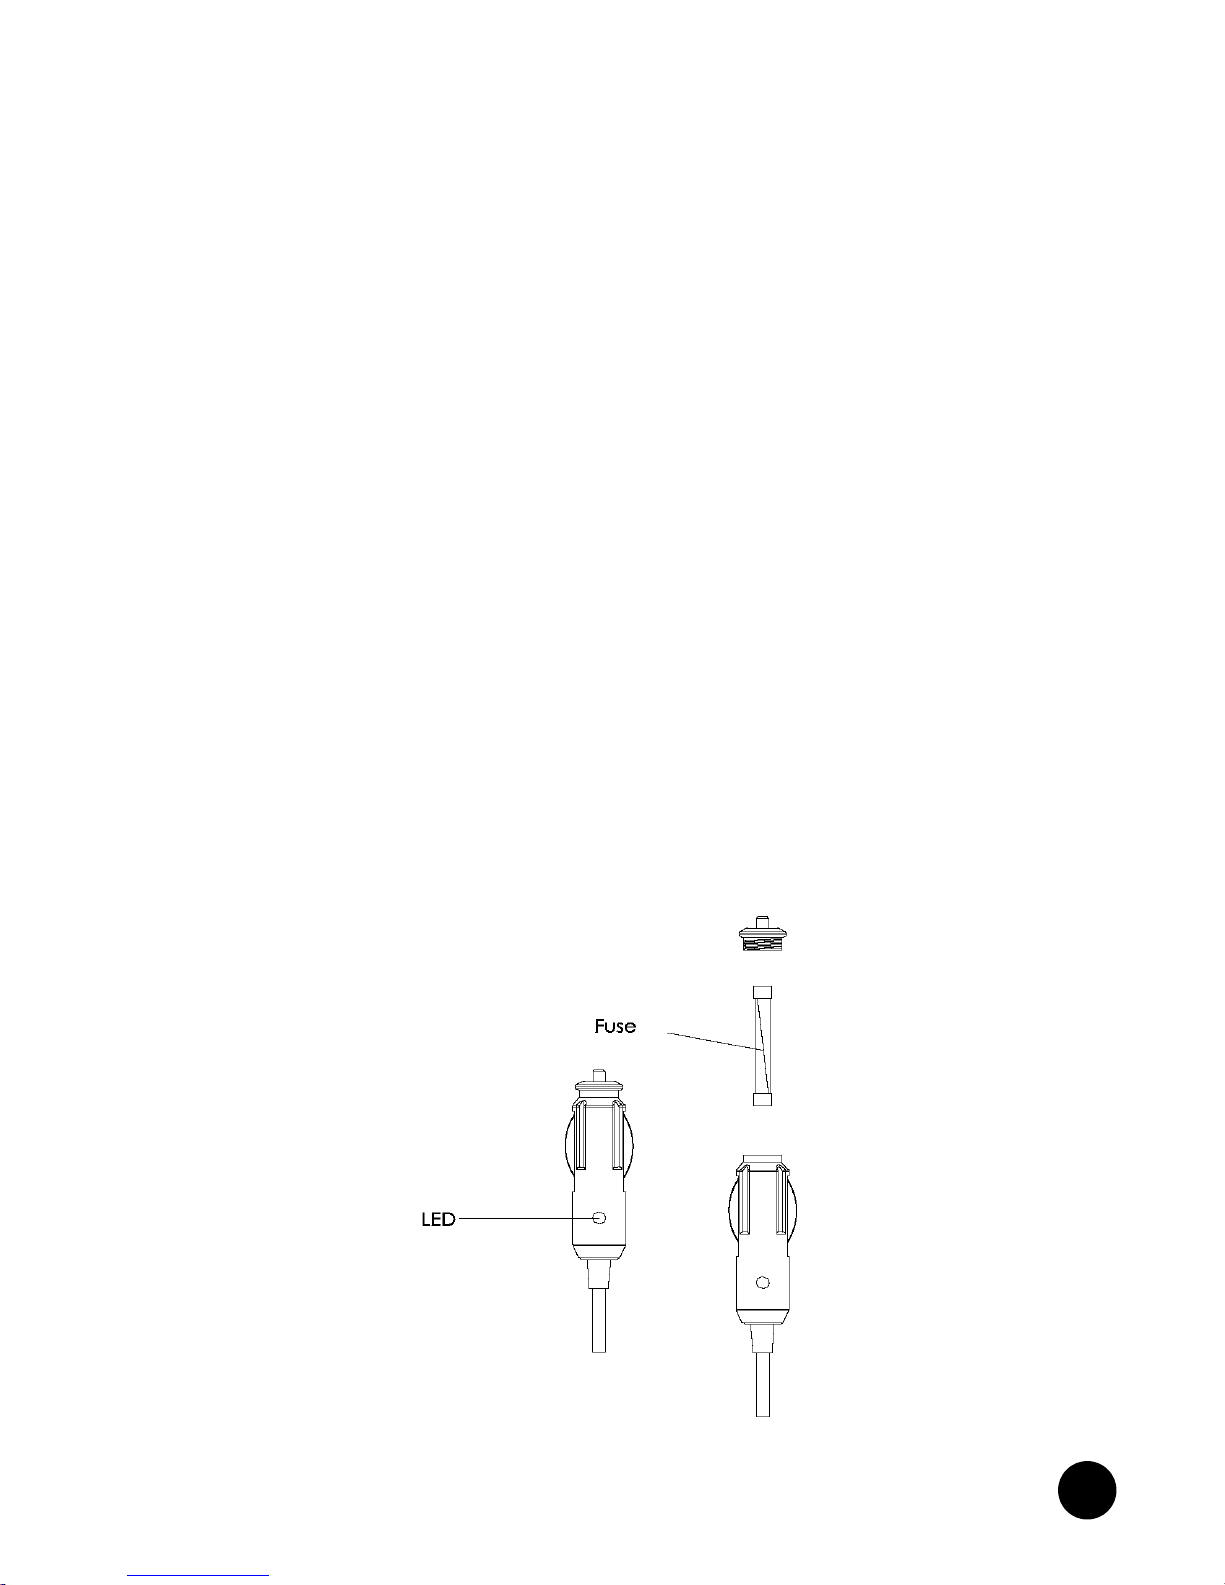
CONNECTIONS
The figure shows colors and polarity of the car lighter adapter.
The adapter has a little lamp (LED) that turns on if the car is
correctly providing the bracket with power.
If the lamp is off:
• verify that 12V voltage is available from the lighter plug;
• verify that the adapter internal fuse works; open the adapter
and check the fuse.
If the fuse is broken, replace it with a fuse with the same
electrical features. DO NOT USE ANY BY-PASS CIRCUIT.
The fuse guarantees that the special protection circuit inside
the plotter works properly under accidental short circuits,
polarity inversion and overvoltage.
If you have to remove the lighter adapter, the internal
connections are the following:
red (or white) + (+ 12V)
black - (ground)
Table des matières
Autres manuels Navionics GPS


