mydome UK113 Mode d'emploi

Light switch timer
3 step Installation overview
3 minute quick programming guide
A police accredited product

Important information
Thank you for Purchasing the Light Switch Timer –Please
read the instructions to learn how to install and use your
new timer.
Whilst you will not be accessing or touching any wiring it
is advisable as a precaution to turn off the mains
electricity during installation of the cradle.
The Unit only works on standard type light switches.
It CAN NOT be used on Flat panel switches, Flush mount
switches or dimmer switches.
This unit operates using two fresh, high-quality AA
alkaline batteries
Batteries must be installed for unit to operate.
Use of rechargeable batteries means the low power
indicator may come on immediately.
Contents
Light switch timer unit, cradle, 3 control Wheels, 2 “n”
shaped plastic insert (in bag)

Contents
Installation 4
Setting the time 5
Programming the unit 6
FAQ –Trouble shooting 7
Timer features 9

STEP 1 –Installing the cradle
Turn off the power to the lights at the mains
1 - Using a screw driver, loosen both screws on the
switch plate - Eight to Ten turns of the screw is usually
enough to install the cradle. The screw does not need
to be fully removed.
2 - Slide the cradle between the wall and the switch
3 - Re-tighten the screws –taking care not to over
tighten the screw.
Turn the mains power back on.
Step 2 –install batteries
Insert two (2) high quality AA batteries into the battery
compartment in the rear of the unit as per the polarity
symbols (+ and -) indicated.
The LCD will flash AM 12:00, Mon (Monday), and OFF
STEP 3 –Setting time & Day
Press enter (temperature gauge will disappear)

Press day/ hour / min buttons until correct day &
time is displayed.
Press enter (temperature gauge will reappear)
PS –Be sure to pay attention to the AM /PM indicator.
Step 4 –Programming the unit
Press prog button
Set ON time –by pressing the day/hour/min
press enter
Set OFF time –by pressing the day/hour/min
press enter
Press prog to complete
Ensure the selected days for the ‘Off’programme match the
days for the ‘On’programme otherwise the lights may stay on
for multiple days.
* The timer has the following, convenient different day modes:
Individual day; Week days, Weekends; Every day.
To select multiple days continue pressing the day button. The
user can select groups of days so a single program can turn

lights on every day at the same time.
*the user can repeat for as many programs as they need.
There are 9 possible on/off programmes
Once set the timer will continue to operate and repeat the
program each week
Step 5 –Installing the unit
Slot the unit into the cradle
Press the On and Off buttons to test on /off operation
Aligning the control wheels
The user can then choose how many lights they wish to
control by aligning the wheels provided in the
corresponding slots on the rear of the light switch timer.
The numbers represent positionsof 1,2 & 3 gang switches.
The wheels will click into place - Ensure the wheel fully
clicks into place on both sides.
To Remove Wheels
Users can remove wheels by placing their finger behind
the wheel with the slider in the upper position and pulling
those outwards with their finger behind the wheel.

FAQ & troubleshooting
Why does the light switch timer not turn lights on and off? (‘n’
shaped inserts required)
The gap between the switch and the control wheels is too
large. In order to reduce this gap please use the clear ‘n
shaped’ inserts. This will allow the wheels to contact & roll
over the complete face of your switch.
Day and time
Programme number
‘ON’ time
AM/PM indicator
Auto / manual
indicator
Room temperature
Low Battery Indicator

Remove the cradle by loosening the screws on the switch by a
few turns
• Insert the “n” shaped insert into
the recess of the cradle as shown.
• Re install the cradle.
• Re-tighten the screws and insert
the unit
Note the Inserts sit between the wall and the switch plate –
moving the switch forwards allowing the wheel to make
contact.
Why does the light switch timer do the opposite desired action
(turns lights on when they should be off and off when they
should go on)?
To turn lights on a switch is pressed ‘down’
To turn lights off a switch is pressed ‘up’
If this is not the case on your current set up, then your switch

plate may have been installed upside down. You will need to
rotate your switch 180 degrees. Upon doing so your light
switch timer will function as intended.
How do I reset the timer?
To reset the timer and erase all pre-set programmes, use a
pointed object, such as a straightened paper clip, to gently
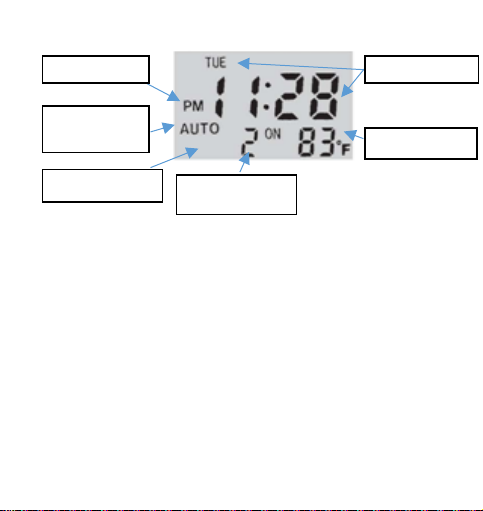
press the rest button. The display clears. The LCD will show AM
12:00, MON (Monday), OFF and current room temperature.
NOTE: After resetting you will need to reset the current time
and day.
Why is the light switch timer showing an Error message?
When "Err" (error) displays on the LCD,
Check and remove any obstacles that may be stopping the
back plate from moving.
Remove the batteries from the unit
Wait one minute before reinserting the batteries.
The clock should now show 12:00 and the timer should now
operate as expected. In the unlikely event that you the Error
message reappears your unit may have developed a fault and
will need to be returned to the retailer.

Will the light switch timer work on a 2 way circuit switch plate?
When using the timer on a 2 way circuit it is important to note
the on /off position of the switch will change and as a result
the unit may not operate as expected.
Ensure the switches are in the correct orientation when using
on a two way switch.
To turn lights on a switch is pressed ‘down’
To turn lights off a switch is pressed ‘up’
Table des matières


