My Child Twizzle Manuel utilisateur
Twizzle
Activity Centre
V5
This product conforms to BS EN 1273:2005
Suitable for children who can sit up unaided, approximately
from 4 months. It is not intended for children who can walk by
themselves and weigh more than 11kg/25lbs.
INSTRUCTIONS: Read the instructions carefully before use and
keep them for future reference. The child may be hurt if you
do not follow these instructions.

page 1
Safety instructions
Warning: Adult assembly required.
Warning: Use the activity centre only if your child meets all of the following conditions:
• Your child is at least 4 months old.
• Your child can sit up unaided.
• Your child is less than 76.2cm (30 inch) tall.
• Your child weighs less than 11kg (25lbs).
Warning: Do not use the activity centre in dangerous conditions or situations.
Warning: NEVER leave the child unattended in the activity centre. ALWAYS keep child in
view while child is in the product.
Warning: NEVER move the activity centre while the child is in the seat.
Warning: It can be dangerous to allow other children to play near the activity centre.
Warning: Strings can cause strangulation! DO NOT place items with string around child’s
neck, such as hood strings or dummy cords. DO NOT suspend string over the product or
attach strings to toys or place near curtain blinds cords or other hanging cords. Do not
add any strings or straps to any part of the activity centre.
Warning: DO NOT use any parts other than those supplied or recommended by the
manufacturer.
Warning: Only use with the jump footplate attached.
Warning: DO NOT place the activity centre on an elevated surface e.g. an elevated
surface or near steps or stairs. A child’s movement can slide the activity centre.
Warning: To avoid the activity centre toppling over, place it on a at, level oor. Adjust
legs to same height so that the tray is level before placing child in the product.
Warning: For INDOOR use only.
Warning: Do not use the product if any of the toys, seat or structural parts are damaged.
Remove the child immediately if you nd any small loose parts or sharp/broken parts.
Important: Care should be taken in unpacking and assembly.
Important: Examine product frequently for damaged, missing, or loose parts.
Battery warnings
– batteries should always be changed by an adult;
– follow the assembly instructions carefully and always take care to insert your batteries
correctly, observing the plus and minus marks on the battery and appliance;
– non-rechargeable batteries are not to be recharged [never attempt to re-charge
ordinary (non-rechargeable) batteries];
– rechargeable batteries are only to be charged under adult supervision;
– rechargeable batteries are to be removed from the toy before being charged;
– different types of batteries or new and used batteries are not to be mixed;
– batteries are to be inserted with the correct polarity;
– exhausted batteries are to be removed from the toy;
– the supply terminals are not to be short-circuited;
– keep batteries out of reach of children;
– always remove batteries if you are not going to use the product for long periods (as
batteries may leak and cause damage);
– exhausted batteries should be removed from the product and disposed of in
accordance with the makers recommendations;
– never dispose of batteries in a re as this may cause them to explode;
– children can choke on batteries. If swallowed seek medical advise immediately.

page 2
Welcome
Battery disposal
Exhausted batteries should be removed from the product and taken to
a recycling facility. You can place batteries marked alkaline in normal
household waste, but these are better taken to a recycling facility.
Please follow these symbols on batteries, which contain harmful substances:
Pb = Battery contains Lead
Cd = Battery contains Cadmium
Hg = Battery contains Mercury
Batteries should not be considered
regular waste. Empty batteries
should be returned to a recycling
facility
Cd HgPb
Thank you for purchasing the MyChild Twizzle Activity Centre.
Please read the instructions and warnings carefully before use to ensure safe and
satisfactory operation of this product.
Your child’s safety is your responsibility. If you have a query with this product or require
replacement parts, please contact the MyChild Helpline on 0161 335 2508.
Lay out the parts on a soft level surface and compare to the part/xings checklist
below. Do not discard any packaging until you are sure that you have all the parts.
WARNING! Assembly by an adult. Keep away from children until fully assembled. Keep
children clear during assembly as pack contains small parts which may present a
choking hazard.
Your 3 year warranty
Whilst we make and test our products to the highest standards of durability there’s
always a small chance of a hiccup! Our promise is to repair, replace or refund a
MyChild product that has an identied manufacturing defect from the date of
purchase for a full 3 years thereafter at no extra cost.
However, you must register within 28 days of the date of purchase to receive the full 3
years guarantee!
To receive your full guarantee you can register your product by:
visiting www.mychild.co.uk/warranty.html and complete the warranty form,
or by telephone on 0161 335 2508.

page 3
Parts checklist
Contained in your carton are:
NoPart Qty
1 Legs 3
2 Seat fabric 1
3 Screws 3
4 Cover plates 3
5 Toy bar 1
6 Toy horse 1
7Toy ower 1
8 Toy monkey 1
9 Toy rings 2
10 Toy bar housing 2
11 Musical toy 1
12 Seat unit * 1
13 Footplate 1
14 Seat tray 1
15 Base 1
* Comes attached to seat tray (14)
You will require one Phillips screwdriver
(not supplied).
1
3 5
9 10 11
12
13 14 15
6 7 8
4
2

page 4
Base assembly
1. Insert the footplate (A) into base (B),
ensuring you line up the arrows on the
footplate with the ‘Insert’ arrow on the
base.
2. Press down on the footplate and
rotate it to the right, till the arrows on the
footplate line up with the ‘Lock’ arrows
on the base. The base is now locked into
position.
3. Jump setting: The jump setting (once
fully assembled) allows your child to
bounce on the footplate. To prevent your
child from bouncing on the footplate turn
it till the arrows point to ‘Lock’ again.
NOTE: DO NOT let your child use the
footplate on the ‘Insert‘ setting.
A
B
page 5
Legs assembly
1. Attach legs at points (1), (2) and (3) on
the underside of the seat tray.
2. Working on one leg at a time.
(A) Insert a leg.
(B) Place a cover plate on.
(C) Secure with a screw. Be careful not to
overtighten the screw.
Repeat for remaining legs.
12
3
A
B
C

page 6
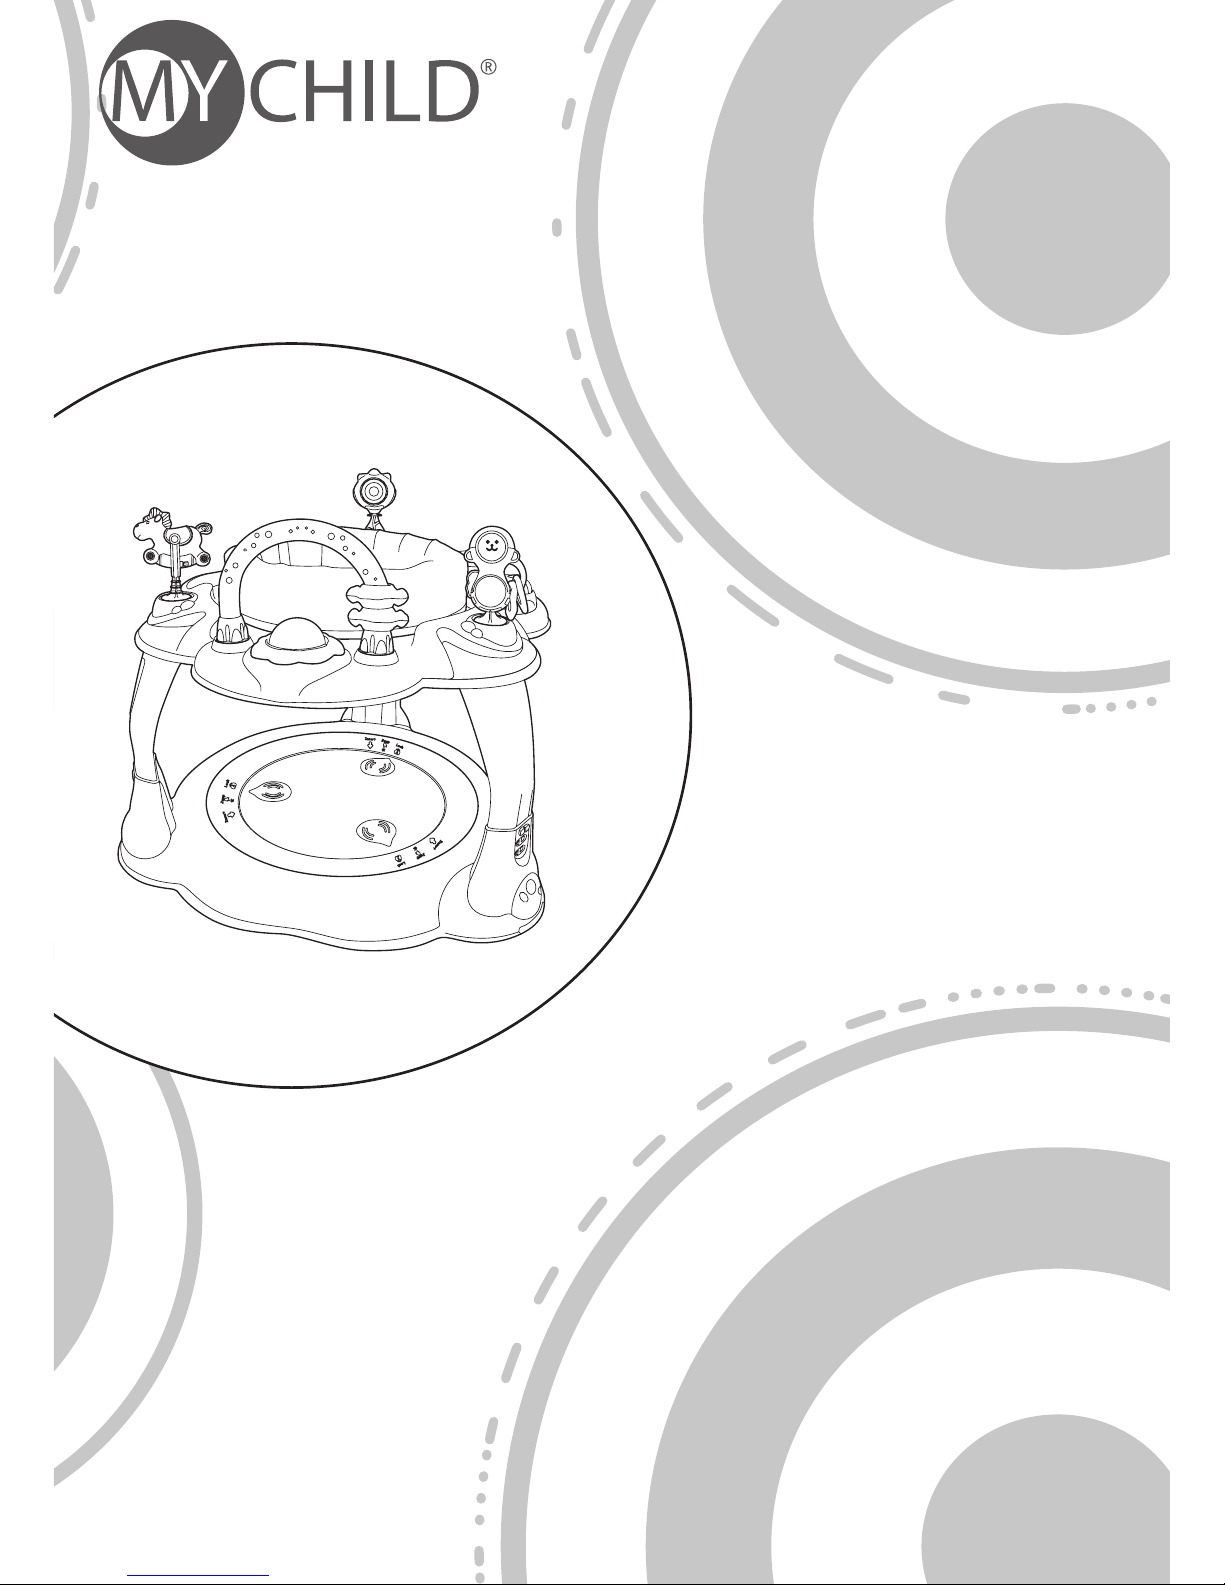
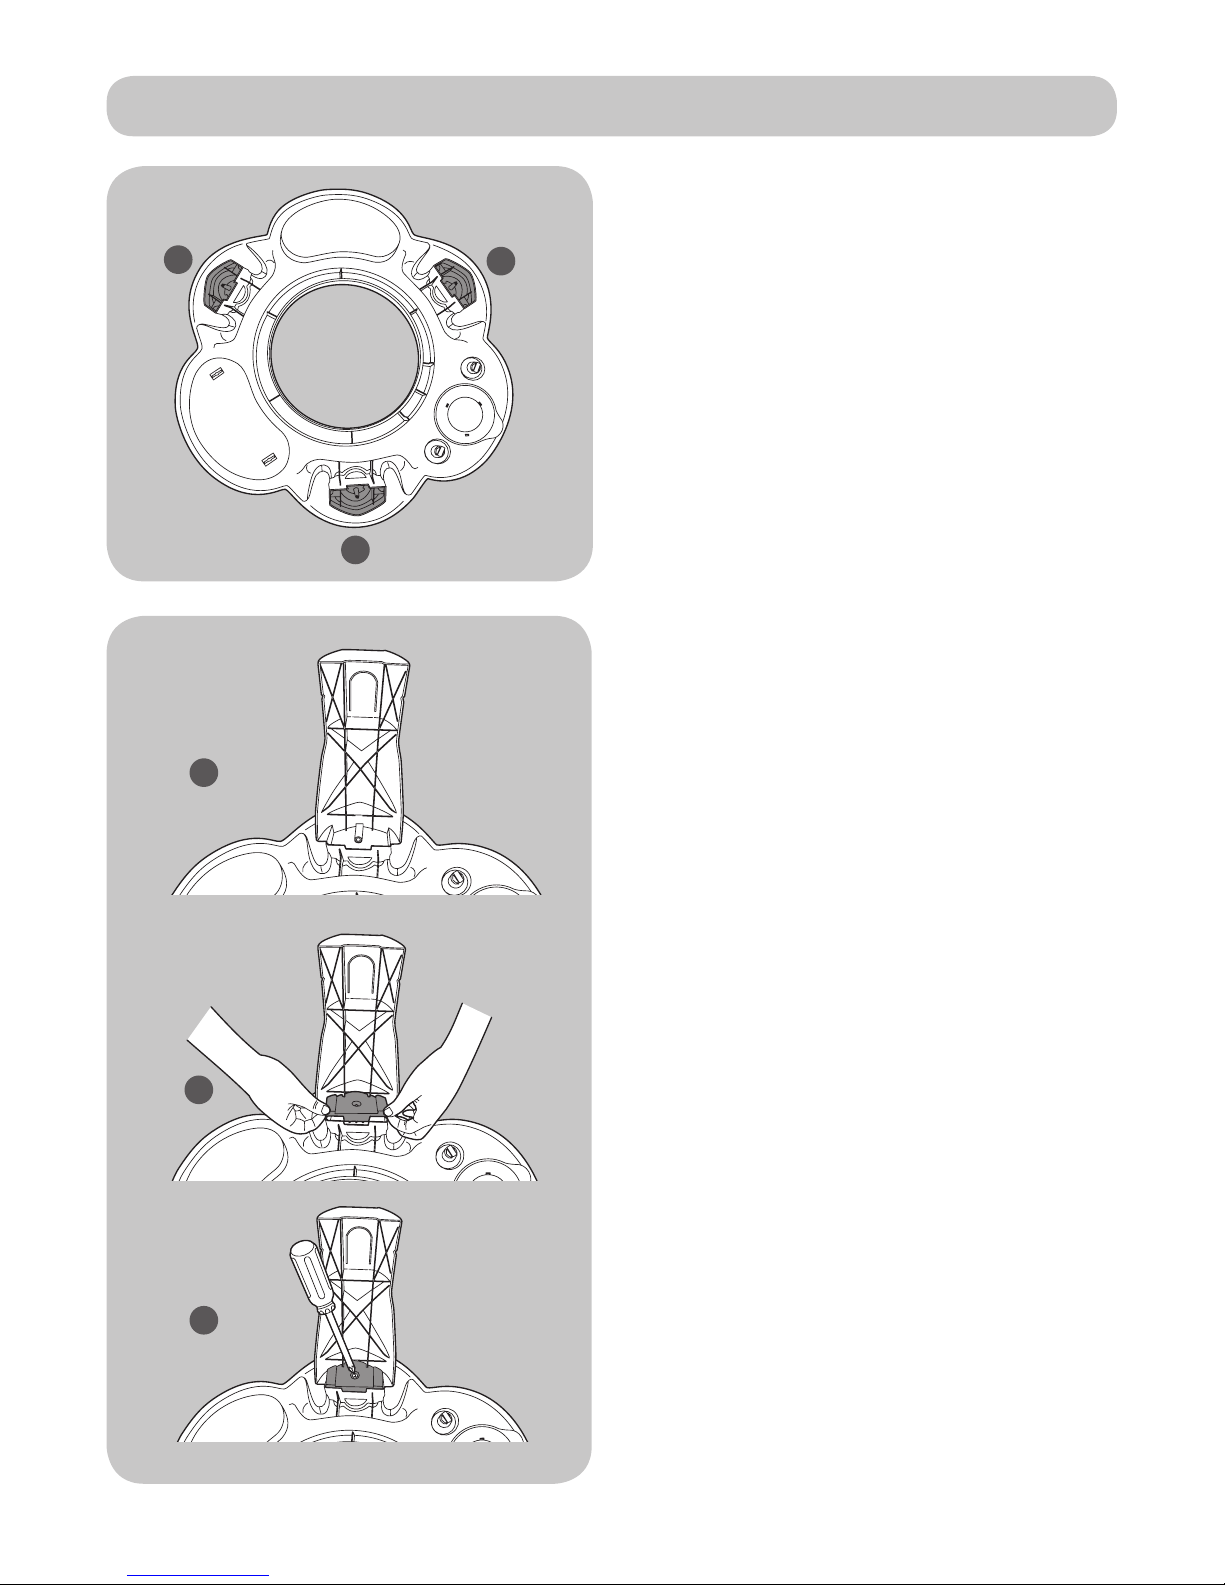
Seat tray and base assembly
Musical toy assembly
1. Line up all the legs (A) with the xing
points on the base.
Press in the button (B) on each leg and
push the leg into the xing point on the
base until they ‘click’ into place (C).
Repeat on remaining legs. Ensure all legs
are at the same height.
1. Using a Phillips screwdriver remove
screw (A) from battery compartment on
the underside of the musical toy.
Using the edge of a coin (B), open the
battery compartment (C).
WARNING: Assembly by an adult.
A
A
B
C
A
click

page 7
Musical toy assembly (continued)
3. Insert the musical toy (D) into the recess
on the seat tray.
Note: the toy should be placed into the
recess with the two white plastic tabs (E).
4. With the musical toy seated in the
recess, locate the white plastic tabs on
the underside of the seat tray.
Push the two plastic tabs up and rotate
clockwise to lock the musical toy in
place.
2. Insert 2 x 1.5V AA batteries (not
supplied) ensuring the correct battery
orientation is observed and then reattach
the cover, replacing the screw and
ensuring it is not over tightened.
ATTENTION: Refer to ‘Battery warnings’ on
page 1.
D
E

page 8
Toys and toy bar assembly
1. To assemble the toy bar:
(A) Thread the two toy rings onto the toy bar.
(B) Place a toy bar housing on each end of
the toy bar.
(C) Rotate toy bar housings to the right to
tighten.
2. Align the toys and toy bar with the
mounting points on the seat tray and ‘click’
them into place. Pull the toy bar and 3 toys
to check they are rmly attached.
NOTE: The toys are not designed to be
removed once attached.
WARNING: Never attempt to lift or move the
activity centre by holding onto the toys.
A B
C
click
click
click
click
click

page 9
Seat unit assembly
2. Place the seat fabric into the seat unit.
3. Fold the seat fabric over the seat unit. 4. Hook the 8 webbing strips on the
underside of the seat fabric over the tabs
(B) on the seat unit.
B
1. Remove the seat unit from the seat tray
by pressing the clips (A) on the underside
of the seat unit whilst lifting and rotating
the seat unit.
A
Table des matières


