Mustek 2400 M Manuel utilisateur

Scanner
USER GUIDE
Appendices
The TWAIN Dialog Box

2
Copyright Information
All rights reserved. No part of this publication may be reproduced,
transmitted, stored in a retrieval system, or translated into any lan-
guage in any form by any means, mechanical, optical, electronic, re-
cording, or otherwise, without our written permission.
We reserve the right to revise this manual and to make changes to any
or all parts at any time, without obligation to notify any person or en-
tity of such revisions and changes.
All other brand or product names mentioned in this manual are trade-
marks or registered trademarks of their respective owners.
FCC Statement
This digital equipment has been tested and found to comply with the
limits for a Class B digital device, pursuant to Part 15 of the FCC
Rules. These limits are designed to provide reasonable protection against
harmful interference when the equipment is operated in a residential
installation. This equipment generates, uses, and can radiate radio fre-
quency energy and if it is not installed and used according to the in-
struction manual, it may cause harmful interference to radio communi-
cations. However, there is no guarantee that interference will not occur
in a particular installation. If this equipment causes harmful interfer-
ence to radio or television reception, which can be determined by turn-
ing the equipment off or on, you are encouraged to try to correct the
interference by one or more of the following measures:
• Reorient the receiving antenna
• Increase the distance between the equipment and the receiver
• Connect the equipment into an outlet on a circuit different from that
to which the receiver is connected
• Consult the dealer or an experienced radio/TV technician for help
NOTE:
1. The changes or modifications not expressly approved by the party
responsible for compliance could void the user’s authority to operate
the equipment.
2. Shielded interface cables and AC power cord, if any, must be used
in order to comply with the emission limits.

3
The TWAIN Dialog Box ............................................. 4
To Acquire the TWAIN Dialog Box ...................... 5
Performing a Simple Scan ...................................... 6
(1) Place the Document/Image ......................... 6
(2) Preview the Image ....................................... 6
(3) Select the Scan Size .................................... 7
(4) Set the Scan Mode ..................................... 7
(5) Set the Resolution ...................................... 7
(6) Execute the Scan ......................................... 7
The TWAIN Dialog Box (Details)..............................8
The Preview Window and Buttons ........................ 9
The Image Setting Buttons.................................. 10
Scan Settings ....................................................... 11
The Main Tab ................................................ 11
The Enhance Tab ........................................... 14
The Filters Tab ............................................... 18
About Tab ..................................................... 19
Using Batch Scan ................................................ 20
Batch Scan Controls ...................................... 20
To Perform a Batch Scan ................................ 21
Appendices
A: Scanning Tips................................................. 22
B: Troubleshooting ............................................. 23
Table of Contents

4
The TWAIN Dialog Box
The TWAIN dialog box is a scanning option provided
with your scanner. TWAIN is an industry standard that
allows scanning directly into any TWAIN-compliant
software. It eliminates most compatibility problems
associated with software and input devices supplied by
different vendors.
You can access the TWAIN dialog box from within most
image editing software such as the application software
bundled with the scanner (e.g., PhotoShop®).

5
To Acquire the TWAIN Dialog Box
You can acquire the TWAIN dialog box from within any
TWAIN-compliant software (i.e., Photo Express™). To
acquire the TWAIN dialog box, using Photo Express™ as an
example, the steps are:
1. Launch Windows®.
2. Launch Photo Express™ (TWAIN-compliant program).
3. Under the File menu, open the Acquire command and
choose Scanner. The Select Data Source dialog box
appears.
4. Choose your scanner model from the list.
5. Click the Acquire button. The Select Data Source dialog
box closes. The TWAIN Dialog box appears.
To acquire the TWAIN dialog box in other TWAIN-
compliant image editing software, please refer to the On-
line Help System, Software Reference.
6
Performing a Simple Scan
You’re using this scanner for the first time. We suggest you
to test drive it by scanning the whole area. To scan the whole
area, please take the following steps:
(1) Place the image or document to be scanned.
(2) Click Preview to see the image in the Preview Window.
(3) Select the scan size.
(4) Select the desired scan mode.
(5) Select the desired resolution.
(6) Click the Scan button.
(1) Place the Document/Image
To scan a document, place your original face down on the
scanner’s glass plate and then please follow these steps:
a. Lift the document cover.
b. Place the document face down on the glass.
c. Slowly lower the document cover, making sure the
document remains in place.
NOTE: Remove the document after scanning is complete
(2) Preview the Image
A Preview is a quick scan of the original. From this
rough scan you can learn how the image will look like
after it is scanned.

7
(6) Execute the Scan
The scan button is used once you have
completed the preview, determined the
scan regio and selected the final scan
settings to be used for the scan.
Congratulations! You’ve scanned your first image. In
the following sections. We’ll show you how to modify
settings so this scanner meets your needs better.
(3) Select the Scan Size
From the list of available paper sizes, select the size of
the document you wish to scan. If you want to scan the
whole area, select A4. Custom will automatically be
selected when you use the Crop Frame to change the
image area to be scanned.
(4) Set the Scan Mode
The Scan Mode determines how the
scanner will view the image. Select
Color to capture images in color. Select
Gray to capture images in shades of
gray. When you wish to scan line art or
text for OCR (Optical Character
Recognition), select Line Art.
(5) Set the Resolution
The Resolution, which is measured in dots per inch (dpi),
determines the effect of the image as it is displayed or
printed. Images scanned at a high resolution capture more
information. However, high-resolution images require
more memory.
See Scan Tips on Appendix A.
8
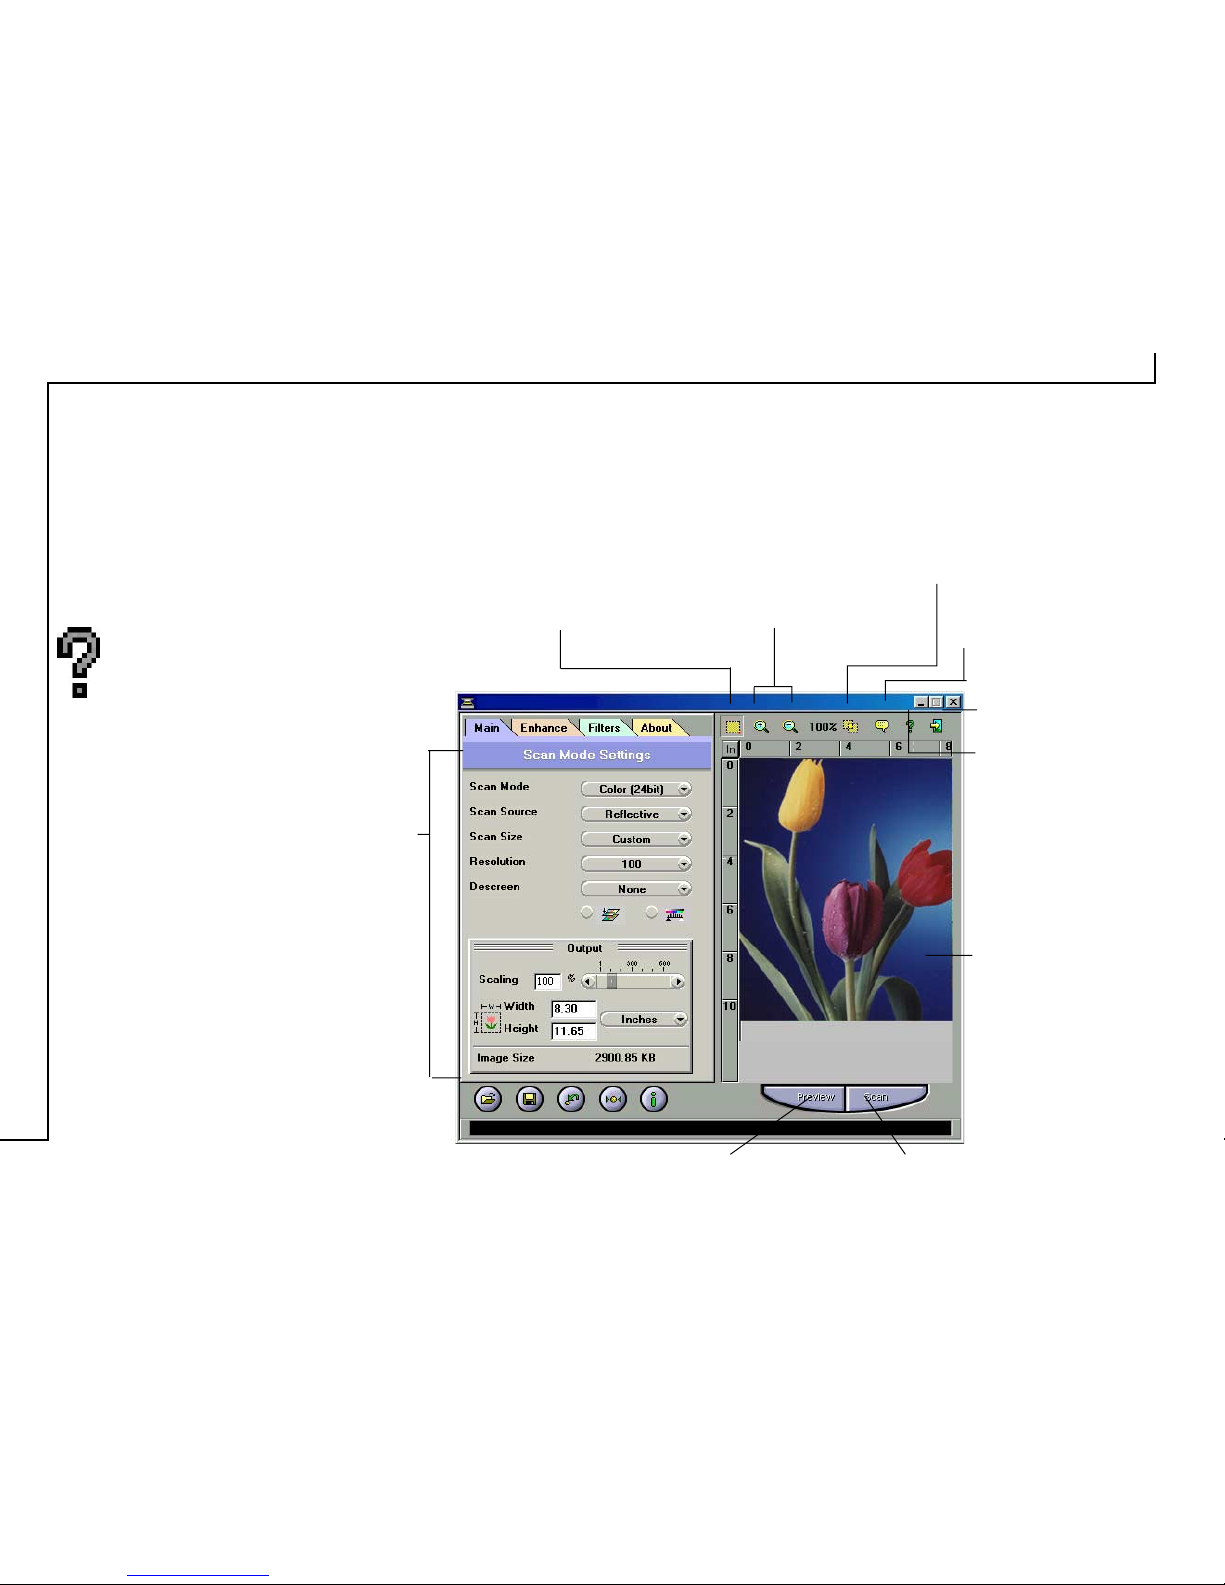
The TWAIN Dialog Box (Details)
The TWAIN dialog box consists of two
sections- the left section where most of the
TWAIN control settings are found and the
right section, which is the Preview window.
For more detailed or additional
information regarding the features and
functions of your scanner software,
please refer to the on-line help system
by clicking on the Help icon.
Cropping Tool
Cropping Tool
Allows you to selectively
scan a portion..
Zoom
Magnifies or shrinks
the image in the
Preview Window.
Batch Scan
Allows up to 10 scan
regions for multiple
scanning.
Preview Window
Exit
Exits the program.
Language Box
Selects the language.
Help
Preview Button Scan Button
Scan
Settings

9
• Preview
Preview (a quick low-resolution scan of the
entire original image) the image in order
to get a clearer idea of the image area you
want to include in your final scan. To preview, the
steps are:
1. Place the document face down on the scan window
glass;
2. Click on the Preview button. After the scanner has
scanned the document, the scanned image will appear
in the Preview Window.
• Cropping Tool
You can select an area, if you don’t want to scan the
whole document. This is optional.
• Zoom Tools
The Zoom In tool increases the magnification (multiple
levels) of the image area. In magnified view, you can
drag the Crop Frame to the exact area you want to
scan. Use the Zoom Out tool to shrink the image.
The Preview Window & Buttons
The Preview window is where the preview image appears.
It is recommended that you preview each document/image
before scanning. Using the preview image, you can specify
the final image area to be included in the scan and/or apply
the enhance and filters features.

10
• Batch Scan Button
Clicking this button allows you to create multiple scan
areas using different scan settings on the image shown
in the Preview Window. For more details, please refer
to the topic Using Batch Scan.
• Scan
After determining the exact image area you wish
to scan and selecting your desired scan settings,
click the Scan button to perform the scan. When
scanning is complete, the image will be displayed on
the main screen of the host software behind the TWAIN
dialog box.
• Help
Provides on-line help for the scanner and software
functions.
• Language Icon
Selects the language you would like to view the
TWAIN interface in.
• Exit Icon
Exits the program.
The Image Setting Buttons
The Image Setting buttons allow you to create your own
convenient scan settings. Saving image settings allows you
to use the same settings again and again without resetting the
image options.
• Load Button
Stores selected settings.
• Save Button
Savesthe actual image settings in a folder.
• Previous Button
Reloads the last saved image settings.
• Reset Button
Returns the image settings to their default values.
• Information Button
Displays all the current control settings of the TWAIN
dialog box.
Ce manuel convient aux modèles suivants
2
Table des matières
Autres manuels Mustek Logiciel


Manuels Logiciel populaires d'autres marques


PS Audio
PS Audio PowerPlay Manuel du propriétaire

Brady
Brady LOCKOUT PRO 3.0 Manuel de service

Avaya
Avaya Interaction Center Manuel utilisateur

Texas Instruments
Texas Instruments TI-83 Plus Silver Edition Manuel

Novell
Novell GROUPWISE 8 - INTERNET AGENT Manuel utilisateur

Oracle
Oracle Application 9i Manuel utilisateur

Acer
Acer RDM Manuel utilisateur

Canon
Canon Vixia HF21 Manuel utilisateur

Canon
Canon ZR950 Manuel utilisateur

Samsung
Samsung Auto Backup Manuel utilisateur

Polycom
Polycom Vortex EF2201 Instructions d'installation et d'utilisation

Brocade Communications Systems
Brocade Communications Systems Brocade 8/12c Manuel utilisateur