Mueller ST-550 Manuel utilisateur

Model: ST-550
Your satisfaction is guaranteed. If you are not completely satisfied with our
Smart Bidet To ilet, and the results it brings, we insist that you let us know. We’ll
help you make the Smart Bidet To ilet work for you, or we’ll refund your money.
USER MANUAL
Bi det To ilet
SMART

IMPORTANT SAFEGUARDS......................................................................................... 2
PRODUCT OVERVIEW................................................................................................. 4
INSTALLING YOUR SMART BIDET TOILET.................................................................. 6
• Tools Needed............................................................................................................... 6
• Prior to Installation....................................................................................................... 7
• Installing the Smart Bidet Toilet................................................................................... 7
• Installing the Remote Control Holder.......................................................................... 9
• Installing and Replacing the Battery Box................................................................... 10
CONNECTING POWER & TESTING WATER FLOW AND THE UNIT........................ 11
• Testing Water Flow & Connecting Power................................................................... 11
• Testing the Unit.......................................................................................................... 11
• Secure the Unit.......................................................................................................... 11
• Pairing the Remote Control with the Unit................................................................... 12
OPERATING YOUR SMART BIDET TOILET............................................................... 12
• Operation................................................................................................................... 12
• Battery Only Mode..................................................................................................... 13
• Stand-up Flush.......................................................................................................... 13
• Kick Flush.................................................................................................................. 13
MAIN FEATURES........................................................................................................ 14
SPECIFICATIONS........................................................................................................ 14
CLEANING & MAINTENANCE.................................................................................... 15
• Cleaning the Toilet Bowl............................................................................................. 15
• Cleaning and Maintenance the Nozzle...................................................................... 15
TROUBLESHOOTING................................................................................................. 16
TABLE OF CONTENTS
1

IMPORTANT SAFEGUARDS
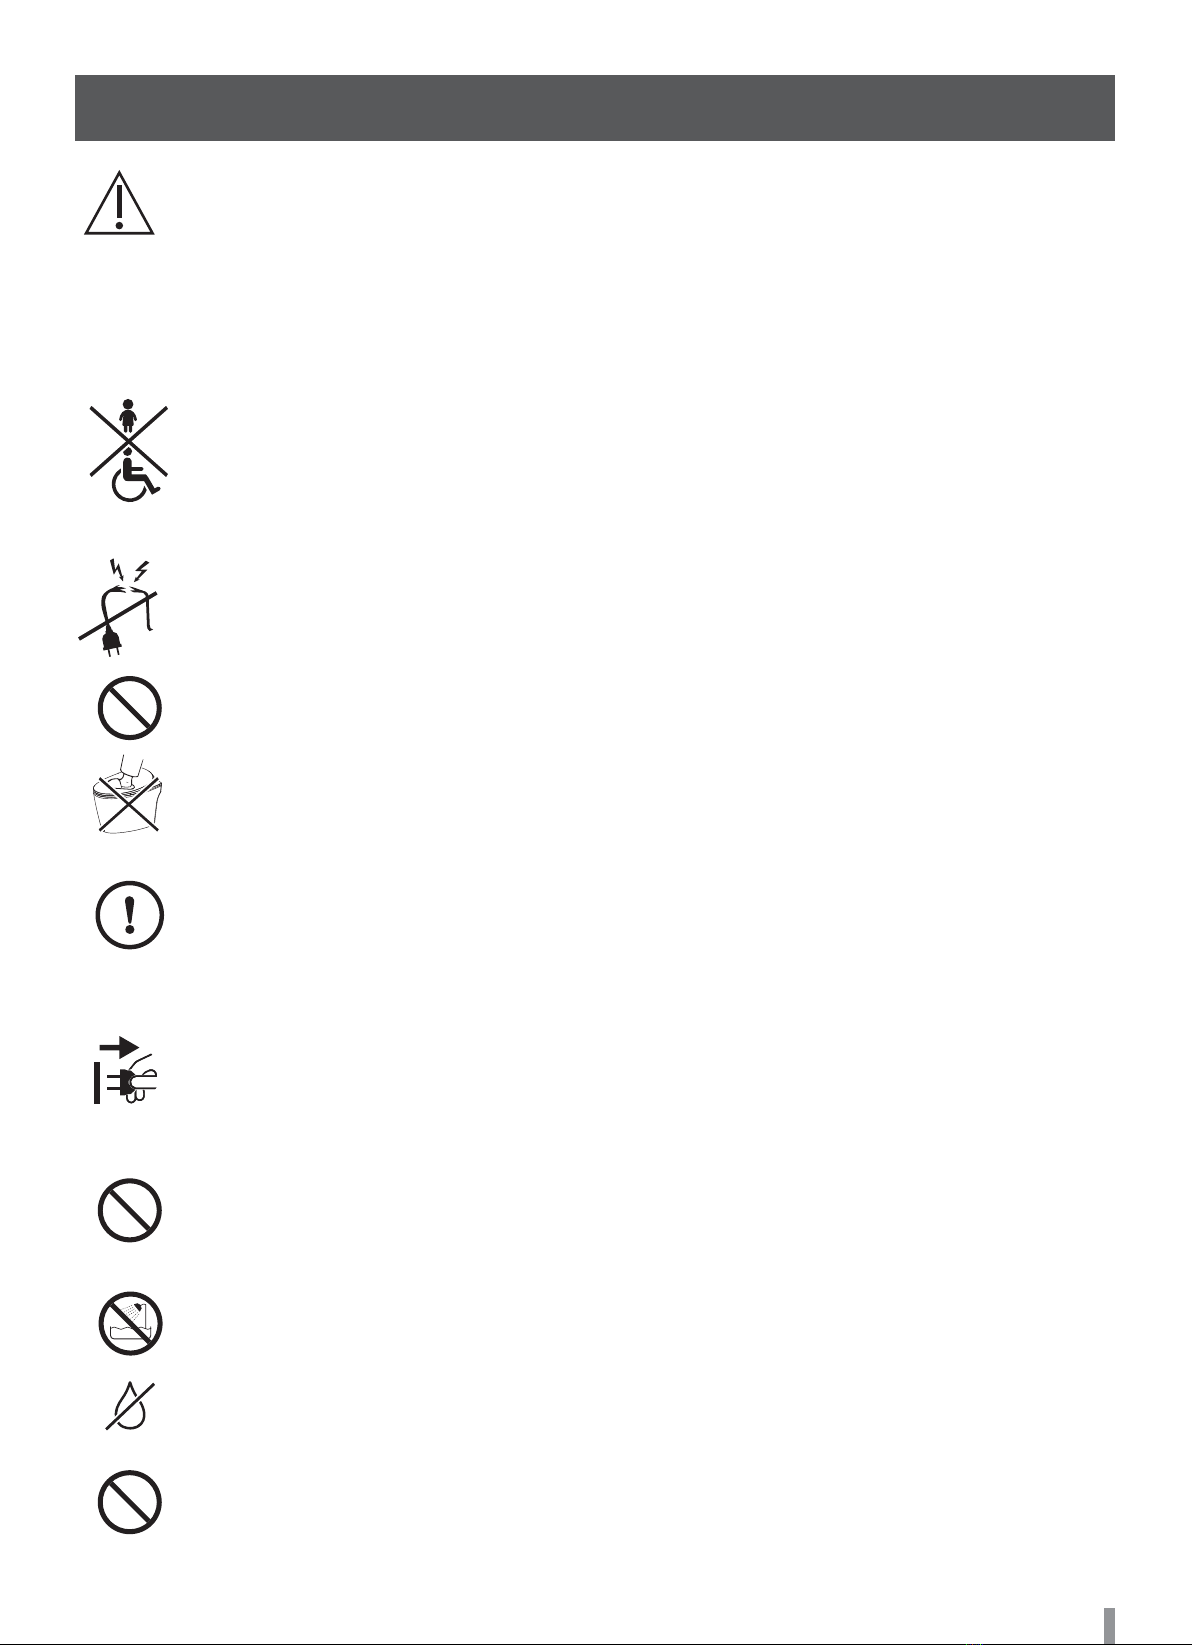
• When using electrical appliances, basic safety precautions should always be followed
including the following:
• Read all instructions.
• Make sure that your outlet voltage corresponds to the voltage stated on the energy
rating label of the Smart Bidet Toilet.
• Close supervision is necessary when this product is used by or near children or
persons with reduced physical, sensory or mental capabilities, or lack of experience and
knowledge, unless they have been given supervision or instruction concerning use of the
appliances by a person responsible for their safety.
• Do not use this appliance for other than its intended purpose.
• Do not operate the appliance if it has a damaged cord or plug. If the appliance malfunc-
tions, or is damaged in any manner contact the Mueller Customer Service.
• The usage of attachments is not recommended by the manufacturer as it may cause
fire, electric shock, or injuries.
• Do not stand on the lid or lean on the seat. There is a risk of injury and damages to the
device.
• The on-site electrical installation and connecting the device to the power mains must be
performed only by authorized and qualified electricians, who are well versed in the locally
applicable regulations and supplemental requirements and know the requirements of the
local utility providers extensively. Improper installation and maintenance work or repairs
can create substantial hazards to the user, for which Mueller cannot be held liable.
• Turn off the power at the power breaker or disconnect the power plug from the outlet
when cleaning. Failure to do so may cause electric shock. (Ensure the power is turned on
when using the nozzle cleaning function.)
• Do not bend or crush the water supply hose, as this may result in water leakage and
flooding.
• Keep the power supply cord away from heated surfaces (e.g. surface radiators).
• Do not install this product in a wet or damp location, such as inside a shower room or
steam room, as this may lead to electric shock or fire.
• Do not pour water or cleaning agents into or onto the back housing where electronics
are stored. It could cause electric shock or fires.
• Do not place or store product where it can fall or be pulled into a tub or sink.
• Do not place in or drop into water or other liquid.
120V
60Hz
2

• The device must be disconnected from the power supply for any and all installation and
maintenance work and for repairs.
• Do not connect or disconnect the power plug with wet hands, as this may cause electric
shock.
• Do not use outdoors and do not operate in a space where aerosol spray is used or con-
centrated oxygen is being administered. It may cause a malfunction or loss of glossi-
ness.
• Do not try to open or repair the Smart Bidet To ilet on your own. Do not make modifica-
tions or install additional items. The Smart Bidet Toilet contains energized power lines.
Repairs must only be performed with original replacement parts and accessories by
certified electrician. Improper installation and maintenance work or repairs can create
substantial hazards to the user.
• Do not use the heated seat for an extended amount of time. Extended use may result
in burns.
• Read the following instructions for batteries usage:
WARNING! This appliance has a polarized plug (one blade is wider than the other).
To reduce the risk of electric shock, this plug will fit in a polarized outlet only one way. If
the plug does not fit fully in the outlet, reverse the plug. If it still does not fit, contact a qual-
ified electrician. Do not modify or force the plug in any way.
Improper use of the grounding plug can result in a risk of electric shock. If repair or
replacement of the cord or plug is necessary, do not connect the grounding wire to either
flat blade terminal. The wire with insulation having an outer surface that is green with or
without yellow stripes is the grounding wire. Check with a qualified electrician or techni-
cian if the grounding instructions are not completely understood, or if in doubt as to
whether the product is properly grounded.
Do not use an extension cord. If the power supply cord is too short, have a qualified elec-
trician or technician install an outlet near the appliance.
– Make sure to use the right poles (+ /-) when inserting the batteries.
– Remove the batteries from the remote control if you won’t use the product for an
extended period of time.
– Do not leave expired batteries inside the remote control, as they can corrode which
could cause damages to your health or the remote control.
– Batteries do not belong in the household waste! Discard batteries in compliance with
your local regulations. Battery leakage may cause fire.
– Keep batteries away from children. Contact a physician immediately in the event of a
battery being swallowed accidentally.
– If your skin comes into contact with the liquid inside a battery, rinse immediately with
copious amounts of water.
– If spilled battery fluid comes into contact with the eyes, rinse with clean water without
rubbing and consult a doctor immediately.
3

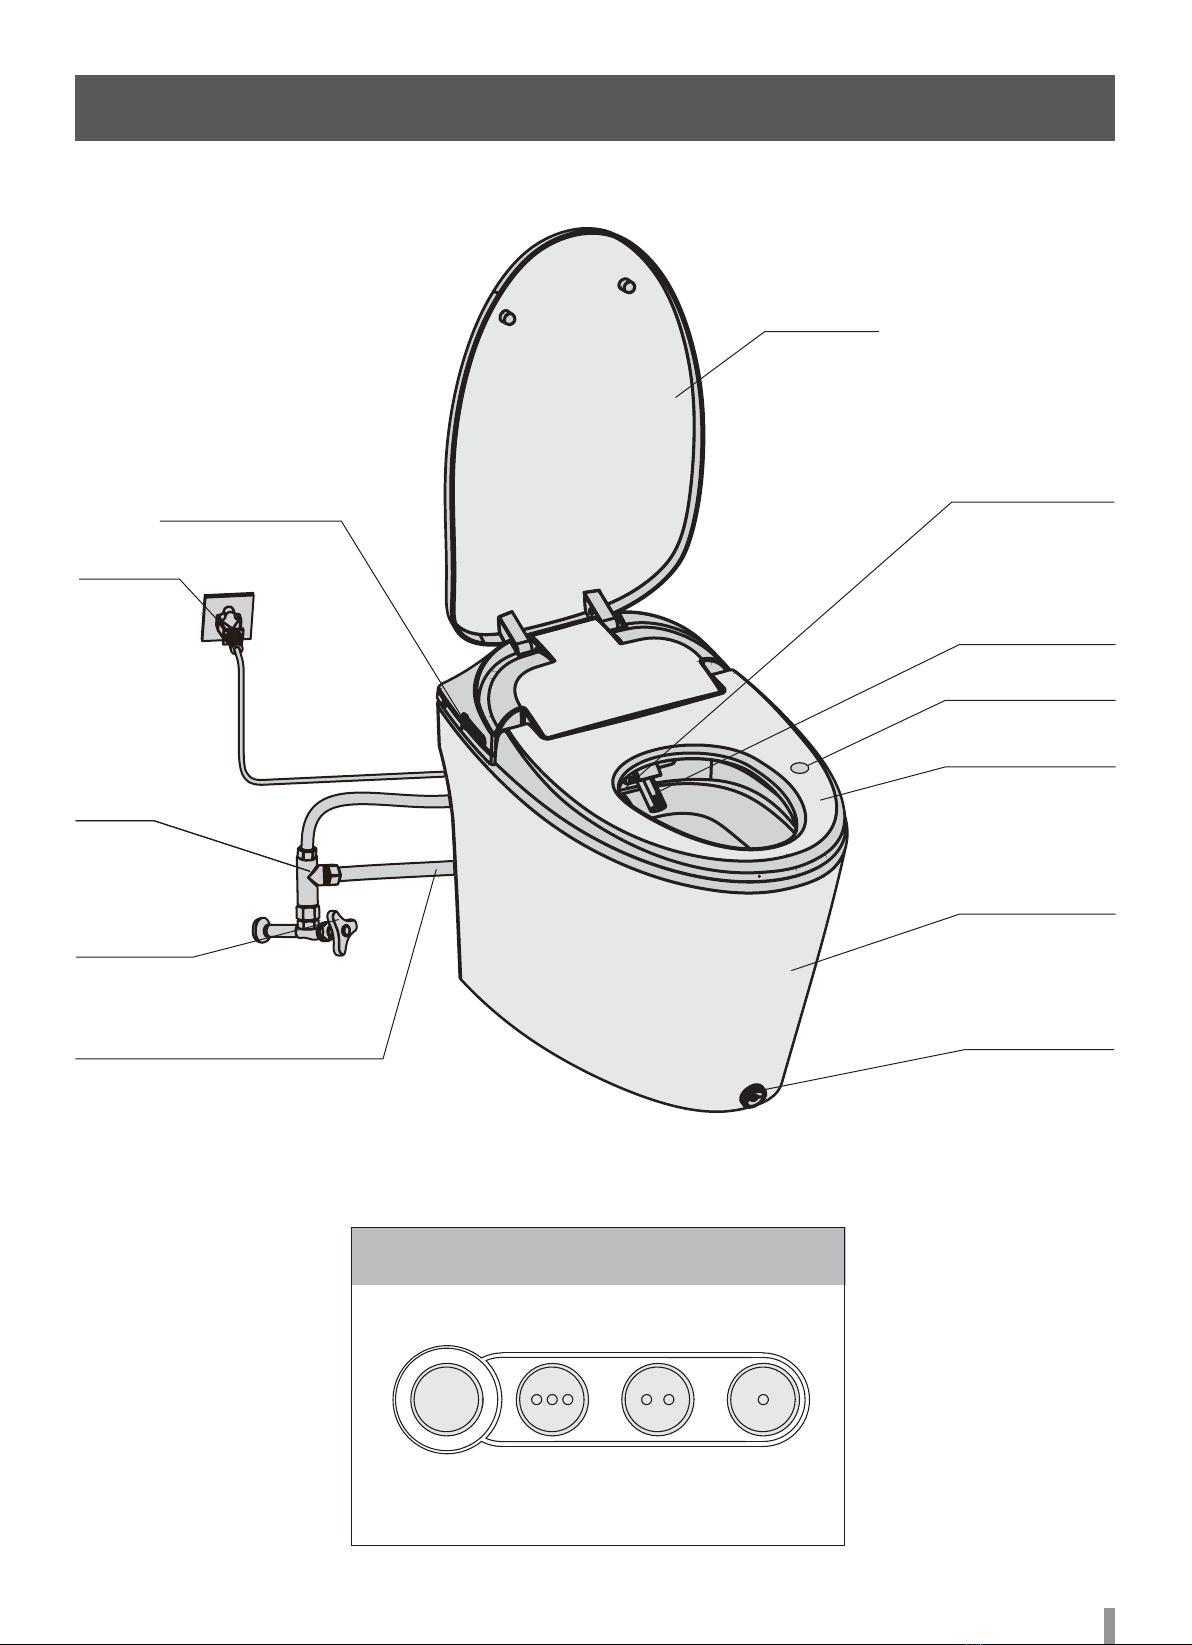
T-valve
Water Valve
Ceramic Water Supply Hose
Power cord
Seat Cover
Side Control Panel
(Back and Front Wash)
Ceramic Toilet Bowl
Self-Heating Seat
Sensor
Bidet Wash Nozzle
Dryer
Kick Flush
RearPower/Stop Front Flush
PRODUCT OVERVIEW
4

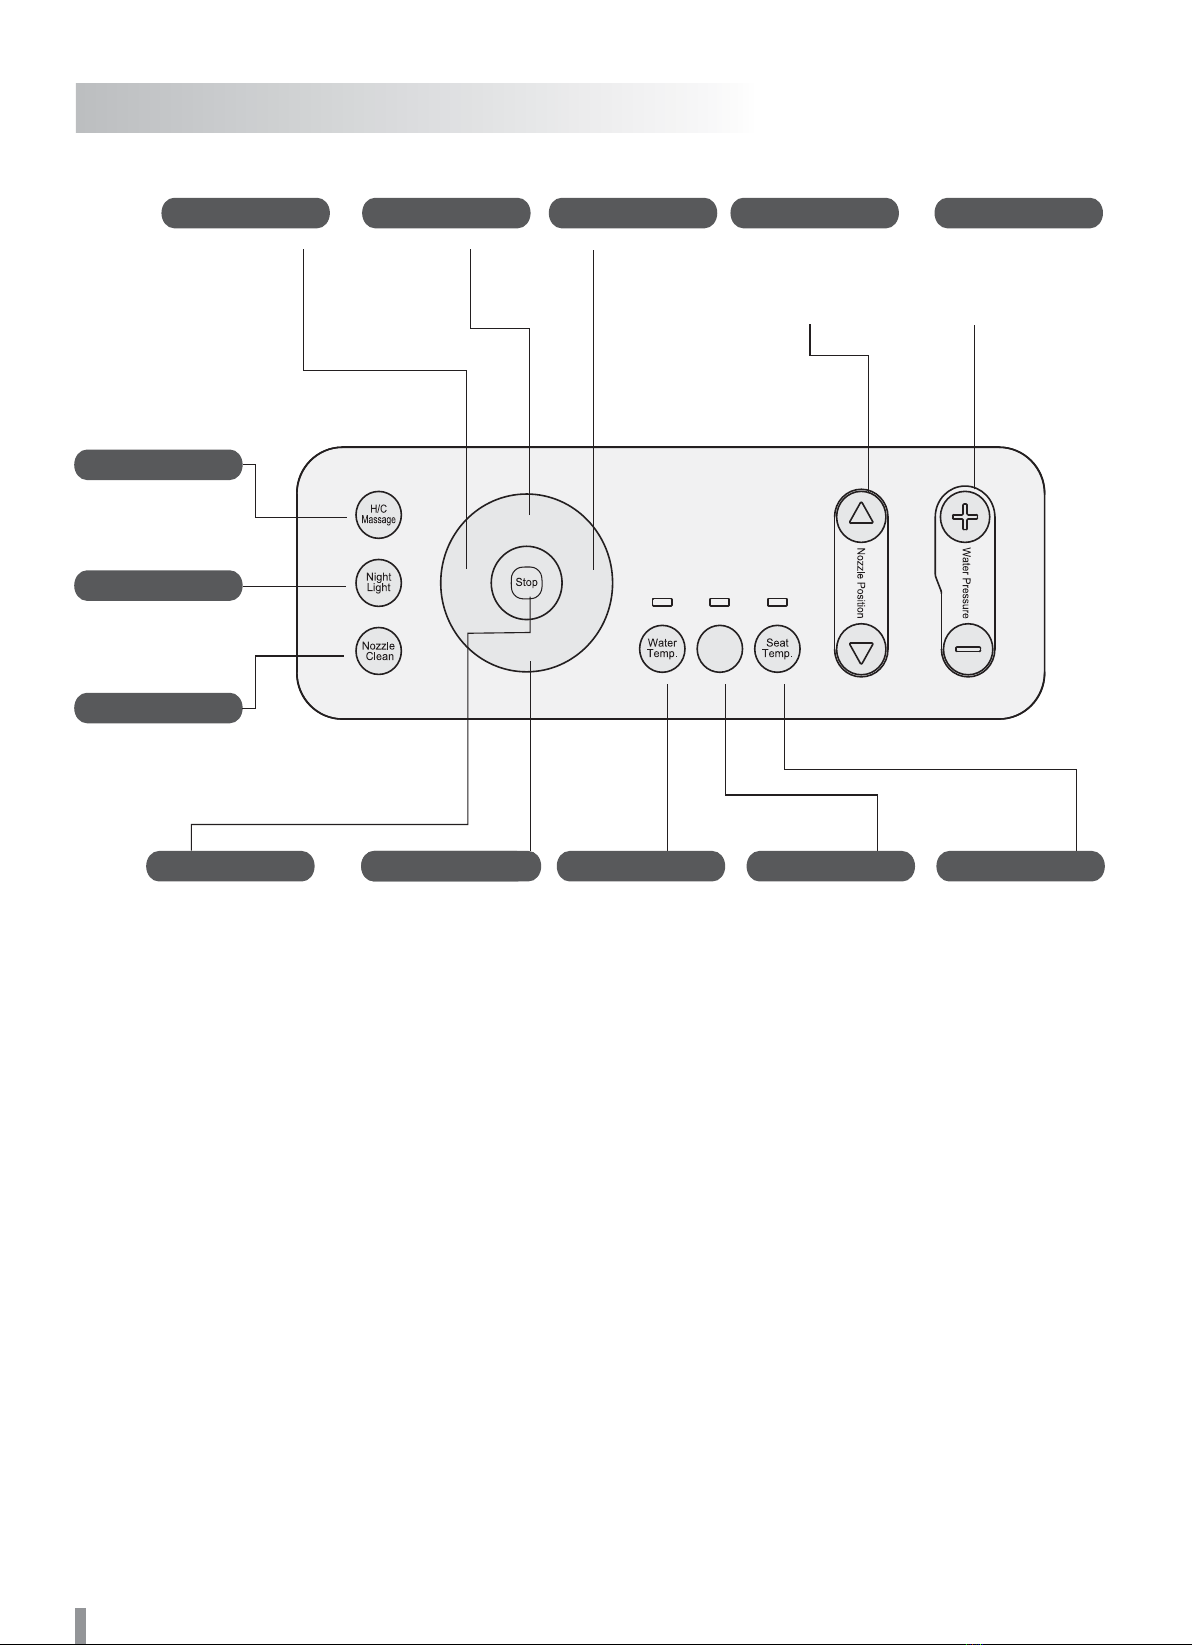
Rear Washing
Stop Rear Wash
Stop Front Wash
Stop Dryer
Nozzle Clean
Nozzle Position
Adjust the nozzle
Position in five
levels
Night Light
Turn the Night Light
ON / OFF
Water Pressure
Adjust the cleaning
intensity of front
and rear washing
Flushing
H/C Massage
Cleaning with hot
and cold water
Dryer
Drying off the
washing area
Front Washing
Seat Temp
Adjust the seat
temperature
Air Temp
Adjust the air
temperature
Water Temp
Adjust the water
temperature
Stop
Flush
RearFront
Dryer Temp.
Air
REMOTE CONTROLLER
5

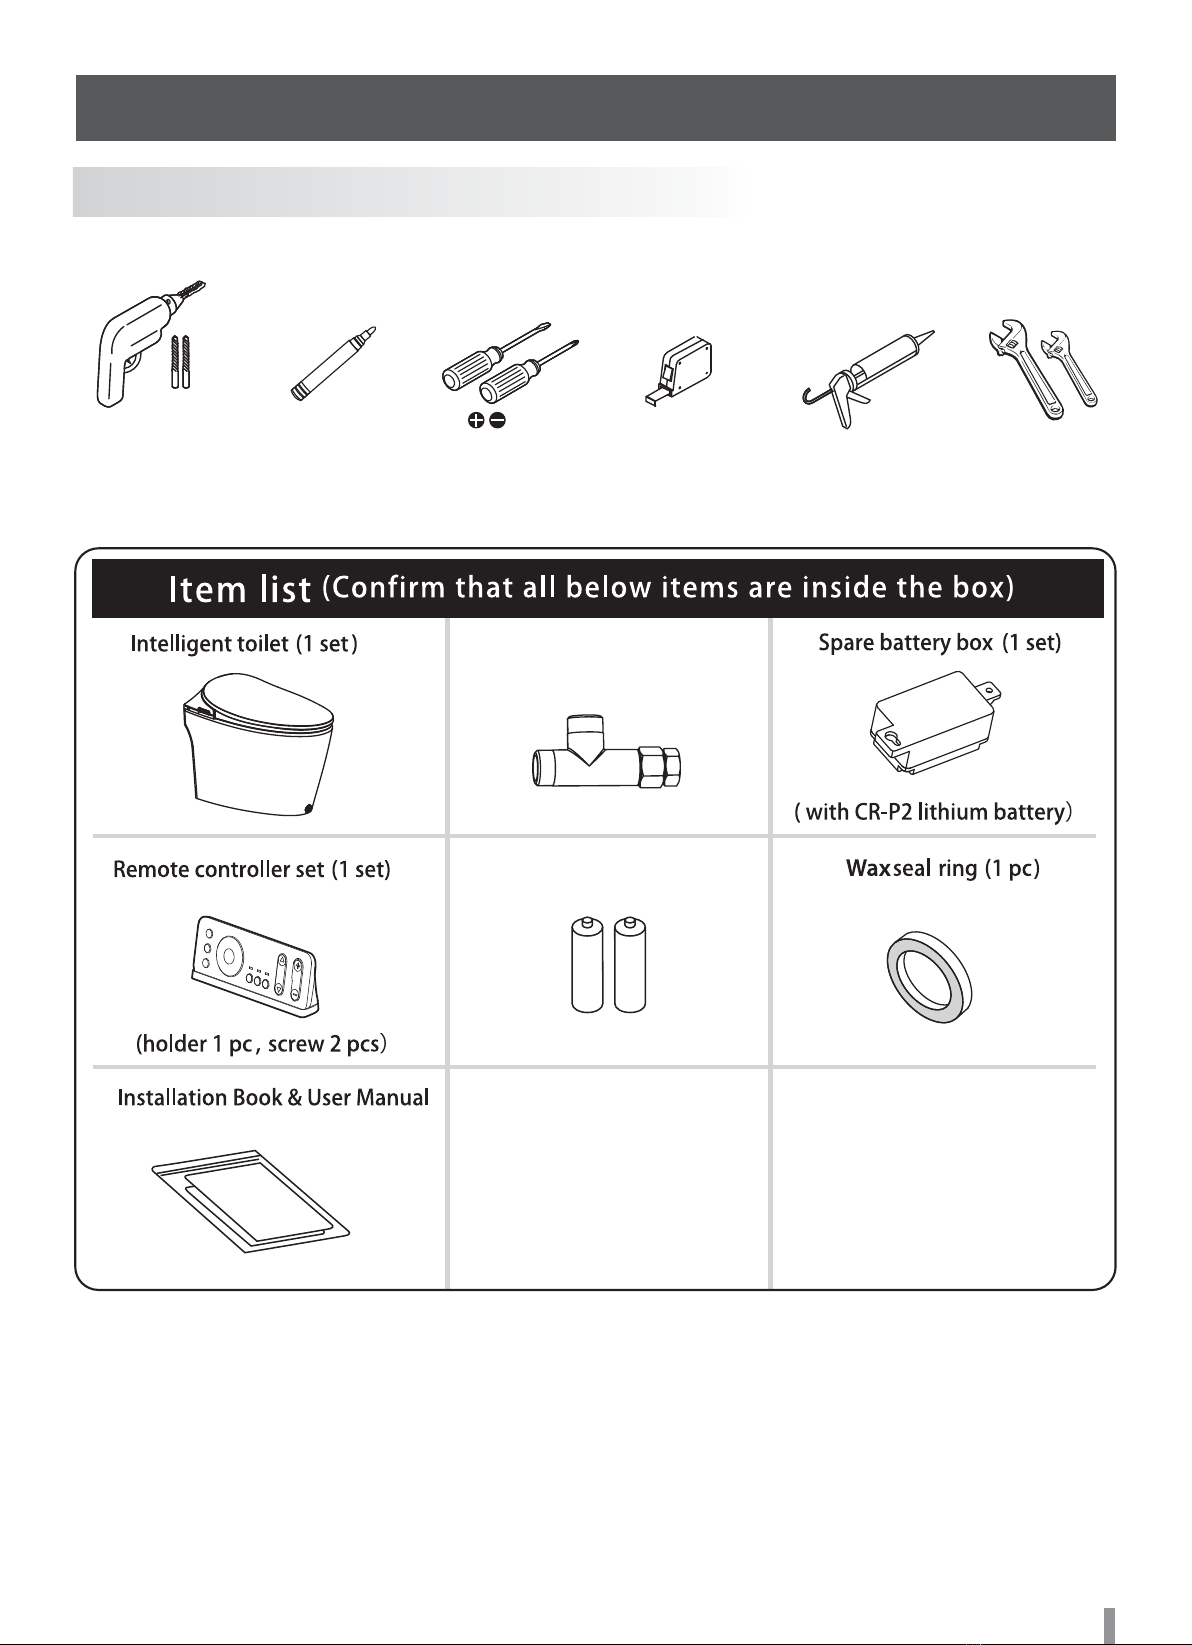
T-valve(1 pc)
Two AAA Batteries
Please have these tools prepared prior to installation.
Crescent
wrench
Silicone
gun
Measuring
tape
Screw
driver
Marking
pen
Drill
(Dia. 0.24in)
INSTALLING YOUR SMART BIDET TOILET
• Please confirm that all the items from the Item list are inside of the package. If anything is missing,
please contact our customer service at (888) 632-9981
• The illustrations above are for references only. Actual items may look different in person.
TOOLS NEEDED:
6

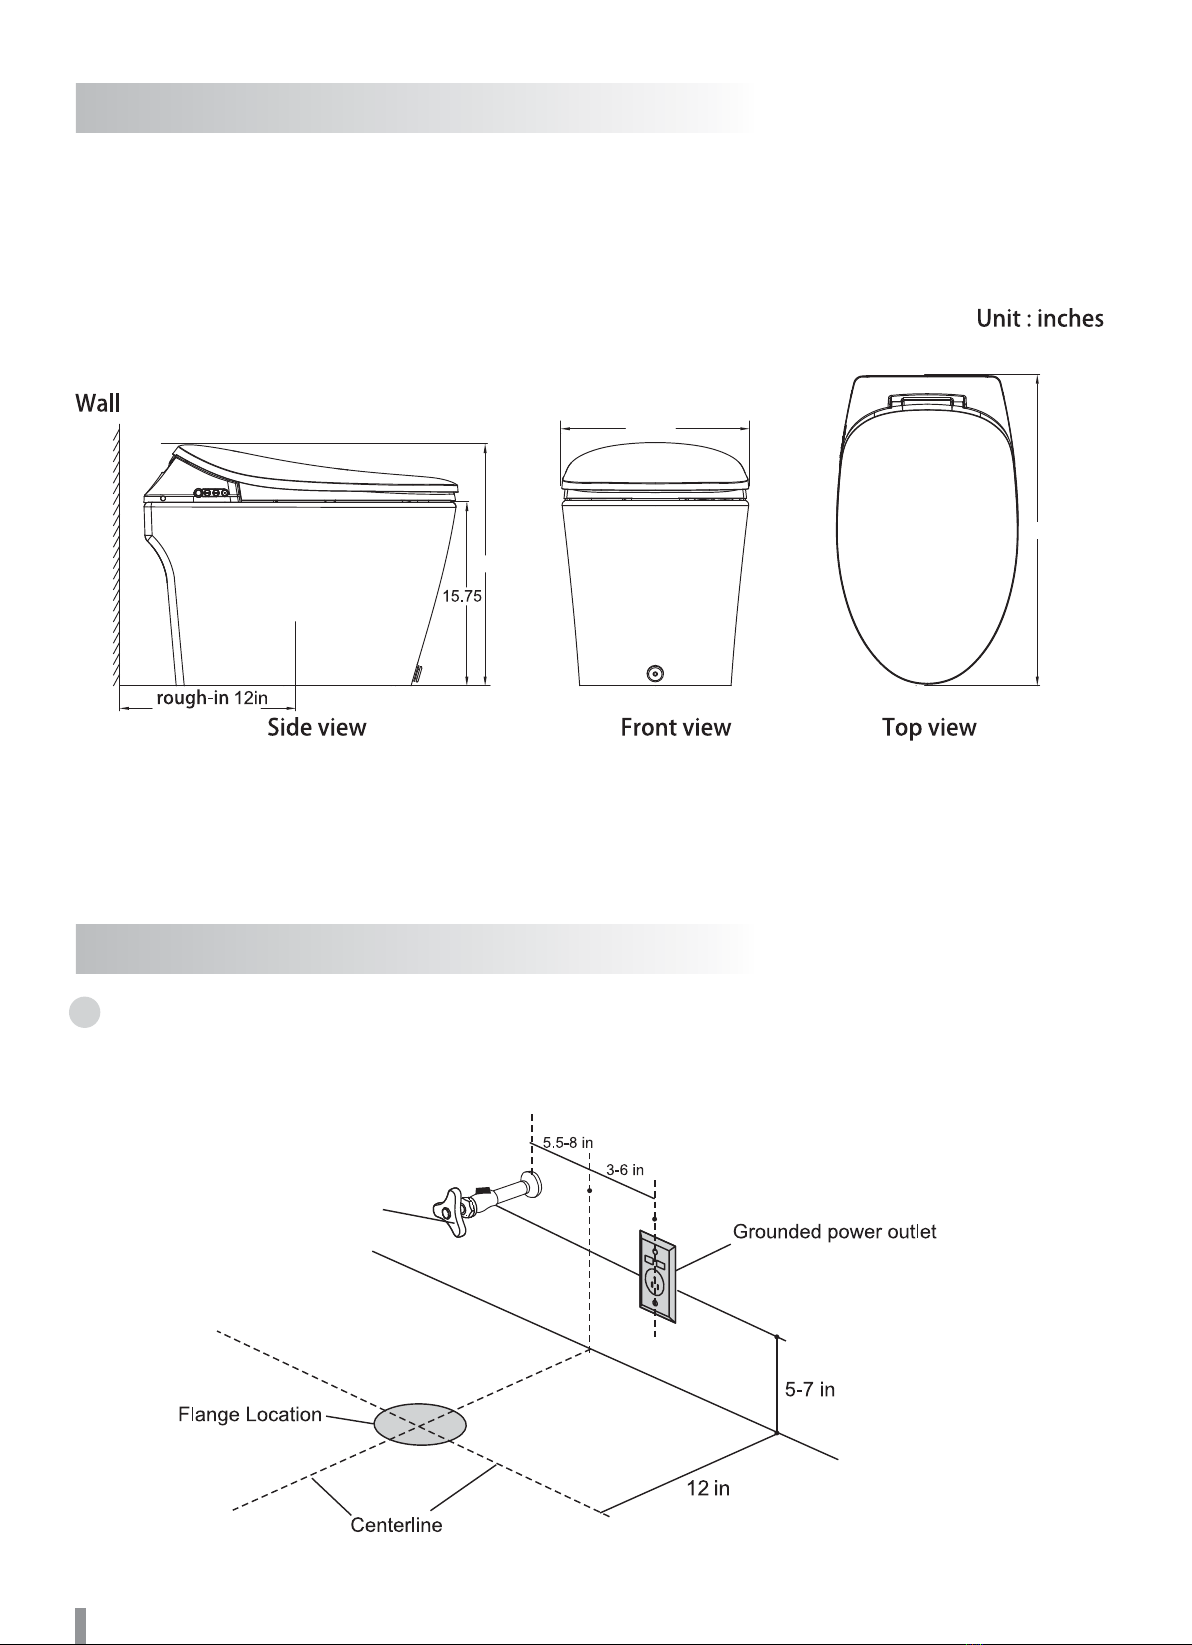
Water valve
- Please check that there is enough pre-arranged space for sewage, electric wires, and water lines.
- Also, please confirm the distance from the toilet flange centerline to the wall.
To confirm mentioned above, please refer to the diagram below:
20.67
15.86
26.93
PRIOR TO INSTALLATION:
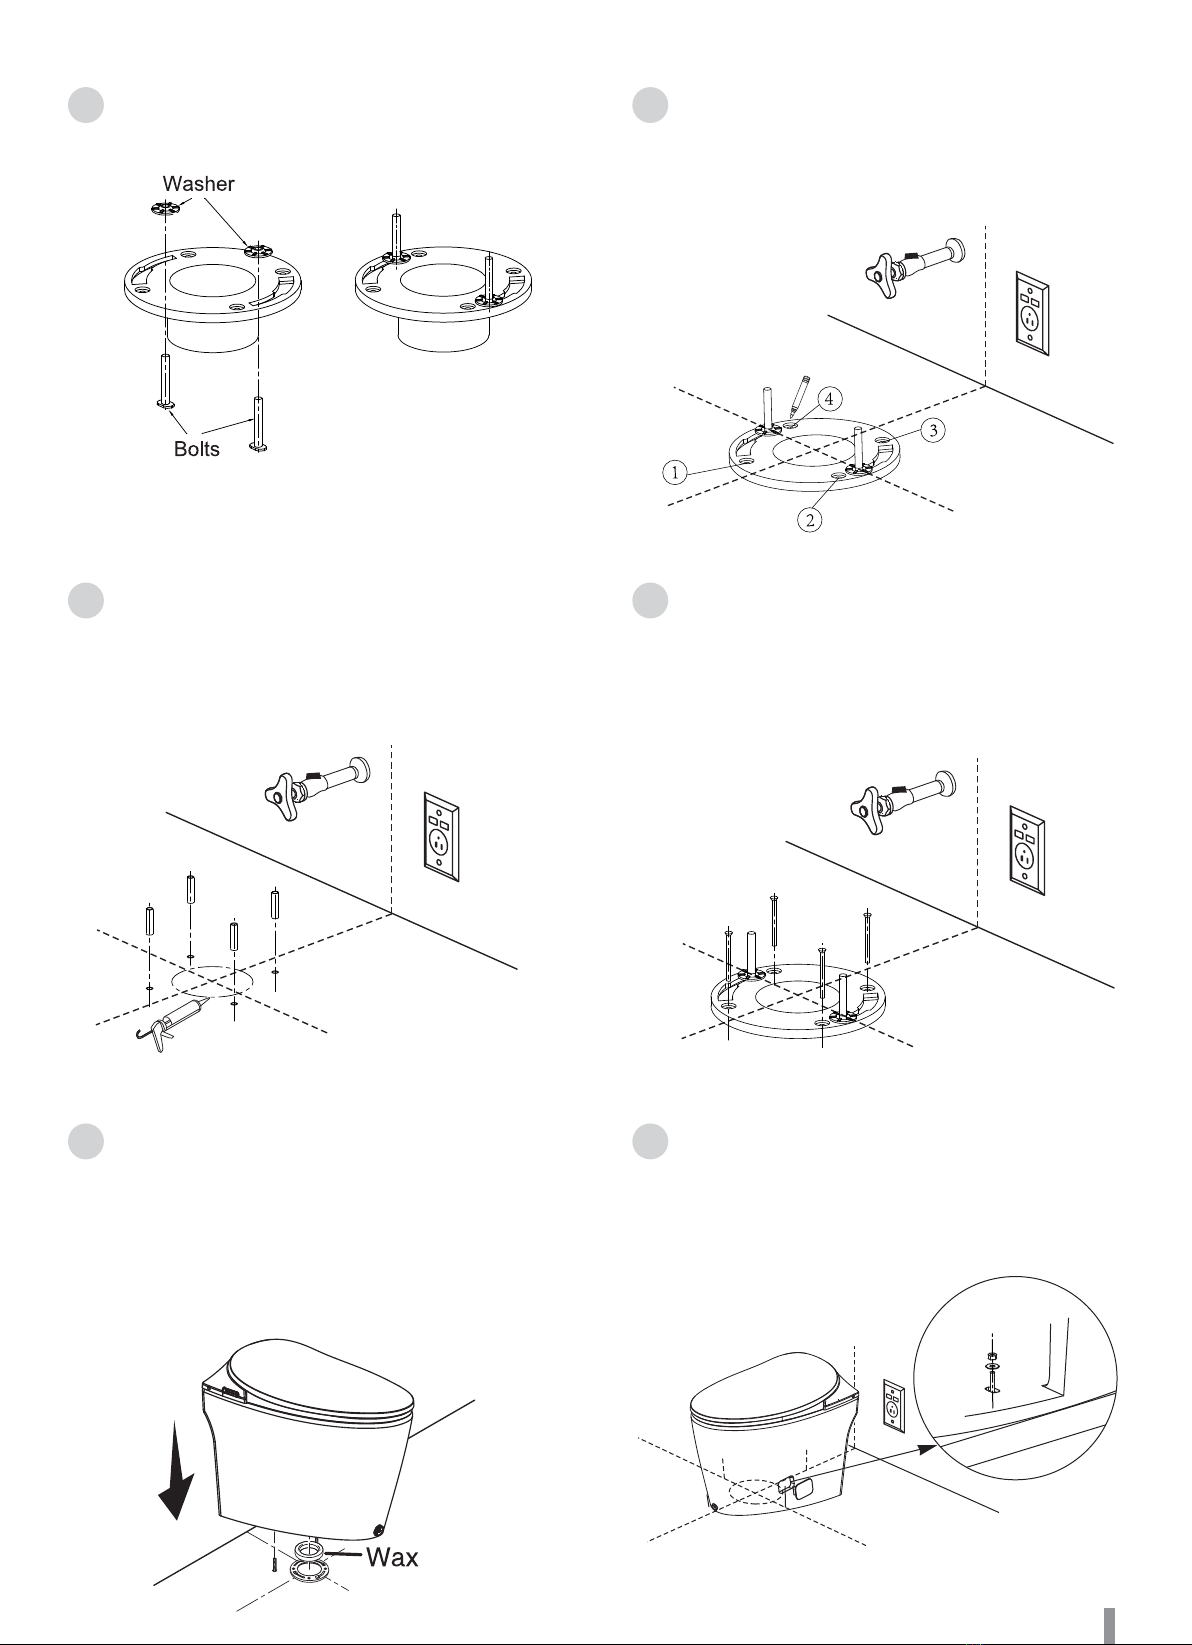
1. Clean and wipe the floor dry.
• The cleanliness and dryness of the floor will affect toilet installation.
INSTALLING THE SMART BIDET TOILET:
7

2. Install the washer and bolts to the flange. 3. Place the flange onto the drain hole, and
ensure the bolts are properly aligned with the
centerline. Then mark the location of sec-
tions 1, 2, 3, and 4, as illustrated.
4. Remove the flange from the drain hole.
Using a 3/16’’ bit, drill 4 holes at the marked
locations. Insert the anchors into the holes
and coat sealant on the edge of the drain
using a silicone gun.
5. Place the flange onto the draining hole
and tighten four screws into the ground. Dou-
ble-check that the bolts are aligned with the
centerline.
6. Remove the cap from the water inlet on
the back of the toilet. Position the wax ring on
the flange. Align the toilet over the flange and
bolts. Carefully lower the toilet onto the
flange making sure that the holes in the base
of the toilet are aligned with the bolts.
7. Evenly press down on the toilet to set the
wax ring. Install washers and nuts on both
bolts. Carefully tighten the nuts with a
wrench.
8

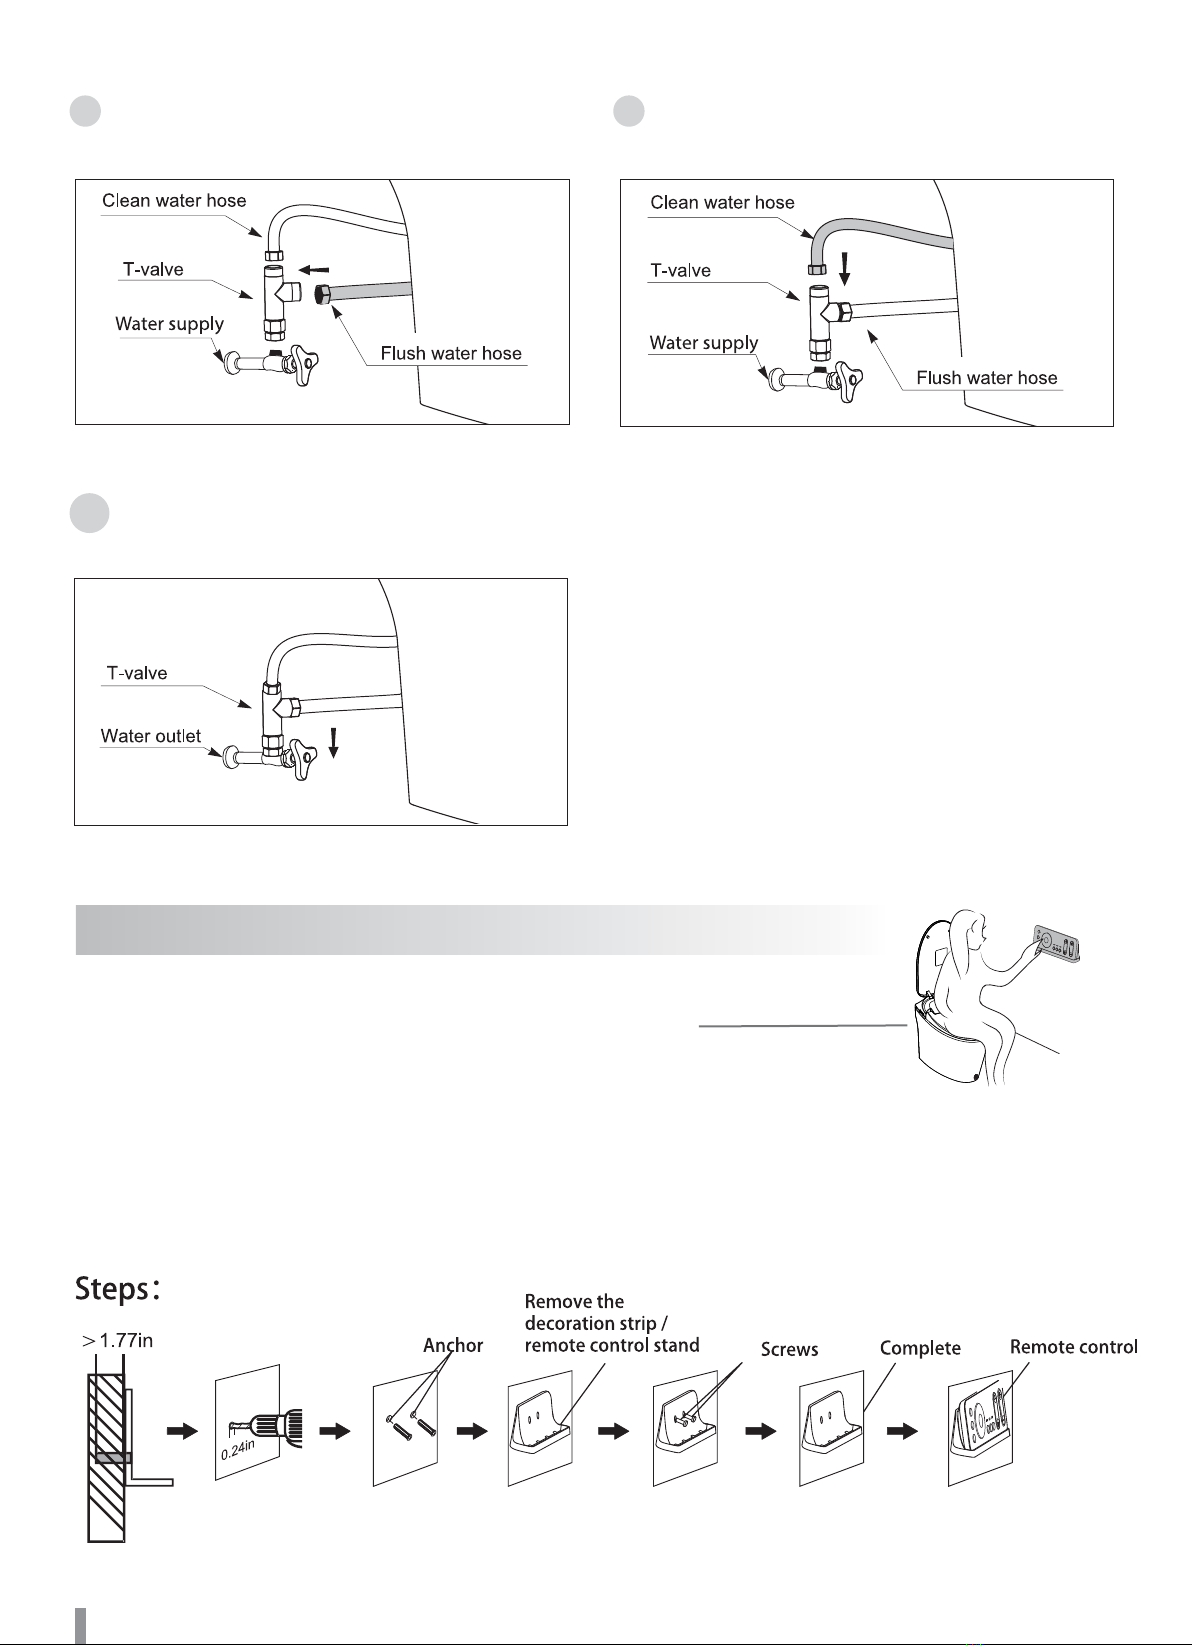
8. Attach the flush water hose to the T-valve
and tighten.
10. Connect the T-valve to the water supply
and tighten.
9. Attach the clean water hose to the T-valve
and tighten.
ATTENTION: The remote holder should be installed within a
reach while seated on the unit. Please refer to the picture.
1. Drill two 0.24 inch/6 mm diameter holes on the wall (about 1.77 in deep).
2. Place the anchors into the holes.
3. Attach the remote control holder to the wall by screwing in the screws to the anchors.
4. Remove the battery cover from the backside of the remote, and install batteries.
5. Once finished, the remote control is ready to be placed in its holder.
NOTE: Steps for installation shown in the diagram below:
INSTALLING THE REMOTE CONTROL HOLDER:
9
Table des matières
Manuels Toilettes populaires d'autres marques

Better Bathrooms
Better Bathrooms BUN/BeBa 27555/78725 Manuel utilisateur

American Standard
American Standard CONCEPT Cube TF-2704 Manuel utilisateur

BIOLAN
BIOLAN ECO Manuel de la liste des pièces

Thetford
Thetford C260 Series Manuel utilisateur

KELISS
KELISS T162A Series Manuel utilisateur

Kohler
Kohler K-22241K Instructions de montage