MUBVIEW ZY-C8 Manuel utilisateur

A Smarter Safety Solution
QUICK START GUIDE
PAN TILT WIRED CAMERA
WIFI OUTDOOR | 24/7 RECORDING | WATERPROOF
ZY-C8 FCC-ID:2AZL7-ZY-C6
Thanks for your shopping and trust.
We have been optimizing our products and improving our
lifetime customer service to offer you a better shopping
experience. If you need help, please contact Mubview before
returning your product. Most questions can be answered
through our online support center at www.mubview.com or
solve your problems within 24 hours. In addition, your advice
or suggestions will be much appreciated and welcomed.
Register via link below to get 3 Years Warranty Extension.
Register link: https://bit.ly/3zBSB2y
Warranty Service
Service Centre
Email: [email protected]
Distributor: [email protected]
More About Us
Web: www.mubview.com
Facebook: https://www.facebook.com/mubview
Amazon Store: www.amazon.com/mubview

1. Packing List -----------------------------------------
2. Product Appearance -------------------------------
3. Download & Install App ----------------------------
4. Account Registration ------------------------------
5. Add Camera to App --------------------------------
5.1 Preparations for Connection -------------------
5.2 Connect Camera to App -----------------------
6. Alert Settings ---------------------------------------
6.1 Motion Detection Settings -------------------
6.2 Noise Detection --------------------------------
7. Reducing False Alarms -----------------------------
8. Install the Camera ----------------------------------
9. FAQ -------------------------------------------------
Contents
P1
P2
P3
P4
P4
P4
P4
P6
P6
P6
P6
P7
P8-P9

1. Packing List
Camera--C8 5V 1A Power Adapter x 1
Screws Set x 3 User Guide x 1
With 3M Power Cable
A Smarter Safety Solution
PAN TILT WIRED CAMERA
WIFI OUTDOOR | 24/7 RECORDING | WATERPROOF
ZY-C8 FCCID: 2AZL7-ZS-GX1S
QUICK STARTGUIDE
1

2. Product Appearance
Working Status Light
Lens
Spotlight
WiFi Antenna
Thumb Screw
SD Card Slot
Reset Key
Speaker
Power Cable
Reset Key
SD Card Slot
Lens
Working
Status Light
Press and hold RESET for 5 seconds to reset the device to factory setting.
(You will hear tips if reset successfully)
Support local SD card storage (up to 128G)
Support FHD resolution
Solid on red: Device is abnormal(Network problem)
Flashing red slowly: Ready for Wi-Fi connection
Flashing red quickly: Wi-Fi connecting
Solid on blue: Wi-Fi connected Successfully
The microphone
2

3. Download & Install App
NOTE: Please turn on both of the following permissions.
*Allow Mubview App to access mobile cellular data and wireless LAN, otherwise it
will fail to connect the camera.
*Allow Mubview App to receive pushed messages, otherwise, the phone will not
receive alarms when motion is detected.
Android
iOS
The camera supports Android and iOS systems.
Please scan the QR code or search 'Mubview' in the App store to download the App,
and follow the instruction to register an account.
If you encounter any problems during the installation, please feel free to contact us
3

4. Account Registration
5. Add Camera to App
A new user needs to register account in App with an email address.
Click 'Sign up' to register a new account.
Note:
* When register a new account, please choose the region you are actually in and fill in
correct country code. (People registered in different regions can't share the camera.)
* Please register with e-mail address.
1. Add camera to App: Home page - Right up corner '+' - ' Power Plug Camera'
5.2 Connect Camera to App
5.1 Preparations for connection
1. Before turn on the camera, insert a Micro SD Card (not included) to save
video clips or you can start the 3-day free cloud service. Without Micro SD
Card or cloud service, no video will be saved.
2. Make sure your WiFi is 2.4GHz. The camera only works with 2.4GHz WiFi,
not support 5GHz.
3. Put the camera and your smart phone as closer as you can (suggest 1-3 ft)
to the router when connect WiFi.
2. Connect the camera to Wi-Fi according to the steps in App.
4

Note:
* When connect camera to Wi-Fi, make sure that the indicator light is flashing
slowly in red. If not, please reset the camera (press and hold the RESET button
for 4-5 seconds until the light turns red and blinks.)
* Make sure your accountant password is correct. ( the password of the
Wi-Fi cannot include single quote, underline, space and virgule / ).
* In general, the router has a connection limit. Once the devices number exceeds
the limit, other devices will fail to connect to the router.
* After checking the above information, if the camera still cannot connect to WiFi,
please try to re-download the App, reset the camera and restart the router, and
then add the camera in App again.
* If you tried all the steps, but still had no luck, please email us for support:
5

7. Reducing False Alarms
6.1 Motion Detection Settings
Enter the application -"Settings"-"Alert Settings"-"Motion Detection" interface,
you can adjust the motion detection settings.
Low gear sensitivity, motion detection distance of 4-5 meters.
Medium gear sensitivity, motion detection distance of 5-7 meters.
High gear sensitivity, motion detection distance of 8-9 meters.
6.2 Noise Detection
After facilitating detection, the camera can detect motion and noise around
the camera. It can select different detection sensitivity according to different
requirements.
Note:
*If the night alarm is disabled, the camera will only record a black and white
video at night.
Do not place the camera towards any objects with bright lights, including
sunshine, bright lamp lights, glass, mirror, etc.
Set alarm area to focus the zone you concern.
Lower the sensitivity properly to reduce the false alarms.
6. Alert Settings
6
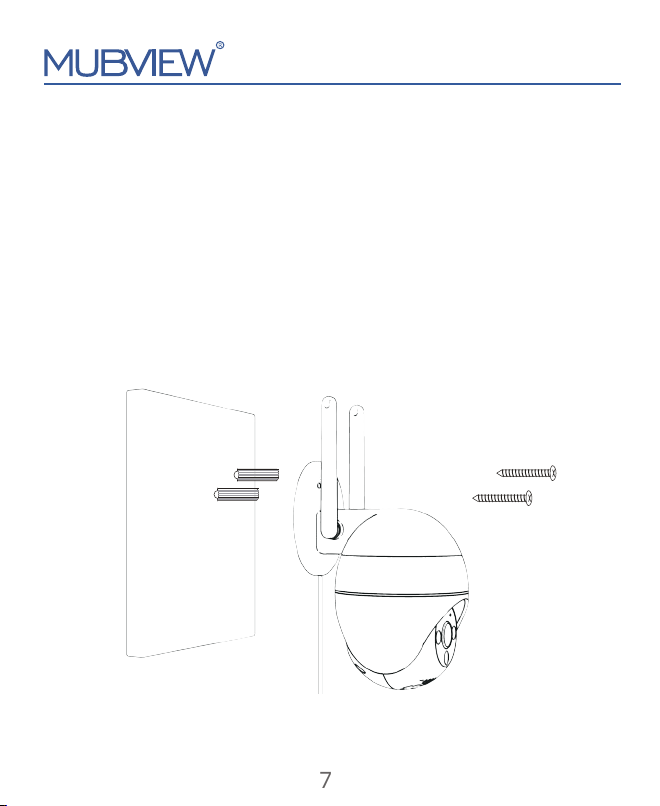
8. Install the Camera
Wall
1. Make a network signal diagnostic at the place you want to install your
camera. Steps as below: Finding the camera in App - Enter its "Settings"-
Click "Installation Guide" - "WiFi Signal Strength "
2. The place where the camera is installed should be close to the socket.
3. Install bracket:
Step 1: Choose a clean, smooth and dry surface (avoid uneven wood leather
and stucco walls).
Step 2: Fix the anchor bolt into the wall - Fix the bracket with screws through
into the anchor bolt.
Step 3: Adjust the angle of the camera as you like.
7
Table des matières
Autres manuels MUBVIEW Caméra de sécurité


