Moultrie 35mm Manuel utilisateur

IMPORTANT:
•Please take a few moments to read and
understand these instructions before
using the your camera system.
•Please call Moultrie Customer Service at
(205) 664-6700 if you have any questions.
•Don't forget to send us your registration.
•Good luck and have fun with your
wildlife photography.
Instruction Manual
Instruction Manual
35mm Wildlife
Surveillance Camera
Photo System
35mm Wildlife
Surveillance Camera
Photo System
Q
UICK
S
TART
G
UIDE
Q
UICK
S
TART
G
UIDE
P
AGES
3 & 4
60045_10504_cvr.pdf

60045_10504_pg.1.pdf
Tracking Game
To track game, set up the Game Spy system to record the activity automatically. The imprinted
photos will show you when and what type of wildlife frequents the area day or night.
General Surveillance
The Game Spy system can be used as a device to monitor areas that might be prone to criminal
activity. The automatic flash can also act as a deterrent to repel would be criminal activity. The
Game Spy system can be used anywhere that requires constant surveillance.
Photo Fun
Remove the camera and use it for any event, day or night, that requires a quality focus free
camera. Take pictures of family, friends, scenery, sporting events, vacations, etc…
Questions or problems call us
Moultrie Customer Service
(205) 664-6700 page 1
INTRODUCTION
Your wildlife surveillance system is easy to use. Infrared activated, it
records events on 35mm film and or counts activity on a LED display.
page 2
QUICK START INSTRUCTIONS
1Load fresh alkaline batteries
2-9V in unit & 2 AA in camera.
Match polarities (
+) and (
+).
Set camera date back, close
camera lens and connect plug
to camera port.
2
3Secure camera, open camera
shutter, and slide unit power
switch to (ON) and back to
(OFF), then push camera test
button.
Close camera Shutter, remove
camera & load film, connect
plug to camera, close cover.
4
60045_10504_pg.2.pdf

page 3
QUICK START INSTRUCTIONS
5Mount system, aim with
laser, switch to off.
7Set test switch to (IR test), close
cover, turn unit on and wait at
least 1 min. for the unit to warm
up. Step aside and wait for the
light to go out. Any motion will
activate the blinking red light.
Switch unit off, return test switch
to (normal).
6Set surveillance functions:
MODE: 24 HR or daylight only.
DELAY: 1,5,or 20 minutes delay
between photos. If you have any problems, check:
•Are batteries fresh and installed properly?
•Do you have enough daylight in location?
•Is the camera lens open?
•Is the camera plugged in?
•Is the film loaded properly?
•Is the test switch in normal?
•Is the power switch on?
•Is the unit in the delay period?
•Change batteries and set up again.
8Lock case, switch unit on and
wait at least 1 min. for the unit
to warm up. If you want to test
fire system and take the first
picture, wait for delay time to
expire and walk in front of unit.
if not, do not walk in front of
unit!
For more help call: Moultrie Customer Service (205) 664-6700
60045_10504_pg.3.pdf

page 4
1
10
11
12
13
14
15
16
17
18
19
20
21
22
23
24
25
26
27
28
29
2
3
4
5
6
7
8
9
PARTS
1. Carry Clip Lug
2. Flash Port
3. Low Light Sensor Port
4. Lens Port
5. Camo Cover (optional)
6. Light Sensor
7. Infrared Sensor
8. Event Light
9. External ON/OFF Switch
10.Mounting Strap Lug
PARTS
11. Control Box Latch
12.Lockable Latch
13.Event Counter LED
14.Reset Button
15.Display Button
16.Delay Switch
17. Daylight/24hr. Switch
18.Sensor Test Switch
19.Computer Control Panel
20.9V Battery Holders
PARTS
21.Foliage Tie Down Lug
22.Camera Test Button
23.Protective Foam Padding
24.Camera Hold Down Socket
25.Camera Power Plug
26.Mounting Hole
27.Camera Back-up Battery Holder
28.Tripod Socket
29.Moisture Seal
CONTROL BOX IDENTIFICATION
60045_10504_pg.4.pdf

page 5
Cover Camouflage Cloth Cover (optional)
Construction Weather-resistant and lockable
Mounting Screw or adjustable strap
IR Sensor Infrared, heat & motion detection
IR Sensor Range 3.3 ft. - 26.2 ft. or 1m. - 8m
IR Sensor Angle 22° (+ or - 11°)
Automatic Activity triggers the 35mm camera
ON/OFF External switch
User Switch Panel Concealed
Mode Switch 24 hr. or daylight only
IR Switch Test or normal
Delay Switch 1/5/20 minute between event
Display Switch Lights counter
Reset Button Resets counter
LED Event Counter Stores up to 90 events
Camera Test Checks camera
CPU Power Supply Dual 9 volt batteries
Camera Back-up Battery Holders Holds 6 AA
alkaline batteries: see "Battery Facts" pg. 10 of these
instructions
Foam Padding Protect camera
Control Cable Quick connection to camera
Control Box Size (w)6.75" x (h)10.3" x (d)2.95"
Control Box Weight 32 oz. (including batteries)
CONTROL BOX SPECIFICATIONS
60045_10504_pg.5.pdf

page 6
PARTS
1. Shutter Release Button
2. Low Light Sensor
3. Focus Free Lens
4. Electronic Flash
5. Red-eye Reduction Lamp
6. Lens Cover ON/OFF Switch
7. Auto/Fill Flash Switch
8. Surveillance System Port
9. Flash Ready Light
10.DX Film Window
PARTS
11. Viewfinder
12. Film Imprinting Mode Switch
13. Year/Hour Button
14. Month Button
15. Day/Minute Button
16. LCD Date or Time Indicator
17. Wrist Strap Lug
18. Self-Timer
19. Film Chamber
20.Film Sprocket
PARTS
21. Film Take-up Spool
22.Film Tip Mark
23.Exposure Counter
24.Back Door
25.Battery Chamber
26.Automatic Rewind Switch
27. Tripod Socket
28.Back Door Latch
CAMERA IDENTIFICATION
1 2 3 4 5
76 8
9
19 20 21 22 23
25 26 27 28
10 11 12
13
14
15
16 17 18
24
60045_10504_pg.6.pdf

page 7
Type 35mm focus-free
Film Size 35mm color, black & white, print or slide
Film Speed IS0 200 - 800 (IS0 400 or 800 for best results)
Lens Quality precision optics
Film Loading Easy loading
Film Advance Motorized
Film Rewind Motorized, manual rewind switch
Exposure Counter Yes
Flash Built-in electronic
Fill-Flash (Auto/Fill button)
Red-Eye Reduction Yes
Ready Light Green LED type
DX Window Indicates type of film in use
Viewfinder Type big viewfinder
Tripod Socket Yes
Data Back Type LCD, time, date, or nothing
Data Back Display Year, month, day or time or nothing
Power 2 - AA alkaline batteries (without film and batteries)
Wrist Strap Keeps camera ready for action
See camera specification insert for more details on your model camera
CAMERA SPECIFICATIONS
60045_10504_pg.7.pdf

page 8
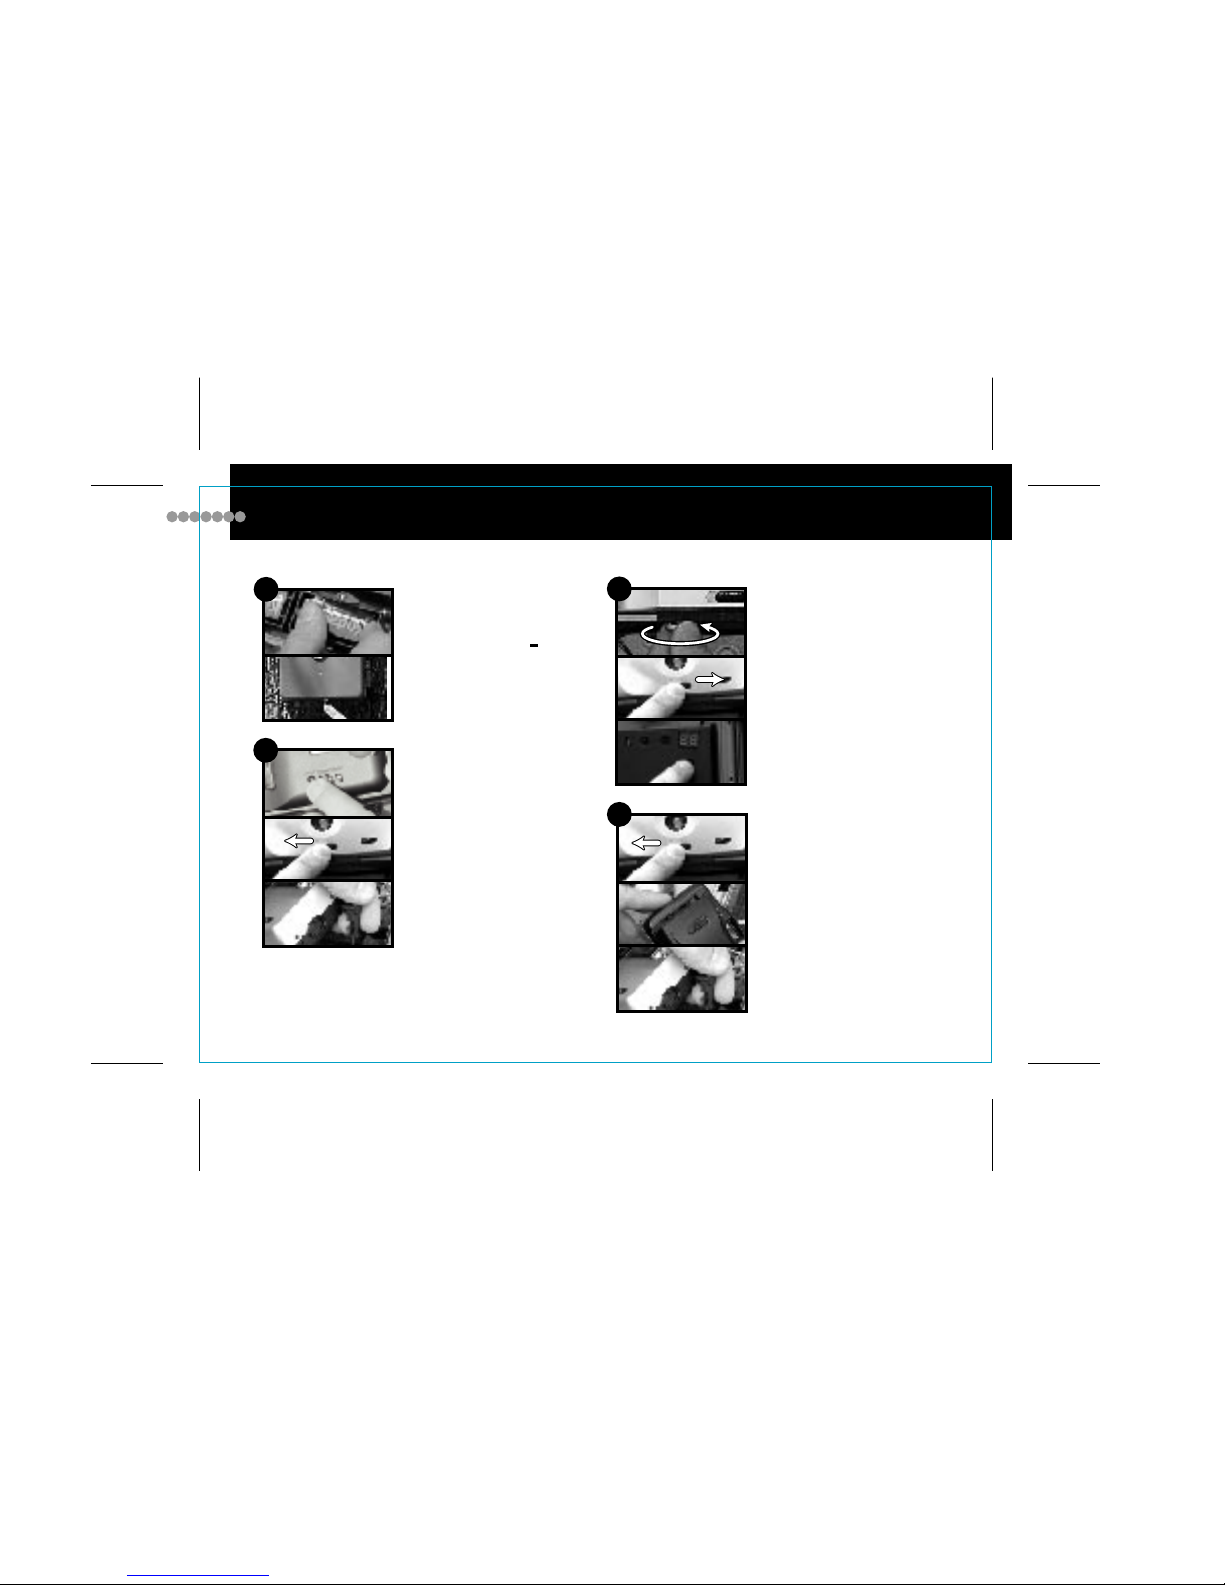
LOADING BATTERIES
9 Volt Batteries for Control Box
Open the control box by swinging the Control Box Latches (11)
open. Insert two fresh 9V alkaline batteries into the 9V Battery
Holders (20). Make sure that the + or - on the batteries match
the + or - indicated in the 9V Battery Holders (20). Make sure
the batteries are secured in their holders.
AA Batteries for Camera
Open the Battery Chamber (25) by sliding the latch in the
direction indicated by the mark on the cover. Place 2 AA
alkaline batteries into the Battery Chamber (25). Make sure
that the + or - on the batteries match the + or - indicated on the
battery chamber door. Close the battery chamber door. Make
sure it is closed securely.
Back-up Power Supply for Camera
Your wildlife camera system also comes with an additional
power supply for long camera life. Insert six fresh AA alkaline
batteries into the Camera Back-up Battery Holders (27). Make
sure that the + or - on the batteries match the + or - indicated in
the Camera Back-up Battery Holders (27). When using back-
up battery holders, alkaline batteries must always be installed.
CAUTION! Always use alkaline batteries, NEVER
rechargeable. Rechargeable batteries may damage circuitry
and void your warranty.
60045_10504_pg.8.pdf

page 9
Your wildlife camera system is battery operated. To provide maximum functionality and battery life you
need to be aware of the following Information.
• Use "alkaline" batteries ONLY. Rechargeable or non-alkaline batteries will cause poor camera
performance, damage the circuitry, and void your warranty.
• For best camera performance, install "alkaline" batteries in all available 9 volt or AA battery slots.
• The two 9 volt battery holders power the control box electronics that consist of the infrared sensor,
computer controlled activation circuitry, and event counter display.
• You can expect at least 7 days of continuous operation from one set of fresh 9 volt alkaline batteries.
• The two AA cells in the camera power the camera motor and flash.
• Cold weather will decrease battery life.
• While the 35mm camera will operate on its 2 AA alkaline batteries, we recommend that the camera
back-up battery holders be used for best camera and flash performance. Up to six additional AA alkaline
batteries can be inserted in the camera back-up battery holders. They are for camera and flash functions
only and must be inserted in pairs (2, 4, or 6).
• The AA alkaline battery life will vary greatly depending on the amount of pictures taken with and without
the flash. You can expect a fresh set of alkaline batteries to last 7 days or 144 flash exposures.
Note: After 7 days use, always replace the AA alkaline batteries to insure proper camera operation.
For Longer Battery Life
• Use the camera in the auto flash mode only, never fill-flash mode.
• Use longer delay periods.
• Use in daylight only mode.
• Always use fresh alkaline batteries.
• Use back-up camera AA alkaline battery supply.
• Check battery power with a battery checker or change alkaline batteries each time you change film.
CAUTION: Never use rechargeable or non-alkaline batteries. They may damage the electronic
circuitry and void guarantee.
BATTERY FACTS
60045_10504_pg.9.pdf
Ce manuel convient aux modèles suivants
1
Table des matières
Autres manuels Moultrie Caméra de sécurité


