MoJack 750XT Instructions d'installation
Ver. 092418
www.theMoJack.com
1-877-575-3173
Instructions for Assembly and Operation
Instrucciones para Asamblea y de la Operación
MoJack 750XT Lift
2
Introduction
This manual contains assembly, parts, operating,
maintenance, adjustment and safety instructions for
your MoJack 750XT lift.
BEFORE USING YOUR MOJACK 750XT, CAREFULLY
READ THIS MANUAL IN ITS ENTIRETY.
By following these operating, maintenance and safety
instructions, you will prolong the life of your MoJack lift
and promote safe operation.
All MoJack parts are thoroughly tested and inspected
before leaving the factory to ensure that they comply
with all relevant safety standards.
NOTE: Please save this manual for future reference.
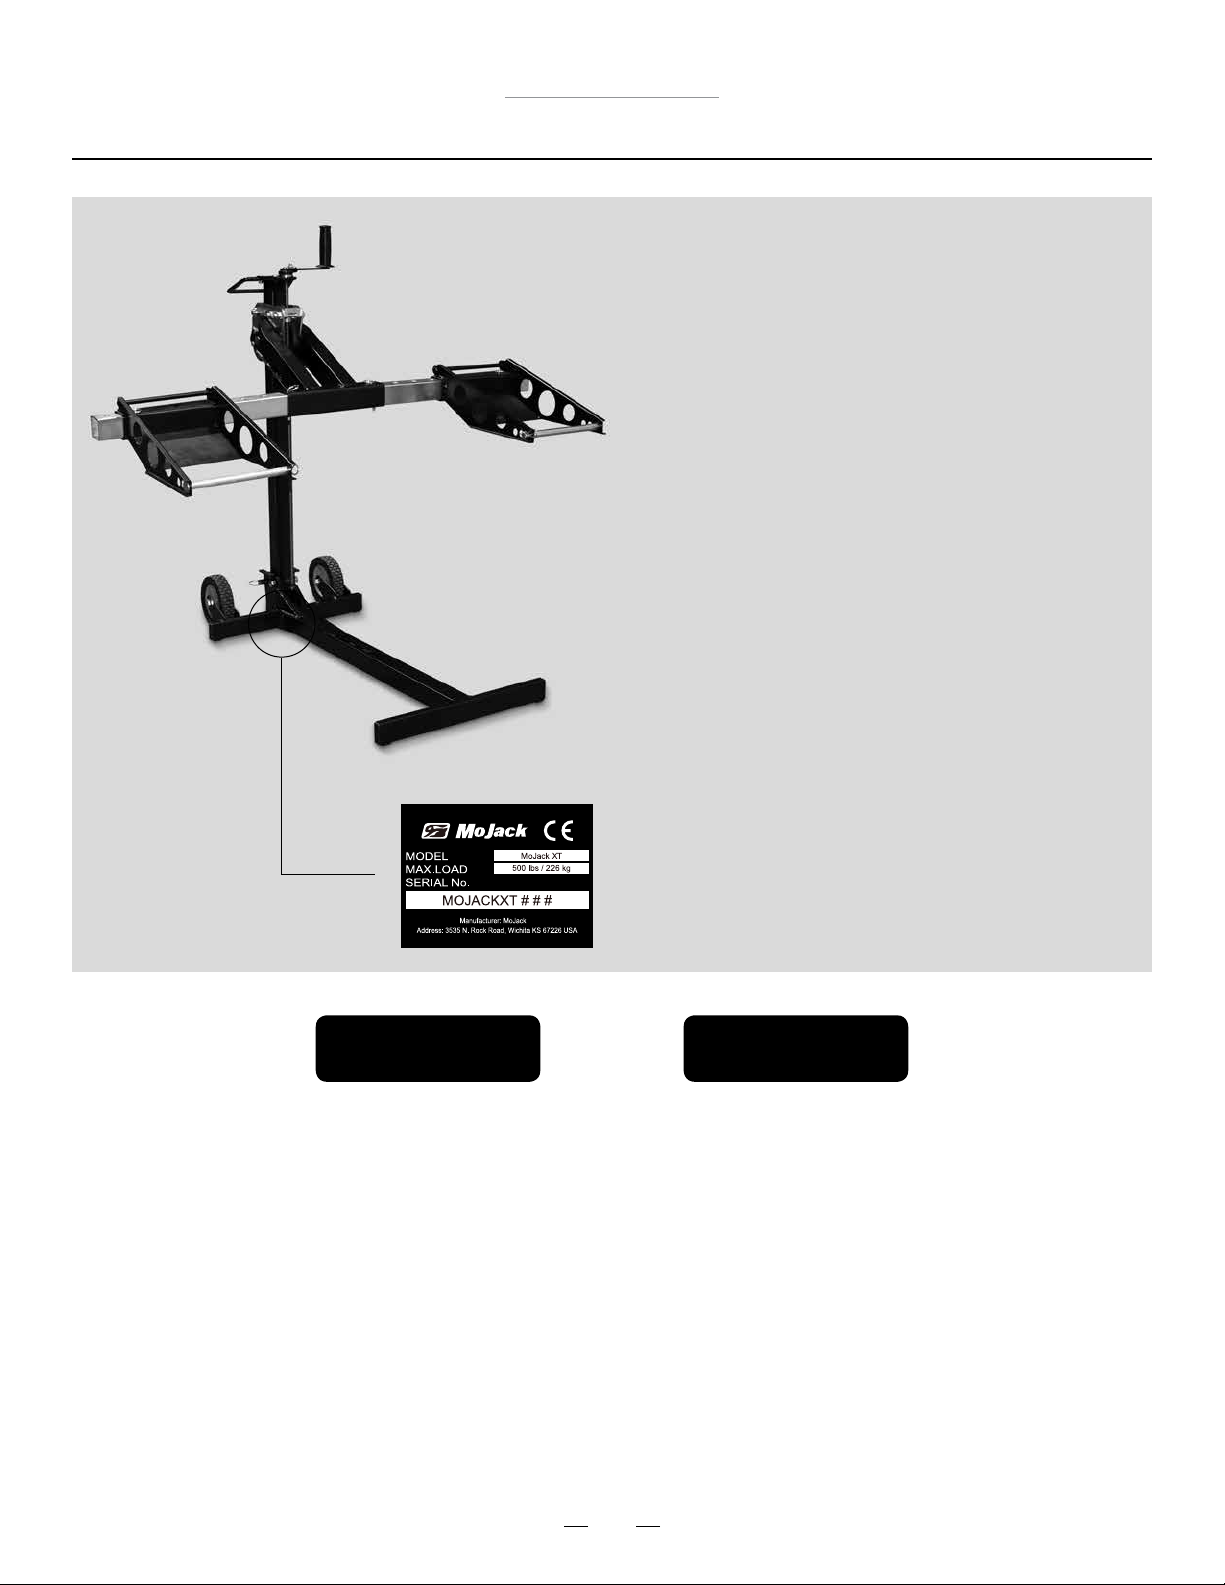
NOTE: Location of unit Serial Number.
Patent #s: U.S., 8,448,920 and 8,387,953
© 2014 MoJack Distributors, LLC.
MoJack and the MoJack logo are registered trademarks of MoJack Distributors, LLC.
MoJack 750XT is a trademark of MoJack Distributors, LLC. All rights reserved.
Submit your questions online at:
Envie sus preguntas por Internet a:
www.theMoJack.com
Need
Assistance?
Please DO NOT return this
product to the store.
Our Customer Service
Department is ready to help!
1-877-575-3173
¿Necesita
ayuda?
¡NO devuelva este producto
a la tienda!
¡Nuestro Departamento de
Servicio de Atención al Cliente
está listo para ayudarle!
1-877-575-3173
MoJack 750XT Lift
3
Warnings and Safety Instructions
IMPORTANT: The MoJack 750XT is intended for use with riding lawn mowers and riding lawn tractors only. Do not
exceed 750 lbs. It should never be used to service other types of machinery unless there is an approved MoJack
accessory tted for the type of machinery. Please consult you local MoJack dealer or distributor.
Read and understand all safety and operating instructions before using the MoJack 750XT.
Never allow anyone unfamiliar with the safety or operating instructions to use the MoJack 750XT.
Follow all safety and servicing instructions provided by the lawn mower’s manufacturer before using
the MoJack 750XT.
Do not modify the MoJack 750XT in any way. Any modications will void any and all warranties and could
compromise your personal safety.
When using the MoJack 750XT, keep ALL bystanders at a safe distance away from the MoJack 750XT.
The MoJack 750XT must be used on a solid level surface.
Do not lift the front end and the back end of the mower at the same time.
Do not use MoJack 750XT lift for anything other than a mower, unless the proper accessory is used.
Always stop engine and remove key before beginning any work on the mower.
Never operate the mower’s engine while using the MoJack 750XT.
Do not exceed the lifting capacity of 750 lbs.
If the MoJack 750XT Tower is leaning while lifting or lowering the mower, this indicates an overload
condition. Remove the mower immediately.
Tower must be locked in place with the Tower Locking Pin before using the MoJack 750XT.
Carrier Locking Pin must be locked into Tower before starting any service on mower.
Do not remove safety warnings or decals from MoJack 750XT.
Before each use, always check for any worn, loose or damaged parts on the MoJack 750XT. If any
damaged parts are present, do not use the MoJack 750XT and contact MoJack at 1-877-575-3173.
Do not climb on mower while it is lifted, being lifted or being lowered.
No one should be on the mower while it is lifted, being lifted or being lowered.
After the mower is raised to a working height, always place wheel chocks (not included) behind the back tires
of the mower.
Wheel Pads must be equal distance from the Lift Arm to maintain proper balance.
Remove all mower attachments before using the MoJack 750XT.
Failure to follow these warnings may result in property damage and serious bodily injury or death.

MoJack 750XT Lift
4
LIMITED WARRANTY
For two years for residential use and one year for commercial use MoJack warrants the product against failure due to
defect in material or workmanship when product is used properly. MoJack will replace any defective part at no cost.
This warranty does not cover any product that has been altered or adjusted, or any product that has been misused or
abused. THIS IS THE CUSTOMER’S SOLE AND EXCLUSIVE REMEDY. MOJACK DISCLAIMS ALL IMPLIED WARRAN-
TIES, INCLUDING THE WARRANTY OF MERCHANTABILITY AND FITNESS FOR A PARTICULAR PURPOSE. MOJACK
SHALL NOT BE LIABLE FOR ANY INCIDENTIAL OR CONSEQUENTIAL DAMAGES. SOME STATES OR PROVINCES DO
NOT ALLOW THE EXCLUSION OR LIMITATION OF THE IMPLIED WARRANTIES OR THE REMEDIES FOR BREACH OF
THE IMPLIED WARRANTIES, SO THESE EXCLUSIONS MAY NOT APPLY TO YOU. THIS LIMITED WARRANTY GIVES
YOU SPECIFIC LEGAL RIGHTS, AND YOU MAY ALSO HAVE OTHER RIGHTS WHICH VARY FROM STATE TO STATE
OR PROVINCE TO PROVINCE.
What does this warranty cover?
This warranty covers against a failure due to a defect in material or workmanship within two years of purchase for
residential use and within one year of purchase for commercial use.
What does this warranty NOT cover?
This warranty does not cover any MoJack which has been altered or adjusted in any way from its original model.
It will not cover any MoJack which has been damaged due to misuse, abuse, accident or negligence. This warranty does
not cover incidental or consequential damages.
What is the period of coverage?
Two-year warranty for residential use, one-year for commercial use from date of purchase for the original owner.
What will MoJack do to correct problems?
We will replace any defective part (within the coverage period) at no charge.
How can I get service?
In order to be eligible for service under this warranty you MUST register your MoJack within thirty (30) days of
purchasing. You must keep your receipt as proof of date of sale. You can register your new MoJack on our website at
www.themojack.com or by calling our toll-free number 1-877-575-3173.
How do I contact MoJack about a warranty issue?
You can contact us from our website at www.themojack.com or by calling our toll-free number 1-877-575-3173.
Do I have other rights under State Law?
This warranty gives you specic legal rights, and you may also have other rights which vary from state to state.
What is the return policy?
Please refer to the Return Policy and Procedures of your place of purchase for returns and refunds.
How do I contact MoJack?
Warranty and Returns
MoJack 750XT Lift
5
1
2
9
9
3
7
8
5
4
10
10
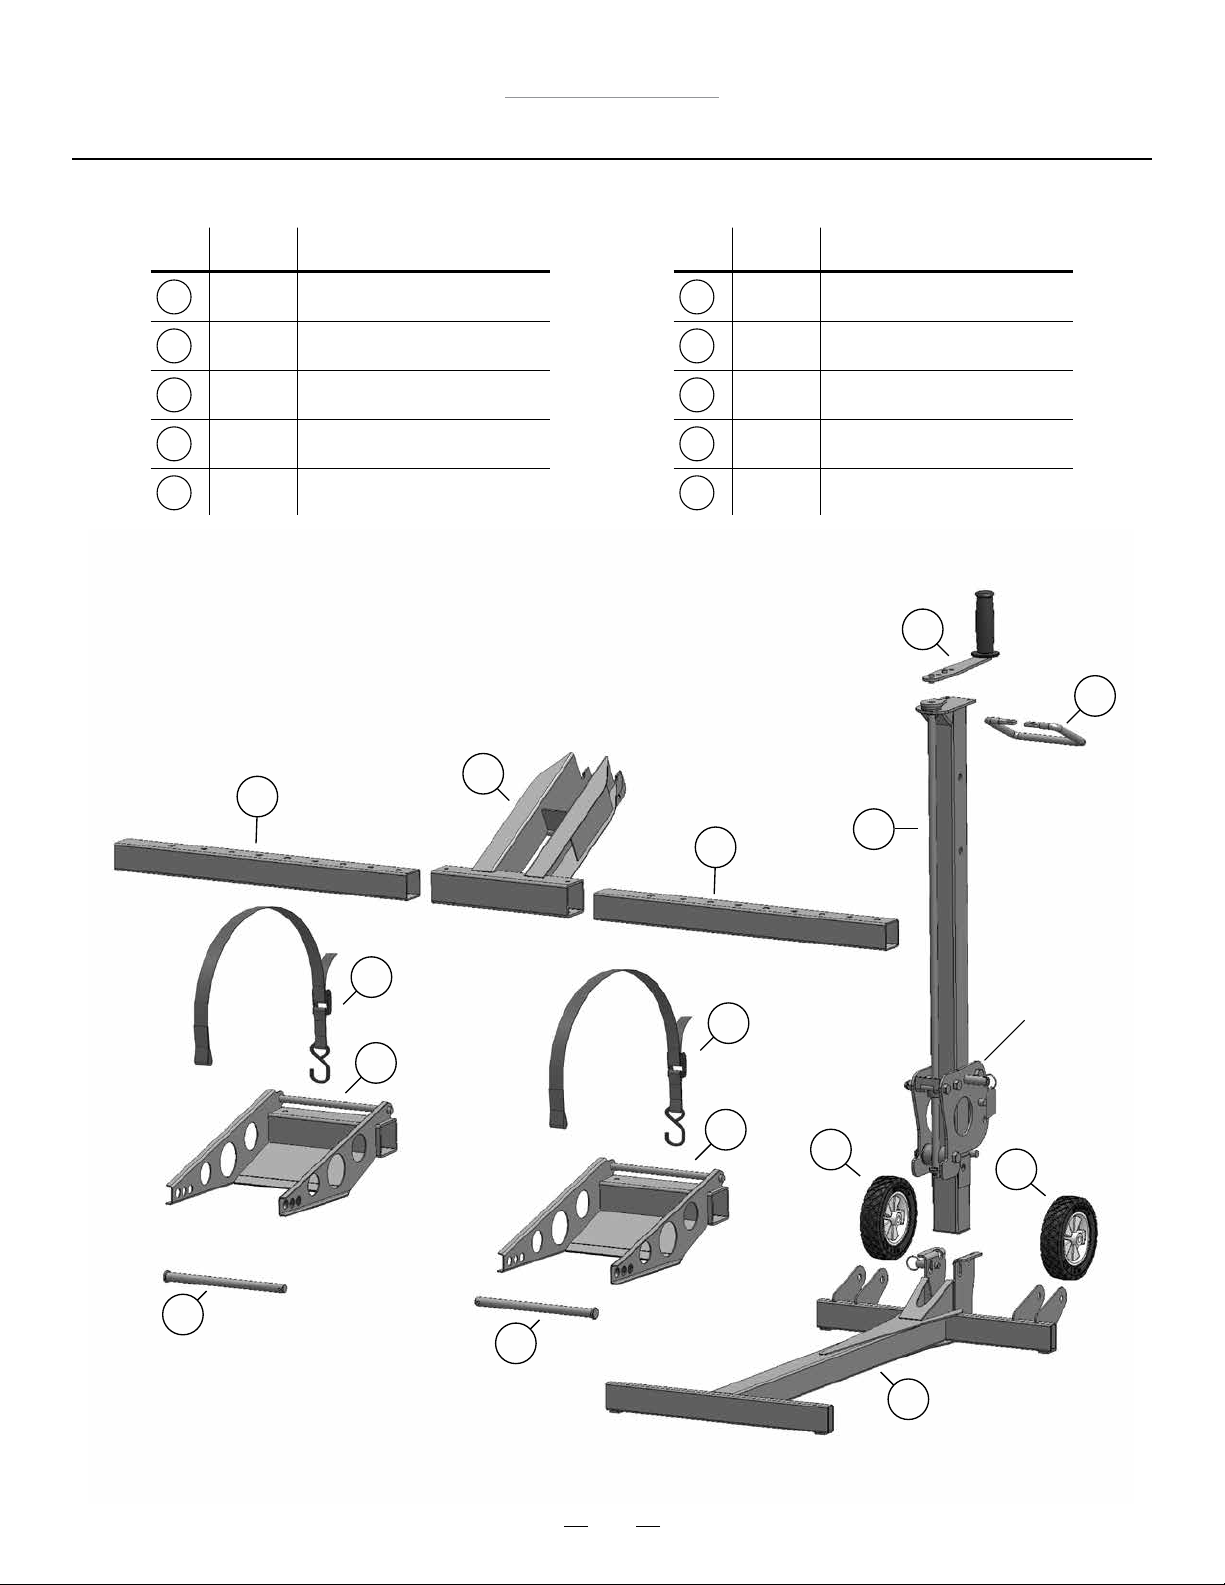
Parts List
6
Item
No.
Qty.
Description
Lift Arm Inserts
Grip Handle
Crank Handle
Support Rod
Safety Strap
2
1
1
2
2
7
8
9
10
1
Item
No.
Qty.
Description
Tower
Lift Arm
Base
Wheel
Wheel Pads
1
1
1
2
2
2
3
4
5
6
54
6
Carrier

MoJack 750XT Lift
6
Hardware List
11
Item
No.
Qty.
Description
Cap Screw M12-1.75 X 80
Cap Screw M12-1.75 X 65
Carriage Bolt M8-1.25 X 20
Nylock Nut – M12-1.75
Nylock Nut – M8-1.25
Push Pin
Clevis Pin
Small Hair Pin
Large Hair Pin
1
2
3
3
3
4
1
1
2
19
12
13
14
15
16
17
18
Tools Needed for Assembly
19mm Wrench (2) 13mm Wrench (1)
14 Nylock Nut – M12-1.75 15 Nylock Nut – M8-1.25
18 Small Hair Pin 19 Large Hair Pin
11 Cap Screw M12-1.75 X 80
13 Carriage Bolt M8-1.25 X 20
12 Cap Screw M12-1.75 X 65
16 Push Pin 17 Clevis Pin

MoJack 750XT Lift
7
Assembly Instructions
STEP 1
Remove MoJack 750XT from package.
Check to be certain all parts and hardware
are present. If any parts or hardware are missing,
please contact MoJack at 1-877-575-3173 or
STEP 2
Assemble the Wheel to the Base
by inserting Cap Screw and Nylock Nut
and tighten. Repeat with second Wheel.
Note: Do not over tighten Nylock Nut.
Base 3
Wheel 4
Nylock Nut 14
Cap Screw 12
Attach the Tower to the Base using
Cap Screw and Nylock Nut as shown.
Note: Do not over tighten Nylock Nut.
STEP 3
Nylock Nut 14
Cap Screw
11
Tower 1
Base 3
4 3
12 14
1 3
11 14
MoJack 750XT Lift
8
Assembly Instructions
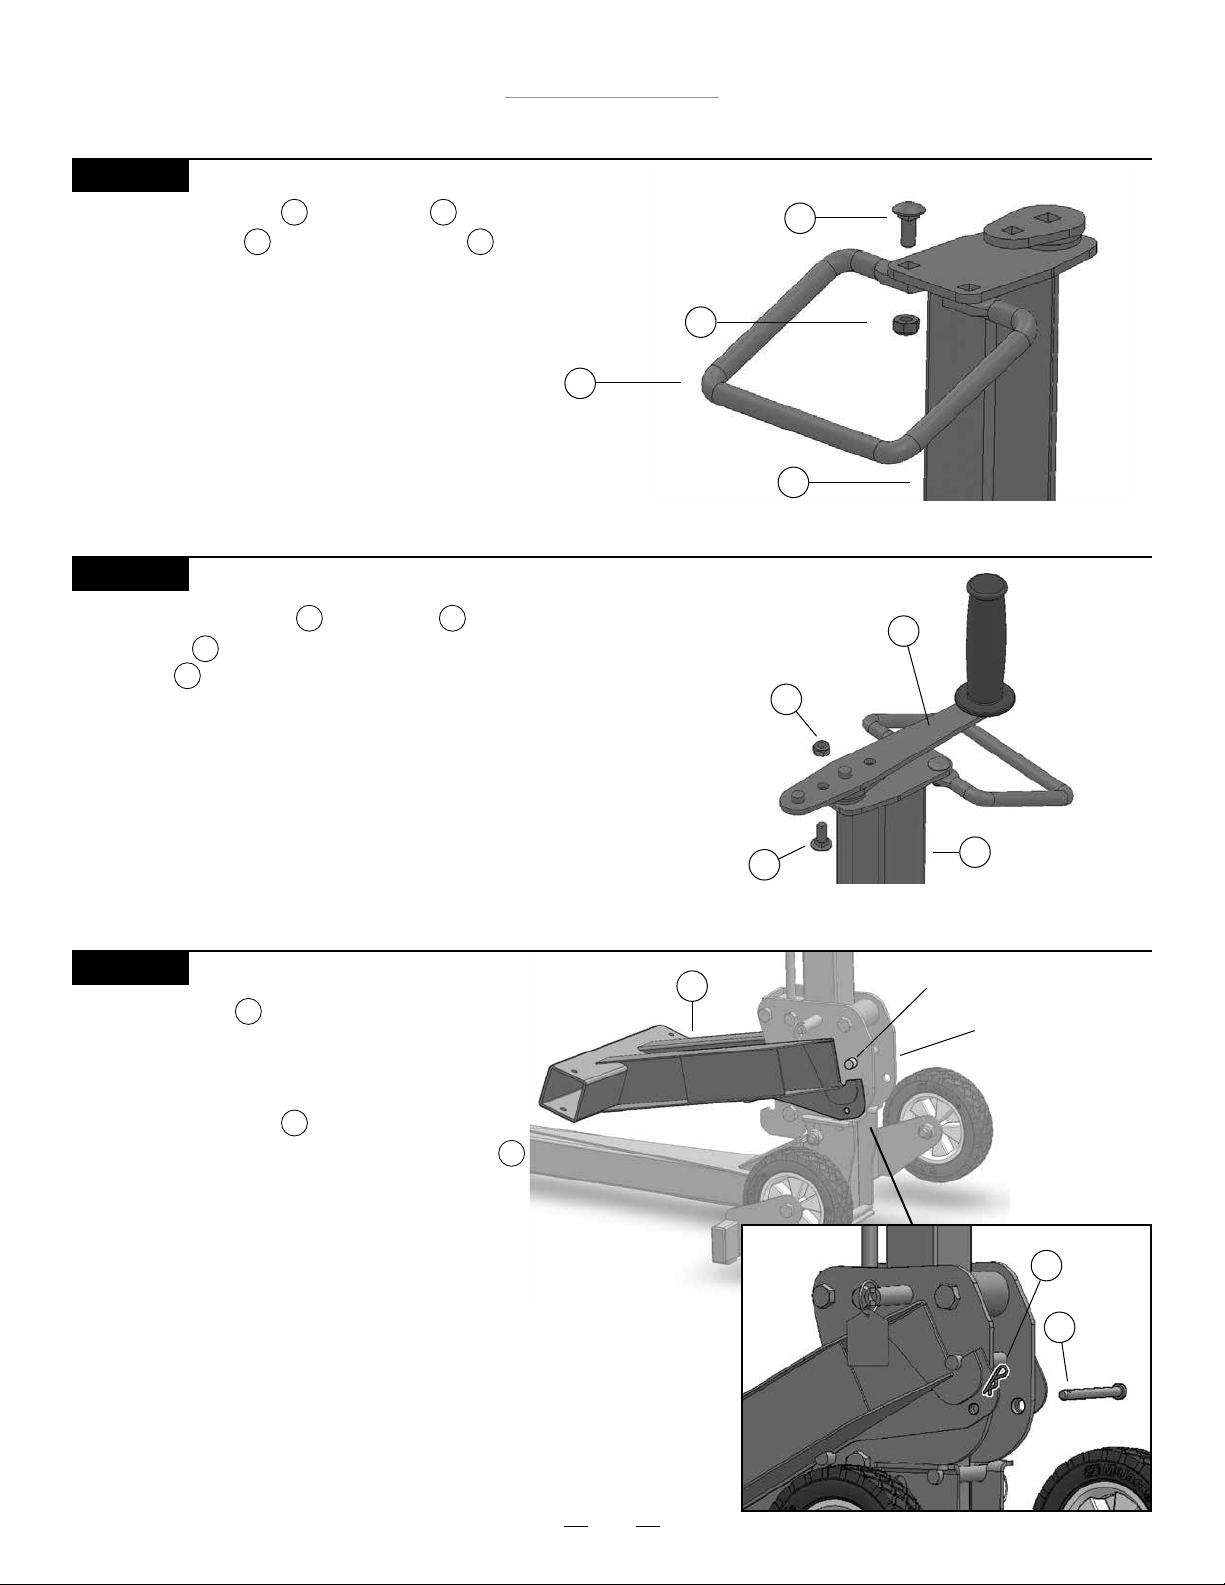
STEP 5
Nylock Nut 15
Carriage Bolt 13
Crank Handle 8
Tower
1
Attach the Crank Handle to the Tower by inserting
Carriage Bolt with threads facing up and fasten with
Nylock Nut .
Note: There are two holes in the Crank Handle. The hole
closest to the rubber grip will provide a 6” radius for crank-
ing. The other hole will provide an 8” radius, making crank-
ing easier. Use the hole that works best with your model of
lawn mower.
18
13
15
STEP 6
Hang the Lift Arm on the Carrier by hooking
the slotted area of the Lift Arm under the top bar
of the Carrier. Lift Arm must be inserted from the
front and then lowered which fastens Lift Arm into
place. Insert Clevis Pin through the hole in the
Carrier and lock by fastening the Small Hair Pin
to the Clevis Pin.
2
18
Lift Arm 2Top Bar of Carrier
Carrier
Attach the Grip Handle to the Tower with
two Carriage Bolts and two Nylock Nuts .
STEP 4
Nylock Nut 15
Carriage Bolt 13
Tower 1
Grip Handle 7
7 1
13 15
Small
Hair Pin
18
Clevis
Pin
17
17
MoJack 750XT Lift
9
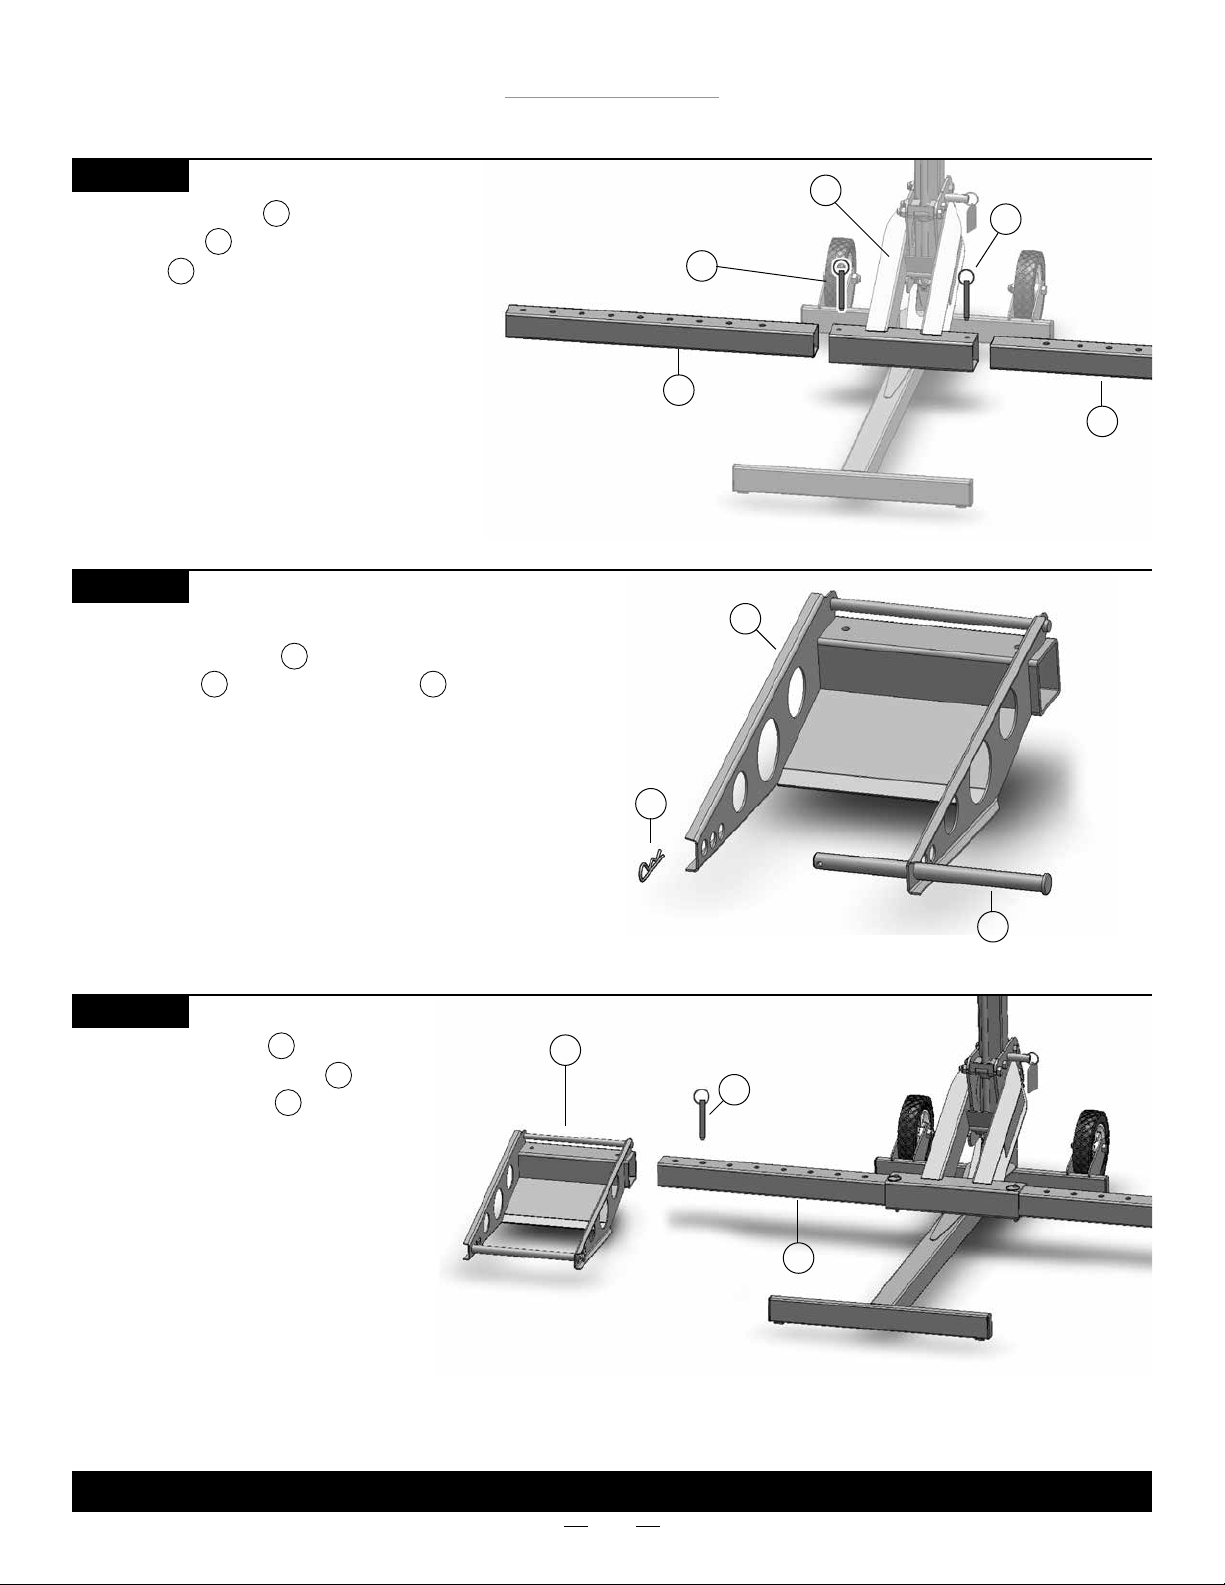
Lift Arm Insert 6
Push Pin
16
Push Pin 16
Lift Arm 2
Lift Arm Insert 6
Assembly Instructions
THIS COMPLETES ASSEMBLY.
Wheel Pad 5
STEP 8
Ready the Wheel Pads for installation by adding
Support Rods and Large Hair Pins .
5
11 19
Large Hair Pin 19
Support Rod 11
Push Pin
16
STEP 9
Slide the Wheel Pads onto both
sides of the Lift Arm Inserts and
secure with Push Pins .
Note: The Wheel Pads can be moved in
or out to t different mower widths. Use
the conguration that works best with
your model of lawn mower. The Wheel
Pads must be equal distance from the
Lift Arm to maintain proper balance.
5
6
16
Lift Arm Insert 6
Wheel Pad
5
Slide Lift Arm Inserts into both sides
of the Lift Arm and secure with
Push Pins as shown.
STEP 7
6
2
16
MoJack 750XT Lift
10
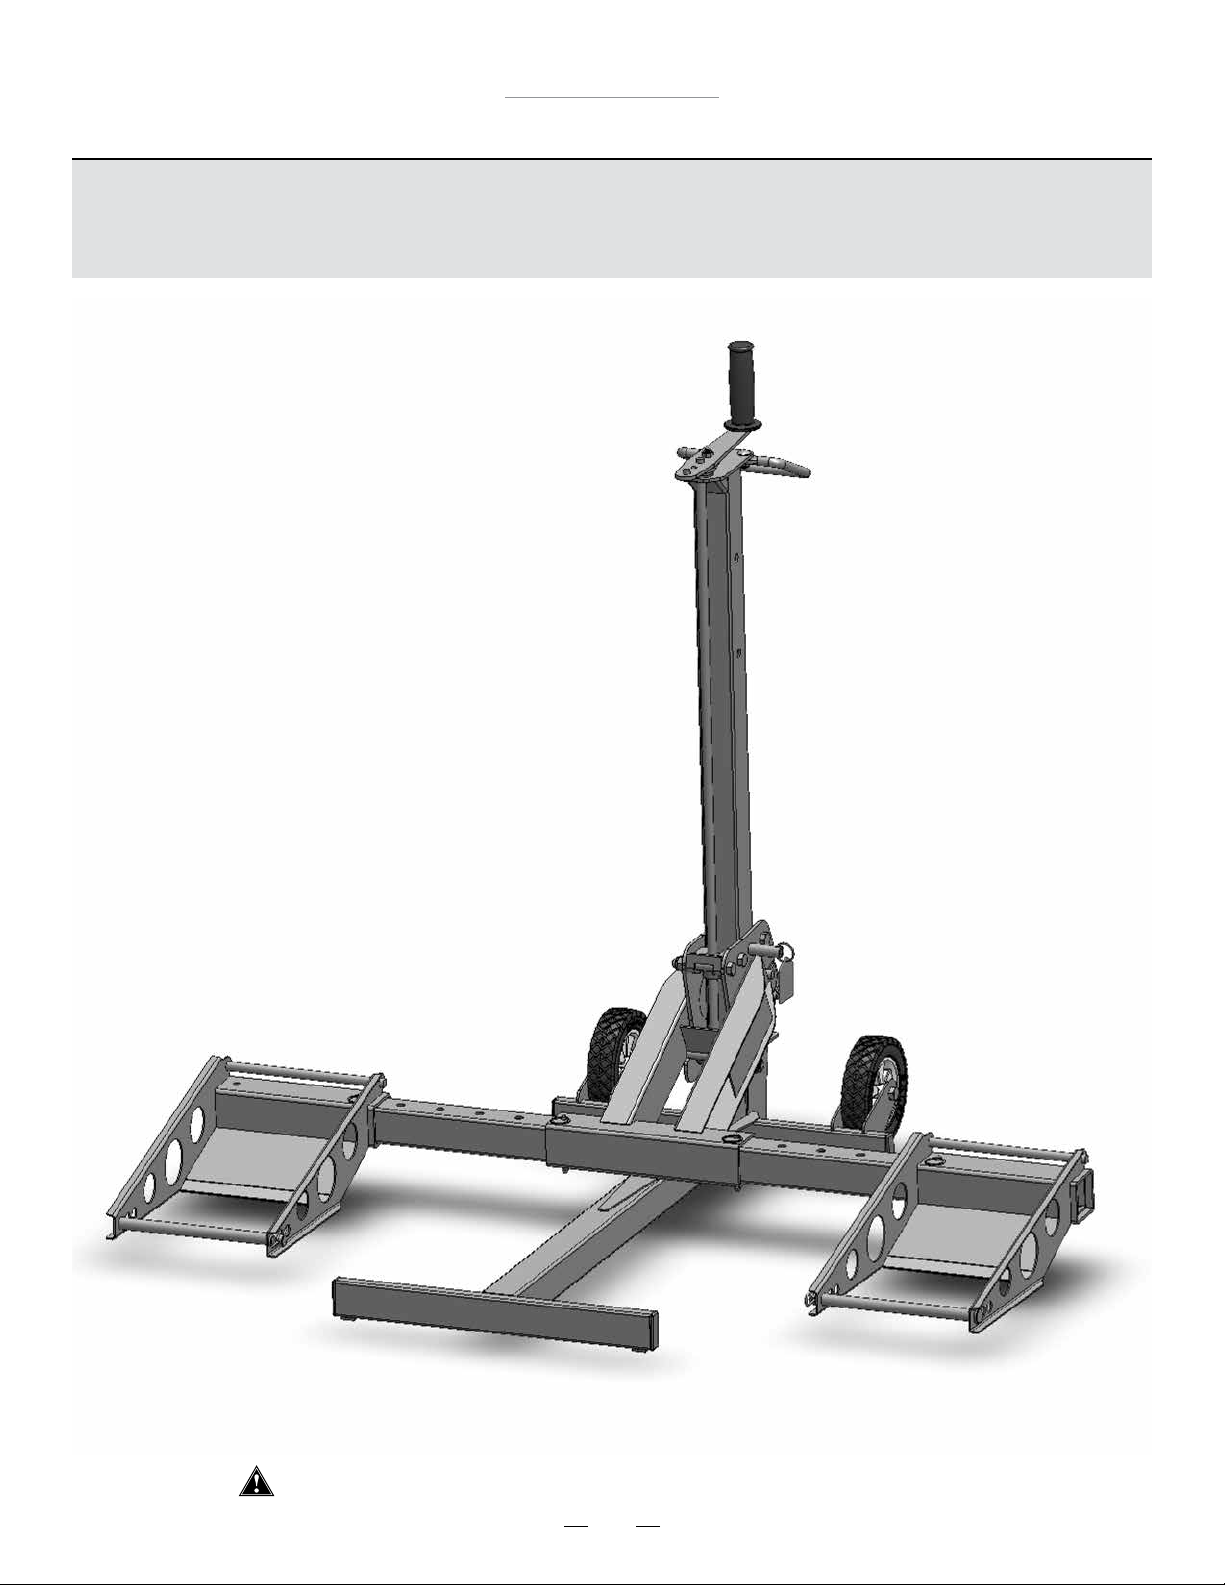
Operating Instructions
Before using the MoJack 750XT, carefully read this manual in its entirety.
Some steps of the Operating Instructions are repeated from the
Assembly Instructions. The Operating Instructions will show a full
working cycle of the MoJack 750XT.
Table des matières
Langues :
Autres manuels MoJack Accessoires pour tondeuses à gazon


