Moffat Washing machine Manuel utilisateur

Instructions for Use
Washing machine

162971
Thank you for your con dence in purchasing our
washing machine, and congratulations on the
excellent choice.
Your new washing machine meets the requirements
of modern clothes care. It consumes less energy,
water and washing agents.
Our appliances are friendly to the environment.
Some of the materials may be recycled, others
deposited or decomposed. To avoid pollution of
environment, once your appliance is no longer
useful, take it to your local authorized waste
appliance dealer.
Description of washing machine
.....................
3
Cautions
.............................................................
4
Important safety instructions
..........................
6
Installation and connection
..............................
8
Operation
.........................................................
12
Tips for washing and energy saving
.............
19
Cleaning and maintenance
.............................
21
Troubleshooting
..............................................
24
Tables
...............................................................
27
Ownership Registration
..................................
29
Warranty
...........................................................
31
Consumer Support
..........................................
32
2

162971
Dimensions (w x d x h):
600 mm x 600 mm x 850 mm
Dimensions (w x d x h):
600 mm x 440 mm x 850 mm
Depth with door open:
106 cm / 88 cm (depending on model)
Weight (net):
79 kg
Nominal voltage:
120 V, 60 Hz
Power:
1500 W
Max. load:
15 lbs (7kg)
Power socket:
120 V, 15 A, 60 Hz
Water pressure:
min. 7 psi (0,05 MPa, max. 116 psi (0,8 MPa)
Fuse:
15 A
1. Front panel
2. Detergent dispenser
3. Door
4. Filter lid
5. Adjustable legs
6. Water outlet hose
7. Water inlet hose
8. Main power cable
3
Description of washing machine
Technical information

162971
•
Be sure to remove transport brackets prior
rst use of the appliance. Attempted operation
of the blocked machine may result in
irreparable damage which is not covered by the
manufacturer’s warranty!
•
When connecting your washing machine to
the water supply, be sure to use the brand new
water inlet hose and appropriate sealing gaskets
(included).
•
Do not locate the machine in a room with
temperature below 0°C. Parts of the machine may
be damaged if frozen.
•
Install the washing machine in a perfectly
horizontal position, on solid at concrete oor.
•
Follow the instructions for correct installation and
water and main connections.
•
Never immerse the end of the drain hose into the
draining water.
•
Prior to starting the washing cycle lock the door
by pressing them at the designed spot.
•
Door may not be open during the washing cycle.
•
Use only detergents and softeners for
machine wash. Manufacturer may not assume
responsibility for any damage and eventual
discoloring of gaskets and plastic components as
a consequence of incorrect use of bleach and/or
coloring agents.
•
For removal of lime residues use such agents
with added anti-corrosion agents. Follow the
manufacturer’s instructions. Finish the lime
removal by multiple rinsing to completely remove
eventual acid residues.
•
Never use detergents containing solvents, since
there is a danger of creating toxic gasses which
may damage the machine and result in ignition or
explosion.
•
Upon completion of washing operation close the
water faucet.
4
Cautions

162971
•
Before any transport insert at least one transport
blocking rod. Prior to this operation disconnect the
appliance from the main power!
•
Rating plate with basic information is located
above the opening of the machine.
Before connecting the appliance read
these instructions carefully. Repairing
any failure arising from inappropriate
connections or use of the appliance is not
covered by the guarantee.
The symbol on the product or on its
packaging indicates that this product
may not be treated as household
waste. Instead it shall be handed over
to the applicable collection point for the
recycling of electrical and electronic
equipment. By ensuring this product
is disposed of correctly, you will help
prevent potential negative consequences
for the environment and human health,
which could otherwise be caused by
inappropriate waste handling of this
product. For more detailed information
about recycling of this product, please
contact your local city of ce, your
household waste disposal service or the
shop where you purchased the product.
5

162971
To reduce the risk of re, electric shock,
or injury to persons when using your
appliance follows basic precautions,
including the following:
1.
Read all instructions before using the appliance.
2.
Do not wash articles that have been previously
cleaned in, washed in, soaked in or spotted
with gasoline, dry-cleaning solvents, and other
ammable or explosive substances as they give
off vapors that could ignite or explode.
3.
Do not add gasoline, dry-cleaning solvents, or
other ammable or explosive substances to the
wash water. These substances give off vapors
that could ignite or explode.
4.
Under certain conditions, hydrogen gas may
be produced in a hot water system that has not
been used for 2 weeks or more. HYDROGEN
GAS IS EXPLOSIVE, if the hot water system
has not been used for such a period, before
using a washing machine, turn on all hot
water faucets and let the water ow from
each for several minutes. This will release
any accumulated hydrogen gas. As the gas is
ammable do not smoke or use an open ame
during this time.
5.
Do not allow children to play on or in the
appliance. Close supervision of children is
necessary when the appliance is used near
children.
6.
Before the appliance is removed from service or
discarded, remove the door.
7.
Do not reach into the appliance if the tub or
agitator is moving.
8.
Do not install or store this appliance where it will
be exposed to the weather.
9.
Do not tamper with controls.
10. Do not repair or replace any part of the
appliance or attempt any servicing unless
speci cally recommended in the user-
6
Important safety instructions

162971
maintenance instructions or in published user-
repair instructions that you understand and have
the skills to carry out.
11.
To reduce the risk of electric shock, disconnect
the appliance from the power supply before
attempting any user maintenance. Turning
the control to the »OFF« position does not
disconnect the appliance from the power supply.
Grounding instructions
This appliance must be grounded. In the event of
malfunction or breakdown, grounding will reduce
the risk of electric shock by providing a path of
least resistance for electric current. This appliance
is equipped with a cord having an equipment-
grounding conductor and a grounding plug. The
plug must be plugged into an appropriate outlet that
is properly installed and grounded in accordance
with all local codes and ordinances.
Improper connection of the equipment-
grounding conductor can result in a risk
of electric shock. Check with a quali ed
electrician or serviceman if you are in
doubt as to whether the appliance is
properly grounded.
Do not modify the plug provided with the appliance-
if it will not t the outlet; have a proper outlet
installed by a quali ed electrician.
7
Save these instructions

162971
In removing the wrapping be careful not to
damage the appliance with a sharp object.
•
Our appliances are packed in environmentally
friendly materials which may be recycled,
deposited or decomposed without any threat to
the environment.
•
To this end all wrappings are marked accordingly.
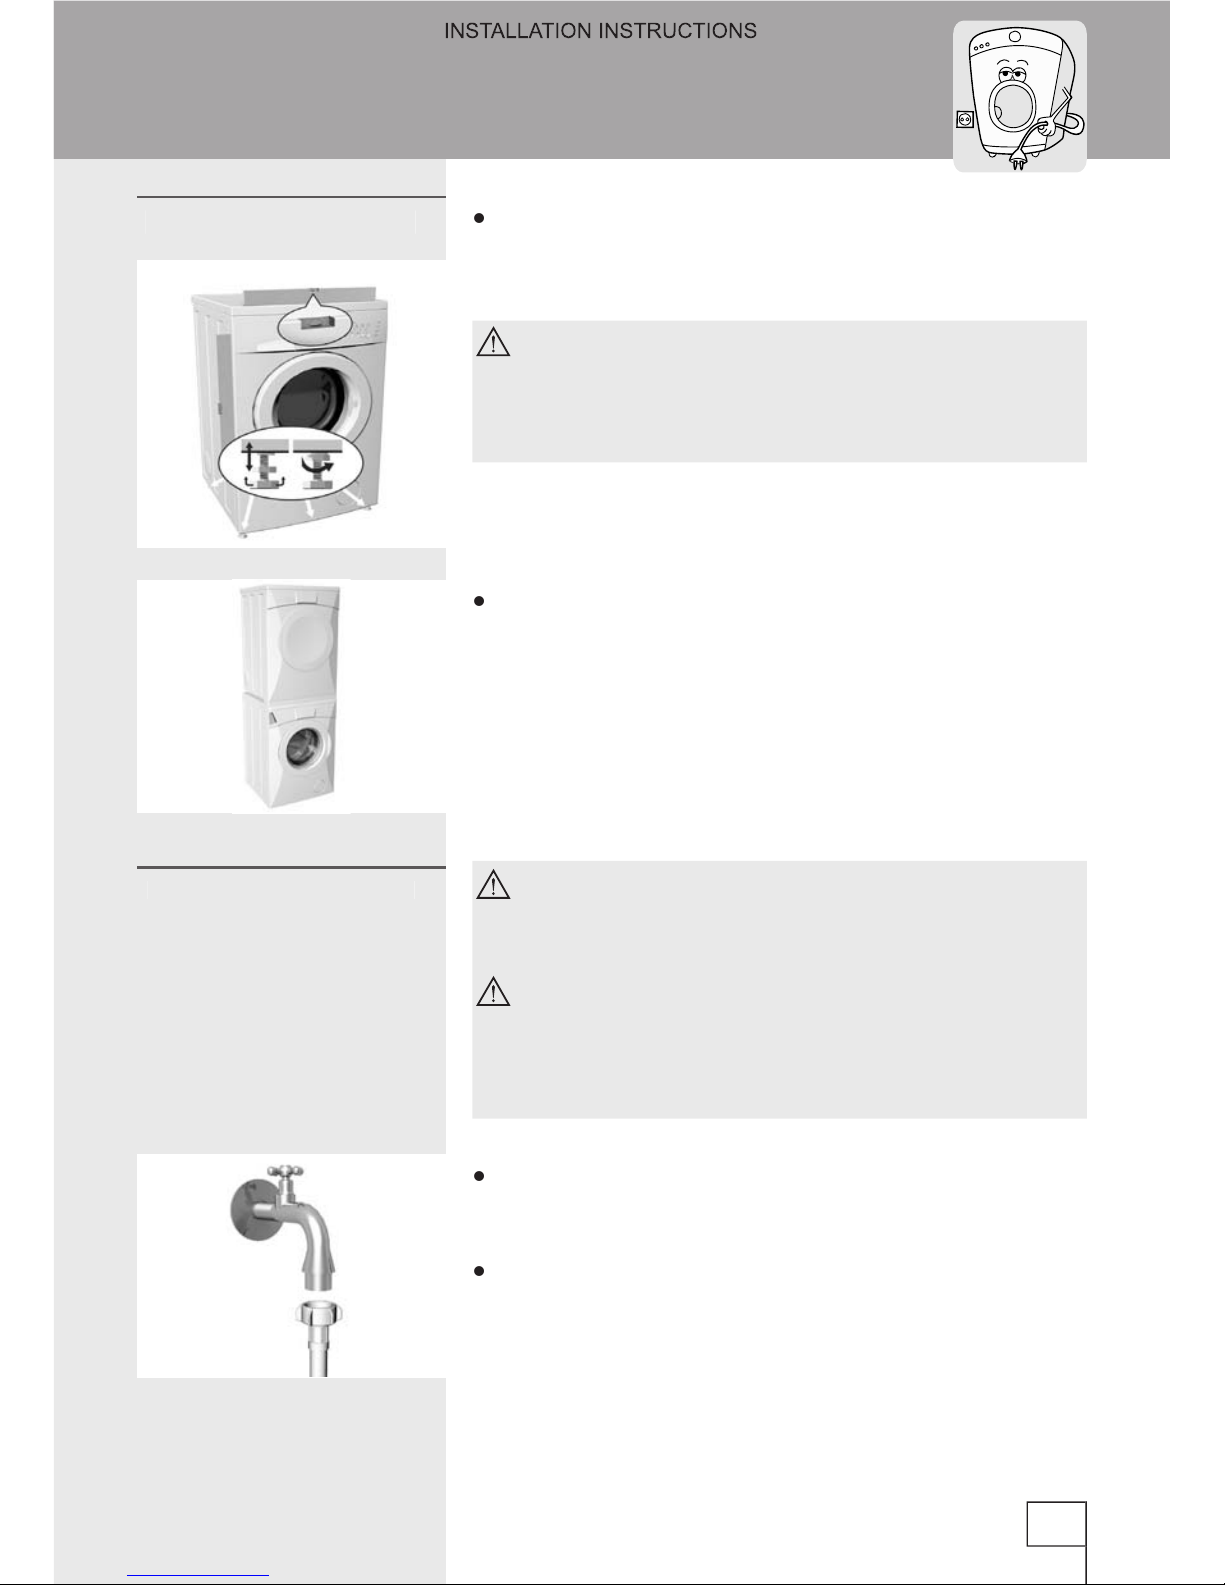
•
Move the pipes.
•
Loosen screws A at the rear of the machine
(Fig. 1).
•
Remove the brackets B (Fig. 1) and slide them
into the groove on the blocking rod (Fig. 2) - the
right one should be turned around.
•
Use the brackets to rotate blocking rods for 90°
and pull them out.
•
Close the openings with attached plastic pegs.
Save transport brackets for eventual later use.
Be sure to remove the transport brackets
prior to use, otherwise the appliance may
be permanently damaged. In such cases
the warranty conditions are void.
Fig. 1
Fig. 2
Fig. 2
8
Installation and connection
Package removal
Removal of transport
brackets
162971
•
Put the appliance in horizontal position by turning
the adjustable legs.
The legs are adjustable up to +/- 0,39 inch (1 cm).
The oor must be a hard surface with a
maximum slope of ˝ per foot (1,27 cm per 30
cm). To make sure the washer does not vibrate
or move, you may have to reinforce the oor.
•
If you have a tumble dryer of the same
dimensions, you can place it on top of the
washing machine.
To ensure correct operation of the appliance,
water pressure inlet must be between 7 psi to
116 psi (0,05 MPa and 0,8 MPa).
Minimum water pressure can be established by
measuring the quantity of poured out water.
0,8 gal (3 litres) of water must be poured out
from completely opened tap in 15 seconds.
•
Insert the gasket with screen into the water inlet
hose thread. Screw the hose thread to the water
faucet
•
In case of hot and cold water connection, connect
one hose to cold and other to hot water faucet as
marked at the rear of the appliance (letters C and
H) (C - cold; H - hot)
9
Water inlet connection
Leveling the appliance

162971
•
Fix the outlet hose to run into the sink or the
bathtub, or connect it directly to the wall drain
outlet (diameter min. 1,6 inch - 4 cm).
•
Wall drain must be installed properly and must
enable occasional cleaning.
•
Fasten the outlet hose support with a piece of
rope led through the hose elbow, to prevent the
hose from slipping to the oor.
The end of outlet hose should be placed between
minimum 24 inch (60 cm) and maximum 40 inch
(100 cm) above the oor level.
•
Plug the main power cable to the wall main
socket.
•
Required voltage and other information are written
on the rating plate above the door opening of the
machine.
The wall socket must be accessible at all
times and must be equipped with a ground
lead (in accordance with the local safety
regulations).
The permanent connection must be tted
by an authorized personnel only.
Damaged main power cable may be
replaced only by the manufacturer or
authorized servicer.
Never plug the appliance into the electric
shaver socket or hair dryer socket.
Connect to individual branch circuit.
10
Connect the appliance
to the mains supply
Water outlet connection
Autres manuels pour Washing machine
1
Ce manuel convient aux modèles suivants
1
Table des matières
Autres manuels Moffat Rondelle

Moffat
Moffat 350A4502P554 Instructions originales

Moffat
Moffat WF40B Manuel utilisateur

Moffat
Moffat Washing machine Manuel utilisateur

Moffat
Moffat MKXR1080 Manuel utilisateur

Moffat
Moffat Washers Manuel utilisateur

Moffat
Moffat WDF40B Manuel utilisateur

Moffat
Moffat MNSR1070 Manuel utilisateur

Moffat
Moffat MCCH1120FWW Manuel utilisateur

Moffat
Moffat MKXR1070 Manuel utilisateur


