MIMAKI OPT-J0475 Manuel utilisateur

MIMAKI ENGINEERING CO., LTD.
https://mimaki.com/
https://japan.mimaki.com/
English
Japanese
Foreword ........................................................................2
Safety Precautions ........................................................3
Warning labels ...............................................................5
Name of Each Part .........................................................6
Setting of 10kg Ink Tank ...............................................7
Replace 10kg ink tank ...................................................9
Set 2L ink pack .............................................................11
Replace 2L ink pack ....................................................13
Use the same color ink in one tank ............................15
Maintenance .................................................................17
About ink level correction ...........................................19
If abnormality occurs ..................................................20
はじめに ........................................................................22
安全にお使いいただくために ........................................23
警告ラベルについて ......................................................25
各部の名称 .....................................................................26
10kg インクタンクをセットする ..................................27
10kg インクタンクを交換する ......................................29
2L インクパックをセットする ......................................31
2L インクパックを交換する ..........................................33
同色インクを 1つのタンクで使用する .........................35
メンテナンス .................................................................37
インク残量補正について ...............................................39
異常が発生したら ..........................................................40
D203324-12
OPT-J0475, OPT-J0476
10kg Ink supply unit
10kgインク供給ユニッ ト
OPT-J0494
Conversion to 2L Ink Unit
2L
インクユニッ ト変換セッ ト

2
Foreword
Congratulations on your purchase of the 10kg ink supply unit.
This operation manual
• This manual explains the operation of the 10kg ink supply unit.
• Read and fully understand this operation manual before using this machine. It is also necessary to keep this operation
manual on hand.
• Make arrangements to deliver this operation manual to the person in charge of the operation of the 10kg ink supply unit.
• Although this operation manual has been carefully prepared for your easy understanding, please do not hesitate to con-
tact your local distributor if you have any inquiry.
• The contents of this operation manual are subject to change for improvement without notice. Please note.
• If this manual should become illegible due to damage, or is destroyed due to fire or similar reason, purchase another copy
of the operation manual at our sales office.
CAUTION
THIS LIMITED WARRANTY OF MIMAKI SHALL BE THE SOLE AND EXCLUSIVE WARRANTY AND IS IN LIEU OF ALL
OTHER WARRANTIES, EXPRESS OR IMPLIED, INCLUDING, BUT NOT LIMITED TO, ANY IMPLIED WARRANTY OF MER-
CHANTABILITY OR FITNESS, AND MIMAKI NEITHER ASSUMES NOR AUTHORIZES DEALERS TO ASSUME FOR IT ANY
OTHER OBLIGATION OR LIABILITY, OR MAKE ANY OTHER WARRANTY, OR MAKE ANY OTHER WARRANTY IN CON-
NECTION WITH ANY PRODUCT WITHOUT MIMAKI'S PRIOR WRITTEN CONSENT.
IN NO EVENT SHALL MIMAKI BE LIABLE FOR SPECIAL, INCIDENTAL OR CONSEQUENTIAL DAMAGES, OR FOR LOSS
OF PROFITS OF DEALER OR CUSTOMERS OF ANY PRODUCT.
Reproduction of this manual is strictly prohibited.
© Mimaki Engineering Co., Ltd.
All Rights Reserved.Copyright

3
Safety Precautions
Symbols
In this document, symbols are used for explaining the contents of cautions on operation. The symbol to be displayed differs
depending on the caution content. Understand the meaning of each symbol and use this machine safely and correctly.
Examples of Symbols
Cautions on Installation
Meaning
WARNING Failure to observe the instructions given with this symbol can result in death or seri-
ous injuries to personnel. Be sure to read it carefully and use the printer properly.
CAUTION Failure to observe the instructions given with this symbol can result in minor or
medium injuries to personnel.
GENERAL WARNING This symbol indicates that the items shown need to be noted. Specific notes are
drawn in the figure.
GENERAL MANDATORY
ACTION
This symbol indicates that the action shown must be executed. Specific instruction is
shown in the illustration.
GENERAL PROHIBITION This symbol indicates that the action shown is prohibited. Specific action that is pro-
hibited is shown in the illustration.
IMPORTANT Important notes for the use of this unit are given with this symbol. Refer to the oper-
ation.
HINT Useful information is given with this symbol. Refer to the operation.
REFERENCE This symbol indicates the reference page for related contents. Click the text to dis-
play the corresponding page.
Caution
Do not install in the following locations
• A location exposed to direct sunlight.
• On an inclined surface.
• A location that vibrates.
• A location exposed to a direct air flow from an air con-
ditioner, etc.
• Around a location where fire is used.
• A location where the temperature or humidity
changes significantly. (The recommended usage
environment differs depending on the connected
printer. Confirm by referring to the operation manual
of the printer)

4
Warning for Use
Precautions
Warning
How to handle ink
• When operating it in poorly ventilated area or closed room, make sure to install ventilation system.
• If you swallow ink or maintenance cleaning solution mistakenly, rest and see a doctor to consult immediately. Never swal-
low the vomit.
• If you feel bad by inhaling a large amount of the steam, immediately move to the place with fresh air and rest with keeping
warm. In addition, consult a doctor immediately.
• If ink adheres to your skin and clothing, rinse immediately with soap water.
If ink enters your eyes, immediately rinse with plenty of clean running water for more than 15 minutes, rinse thoroughly
even the back of the eyelids. Consult a doctor immediately as soon as possible.
• Keep ink tanks and waste ink tanks away from children.
• Prevent ink from leaking and flowing to the natural water system and domestic wastewater.
• Dispose the waste ink according to the local regulations.
• Ask the industrial waste disposal company to dispose the emptied ink tanks and waste inks.
• Do not use this machine in an area where children might be present.
• Be sure to read the Safety Data Sheet (SDS) before handling ink.
• When handling the ink, pay close attention to ventilation and be sure to wear the included safety glasses and gloves. Ink
may enter the eyes.
Prohibition of disassembly or modification Prohibition of use in a damp environment
• Never disassemble or modify this machine and ink
tank Doing so may result in electric shocks or product
breakdown.
• Avoid placing the product in a damp environment.
Donot splash water onto the product. Otherwise, fire,
electric shocks, or product breakdown may result.
Caution
Use dedicated ink
• Use dedicated ink Understand that if it is damaged due to use of non-dedicated ink, the repair is a burden to the customer.
• When the ink other than dedicated ink is used, the protective device does not work.
• The dedicated ink must not be used for other printers. The printer will be broken.
• Do not refill the tank with the ink except the ink specified by us. Please understand we cannot take responsibility to all about
the trouble caused by using refilled ink.
Ink tank
• Store the ink tank at 1 m and lower place. If you store it at 1 m and higher place, in case of ink tank falls, the cap may come
off and the ink may scatter.
• After moving the ink tank from a cold place to a warm place, leave it for 3 hours and more under the room temperature.
• Open the ink tank just before installation. If the ink tank is left for a long time after opening it, it may not print normally.
• Use up the ink tank within 3 months after opening it. After an extended period with opening it, the ink quality deteriorates.
• Store the ink tank in a cool dark place.
• Please use the dedicated ink tank for this machine. This machine recognizes the dedicated ink tank and operates. In case
of the failure by remodeling ink tank etc., even within the warranty period, it will not be covered by the warranty.
• Do not touch the PCB contact portion of the ink IC chip with hands or contaminate it. It may cause damage to the PCBs.
• Do not tap the ink tank strongly or shake violently. The Ink may leak from the tank.
Bending tube
• For the protruding tube, be careful not to bend it in the following situation.
When the tube bends, the replacement is required, Call dealer or our service office.
1. When moving to the back of the machine to do media setting, etc.
2. Replace ink tank

5
Warning labels
Warning labels are stuck on the machine. Be sure to fully understand the warning given on the labels.
If a warning label is illegible due to stains or has come off, purchase a new one from a distributor or our sales office.
No. Order No. Label Description
1 M903330 Be sure to wear the included
safety glasses and gloves.
2 M907764
Because there is a possibility of
damage, do not ride or put any-
thing.
1
1
2
ὀࠉព
CAUTION
ATTENTION
ୖ㒊ࡿ࡞
DO NOT STEP ON TOP
NE GRIMPEZ PAS DESSUS

6
Name of Each Part
• Be sure to lock the casters of the 10kg ink supply unit before turning on the power.
• Your waist may get hurt by the weight of the ink tank, be careful enough when setting the tank.
• Do not move the 10kg ink supply unit with the ink tank on.
Supply pipe
10kg ink supply unit
10kg ink tank
Ink supply attachment
IC slot
2L eco-case
Base
【When 2L ink pack is used】
7
Setting of 10kg Ink Tank
1Attach the ink IC chip.
• Insert the ink IC chip with the surface having metal pieces facing up.
Inserting the wrong side by accident can cause faults or damage of the ink
IC chip.
• Do not touch the metal parts of the ink IC chip. Doing so can damage the
ink IC chip due to static, or may cause a read error due to contamination
or scratch.
2Set 10kg ink tank to the ink supply unit.
3Remove the lid of the ink tank.
• Be sure to wear the included safety glasses and gloves. Ink and cleaning solution for maintenance may enter the eyes.
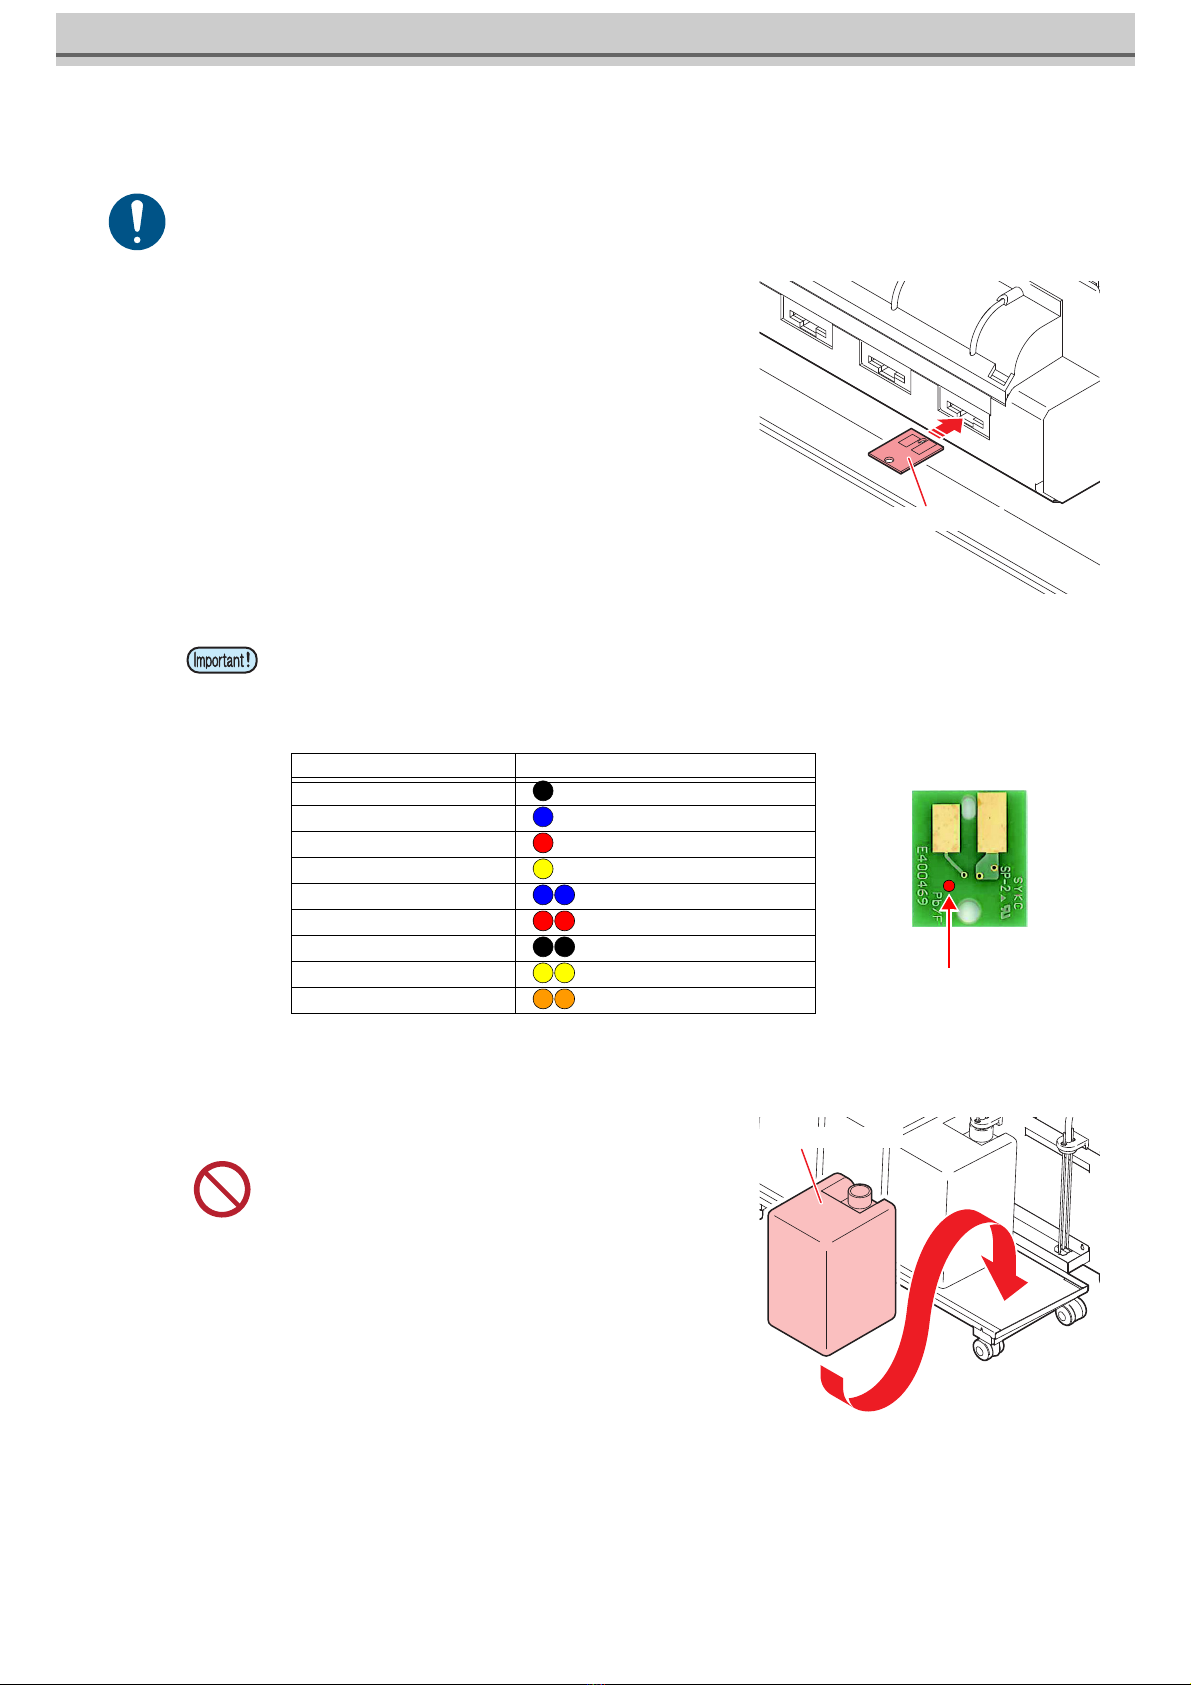
• The ink IC chip has information on the ink color, remaining amount of ink, expiration data, and similar items.
• To set the ink tank, insert the ink IC chip packed with the ink tank into the Ink IC socket.
• Be careful not to set an ink IC chip that is not the pair of the ink tank. Doing so can result in poor image quality or
similar problem.
• The symbol indicating color information is affixed on the ink IC chip.
• Never move the tank after setting the ink tank. It may cause ink
leakage.
Ink IC chip.
Color of ink Indication mark
Black (K) (one black circle)
Blue (Bl) (one blue circle)
Magenta (M) (one red circle)
Yellow (Y) (one yellow circle)
Light blue (LBl) (two blue circles)
Light magenta (Lm) (two red circles)
Light black (Lk) (two black circle)
Fluorescent yellow (FY) (two yellow circles)
Fluorescent pink (FP) (two orange circles)
Ink IC chip.
Location of the mark
10kg ink tank

8
4Stir the ink with a supply pipe.
5Set the supply pipe in the ink tank.
Ink tank arrangement of each ink set, and ink IC chip arrangement
• Ink may be scattered. Always wear the included safety
glasses.
Supply pipe
Supply pipe
12345678
14
8
3
7
2
6 5
Front
1 2 3 4 5 6 7 8
MYY K KM Bl Bl
MYK
Bl
FP Lbl
FY Lm
MYKM Bl Bl Lbl
Lm
MYKM Bl Lbl
Lm
Lk
4-color
8-color
7-color
6-color

9
Replace 10kg ink tank
Do as follows when [INK END] or [INK NEAR END] is displayed on the sub-display.
When [INK END] is displayed
1Press the key to cancel the message dis-
play.
• A message prompting ink replacement will be displayed.
2Remove the supply pipe from the ink tank.
3Remove the used ink tank.
4Refer to Step 2 of P.7 "Setting of 10kg Ink Tank" and set a new ink tank.
• Be sure to wear the included safety glasses and gloves as there is a danger of ink splashing.
• When exchanging the ink tank, perform it after curing the surroundings with a waste etc. The surroundings become dirty with
ink dripping from the supply pipe.
• Ink tank has an expiry date. It is usable until the second month after the expiry date stated in the ink tank, but it will be unus-
able after 3 months. Replace the ink tank as soon as possible.
• Hook the removed supply pipe in the cutout of the supply unit.
Information
Please exchange ink tank
and ink IC
After replacing the ink IC,
ink supply is started.
(Time: about 3 minutes)
OK
Supply pipe
10kg ink tank

10
5Remove the used Ink IC chip.
6Attach the ink IC chip.
• After the ink IC is inserted, the supply between the ink supply unit and the
ink supply attachment is automatically performed.
Supply ink of 10kg
If [INK SUPPLY ERROR] occurs after ink tank replacement and automatic supply, do as follows.
1Refer to P.7"Setting of 10kg Ink Tank" and set the ink tank and ink supply pipe.
2Select [TEST PRINT / CLEANING] – [10kg INK
SUPPLY] and press the key.
3Press the key on the 10kg ink supply
start screen to start supply.
When [INK NEAR END] is displayed
Very little ink remains in the bottle. Although the print operation can continue without replacing the ink bottle, the
ink may run out during the printing operation. We recommend that you replace the ink tank with a new one soon
after this is indicated.
If you press the key in local mode, you can check the replacement tank with the local guidance.
• Replace the ink IC chip after setting a new 10kg ink tank.
• Remove and attach ink IC chips in local mode.
• Automatic supply takes about 3 minutes at maximum. Other
supply operations and printing can not be performed while
automatic supply is in progress.
• In order to resolve [INK SUPPLY ERROR], make sure that the
ink tank and ink supply pipe are set correctly.
Ink IC chip.
Ink IC chip.
10kg ink supply unit
Start [ENT]
10kg ink supply unit
Filling
Please wait
Ce manuel convient aux modèles suivants
2
Table des matières
Autres manuels MIMAKI Accessoires pour imprimantes


