MICAMCORDER MI-96HD Manuel utilisateur


DIRECTORY
01
01
01
02
03
04
05
06
06
06
07
08
09
09
10
10
12
12
12
12
13
13
Preface
Product Assurance
Product Overview
Product Features
Package Content
Product Structure
Firmware Update
Operating Instructions
Installing the Battery
Installing the Micro-SD card
Installing the Mounts/Brackets
Recording Instructions
Start/Stop recording via wired remote
Start/Stop recording via power-on wired remote
Pictures Shooting Instructions
Playback Instructions
OUTPUT Connection
Connect to external MIC
Connect to HDTV via HDMI
Connect to TV via AV-OUT
Connect to PC via USB
Connect to power source
14
14
14
14
14
15
15
15
15
15
15
16
16
16
16
16
System Function Settings
Setting Operational Approach
Resolution Setting
Quality Setting
Video Rotating Setting
Record Mode Setting
External MIC VOL Setting
Internal MIC VOL Setting
Record Overwrite Setting
Motion Detection Setting
Time Stamp Setting
TV Type Setting
Time Setup Setting
Beep Sound Setting
Format Setting
Language Setting

1
PREFACE
Thank you for purchasing the MI-96HD high resolution digital camcorder. The
MI-96HD is a small, all-in-one design that is convenient for you to record activities
anytime and anywhere. With the high speed dynamic photograph function, it can
clearly record any activity, and let you share the experience with anybody.
Please read this manual carefully to ensure you understand it before using this
product. Please also keep this manual safe for future reference.
PRODUCT ASSURANCE
This product has authoritative CE, RoHS & FCC certification to assure customer
safety when using it.
PRODUCT OVERVIEW
The MI-96HD has world leading digital video/photography/audio storage,
high-speed HDMI video transmission and other functions, as well as a number
of invention patents & technical patents.

2
PRODUCT FEATURES
1. Resolution : 960 x 240 ; integrated 2.0-inch TF LCD
2. Image sensor: 5Mega pixel ,1/2.5-inch CMOS sensor
3. Video output: HDMI CTS1.2 Compliant
4. Composite video output (AV-OUT)
5. Video signal format: MPEG-4 AVC/H.264
6. Resolutions: 1920 x 1080(30FPS) 1440 x 1080(30FPS)
1280 x 720 (25FPS/50FPS/30FPS/60FPS) 848 x 480(30FPS /60 FPS)
7. 5Mega pixel static shooting
8. Recording format: MOV/MP4
9. Lens design rotates 200° to allow multiple camera mounting positions.
10. Built-in microphone/speaker (single channel)
11. Recovering function makes it possible to recover files which have been lost.
12. Electronic shutter1/2-1/1000 second
13. USB2.0/HDMI/TV jack
14. Support external Micro SD Card up to 32Gb (Class 4)
15. Overwrite recording, Motion-Detection, Real-time stamp
16. Built-in high capacity li-ion battery, 3.7V/100mAh
17. Working humidity: 10% ~ 98%
18. Temperature: -10 ~ 60℃
19. Dimension: 102 x 57 x 38 mm (L x W x H)
20. Camera weight- 122 grams

REC
HDMI
HDMI
3
PACKAGE CONTENT
Goggle Strap Mount Flat Mount Bar Mount Vented Helmet Mount
Rubber Belt x 3 3M sticker x 3 Lanyard Rope Carry Pouch
Elastic Strap USB Cable HDMI Cable AV-OUT Cable
Wired Remote Microphone AC Charger Battery
CD-Rom/User Manual
NOTE:
ALL CONTENTS ABOVE ARE SUBJECT TO CHANGE WITHOUT PRIOR NOTICE.

19 20 21 22
4
1. 110°lens
2. Horizontal laser light
3. Camera shutter
4. [⊙]Press and Hold for 2 seconds to
power on or power off the Cam
5. Recording key
6. Turn on or turn off the horizontal laser light
7. 200°rotating lens
8. Recording indicator
9. External MIC interface
10. Wired-Remote jack、USB jack、AV-OUT jack
11. 1/4 Screw Thread
12. Lanyards orifice
13. Power indicator
PRODUCT STRUCTURE
14. Locking key of rear cover
15. Internal MIC
16. Loudspeaker
17. 2-inch LCD Screen
18. Playback integrated key
19. Battery Holder
20. HDMI output jack
21. Micro-SD Holder
22. Screen Cover
MAIN UNIT
A
BC
D
E
5
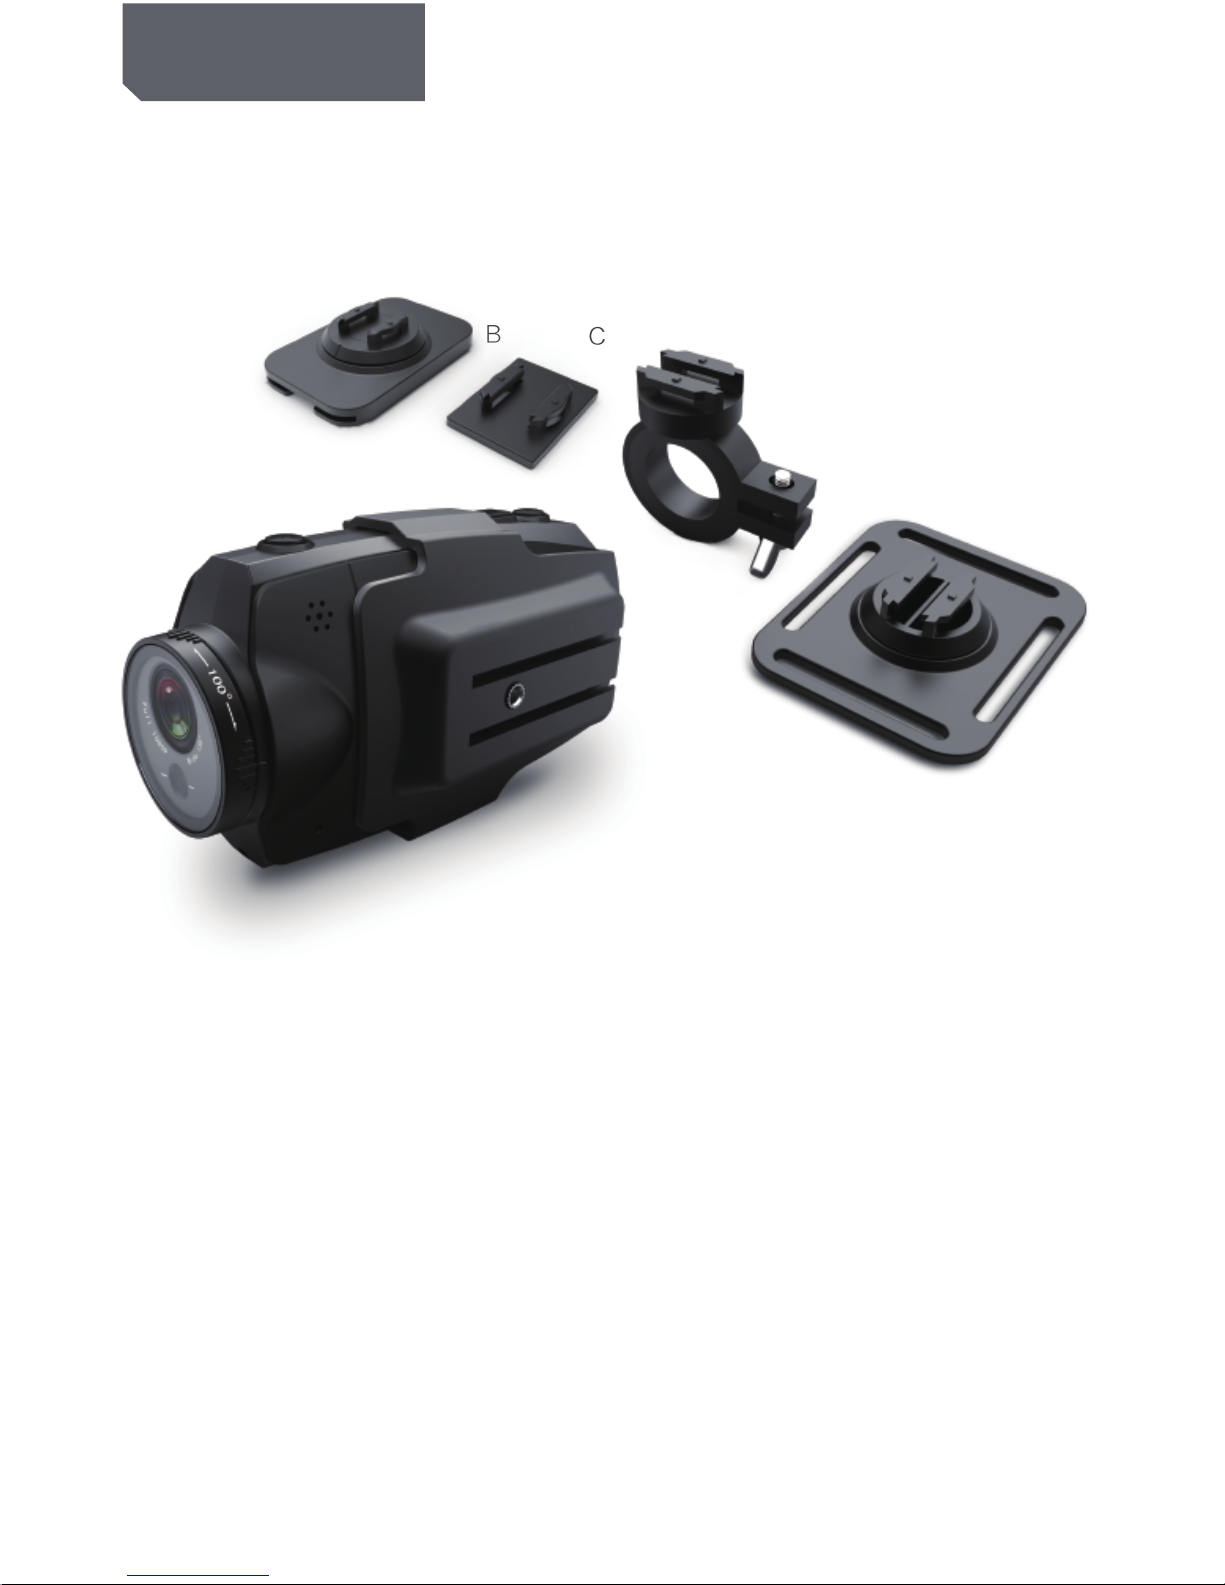
PRODUCT STRUCTURE
MOUNTS
A .Cradle: with two 1/4 tripod threads fitted for use with other mounts as shown
below, this camera can be widely used with any equipment and any application.
B. Goggle Strap Mount: can be fixed on to your goggle strap and any other elastic
band or strap.
C. Flat Mount: With a high performance, waterproof and heat-resistant 3M sticker
at the back, it is ideal for flat, non-porous surfaces.
D. Bar Mount: with 3 sizes of rubber, the camera can be mounted on to the tubes
of mountain bike handle bars, roll bar cages etc.
E: Vented Helmet Mount, with the Velcro strap is ideal for mounting the camera to
various styles of vented helmets.
FIRMWARE UPDATE
Please check the current software version if you want to get the latest firmware
Update then please compare with the latest version on www.micamcorder.com.

HDMI OUT
CARD/BATT
OPEN
▲
HDMI OUT
CARD/BATT
OPEN
▲
▲
6
Installing the Battery
1. Slide the lock on the rear cover and it will automatically open. (Refer to picture1)
2. Follow the instructions. Insert the battery with the correct Polarity (+/-). (Refer to picture2)
3. Push the rear cover closed. (Refer to picture3)
NOTE: IF YOU DO NOT INTENT TO USE THE PRODUCT FOR
A LONG TIME, PLEASE REMOVE THE BATTERY. BATTERIES
CONTAIN CHEMICAL SUBSTANCES SO THEY SHOULD BE
HANDLED AND DISPOSED OF CORRECTLY.
Installing the Micro-SD card
1: Slide the lock on the rear cover and it will automatically open. (Refer to picture4)
2: Follow the instructions. Insert the SD card in the correct direction. (Refer to picture 5)
3: Push the back cover to the closed position. (Please refer to picture6)
NOTE: THE MI-96HD REQUIRES A CLASS 4 OR ABOVE SD
CARD TO OPERATE CORRECTLY. MOST FAULTS WITH
OPERATING CAMERAS ARE BECAUSE A CHEAP SD CARD
IS USED. CHOOSE ADDITIONAL SD CARD WITH CARE.
Picture1
Picture2 Picture3
Picture4
Picture5 Picture6
OPERATING INSTRUCTIONS

7
MOUNTS AMOUNTS C
MOUNTS AMAIN UNIT
Picture1
Picture2
Picture3
Installing the mounts
1. Follow the instructions. Fix the mounts to the camera in the correct direction.
(Refer to picture 1)
2: Follow the instructions. Using the screw cap to fix the mount to the 1/4 thread of
camera (Or it can be fixed on other 1/4 tread mounts. (Refer to picture2)
3: Follow the instructions. Slide any mount of B/C/D/E into the holder of “A” mount.
(Refer to picture3) Make sure the mount locks in firmly to avoid the cradle sliding
out of the mount during operation.
OPERATING INSTRUCTIONS
REC
8
Picture1
Picture2 Picture3
OPERATING INSTRUCTIONS
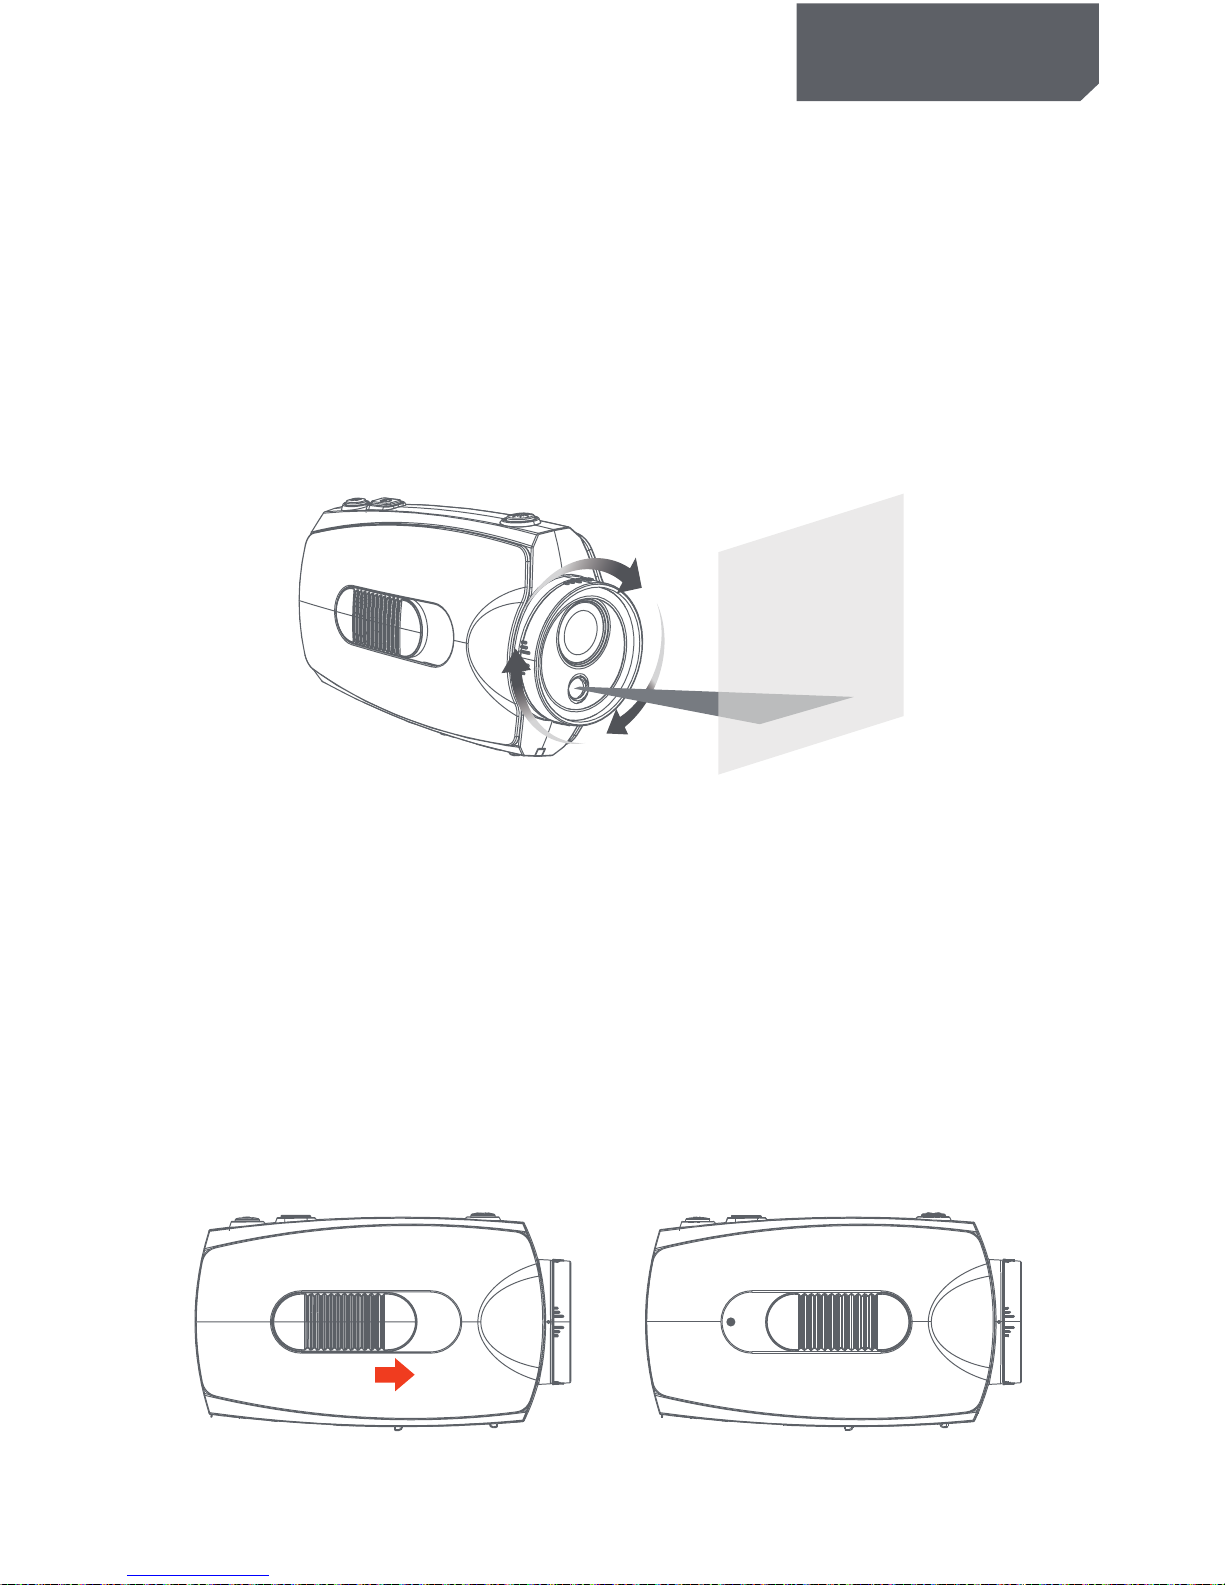
Recording Instructions
1.Press [⊙] key and hold for 2 seconds to power up the camera.
2. Adjust the lens to the proper angle.
a) Face a blank surface and press [⊙] to turn on the lasers ( The lasers will disappear in 15
seconds). The laser can be turned on or off at any time with the laser light button.
b) Check whether the laser light is horizontally aligned. If not, rotate the lens until it is in
the horizontal state. (Refer to picture1)
WARNING: DO NOT DIRECT THE LASER LIGHT INTO ANYBODY’S EYES
The indicator light glows green to indicate standby mode.
3. Start / stop recording
a) Slide the recording switch forward. The recording indicator ( red ) turns on and flashes
while camera beeps (These audio beeps can be turned off in the menu), and camera is
recording . (Refer to picture2)
b) To stop recording, slide the switch backwards, the camera beeps and the indicator light
turns green indicating standby mode. (Refer to picture3)
* With the LCD screen constantly on the battery will only last for approximately 30 minutes.
By pressing the LCD button the screen will turn off and then the battery will last for 2-3
hours. By pressing the LCD button for 2 seconds the camera will completely turn off.
* The LCD screen will shut off automatically 30 seconds after the camera starts recording,
and the LCD screen will also shut off automatically 60 seconds when in standby mode if
no keys pressed. It allows more time to the user for tuning the camera. But the LCD
won’t shut off during Playback mode.
Table des matières
Manuels caméscope populaires d'autres marques


Panasonic
Panasonic AG-HMC152EN Manuel utilisateur

Insignia
Insignia NS-DCC5HB09 - Camcorder - 720p Manuel utilisateur

MYDLINK
MYDLINK DCS-6100LH Manuel utilisateur

Sony
Sony video Hi8 Handycam CCD-TR555 Manuel utilisateur

SECURECOM
SECURECOM V-5014B Manuel utilisateur

Panasonic
Panasonic HDC-SD100 Manuel utilisateur


