Mi Robot Vacuum-Mop 2 Pro Manuel utilisateur

Mi Robot Vacuum-Mop 2 Pro User Manual · 01
Manual de usuario de Mi Robot Vacuum-Mop 2 Pro · 19
Manuel d’utilisation du MiRobotVacuum-Mop2Pro · 37
Manuale utente di Mi Robot Vacuum-Mop 2 Pro · 55
Руководство пользователя Робота-пылесоса MiRobotVacuum-Mop2Pro · 73
Odkurzacz z mopem Mi Robot 2 Pro — instrukcja obsługi · 92
Mi Staubsauger-Wischer-Roboter2 Pro Benutzerhandbuch · 110
Mi Temizlik Robotu 2 Pro Kullanım Kılavuzu · 128
Manual do utilizador do Aspirador robô com mopa Mi 2 Pro · 183
Посібник користувача Миючого робота-пилососа Mi2Pro · 201
Robotický vysavač smopem Mi 2 Pro – Uživatelská příručka · 219
Ρομποτική σκούπα - σφουγγαρίστρα Mi Robot 2 Pro Εγχειρίδιο χρήστη · 237
Aspirator și mop robotic Mi 2 Pro – Manual de utilizare · 257
Bruksanvisning för Mi robotdammsugare och -mopp 2 Pro · 275
ﻦﻣ تﻮﺑورﺔﻴﺋﺎﺑﺮﻬﻛﺔﺴﻨﻜﻣوﺔﺤﺴﻤﻣمﺪﺨﺘﺴﻣﻞﻴﻟد
Pro 2 · 146
Mi
· 164
Mi 2 Pro


Safety Instructions
Usage Restrictions
• This appliance can be used by children aged from 8 years and above and persons
with reduced physical, sensory or mental capabilities or lack of experience and
knowledge if they have been given supervision or instruction concerning use of
the appliance in a safe way and understand the hazards involved. Children shall
not play with the appliance. Cleaning and user maintenance shall not be made
by children without supervision.
• The appliance is only to be used with the power supply unit provided with the
appliance.
• This appliance contains baeries that are only replaceable by skilled persons.
• Please keep the cleaning brush out of reach of children.
• Keep hair, loose clothing, fingers, and all parts of body away from openings and
moving parts.
• Do not use the vacuum-mop to clean any burning substances.
• Do not pick up the vacuum-mop by its laser radar cover.
• Make sure the vacuum-mop is turned off and the charging dock is unplugged
Read this manual carefully before use, and retain it for future reference.
This product is for floor cleaning in a home environment only. Do not use it
outdoors, on non-floor surfaces, or in a commercial or industrial seing.
01

before cleaning or performing maintenance.
• This vacuum-mop is only intended to clean floors in a home environment. Please
do not use it outdoors such as on an open balcony or on a surface that is not a
floor like a sofa, or in a commercial or industrial seing.
• Do not use the vacuum-mop in an area suspended above ground level, such as a
lo , open balcony, or on top of furniture, unless a protective barrier is present.
• Do not use the vacuum-mop at an ambient temperature above 35°C or below
0°C or on a floor with liquids or sticky substances.
• Pick up any cables from the floor before using the vacuum-mop to prevent it
from dragging them while cleaning.
• Pick up any fragile or loose items from the floor, such as vases or plastic bags, to
prevent the vacuum-mop from being obstructed or bumping into them and
causing damage.
• Do not place children, pets, or any item on top of the vacuum-mop while it is
stationary or moving.
• Do not use the vacuum-mop to clean the carpet.
• Do not allow the vacuum-mop to pick up hard or sharp objects such as building
materials, glass, or nails.
• Do not spray any liquid into the vacuum-mop (make sure the dust compartment
is thoroughly dry before its reinstalling).
• Do not place the vacuum-mop upside down (laser radar housing should never
touch the ground).
02

Baeries and Charging
• WARNING: Do not use any third-party baery. Use only with CDZ1SHW charging
dock.
• Do not aempt to disassemble, repair, or modify the baery or charging dock on
your own.
• Do not place the charging dock near a heat source.
• Do not use a wet cloth or wet hands to wipe or clean the dock’s charging
contacts.
• If the vacuum-mop won’t be used for an extended period, fully charge it, then
turn it off and store in a cool, dry place. Recharge the vacuum-mop at least once
every 3 months to avoid over-discharging the baery.
• The lithium-ion baery pack contains substances that are hazardous to the
environment. Before disposing of the vacuum-mop, please first remove the
• Only use this product as directed in the user manual. Users are responsible for
any loss or damage arising from improper use of this product.
• This product's laser radar meets the IEC 60825-1:2014 Standard for Class 1 laser
product safety and does not produce laser radiation hazardous to the human
body.
03

Hereby, Xiaomi Communications Co., Ltd. declares that the radio equipment type
MJST1SHW is in compliance with Directive 2014/53/EU. The full text of the EU
declaration of conformity is available at the following internet address:
hp://www.mi.com/global/service/support/declaration.html
For detailed e-manual, please go to www.mi.com/global/service/userguide
baery pack, then discard, or recycle it in accordance with local laws and
regulations of the country or region it is used in.
• When removing the baeries from the product, it is beer to use up the
baeries and make sure your product is disconnected from power. Uninstall the
screw on the boom, then remove the cover.
• Unplug the baery connector, then remove the baeries. Do not damage the
baery case to avoid any risk of injuries.
• Return the baeries to a professional recycling organization.
04
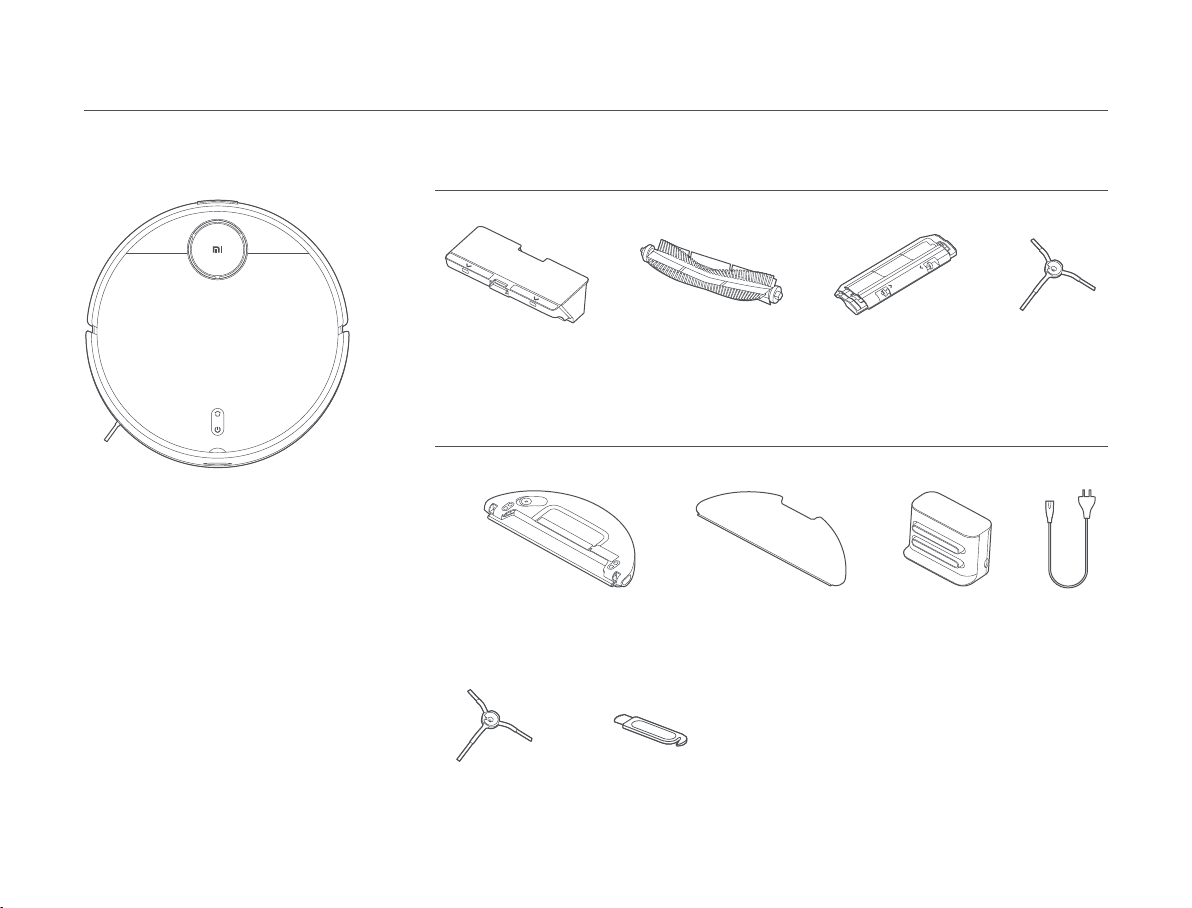
Other Accessories
Cleaning Tool
Vacuum-Mop
Brush Brush Cover Side Brush
Accessories List
Pre-installed Accessories
Dust Compartment
Product Overview
Power CordCharging Dock
Note: Illustrations of product, accessories,
and user interface in the user manual are
for reference purposes only. Actual
product and functions may vary due to
product enhancements.
Water Tank (Mop pad installed,
for vacuuming & mopping mode)
Mop Pad
(Replacement)
Side Brush
(Replacement)
05
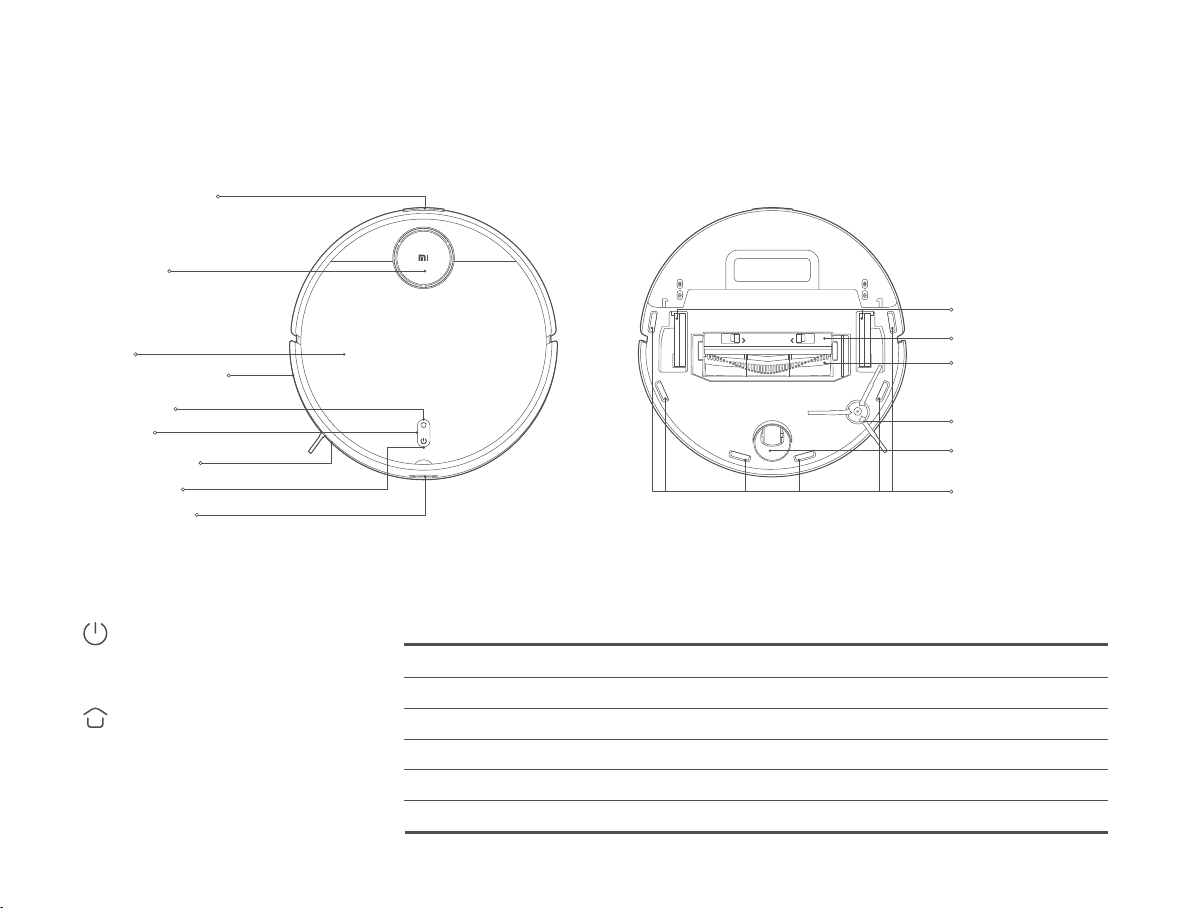
Edge Infrared Sensor
Collision Sensor
Power Buon
Dock Buon
Indicator
Cover
Charging Contacts
Laser Radar
(Laser Distance Sensor)
Indicator Status
Brush
Caster Wheel
Le Wheel/Right Wheel
Cliff Sensors
Side Brush
Brush Cover
Power Buon
Dock Buon
Yellow Wi-Fi not connected
Breathing white Updating firmware/Charging (baery level ≥ 15%)
Blinking white Returning to the dock to charge
White Turned on/Working normally/Fully charged/Wi-Fi connected/Downloading firmware
Blinking yellow Low baery/Error/Awaiting Wi-Fi connection
Breathing yellow Charging (baery level < 15%)
Docking Sensor
Turn on/off: Press and hold for 3 seconds
Start/Pause: Press
Pause: Press when it is working
Start docking: Press when it is paused
Stop docking: Press when it is docking
06
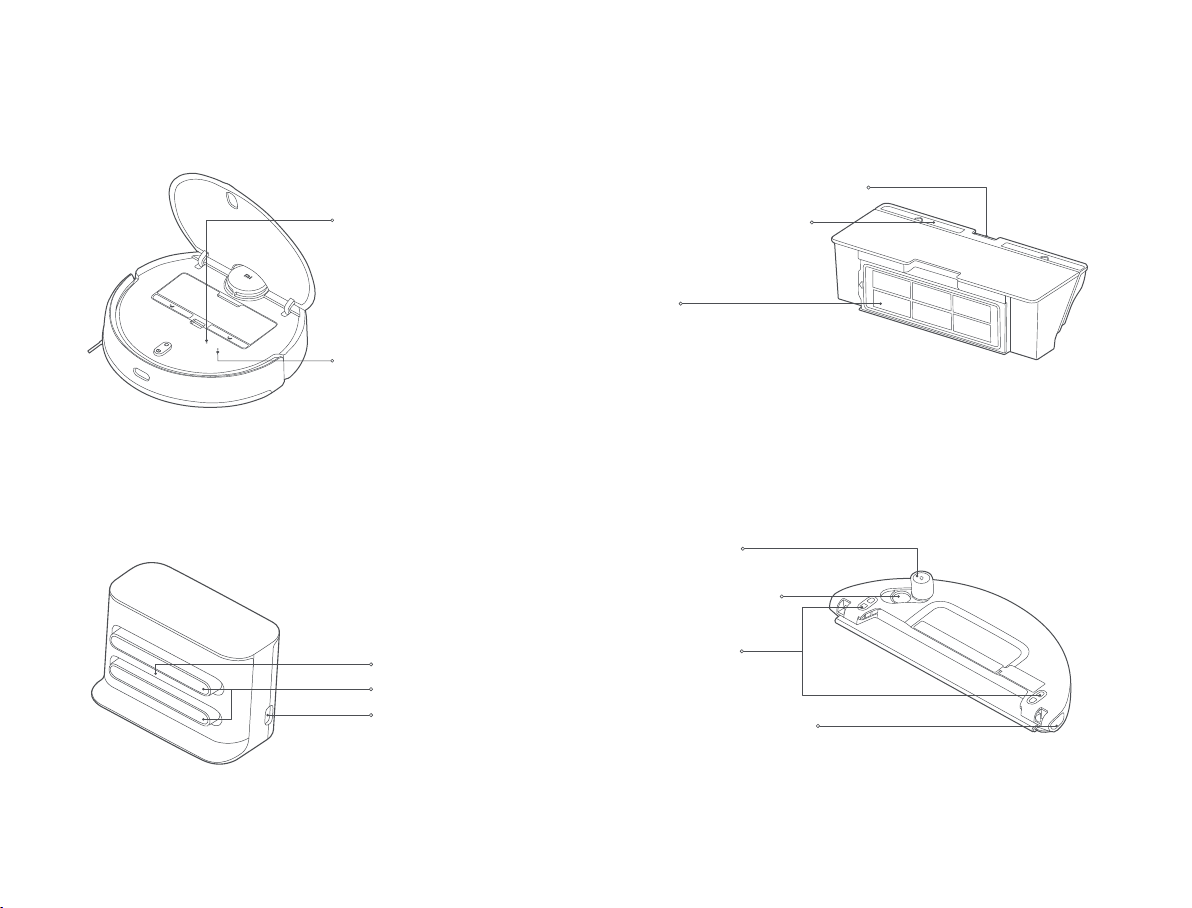
Dust Compartment Release Buon
Dust Compartment Cover
Filter
Water Tank Release Buon
Water Tank Lid
Dust CompartmentVacuum-Mop
Water Tank(Used for Vacuuming & Mopping Mode)
Charging Dock (Place against a Wall)
Wi-Fi Indicator
Reset Buon
Staying blue for 2 seconds then
goes off: Wi-Fi connected
Blinking blue: Connecting to
Wi-Fi/Updating firmware
Blinking yellow: Awaiting Wi-Fi
connection
Press and hold for 3 seconds to
reset the system.
Press and hold for 10 seconds to
restore the system.
Signaling Area
Note: The water tank may contain a small amount of residual water due to quality
inspection. This is normal.
Note: The dust compartment must be installed for both vacuuming mode and
vacuuming & mopping mode, otherwise the vacuum-mop cannot be turned on.
Power Port
Charging Contacts
Water Filling Opening
Electrode Plate
07
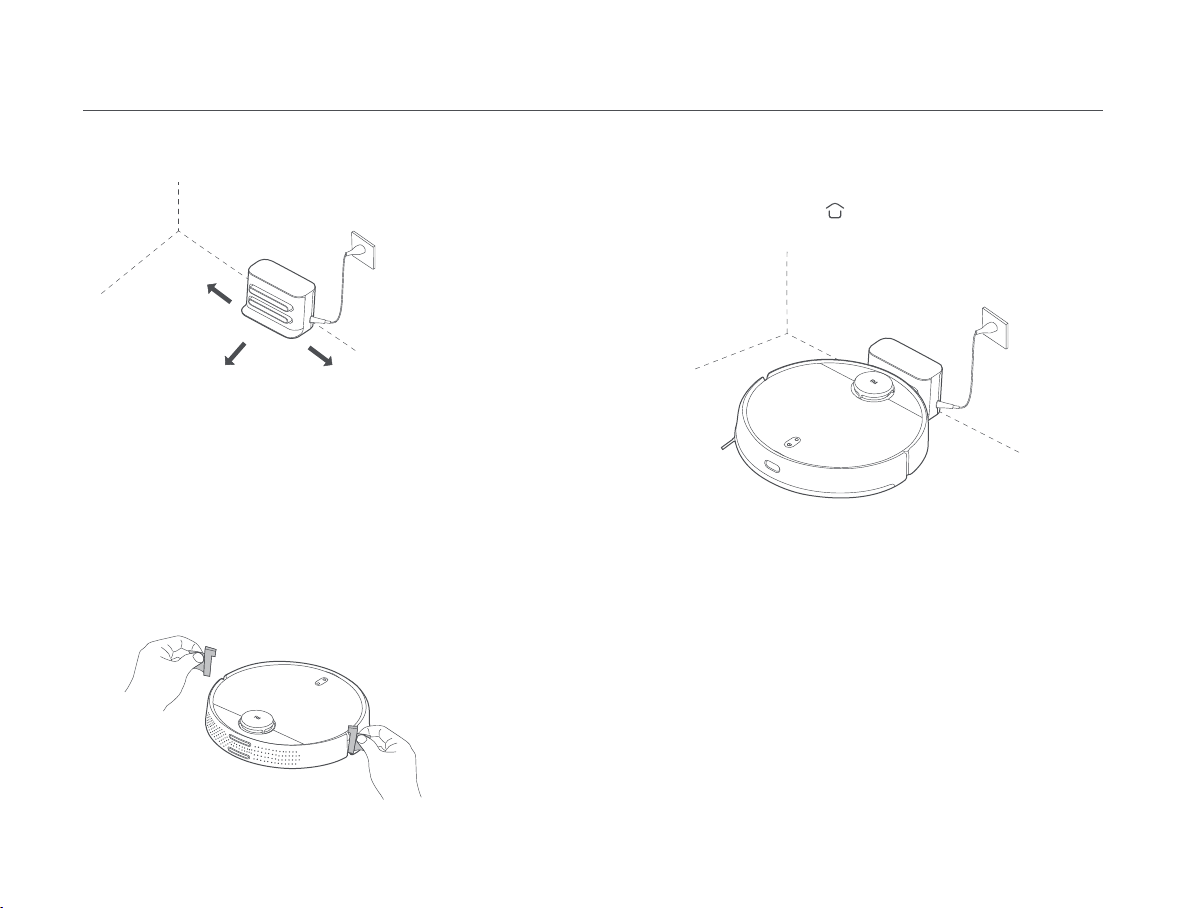
Removing the protective strips
Installation
Charging
> 0.5 meters
> 1.5 meters > 0.5 meters
Placing the charging dock against a wall and connecting it to an
electrical outlet
Notes:
• Do not place the charging dock in an area with direct sunlight.
• Make sure there are more than 1.5 meters of clearance in front of the charging dock
and more than 0.5 meters on either side of it.
• Tidy up any loose power cord to prevent the vacuum-mop from geing tangled,
which could accidentally move or unplug the charging dock.
Notes:
• If the vacuum-mop cannot be turned on due to a low baery, put it against the
charging dock to charge.
• The vacuum-mop will automatically turn on when it is on the charging dock, and
cannot be turned off while charging.
• When using the vacuum-mop for the first time, please follow the in-app prompts to
complete quick map creation. To ensure accurate mapping, it is recommended to
follow the vacuum-mop and remove any obstacles on the ground when it is creating
the map. Make sure the vacuum-mop starts from the charging dock.
• If the vacuum-mop may get stuck or scratch the surface of the furniture in some
areas, you can set restricted areas in the app to prevent the vacuum-mop from
entering those areas.
Before using the vacuum-mop, remove the protective strips from each side.
When using the vacuum-mop for the first time, manually place it against
the charging dock to charge. Ensure that the charging contacts on both
the vacuum-mop and the charging dock are aligned. During daily use, you
can directly press the buon to send the vacuum-mop to the charging
dock to charge.
08
Autres manuels pour Robot Vacuum-Mop 2 Pro
1
Table des matières
Langues :
Autres manuels Mi Aspirateur

Mi
Mi Robot Vacuum-Mop 2 Pro Manuel utilisateur

Mi
Mi SCWXCQ01RR Manuel utilisateur

Mi
Mi STYTJ02YM Manuel utilisateur

Mi
Mi P Manuel utilisateur

Mi
Mi G10 Manuel utilisateur

Mi
Mi Mop 2 Pro Manuel utilisateur

Mi
Mi Robot Vacuum-Mop 2 Ultra Manuel utilisateur

Mi
Mi SSXCQ01XY Manuel utilisateur

Mi
Mi MJSTG1 Manuel utilisateur

Mi
Mi SCWXCQ02ZHM Manuel utilisateur


