MERIT INDUSTRIES PM0599-03 Mode d'emploi

merit industries, inc. PM0599-03
FOR TECHNICAL ASSISTANCE:
CONTACT YOUR LOCAL DISTRIBUTOR
For a list of distributors, visit the Merit Industries, Inc. Web site
www.meritind.com
MoD BoX
Installation & Owner’s
Manual


Table of Contents
Section 3: Installing
Hard Drive & Testing
Installing the Hard Drive .................... 27
Testing the Unit ................................... 30
Touch Screen ................................. 30
Bill Acceptor ...................................30
Audio Test ...................................... 31
Music Selection and Pricing ...........31
Connection Rules ........................... 31
Section 4: Sound System Setup
Introduction ......................................... 32
Sound System Setup ......................... 32
Paging ................................................... 36
Speaker Synopsis .............................. 36
Section 5: Perimeter Lighting
Controller ............................................. 40
Section 6: Routine Service ............ 42
Introduction ......................................... 42
Preventive Maintenance ................... 43
Exterior ...........................................43
Touch Screen Calibration ............... 43
Section 7: Troubleshooting
Introduction ......................................... 44
MoD BoX LED’s .................................... 45
Power Supply Board ......................45
Communication Controller ............... 45
Computer Core Assembly .............. 46
Sequence of Operation ..................... 47
Connection Diagrams ........................ 48
Troubleshooting Charts ................... 52
Contact Information ........................... 55
Warranty ............................................... 56
Software License
Agreements ........................................ 57
Safety Instructions ........................ 1
Section 1: Unpacking
& System Description
Introduction ......................................... 3
MoD BoX Jukebox Features ............. 4
Unpacking Instructions ..................... 5
Visual Inspection ............................5
Handy Case ....................................5
Installation Instructions .................... 6
Installing the
Hanger Bracket ..............................6
Hanging the MoD BoX
on the Bracket ................................ 8
Major Components ............................ 10
MoD BoX Specifications .................... 14
General ........................................... 14
Sound System ................................ 14
Fuses and Circuit Breakers ...........14
Lighting ........................................... 14
Power System .................................... 15
Section 2 - Network
Introduction ......................................... 16
Where to Install the Designated
Line and Router .................................... 17
Internet Wiring ................................ 17
Router ............................................. 17
Router/Modem Power .......................... 18
The Router ............................................. 19
Introduction ..................................... 19
Ethernet Cable Pin Out
and Instructions .................................... 20
Installing the Router ............................. 21
Description ...................................... 21
Programming the Router ..................... 22
Introduction ..................................... 22
Description ...................................... 22
Procedure ....................................... 23

COPYRIGHT © 2006 MERIT INDUSTRIES, INC.
1. Read these instructions.
2. Keep these instructions.
3. Heed all warnings.
4. Follow all instructions.
5. Do not use this apparatus near water.
6. Clean only with a dry cloth.
7. Do not block any ventilation openings.
Install in accordance with the
manufacturer’s instructions.
8. Do not install near any heat sources
such as radiators, heat registers,
stoves, or other apparatus (including
amplifiers) that produce heat.
9. Do not defeat the safety purpose of the
polarized or grounding-type plug. A
polarized plug has two blades with one
wider than the other. A grounding type
plug has two blades and a third ground-
ing prong. The wide blade or the third
prong are provided for your safety. If
the provided plug does not fit into your
outlet, consult an electrician for replace-
ment of the obsolete outlet.
10. Protect the power cord from being
walked on or pinched, particularly at
plugs, convenience receptacles, and
the point where they exit from the ap-
paratus.
IMPORTANT SAFETY INSTRUCTIONS
11. Only use the attachments/accessories
specified by the manufacturer.
12. Use only with the cart, stand, tripod,
bracket, or table specified by the manu-
facturer or sold with the apparatus.
When a cart is used, use caution when
moving the cart/apparatus combination
to avoid injury from tip-over.
13. Unplug this apparatus during lightning
storms or when unused for long peri-
ods of time.
14. Refer all servicing to qualified service
personnel. Servicing is required when
the apparatus has been damaged in
any way, such as when the power-sup-
ply cord or plug is damaged, liquid has
been spilled or objects have fallen into
the apparatus, the apparatus has been
exposed to rain or moisture, does not
operate normally, or has been dropped.
1 MOD BOX INSTALLATION & OWNER’S MANUAL PM0599-03

COPYRIGHT © 2006 MERIT INDUSTRIES, INC.
The lightning flash with arrowhead symbol,
within an equilateral triangle is intended to
alert the user to the presence of uninsulated
“dangerous voltage” within the product’s en-
closure that may be of sufficient magnitude
to constitute a risk of electric shock to per-
sons.
The exclamation point within an equilateral
triangle is intended to alert the user to the
presence of important operating and main-
tenance servicing instructions in the litera-
ture accompanying the jukebox.
CAUTION
RISK OF ELECTRIC SHOCK
DO NOT OPEN
DO NOT REMOVE ANY COVERS, GUARDS, OR SHIELDS.
NO USER SERVICEABLE PARTS ARE INSIDE THIS JUKEBOX.
REFER SERVICING TO QUALIFIED SERVICE PERSONNEL
PM0599-03 MOD BOX INSTALLATION & OWNER’S MANUAL 2
WARNING: To reduce the risk of fire or
electric shock, do not expose this appara-
tus to rain or moisture.
No objects filled with liquid, such as vases,
shall be placed on the apparatus.

COPYRIGHT © 2006 MERIT INDUSTRIES, INC.
INTRODUCTION
The MoD BoX jukebox is part of a much larger system – the AMI
Entertainment®network. This network is a digital platform that
delivers music across the Internet to Jukeboxes anywhere.
The MoD BoX jukebox is an Internet-enabled jukebox that allows all
the traditional functions of a jukebox backed by the power of the
Internet. The Internet connectivity gives patrons more features, such
as the ability to download “Music On Demand” songs when their
song choice is not already on the jukebox.
Section 1: Unpacking & System Description
3 MOD BOX INSTALLATION & OWNER’S MANUAL PM0599-03

COPYRIGHT © 2006 MERIT INDUSTRIES, INC.
MOD BOX JUKEBOX FEATURES
The major MoD BoX features are:
General Features:
• Sturdy construction and reliable design
• Conveniently located customer, operator, and service controls
• All major components are modular and easy to replace, if needed
• Computer-controlled digital music
• A 250-watt amplifier with dual 7-band equalizers
• Song reject
• 300 album and cover art capacity
• Unwanted music categories can be blocked
• Bill acceptance of $1, $5, $10, and $20
• 700-bill capacity bill acceptor
• Web-based management
• Attract mode
• “Music On Demand” song download
• Dynamic search capabilities
• No pause between plays
• Easy to change pricing
Service Features:
• All servicing can be done from the front of the jukebox
• Modular component construction for easy replacement
• Complete cash and play audit information
• Password protected Operator Web site
• Access anytime and from anywhere
• Track revenue and usage
• Download new music and other content
• Check system status
PM0599-03 MOD BOX INSTALLATION & OWNER’S MANUAL 4

COPYRIGHT © 2006 MERIT INDUSTRIES, INC.
UNPACKING INSTRUCTIONS
This section contains information for unpacking the jukebox and installing it at a location.
Save all tie-down hardware in case the MoD BoX must be moved to another location.
Exterior
1. Remove the shipping carton with care: Do not use shipping hooks or sharp tools that
could damage the jukebox cabinet.
2. Remove the plastic bag that covers the jukebox.
3. Carefully inspect the interior and exterior of the jukebox to ensure that no damage
occurred during transit.
If damage is detected, the carrier who delivered the jukebox should be contacted
immediately to examine it. Regardless of the exterior condition of the shipping car-
tons, the carrier should be called and notified of damage. Do not destroy packing
material or boxes until the carrier’s agent has examined them.
Damage claims are your responsibility. Do not return damaged merchandise until
after your claim has been established. The invoice amount for repair charges can
then be collected from the carrier.
Doors
1. Locate the red bag in the coin return on the side of the cabinet. Remove the door key
from the bag and unlock the top door. Turn the key to the right and press in on the
door as you turn the key.
VISUAL INSPECTION
Check to be sure that all electrical plugs are completely seated into their receptacles.
HANDY CASE
Locate the Handy Case, the blue plastic envelope. The Handy Case contains a variety of
items, including manuals, spare parts, and fuses. The monitor control module (to control
vertical/horizontal controls and brightness/contrast controls) is also in the case, and should
be plugged into the mating connector on the monitor should you need to adjust the monitor
settings. Keep the Handy Case with the jukebox at all times for ready reference.
5 MOD BOX INSTALLATION & OWNER’S MANUAL PM0599-03

COPYRIGHT © 2006 MERIT INDUSTRIES, INC.
CAUTION
MoD BoX must be solidly fastened to structural mem-
bers within the supporting wall.
MoD BoX weighs 130 pounds (50 kg); if it falls, it could
cause damage or injury.
INSTALLATION INSTRUCTIONS
INSTALLING THE HANGER BRACKET
NOTE: It is recommended that all wall installations or removals be performed by
two people for safety reasons.
NOTE: Before installing the MoD BoX on a wall, you should first install the hard
drive.
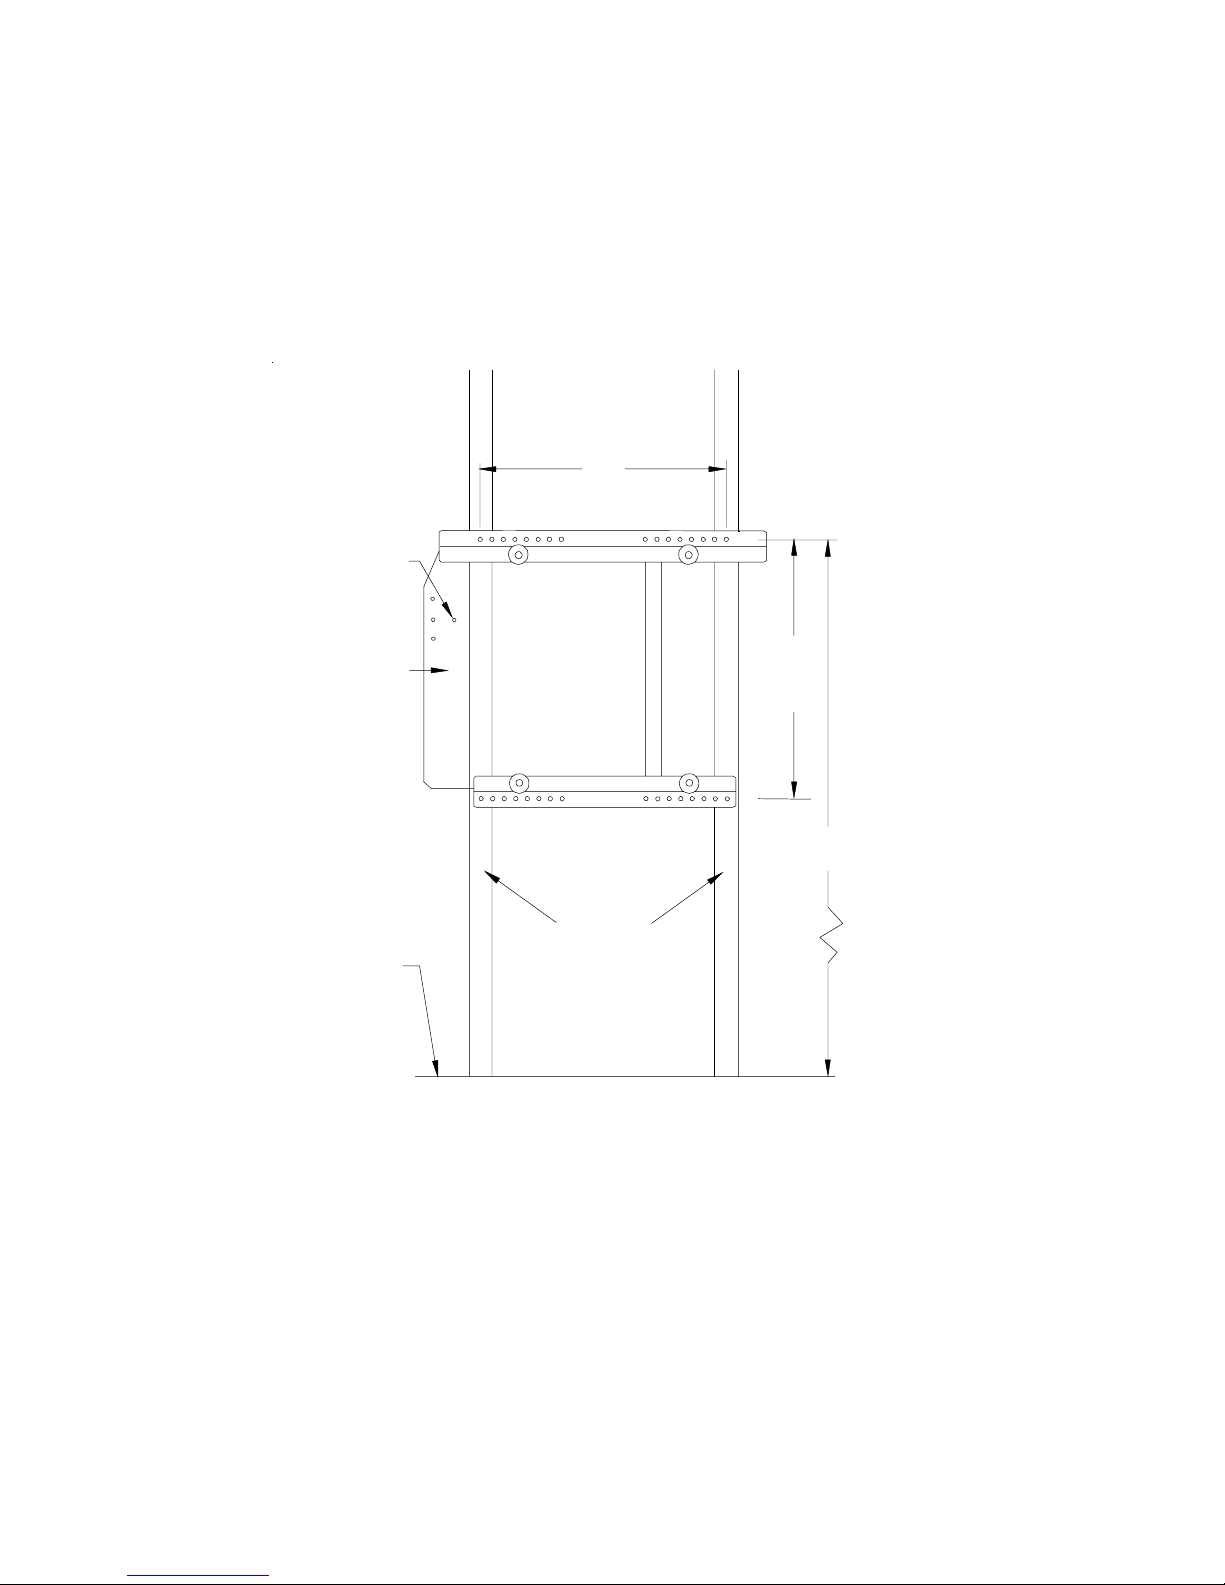
1. PREFERRED METHOD*: At the installation location, use a level to mark a horizontal line
that is exactly 64-3/8” (163.5 CM) off the floor. This will place the bottom of the MoD
BoX at the recommended 38” (965 cm) above the floor. Refer to Figure 1-1.
2. Using the level, mark another horizontal line which is 17" (43.2 cm) below the first line.
3. Locate the wall stud locations on the horizontal lines. Drill 5/32” holes at the marks.
Place the hanger against the wall and secure using the (4) 1/4” x 1-1/2” lag screws
supplied.
* In order to comply with the height requirements of ADA (Americans with Disabilities
Act), this line must be no more than 55-3/8” (140.6 cm) from the floor.
CAUTION
Supplied fasteners (1-1/2” lag screws) are for wood
wall stud construction. For other types of construc-
tion, installer must provide and use appropriate
fasteners.
PM0599-03 MOD BOX INSTALLATION & OWNER’S MANUAL 6

COPYRIGHT © 2006 MERIT INDUSTRIES, INC.
FIGURE 1-1 - INSTALLING THE HANGER BRACKET
7 MOD BOX INSTALLATION & OWNER’S MANUAL PM0599-03
16"
STUDS
17"
FLOOR
64-3/8"
HANGER
BRACKET
OPTIONAL
ANCHOR HOLE
TO LOCK
MOD BOX
TO BRACKET
Ce manuel convient aux modèles suivants
1
Table des matières