Mercator Ikuü SDC56 Manuel utilisateur

SMART VIDEO DOORBELL
QUICK START GUIDE
SDC56 www.ikuu.com.au

222
This smart video doorbell is designed for use in homes, apartments, oices, garages
and sheds. It’s easy to set up and operate, giving you and your family the security and
peace of mind that you deserve.
You can monitor your video doorbell remotely through the Mercator Ikuü app, which
can be downloaded for free from the Apple App Store and Google Play Store.
Make sure to fully charge your video door bell unit prior to installation. The
deterioration of the battery may vary depending on how oen the unit is used,
how oen the video feed is viewed via the app and whether motion alerts are
turned on or o.
Introduction
Contents
1 x Smart Wireless Video Doorbell including
rechargeable batteries
1 x Indoor Chime Unit
1 x Reset Pin
7 x Screws and Wall Plugs
2 x Grub Screw
1 x L Shaped Screw Driver
1 x Small Phillips Head Screw Driver
1 x Wall Mount
3 x 1.5V “AA” Type Batteries
1 x Micro SD Card*
1 x DC Power Adaptor
1 x USB cable
*Class 10 required
(Max. 128GB card supported)

333
Reset Button
Use the pin to hold for
5 seconds to reboot
and clear all settings to
factory defaults.
This will allow you
to connect with a
dierent Wi-Fi network
if required.
Speaker
Two way audio
Grub Screw
Location
USB Port
Power with supplied
cable and 5V DC
adaptor
Status Light
Entering Pairing Mode
Purple, red, and blue
followed by the
doorbell announcing
‘system reset’.
Pairing Mode
Flashing blue.
The doorbell is now in
pairing mode.
During Pairing
Red, purple and blue
then o.
When motion is
detected or the ring
button is pressed
Red, blue then o.
Lost Wi-Fi
Blue then o.
Ring Button
Press to activate
doorbell
Indoor Chime Unit
The chime unit comes
pre-paired with the video
doorbell
Note: If there isn’t
sound refer to page 8
‘pairing your indoor
chime unit’
Camera Lens
1080p HD, with
120° angle of view
Microphone
Light Sensor/
Infrared LEDs
Detects low light
and turns on the
infrared lights which
allow the camera
to capture both day
and night images.
Identification

444
1. Download the Mercator Ikuü app.
2. Tap ‘create new account’ or ‘log in to account’.
3. Follow the in-app prompts and tap ‘OK’.
Log in to the
Mercator Ikuü
app.
Note: Ensure your
Video Doorbell is
in pairing mode.
The LED should
be flashing blue.
If it isn’t, use the
reset pin to press
and hold the reset
button on the
side of the unit
for 5 seconds and
wait for the Video
Doorbell to restart.
1
Tap the icon
and select
‘Add Device’.
2
Connect Your Video Doorbell to the App
Set Up the App
Preparing Your Device
Remove the battery compartment cover. Pull o the isolation strip to allow
the battery to make electrical contact.
Reinstall the battery cover.
Note: Ensure the battery polarity (+/-) matches the battery compartment sign.

555
Connect Your Video Doorbell to the App (cont.)
Select
‘Doorbell’ from
the sidebar,
and then tap
the Video
Doorbell icon.
3
When the
prompt
appears, tap
‘next step’.
4
Enter your
Wi-Fi name and
password, then
tap ‘Confirm’.
5
When the
prompt
appears, tap
‘Continue’.
6

666
Place the
camera eye
over the QR
code to scan
(holding the
camera 15cm
away from your
mobile screen).
When you hear
the prompt,
tap ‘I Heard a
Prompt’.
7
The app
will begin
connecting
to your video
doorbell.
When it
reaches 100%,
you will be
taken to the
product’s
settings page.
8
Update the
name of
the device
and assign
it to a room
(optional), then
tap ‘Done’.
If you don’t
see the screen
shown, the
doorbell
did not pair
successfully.
Please retry
from step 1.
9
The camera
feed will open,
and you will
be prompted
to allow
access to
your device’s
microphone.
Tap ‘OK’ to
continue. Your
camera is now
connected
and ready for
use.
10
Connect Your Video Doorbell to the App (cont.)

777
Doorbell Functions
Take a photo of the live video feed, which will be saved to the photo
album.
Speak through the doorbell speaker via your phone
microphone.
Take a video of the live video feed, which will be saved to the photo
album. Event Recording only.
Review camera footage from the SD card (if installed).
Adjust motion detection settings.
View previously saved photos and video recordings. You can download
these to your local mobile device.
Adjust the date when reviewing playback.

888
Pairing Your Indoor Chime Unit
To Install Batteries
Installation Chime Unit
1. In a location near your door and with good Wi-Fi coverage, power on your indoor
chime unit with 3 x 1.5V “AA” type batteries (Alkaline batteries recommended).
Press the “Volume” button for 5 seconds till the melody changes. Press the
doorbell button to test the indoor chime unit. If the chime doesn’t sound please
refer to step 3 below.
2. If you need to un-pair your chime unit from the video doorbell press and hold the
chime Volume button for approximately 30 seconds. The chime will continue to
sound throughout the 30 seconds - once the chime stops sounding for at least 10
seconds the chime unit has been successfully un-paired. Test that the chime has
un-paired by pressing the push button and listening for the chime. If it continues
to sound please repeat this step.
3. If you need to re-pair your chime unit to your video doorbell press and hold
the chime Volume button for approximately 15 seconds making sure to release
the button as soon as the chime stops sounding. Test that the chime has been
successfully paired by pressing the push button and listening for the chime.
4. Press the “Volume” button once to trigger one time. There are 4 volume levels to
choose from low to high.
5. The indoor chime units oers 38 dierent kinds of melody. Press the “Melody”
button to choose one you like, each press changes the melody.
1. Remove Battery Cover from rear of unit by unclicking the top part.
2. Pull o the isolation strip to allow the battery to make electrical contact.
3. Replace battery compartment cover.
Note: When the Push Button unit is
depressed, a red LED light will light up, but
this is not an indicator of the Push Button Unit
battery level. It is recommended to replace
batteries once a year to ensure range and
transmission reliability.
The ‘keyhole’ shaped slot on rear of unit (above battery compartment) will enable
the Chime Unit to be easily mounted to a flat surface. ‘Keyhole’ slot enables unit to be
easily removed from mounting position for replacement of batteries relocation,

999
Installation Instructions
Before choosing your location, check the Wi-Fi strength/coverage in that area.
IMPORTANT: Mount the doorbell under eave and avoid placing it in direct sunlight
and extreme weather. Do not mount the doorbell unit on metal or near metal door
frames, security door, or proximity any metal door furniture as this might aect the
functionality of the doorbell.
Please Note: The below image shows the doorbell angle view. Install it in a suitable
location with Wi-Fi coverage (Fig.01).
1. Drill appropriately sized hole and insert wall plug (if required).
2. Fit screw provided, ensuring that there is a gap of approx. 3mm between
mounting surface and head of screw to enable attachment of unit.
3. Attach Chime Unit by sliding ‘Keyhole’ shaped slot over screw. Alternatively unit
can be le unmounted, in this form it can also be used as a portable paging
device. Carry it with you around the house as needed.
Wi-Fi Coverage
FIG. 01
Volume
Button
Melody
Button
101010
Note:
• This doorbell requires a network device (e.g. wireless/non-wireless router, network switch etc.) that
is connected to the internet for setup and use. This network device is not supplied with this kit.
• This doorbell might experience network, motion command and live transmission delay issues.
This is normal, due to the connected network, 3G/4G mobile network, server overflow or internet
upstream speed, download speed and video resolution. To reduce delay, it is recommended to
reduce the video quality, or contact your mobile/network service provider.
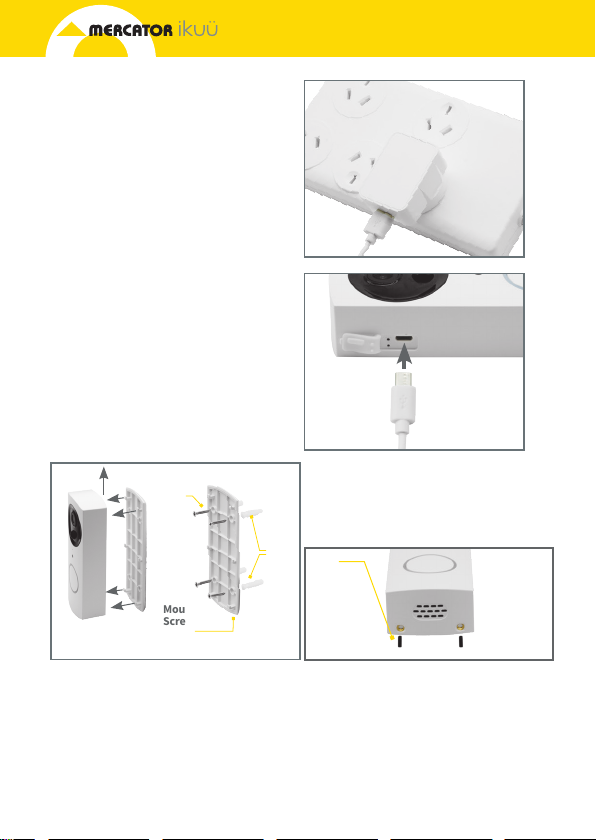
1. Plug DC power adaptor into a
power source and connect it with
doorbell using provided USB cable
(Fig 2 & 3).
2. During charging, the charging
indicator should turn red. We
suggest charging the doorbell for
6-8 hours before installation.
INSTALLATION
Note: Product should be fully
charged before installation.
1. Mark screw position through the
bracket holes (Fig 4).
2. Fix the mounting bracket on the
wall by using the included screws
and wall plugs.
3. Install the doorbell to the bracket
and secure with included grub and
screw and screwdriver (Fig 5).
Grub
Screw
Wall
Plugs
Mounting
Screws
Mounting
Screws
FIG. 04
FIG. 02
FIG. 05
FIG. 03
1
2
Table des matières


