Medi Alarm PRO Manuel utilisateur

1
4G Fall Detector Pro
User Guide
Refer to the accompanying letter with your order for
details on your Alarm’s programming.
For alterations or amendments, consult this manual
or call us on 1300 665 322.
medialarm.com.au © 2020. Medi Alarm. All rights reserved.

2
Contents
What’s in the Box ................................................................ 3
Overview ............................................................................. 3
Powering the Alarm On and Off .......................................... 5
About the Screen ................................................................ 5
Charging Your Medi Alarm .................................................. 6
What Happens When the Alarm is Activated ..................... 6
Programming the Medi Alarm ............................................ 7
How to Set the Alarm’s Time Zone ..................................... 8
How to Change the Alarm’s Name ...................................... 8
Resetting the Alarm to Factory Defaults ............................. 8
About Fall Detection ........................................................... 9
About Phone Calls ............................................................. 10
About Battery Alerts ......................................................... 11
How to Check the Alarm’s GPS Location ........................... 11
Troubleshooting ................................................................ 12
Taking Care of Your Medi Alarm ....................................... 14
About Our Warranty ......................................................... 14
Contact Us ......................................................................... 15
3
What’s in the Box
Medi Alarm PRO 4G with SIM card pre-installed.
Charging cradle, power adapter & USB cable.
Lanyard accessory.
Accessories including a wireless charger, beltclip and wristband
are also available from Medi Alarm.
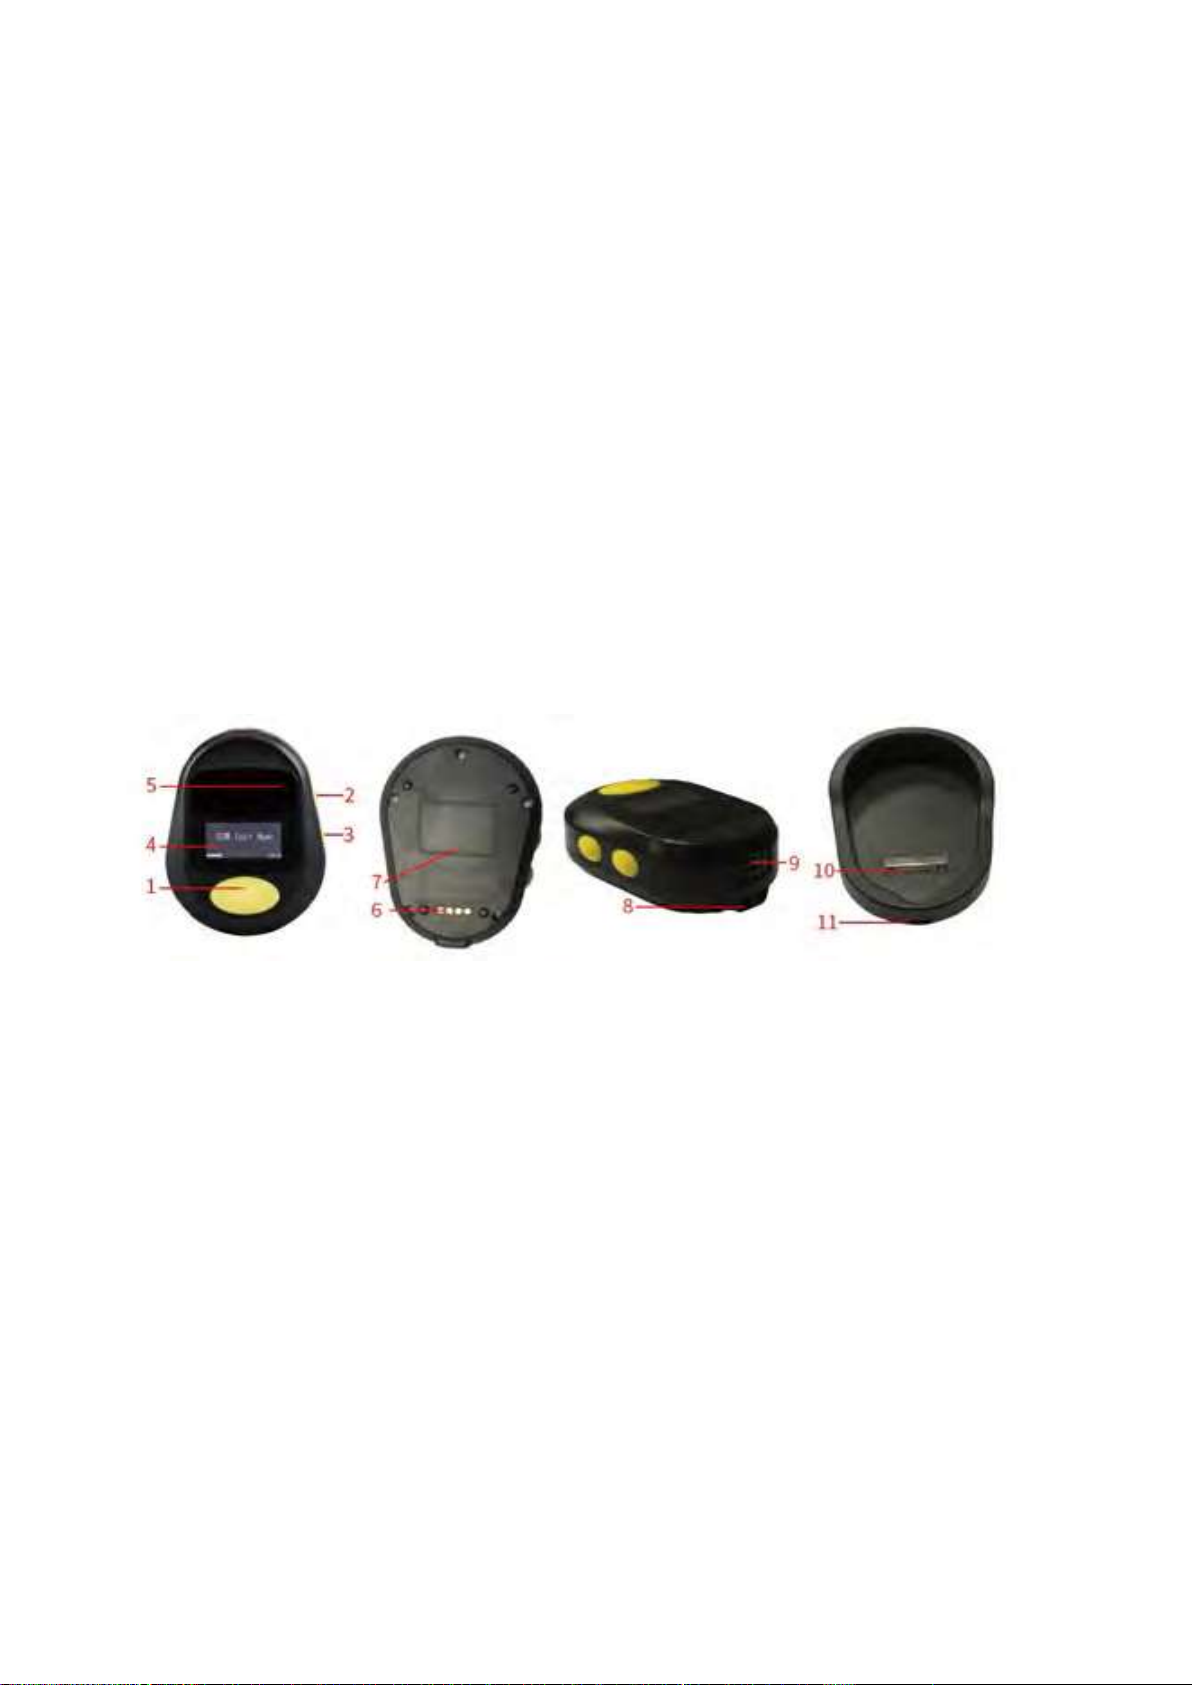
Overview
The Medi Alarm PRO 4G Fall Detector is a waterproof (IP67) GPS
tracker equipped with two-way communication and Fall Detection.
We recommend that you do not wear the device in a bath, pool or
submerge the device in water. It can be worn in the shower.
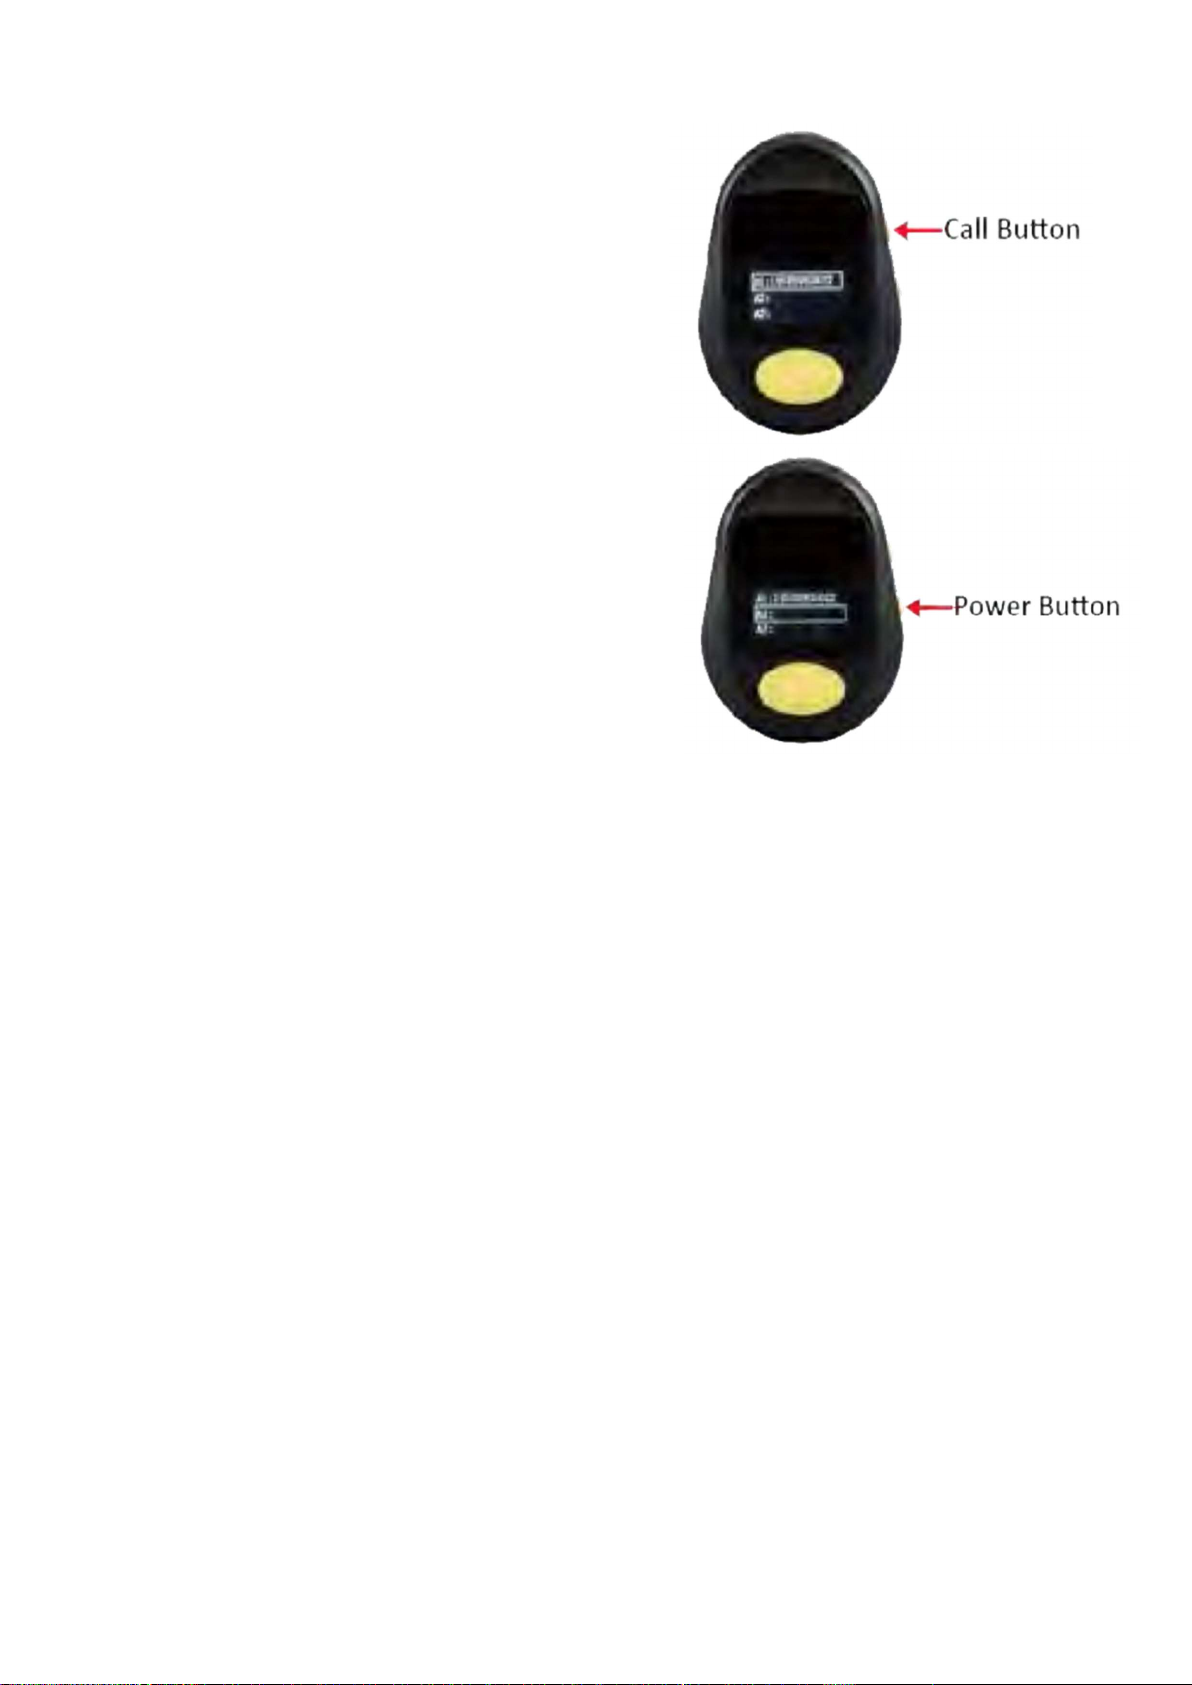
1. SOS Button
2. Call Button
3. Power Button
4. Display
5. Microphone
6. Charging contact points
7. Wireless Charging
Receiver (Interior)
8. Lanyard loop
9. Speaker
10. Charging cradle contact
points
11. Charging cradle
connection port
When you receive your Alarm, take it outside before switching it on
and leaving in an area with open sky (but away from direct sunlight)
for 10 minutes to connect to the GPS system. Charge your Alarm to
100% (as shown on the display) before wearing it.

4

5
Powering the Alarm On and Off
Press and hold the Power button until you hear the Alarm beep. The
unit will begin its start up sequence as shown with a progress
indicator on the display. Allow some time for the Alarm to make its
initial connections to mobile (GSM), time code (UTC) and GPS
networks.
To turn the Alarm off, press and hold the Power button until it beeps
and the display turns off.
About the Screen
The screen displays the current Date, Time, Battery Charge level and
Mobile Signal strength. The display can rotate vertically depending on
the angle of the alarm.
Power Saving Mode
To save battery power, the Alarm’s screen switches off when not in
use. Press the Call button to reactivate the screen.
If you prefer the screen to stay on continuously, the A1 Contact can
send the command L2,00 via SMS. See more on page 5 about
programming the Alarm via SMS.
If Power Saving Mode is disabled you will not see the battery symbol
filling up when charging. A lightning bolt on the battery symbol in the
top left corner of the screen indicates the Alarm is charging.

6
Charging Your Medi Alarm
The Medi Alarm can be charged using the
included charging cradle or optional wireless
charger.
Place the Alarm on the cradle. The display will
show a battery icon filling up.
We recommend charging for one hour once a
day.
What Happens When the Alarm is Activated
When the SOS button is held down, or a Fall is detected, all stored
Contacts will be sent an SMS advising the Wearer’s location and
when the Alert was triggered.
This is then followed by the
phone call sequence. The
Medi Alarm will telephone
your Emergency Contacts will
be called one at a time in the
order they have been set,
until a Contact answers and
follows the voice prompt to
press ‘1’ on their phone’s keypad to acknowledge the call.
After the receiver presses 1 they will be speaking to the Wearer of
the Medi Alarm. The call sequence will be stopped at this point.
If a False Alarm occurs or the Wearer feels they do not wish to begin
the phone call sequence, they can press and hold the SOS button to
cancel the alert. Canceling the alert will send an SMS to Emergency
Contacts advising the SOS or Fall alert was a false alarm.

7
Programming the Medi Alarm
Setting the Programming Number (A1)
Make sure Alarm is turned on, then send the command
‘A1,xxxxxxxxxx,Name’ via SMS to the Alarm’s phone number.
For example, text: A1,0411123123,JohnSmith
The Alarm will reply with ‘1TEL OK! 0411123123’
The phone number stored in A1 can send SMS commands to the
Alarm to change Emergency Contacts and other settings, such as
adjustments to Fall Detection (see page 7).
Note that commands are case-sensitive. Only Upper Case letters will
work.
Setting Your Emergency Contacts
Emergency Contacts are generally preset prior to shipping your Medi
Alarm. Refer to the accompanying letter with your shipment for more
information. Text ‘G’ to the Alarm to receive an SMS list of all
programmed numbers.
The Alarm can store up to eight Contacts, referred to as A1 to A8.
Setting Emergency Contacts works the same way as setting A1. For
example, to set the second Emergency Contact, send the SMS
command ‘A2,0412345678,JaneSmith’.
Be aware that phone numbers belonging to other Medi Alarm
devices can not be added to an Emergency Contacts list.
A1 can replace Contacts simply by overwriting them with new details.
A Contact can be also deleted by A1 by sending the command ‘AX,D’,
where X is the place on the list of the Contact, eg. A7,D will delete
the seventh Contact on the list.

8
How to Set the Alarm’s Time Zone
A1 can send the command L+XX:XX, where X represents the correct
hour and minute offset from the Universal Time Code (UTC).
See the below table for common Time Zone commands.
Time Zone Command
AEST (NSW, VIC, QLD, TAS, ACT)
L+10:00
AEDT (NSW, VIC, TAS, ACT) L+11:00
ACST (SA, NT) L+09:30
ACDT (SA) L+10:30
AWST (WA) L+08:00
The Alarm will respond with ‘Set Time Zone OK!’ to confirm it has
successfully updated. Please allow a few minutes for the Alarm’s
display to show the correct time.
How to Change the Alarm’s Name
A1 can send the command Z2,XxxxxxXxxxxx, where Xxxx represents
the Wearer’s name or other information. By default, Alarms are
programmed to show the Wearer’s first name followed by
‘MediAlarm’, eg. JohnMediAlarm.
The name is not indicated any where on the device and is only
visible in the SMS responses it sends when replying to other
commands or when an SOS is activated.
Resetting the Alarm to Factory Defaults
To reset the Alarm to factory default settings, send the SMS
command RESET! Note that this will erase all Emergency Contacts
and other programming. The Alarm will restart.

9
About Fall Detection
The Alarm will detect a Fall and send an Alert if it senses sudden
changes in Angle, acceleration and an impact.
Adjusting Fall Detection Sensitivity
Medi Alarms are shipped with a pre-programmed Fall Detection
sensitivity of 065. A1 can adjust the sensitivity level if the Alarm is
frequently being set off in error.
A1 can send the command ‘KLxxx’ to
set the Fall Detection threshold,
where xxx is a three-digit number
from 001 to 255.
The Alarm will reply with ‘SET Low-g Threshold OK!’
Note 001 is the least sensitive and 255 is the highest sensitivity.
We recommend Fall Detection to be sensitive enough to detect a low
impact fall, such as the Wearer falling and sliding down a wall to the
floor.
How to Disable Fall Detection
A setting of 000 will completely disable Fall Detection (i.e. KL000)
The Alarm will rely with ‘Disabled Low-g OK!’
For more information about resolving issues related to Fall
Detection please see Troubleshooting on page 10.
10
About Phone Calls
Making a Phone Call
Press and hold the Call button to see a
list of your Alarm’s stored Contacts.
Tapping the Call button or the Power
button will scroll up and down the
Contacts list. Pressing the SOS button
will dial the selected number. Press
the SOS button again to hang up.
Press and hold the Call button again to
return the display to the Home screen.
Note that your Medi Alarm is designed
for emergency purposes only.
Receiving a Phone Call
Only stored Emergency Contacts can make Calls to your Medi
Alarm.
If a Contact phones the Alarm it will answer automatically. The call
will end when the caller hangs up.
How to Adjust the Call Volume
While on a call, tap the Call button to turn the volume up. Tap the
Power button to it down. Do not press and hold the Power button as
this may turn the Alarm off.
Table des matières


