Maxim CM5C Manuel utilisateur

USE AND CARE GUIDE FOR
MODEL CM5C
READ AND SAVE THESE INSTRUCTIONS
WARNING: A risk of fire and electrical shock exists in all
electrical appliances and may cause personal injury or death.
Please follow all safety instructions.
Electric Cordless
Crepe Maker

2
IMPORTANT SAFEGUARDS
When using electrical appliances, basic safety precautions should
always be followed to reduce the risk of fire, electric shock and injury
to persons, including the following:
• Read all instructions before using appliance.
• Do not touch hot surfaces. Use handles or knobs.
• To protect against electric shock, do not immerse power base
or body of unit in water or other liquid.Only the top cooking sur-
face should be permitted to contact the batter. See instructions
for cleaning.
• Close supervision is necessary when any appliance is used
near children.
• This appliance is not for use by children.
• Unplug from outlet when not in use and before cleaning. Allow
to cool before putting on or taking off parts, and before
cleaning the appliance.
• Do not operate any damaged appliance. Do not operate with a
damaged cord or plug, or after the appliance malfunctions or
has been dropped or damaged in any manner. Contact
Consumer Service for return authorization, examination, repair
or adjustment.
• To avoid injuries, use attachments only if recommended by the
manufacturer.
• Do not use outdoors or while standing in a damp area.
• Do not let cord hang over edge of table or counter, or touch hot
surfaces.
• Do not place on or near a hot gas or electric burner, or in a
heated oven.
• To disconnect, switch to OFF position, then remove plug from
wall outlet.
• Do not use appliance for other than the intended use.
SAVETHESE INSTRUCTIONS
CAUTION: A short power supply cord is provided to reduce the
risk of personal injury resulting from becoming entangled in or trip-
ping over a longer cord. Extension cords are available from local
hardware stores and may be used if care is exercised in their use.
If an extension cord is required, special care and caution is
necessary. Also the cord must be: (1) marked with an electrical rating

3
of 125 V and at least 10 A, 1250 W, and (2) the cord must be
arranged so that it will not drape over the countertop or tabletop
where it can be pulled on by children or tripped over accidentally.
POLARIZED PLUG: This appliance has a polarized plug, one
blade is wider than the other.As a safety feature to reduce the risk
of electrical shock, this plug is intended to fit in a polarized outlet
only one way. If the plug does not fit fully in the outlet, reverse the
plug. If it still does not fit, contact a qualified electrician. Do not
attempt to defeat this safety feature.
ELECTRIC POWER: If the electric circuit is overloaded with other
appliances, your appliance may not operate properly. It should be
operated on a separate electrical circuit from other appliances.
This product is for household use only.
Notes on Crepes and
Crepe Batters
Some say “crêpe” (rhymes with pep), others say “crepe”
(rhymes with drape). No matter how you pronounce it, it’s a
delicious “envelope” for almost any filling you can think of.
An easy, imaginative way to stretch expensive ingredients or
everyday leftovers . . .
a party appetizer, main course or dessert that will make the
meal memorable . . .
an “instant” late-night snack or Sunday breakfast treat, using
crepes from the refrigerator or freezer . . .
an entertaining, do-it-yourself hors d’oeuvres for guests - they
can “decorate” their own crepes as they please . . .
a tender, light alternative to pasta in dishes calling for lasagna,
cannelloni, manicotti and even noodles . . .
a perfect way to add appeal to children’s meals, dinner for one
or two and for those “what-shall-we-have nights” ...foreasier to
make and serve than your family, guests or even you might
believe!
Crepes have a long and international history. No one is sure
who invented the first true crepe. Probably it evolved over cen-
turies from a simple flour and water mixture, flattened and baked
over fire to hold food, long before eating utensils (or sandwiches!)
were thought of.Among the flavorful descendants, we can include

4
Mexican Tortillas, Russian Blinis, Jewish Blintzes, Hungarian
Palascintas, Chinese Egg Rolls, Italian Manicotti and pancakes of
every country. The term ‘crêpes’ originates from France where
crepes are baked every year during the ‘Chandeleur’, a religion
celebration of pagan origin. Brittany, a region of northern France,
is famous for its crepes served with various sweet or salty fillings
for the delight of tourists and locals.
There are so many versions of crepes and variations in fillings
and sauces that you really can do anything you like - perhaps
you’ll create a new dish!
In all crepe batters, the proportions of flour, eggs and liquid
can be varied to produce a thin, lacy crepe; a sturdier, thicker
crepe or any egg-y rich crepe. Adding butter or margarine adds
flavor and easier removal from the pan.Oil may make crepes stick
slightly. Sugar adds crispness but may make crepes break in
rolling.
Since dessert crepes have a sweetened filling and/or sauce,
you can use a basic batter without sugar for crepes you wish to
fold or roll.
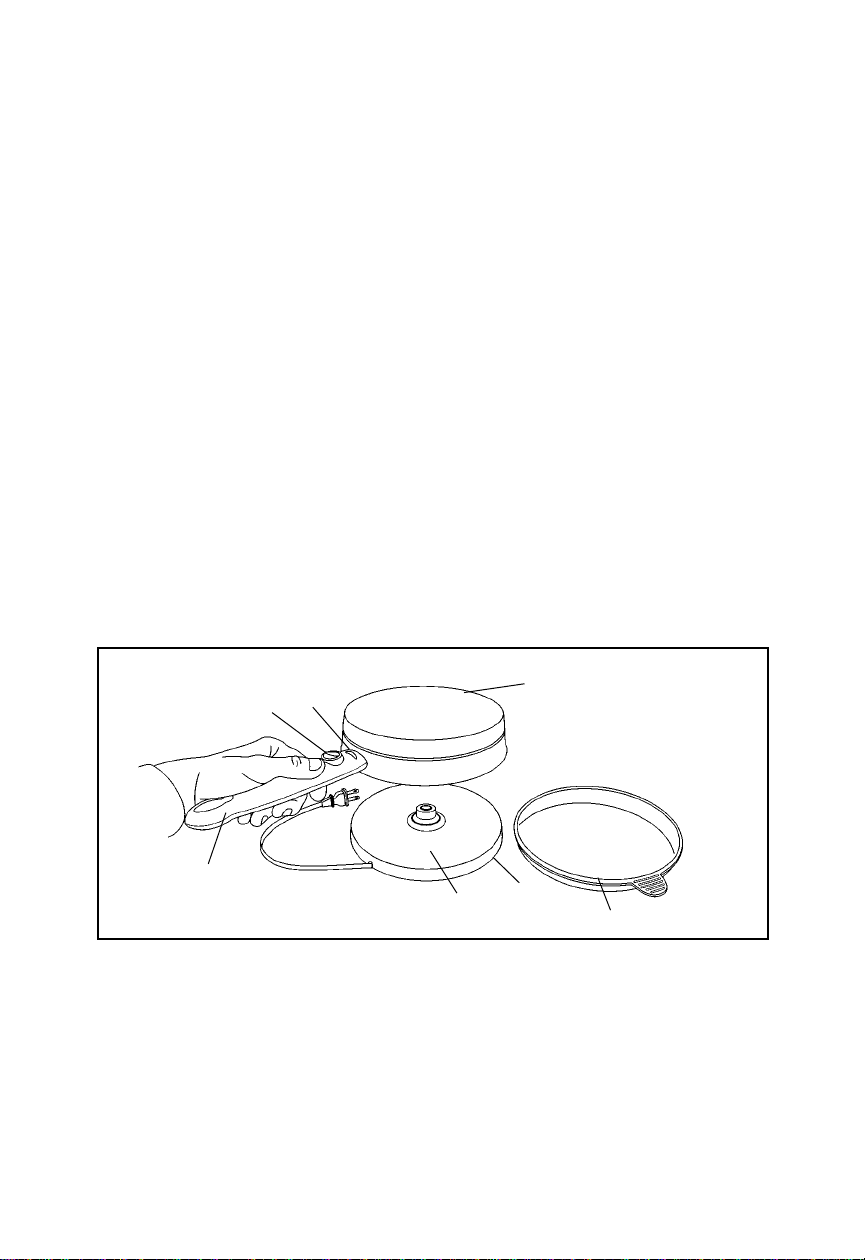
Note: Product may vary slightly from illustration.
1.
2.
3.
4. 5. 6. 7.
1. Non-Stick Cooking Surface
2. Red Ready Light
3. On/Off Power Switch
4. Cool-Touch Handle
5. 360° Cordless Base
6. Cord Wrap Around Base
(not pictured)
7. Dipping Tray
FIGURE 1

5
UsingYour Cordless
Crepe Maker
1. Before using, wipe non-stick cooking surface with a damp
cloth and dry.
2. Place crepe maker on cordless base.
3. Plug into 120 V ~ 60 Hz outlet.
4. Turn the power switch to on.The red Ready Light will come
on.
5. Allow the crepe maker to preheat until the red Ready Light
turns off.
6. Prepare the crepe batter as per the recipe. Pour the batter
into the dipping tray. Do not overfill.
7. Have a clean plate nearby to stack the finished crepes.
8. Grasping the handle of the crepe maker, turn the unit over
and dip the non-stick cooking surface into the batter
(as shown in FIGURE 2), swirling gently for a moment. Do
not redip.
9. Turn the crepe maker to the upright position and return to the
base.
10. The red Ready Light will turn on. The crepe is ready when
slight browning appears at the edges of the crepe and it has
almost stopped steaming – approximately one minute.
During the cooking process, the ready light will cycle on and
off.
11. Invert the crepe maker over the plate. If the crepe does not
drop off, loosen at the edge with a plastic spatula. It is not
necessary to brown the other side.
NOTE: Do not use metal utensils as they will scratch the non-stick
surface of the crepe maker.
12. Continue to make crepes—repeating steps 8-11.
Note:Variation in ingredients or individual preferences as to crepe
color will affect the cooking time.
FIGURE 2

6
Hints:
• Stack crepes as they are made. Keep crepes moist as they are
made by covering stack with a paper towel or foil. This is not
necessary for crepes that are to be filled and/or sauced and
heated.
• The first crepe or two may be lacy or have holes, particularly if
the batter is frothy from blender-mixing or whipping. The last
crepe may not stick to the crepe maker if the batter is too
shallow and the non-stick surface touches the bottom of the
dish.
• If crepes stick to the non-stick surface, check the recipe—
recipes using oil in place of butter or margarine or recipes
including sugar can stick slightly. Wipe the non-stick surface
with a bit of butter on a paper towel before the first crepe or
between each dipping.
• If crepe maker is dipped and kept in the batter too long, the
batter will not adhere to the non-stick surface. The dipping
procedure should take only a few seconds.
• The crepe will take 45-60 seconds to cook.
• Edges of crepe may begin to “curl” when done. Center of crepe
may have a “wet-like” appearance when finished.

7
Serving
Starting with a pile of flat crepes, you can use them in a number of
ways, depending on whether you want a simple sauced or a fancy
filled crepe.They can be served cold, warm or hot, baked, broiled
or crisp-fried in oil. Here are some ideas on handling crepes. See
recipes for the ways to use various shapes.
Or stacked ...to make a cake (gateau) or in a casserole dish, with
appropriate fillings and toppings, served hot or cold.
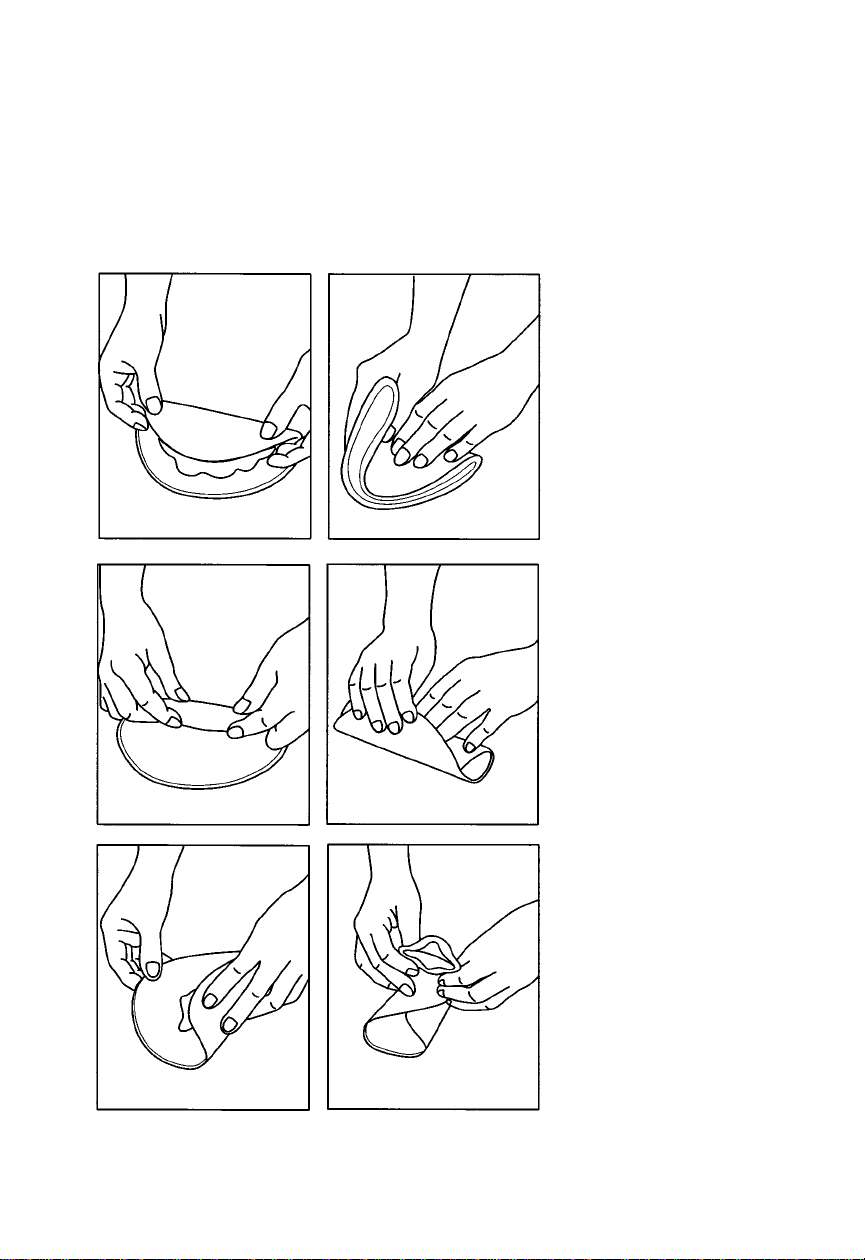
FIGURE 3 -
“Quartering” Crepes
Crepes are folded in
quarters . . . when
served plain (or
spread with a thin
filling) and served in
sauce, or used “hot off
the pan” for dipping in
an appetizer dip.
FIGURE 4 -
Rolling Crepes
Or rolled . . . when
filled with a few
spoonfuls of an
entree or dessert
mixture and quickly
baked or broiled, or
filled with cold
mousse, ice cream
or whipped cream.
FIGURE 5 -
Folding Crepes
Or folded . . . into an
envelope for small
appetizers, ravioli-like
entrees, crisp-fried
treats of all kinds.

8
Keeping Crepes Warm
If you want to serve crepes warm without baking, broiling or
frying them, simply cover the stack of crepes as they are made
with a foil cover.Or set a rack or perforated screen (such as a wire
mesh spatter shield) over a skillet with an inch of simmering water
in it. Freeze or Refrigerate
Crepes will keep up to a month in the freezer or a week in the
refrigerator.Simply stack a batch on a sheet of foil or waxed paper,
insert into a large plastic food storage bag, seal and fasten open-
ing, pressing out as much air as possible.To use, allow crepes to
warm up to room temperature. They will “peel” apart with just a
gentle pull. If you’re in a hurry, the stack can be warmed covered
with foil on a flat pan in a low oven.
Care and Cleaning
NOTE: DO NOT IMMERSE ANY PART OF THE CREPE MAKER
IN WATER OR OTHER LIQUID.
1. Before cleaning, turn the power switch to off and remove
plug from outlet.
2. Allow crepe maker to cool slightly.The unit is easier to clean
when slightly warm.
3. Wipe the non-stick surface with a soft cloth. If baked on
batter does not remove, brush with a little oil or melted
butter. Allow to stand for 5 minutes, then wipe with a damp
cloth.The other parts can be wiped with a soft damp cloth.
4. Always clean after each use to prevent a build-up of baked
on batter.
NOTE: Do not use abrasives on the non-stick cooking surface.
Any servicing requiring disassembly other than the above
cleaning must be performed by an authorized service center.

9
Recipes
We suggest you start with the batter recipes given here - they all
“dip, cook and release” well on your crepe maker.They fold or roll
well and keep for weeks in the freezer and days in the refrigerator.
Batter can be used immediately. However, an hour or two standing
will produce slightly more tender crepes. Or, refrigerate batter up
to three days for use as needed.
Basic Batter
1 cup all-purpose flour
2 eggs
1⁄2cup milk
1⁄2cup water
1⁄4tsp salt
2 TBL butter or margarine, melted
Place ingredients in blender in order given. Blend 30 seconds,
stop and stir down sides. Blend 30-60 seconds until smooth. Or,
mix in bowl with wire whisk or mixer, first combining flour and
eggs, adding liquid gradually. Beat until smooth; add other
ingredients. Makes about 16 crepes.
NOTE:Measure flour and liquid carefully, since consistency of bat-
ter is important. (It should be about the consistency of thick heavy
cream). Spoon flour into measuring cup and level off with straight
edge of knife or spatula.

10
Variations
Richer, More Egg-y Crepes
1 cup all-purpose flour, presifted
3 eggs
3⁄4cup milk
3⁄4cup water
1⁄4tsp salt
2 TBL butter or margarine, melted
Cornmeal Crepes
Delicious with any Mexican-style or any main dish fillings:
1⁄2cup yellow cornmeal
1⁄2cup boiling water
3 eggs
1⁄2tsp salt
1⁄2cup all-purpose flour
2 TBL butter or margarine, melted
3⁄4cup milk
Combine cornmeal and boiling water and stir until smooth.Let cool
slightly.Combine eggs, salt, flour and butter until smooth.Add milk
and mix until smooth. Stir batter occasionally when dipping if
cornmeal tends to settle to bottom.
Buckwheat Pancake Mix
Makes a flavorful, “wheaty” crepe for entree and fruit filling:
1 cup buckwheat pancake mix
(or 2⁄3cup buckwheat flour plus 1⁄2teaspoon salt)
1 egg
1 cup milk
3 TBL butter or margarine, melted
NOTE:Regular pancake mix can be substituted.Since mixes vary,
it may be necessary to add a little more milk.
Table des matières
Langues :
Autres manuels Maxim Appareils de cuisine

Maxim
Maxim CM5 Manuel utilisateur

Maxim
Maxim GR-586 Manuel utilisateur

Maxim
Maxim kitchenpro MU08 Manuel utilisateur

Maxim
Maxim MDSM Manuel utilisateur

Maxim
Maxim MJ250 Manuel utilisateur

Maxim
Maxim Kitchenpro SW28 Manuel utilisateur

Maxim
Maxim MW45 Manuel utilisateur

Maxim
Maxim kitchenpro MUT08 Manuel utilisateur

Maxim
Maxim RO27 Guide d'installation

Maxim
Maxim kitchenpro MSG28 Manuel utilisateur