MaxiCool CLK120H4C Manuel utilisateur

CONTENTS
Identification of parts
Indoor unit
Outdoor unit
Operating and display
Remote controller
Operation instructions
Operation modes
Air flow direction control
"I FEEL" mode
Timer operation mode
Electric heating mode
Sleep operation mode
Safety Precautions
Maintenance
Protection
Troubleshooting
Installation instructions
Select the installation locations
Indoor unit installation
Outdoor unit installation
Air purge
Electrical work
Test run
Notes
Front panel installation
2
3
3
4
7
8
9
10
9
11
12
5
14
15
16
17
20
21
23
27
29
29
1

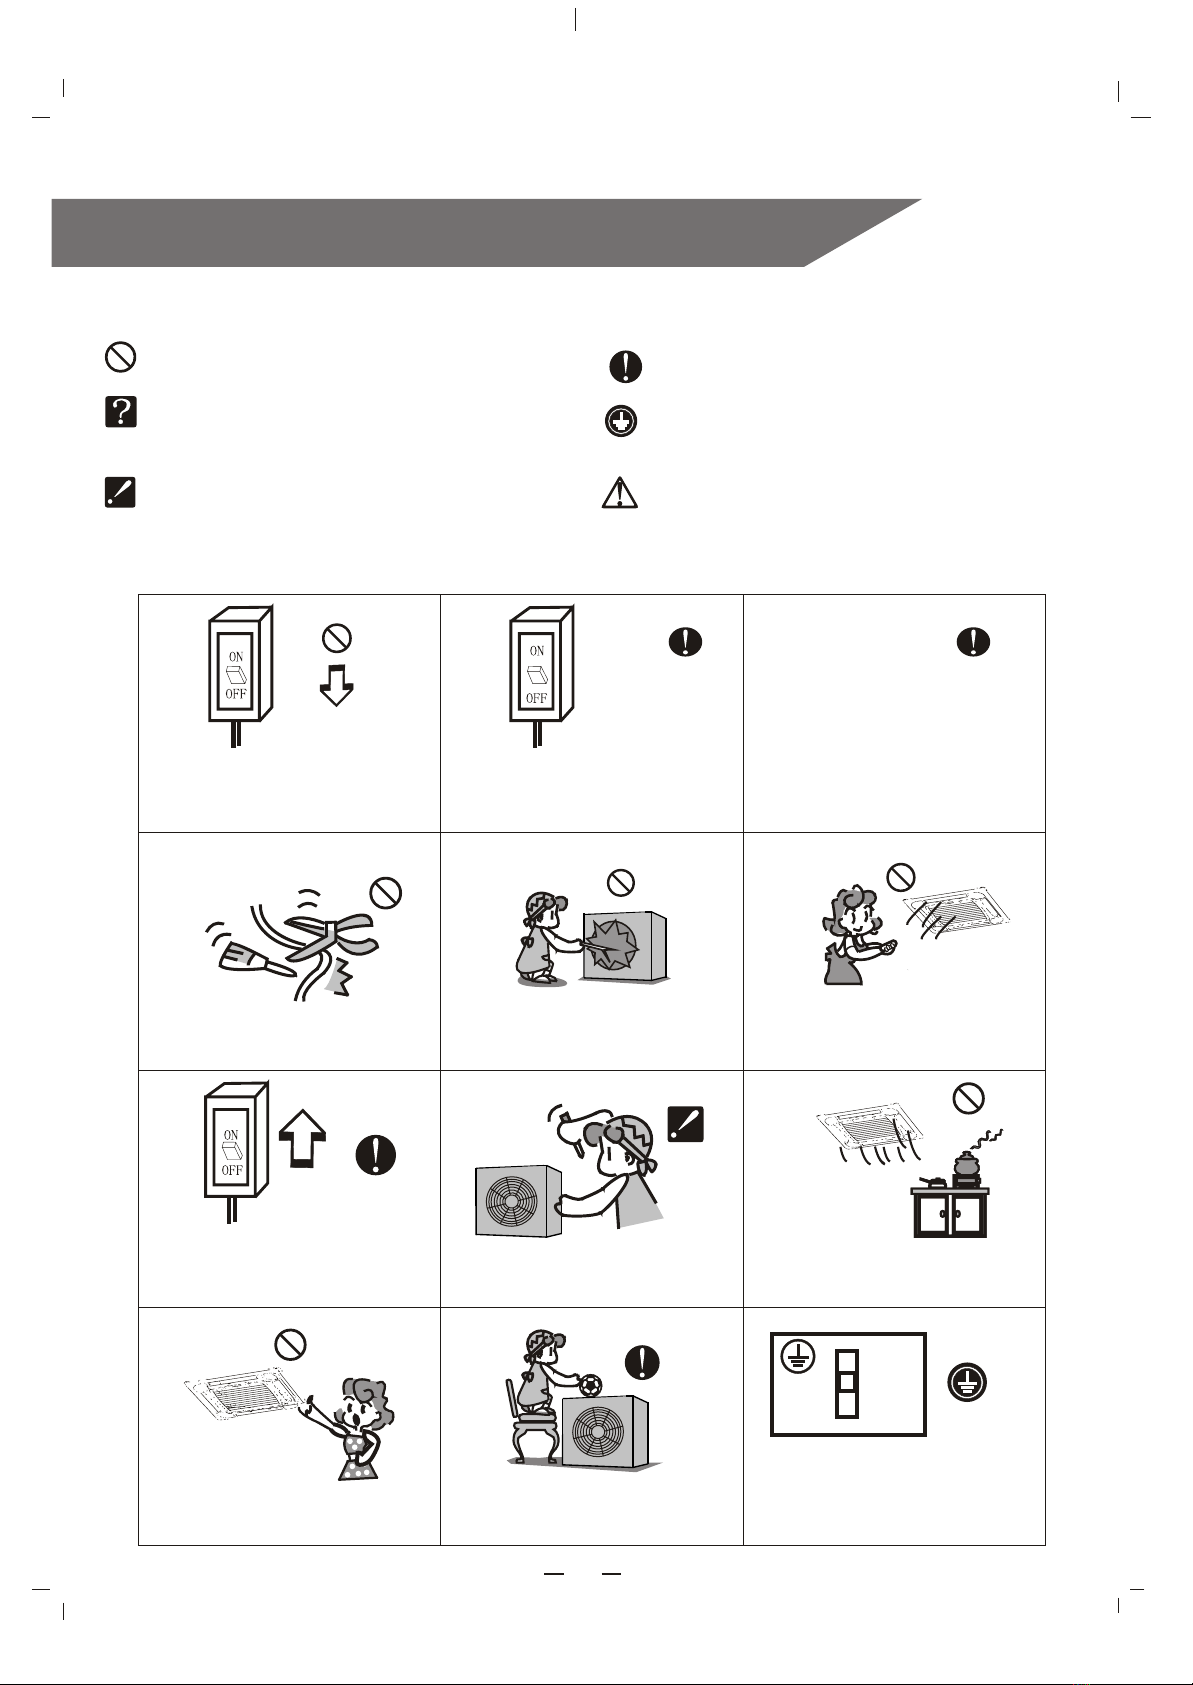
Safety precautions
Symbols in this User's Manual are interpreted as shown below:
Be sure not to do.
The feature of the appliance,
instead of a fault.
Pay attention to such a situation.
Grounding is necessary.
Be sure to follow the instruction.
Do not use the power supply circuit
breaker or pull off the plug to turn it off
during operation. This may cause a fire
due to spark, etc.
Keep the power supply circuit breaker
or plug from dirt. Connect the power
supply cord to it firmly and correctly,
lest an electric shock or a fire break out
due to insufficient contact.
Use 220V~/50Hz power supply only
Use 380V~/50Hz power supply only
Otherwise, serious faults maybe occur
or a fire maybe break out.
Do not knit, pull or press the power supply
cord, lest the power supply cord be broken.
An electric shock or fire is probably caused
by a broken power supply cord.
Never insert a stick or similar to the unit.
Since the fan rotates at high speed, this
may cause an injury.
Do not repair the appliance by yourself.
If this is done incorrectly, it may cause an
electric shock, etc.
Turn off the appliance first before cutting
off power supply when malfunction occurs.
It is harmful to your health if the cool air
reaches you for a long time. It is advisable
to let the air flow be deflected to all the room.
Prevent the air flow from reaching the gas
burners and stove.
Do not touch the operation buttons
when your hands are wet.
Do not put any objects on the outdoor
unit.
It is the user's responsibility to make the
appliance be grounded according to
local codes or ordinances by a licenced
person.
2
Warning: Incorrect handling could
cause a serious hazard, such as death,
serious injury,etc.
Single phase model
Make sure to use correct power source
3-phase model

3
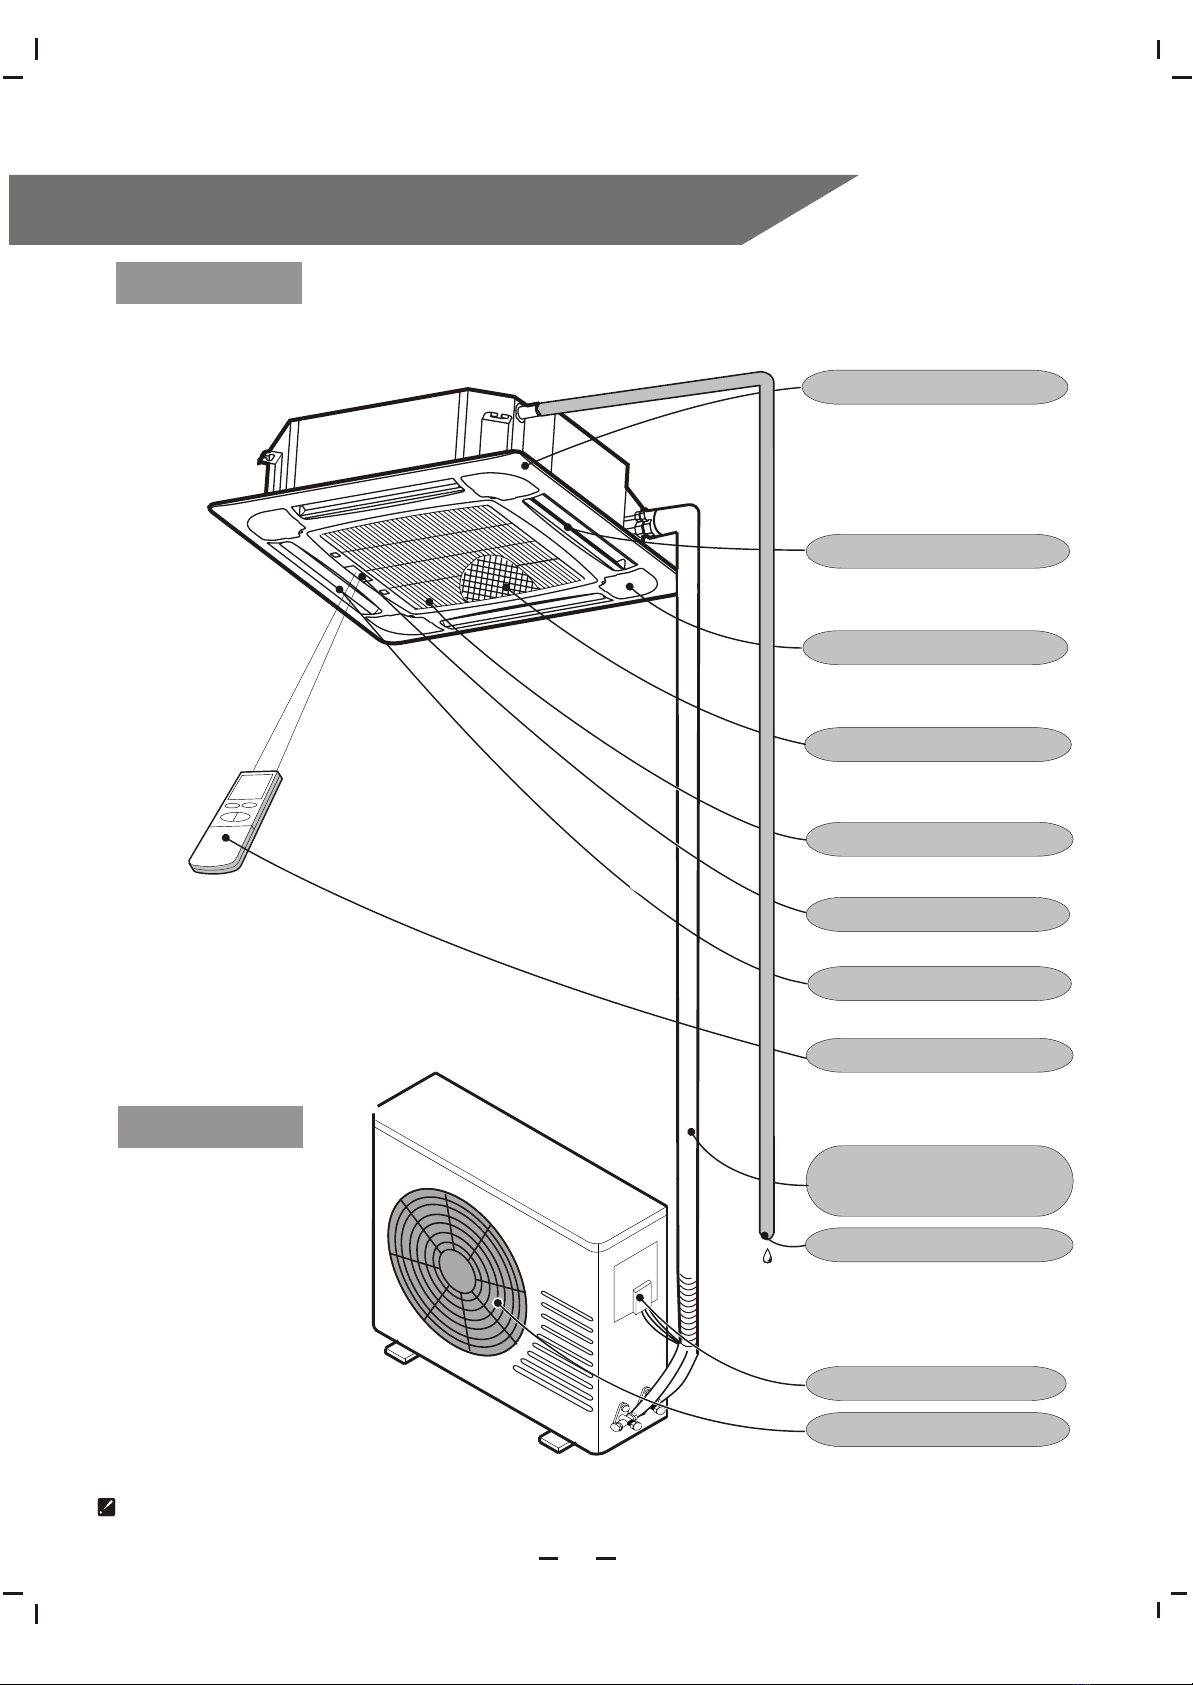
Indoor unit
Outdoor unit
Identification of parts
The figures in this manual are based on the external view of a standard model.
Consequently, the shape may differ from that of the air conditioner you have selected.
Air vanes
Air outlet
Electrical cover
Note: The condensate water drains
at COOLING or Dry operation.
Drain hose
Pipes and power
connecting cord
Remote controller
Air outlet
Air inlet grill
Air filter
Display panel
Corner panel
Front panel

Identification of parts
4
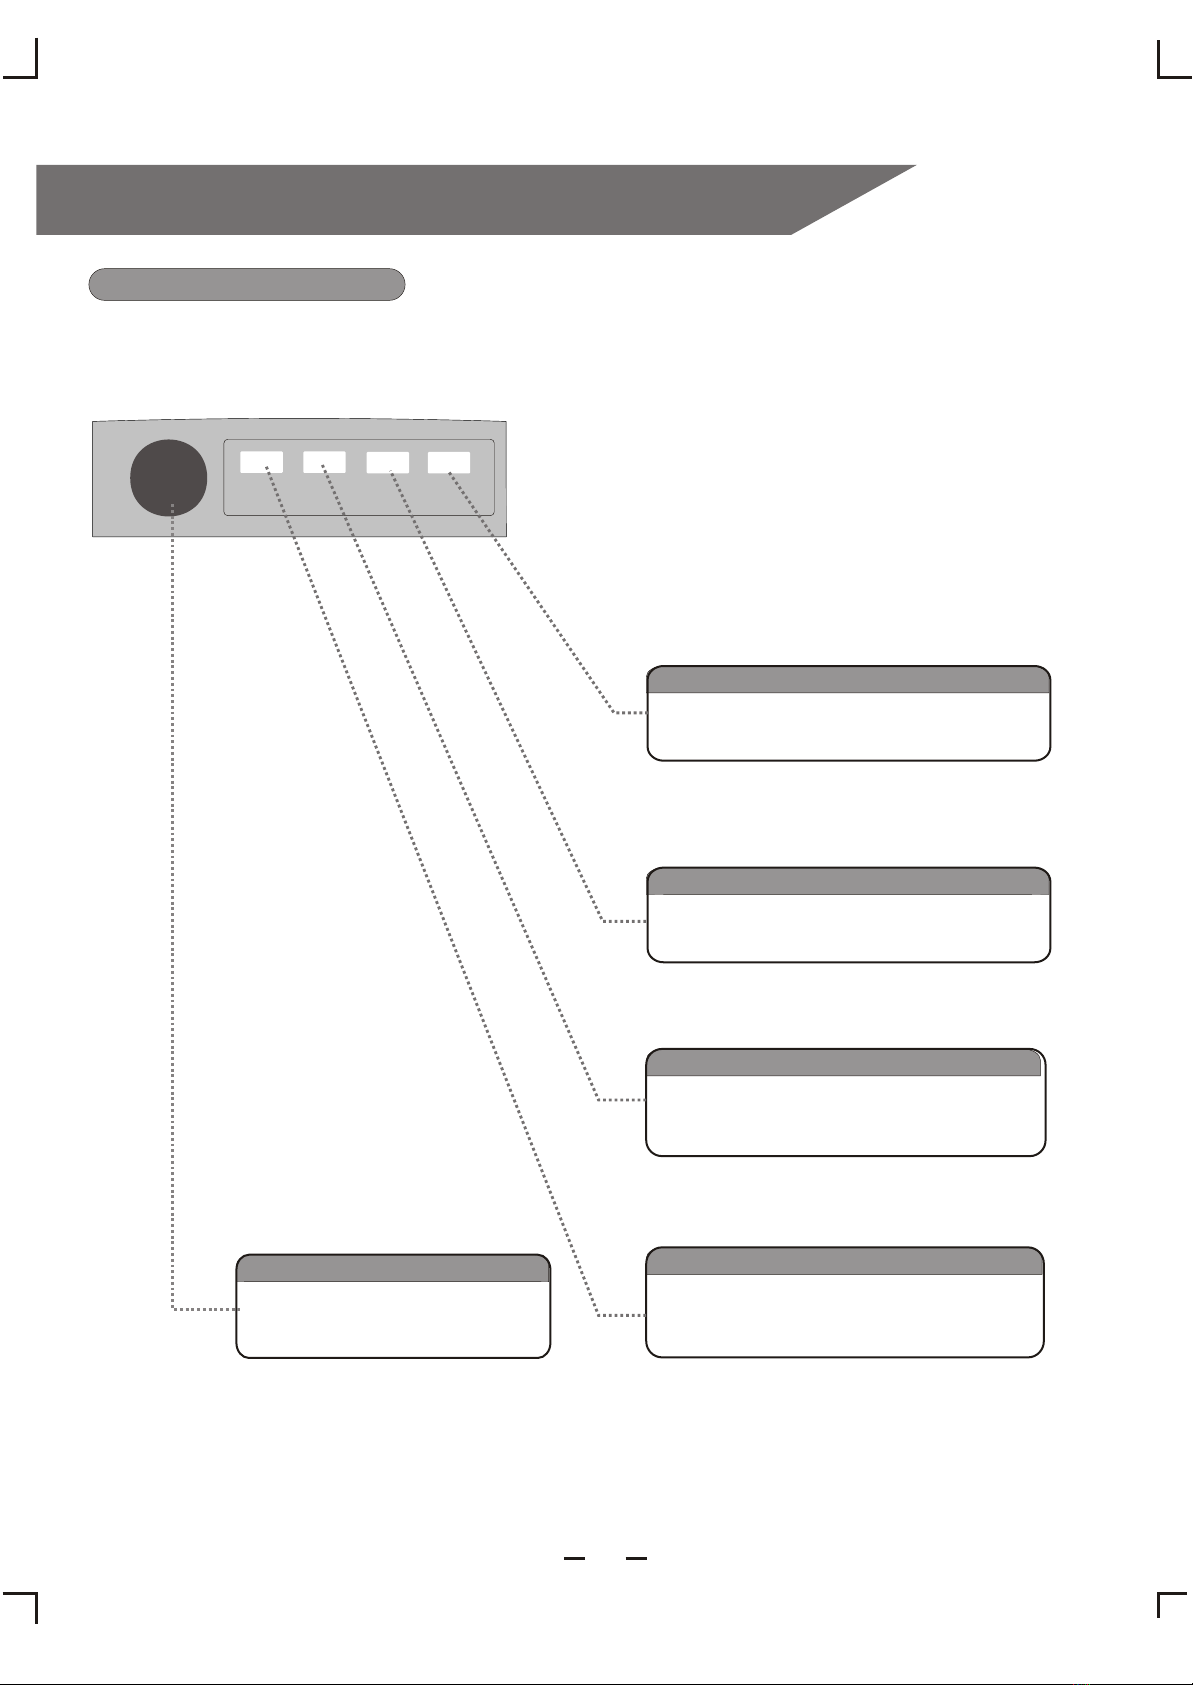
Operating and Display
It lights on when timer is in use.
It lights on means the water pump is
running. It flashes means drain failure.
It lights on when the electrical heater is
in use and lights off when heater is off.
Receives signal from
the remote controller.
Timer indicator (Yellow))
Drain indicator (Orange)
Electrical heater indicator (Red)
Signal receiving section
RUN
TIMER
TIMER DRAIN HEATER
It lights on during operation.
It flashes for ten seconds when
setting SLEEP mode.
Run indicator (Green)
It lights off when timer finishes.

5
Identification of parts
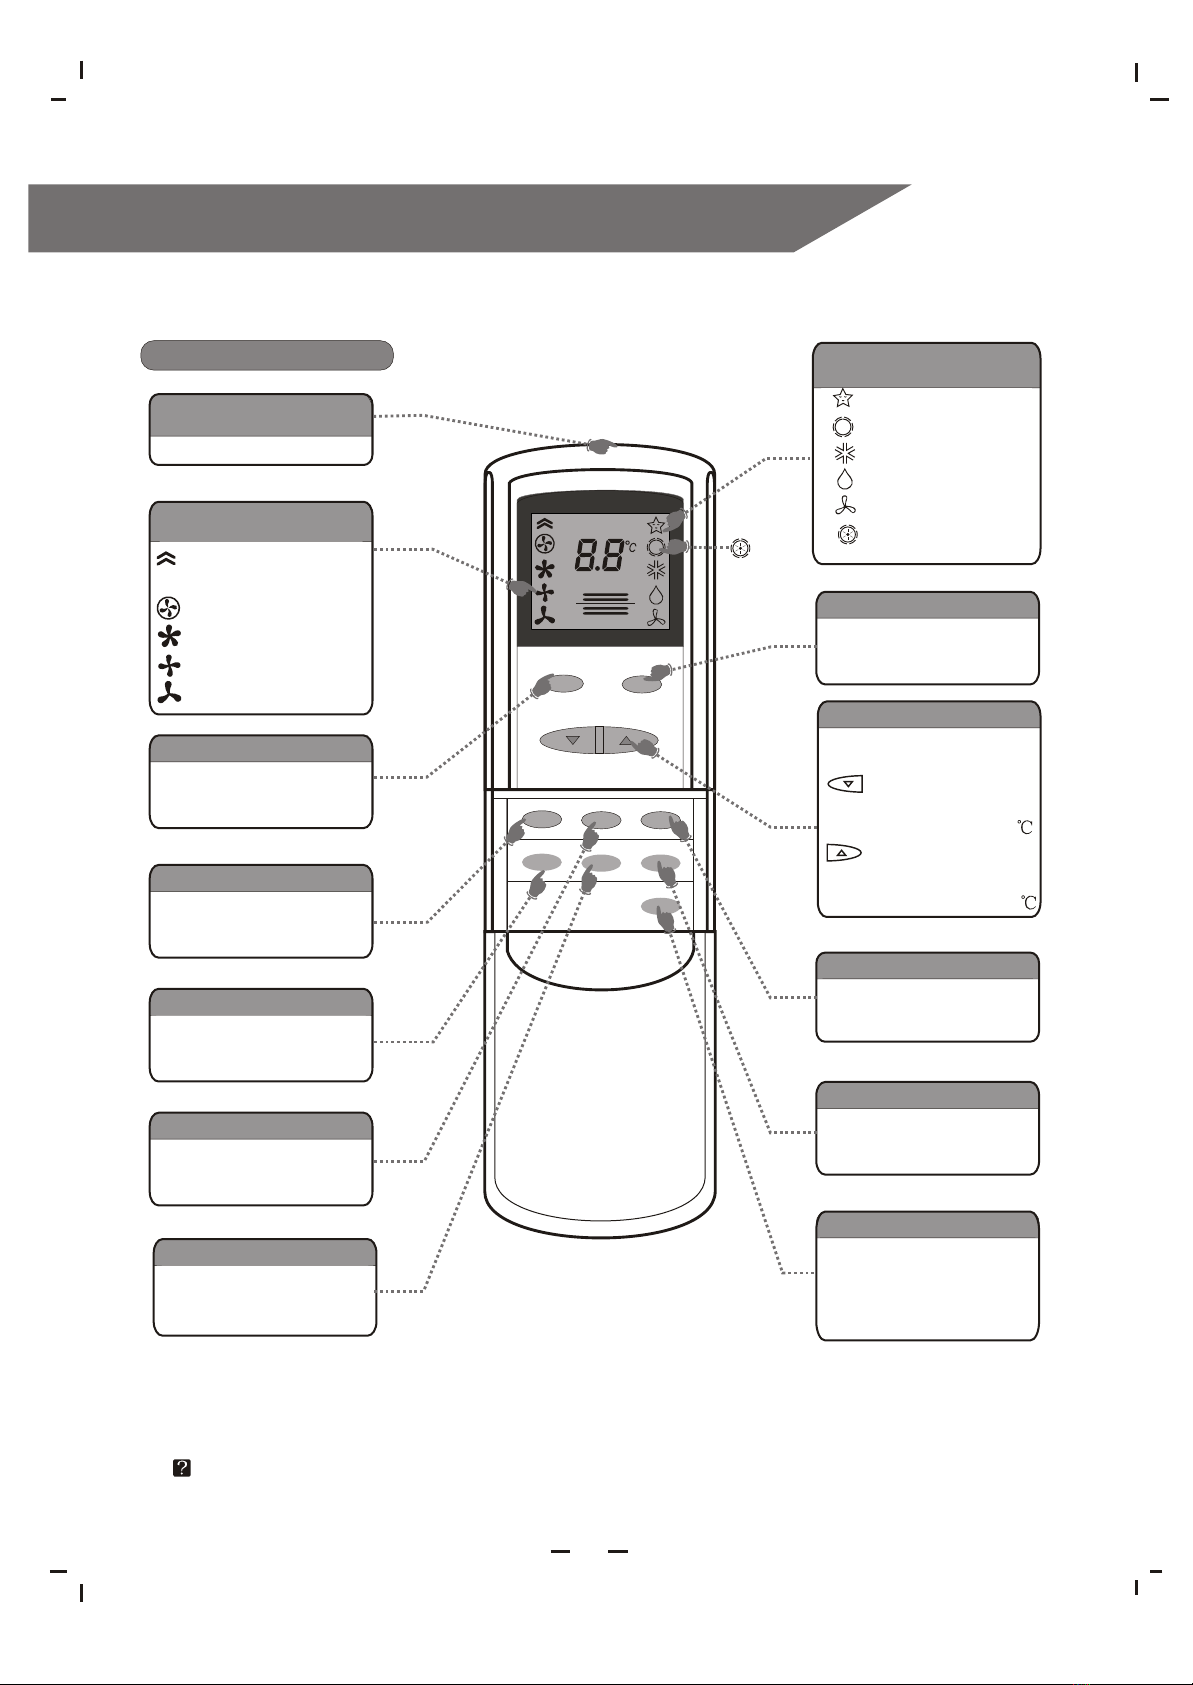
send signal to appliance.
Press once to turn on
and press again to off
For presetting the time
to turn on or off the
air conditioner
After setting the timer,
press once to confirm.
The remote controller continues displaying even the unit has stopped operation.
For setting operation
mode
Press once the start
the electric heater
in heating mode, press
again to cancel.
Press to set and press
again to cancel
Press to cancel timer
To adjust air flow
direction
signal transmit.
high fan speed
medium fan speed
low fan speed
For adjusting room
temperature
Remote controller
signal transmitter
ON/OFF button
TIMER button
HEATER button
TIMER-SET button
MODE button
FAN Speed button
SLEEP button
TIMER-Cancel button
SWING button
Remote controller
indicator section
Remote controller
indicator section
TEMPERATURE button
Sleep indicator
Heating indicator
Electric heater
indicator
Cooling indicator
Dry indicator
Fan only indicator
I FEEL "I FEEL" mode
Press once to
raise the set
temperature by 1
I FEEL
HI
h
LOW
FAN ON/OFF
TEMP
SLEEP SWING MODE
CAN SET TIMER
HEATER
Press once to
lower the set
temperature by 1
auto fan speed
Press to select the
indoor fan speed.
Remote controller

TIMER
SET
CAN
MODE
SWING
SLEEP
The appliance may not work in the following cases:
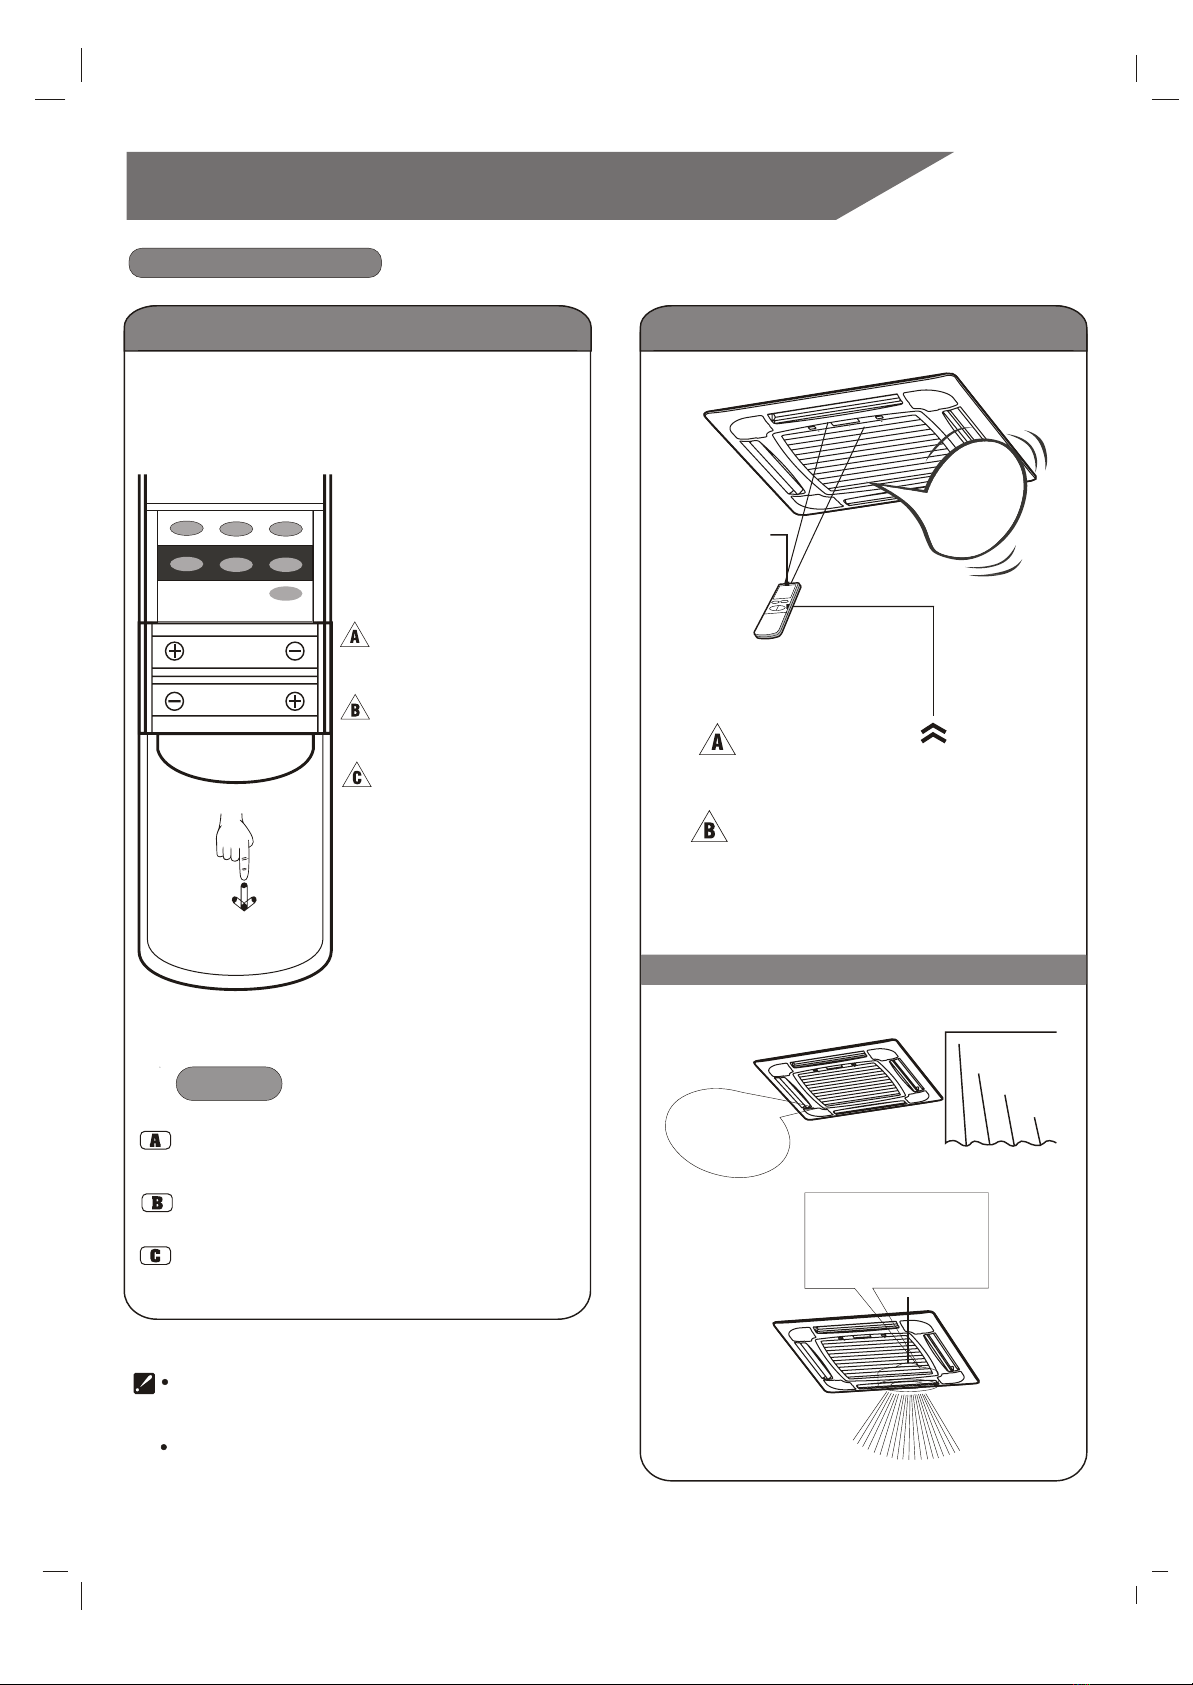
How to load batteries
How to use remote controller
Pull to open
the cover.
Load batteries properly
in the compartment
according to polarity.
Push up to close
the cover.
Note:
The service life of an alkaline battery is about 1 year.
When the indoor unit does not response to signal, or
the display becomes dim, replace the batteries at once.
Replace the two batteries with new ones of the same
tape.
To prevent liquid leakage, take out all batteries when
it is not going to be used for a long time.
After replacing batteries, if the remote
controller does not display, take them
out and reload them 20 seconds later.
Be sure to stop the air conditioner
before loading the batteries.
Signal
transmitter
The range that the signal can reach
is about 7m when pointing at the
front of indoor unit.
Signal-sent symbol will flash
for a short time when signal is sent.
No signal
is received
Remote controller
is exposed to
direct sunlight or
strong spotlight
Identification of parts
Remote controller
6__
"Beep" means
receiving signal
HEATER

- 7 -
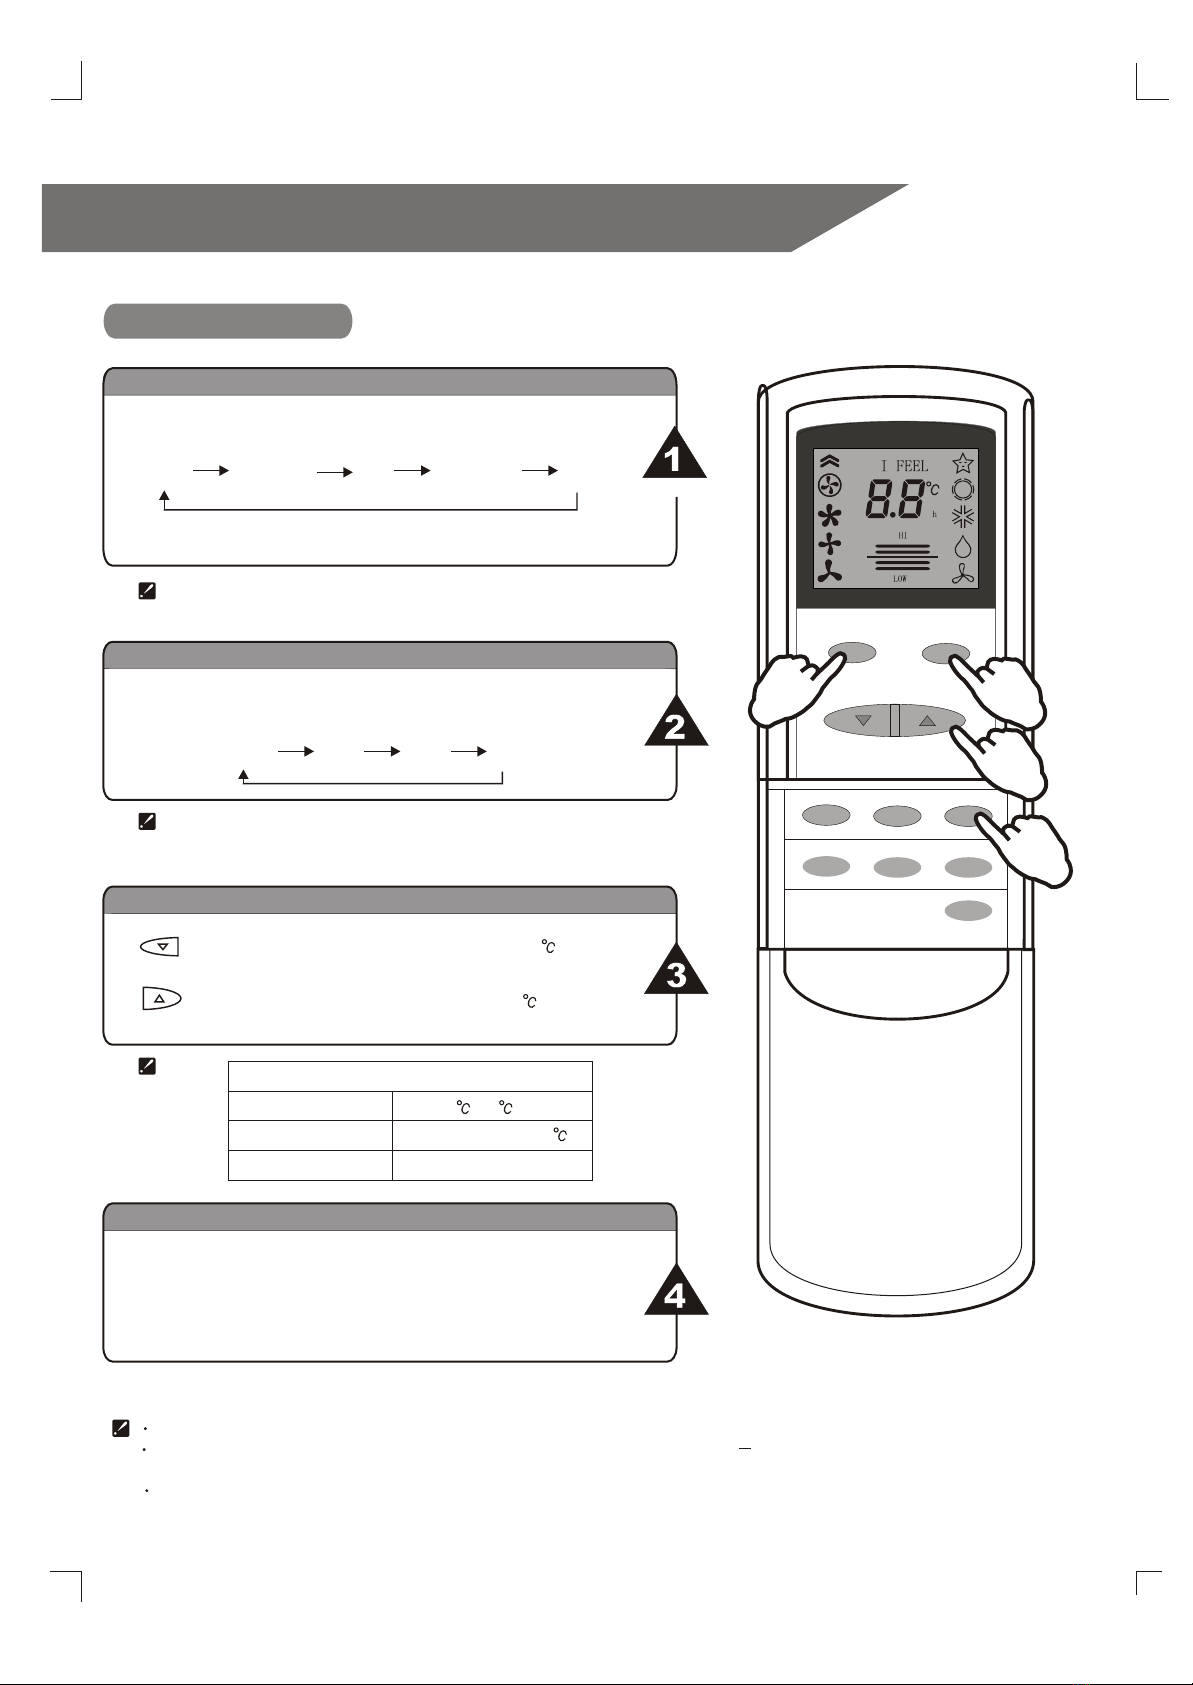
Each time the MODE button is pressed, the operation mode
is changed in sequence:
Press until your desired mode appears.
Each time the "FAN" button is pressed, the fan speed is
changed in sequence:
"I FEEL "mode is specified on page 9.
The compressor does not run in "FAN ONLY " mode.
18 ~32
HEATING
"I FEEL" COOLING DRY FAN ONLY
Selecting mode
Select fan speed
2
+
-
AUTO HI MED LO
.
At "FAN ONLY" mode, only "HI","MED" and "LO" are available.
While at "DRY"mode, airflow is set by air conditioner automatically,
"FAN" button is ineffective in this case.
Setting temperature
Press once to lower temperature by 1
Press once to raise temperature by 1
Range of available set temperature
HEATING or COOLING
DRY
FAN unable to set
room temperature
Turning on
Press "ON/OFF" button, when the appliance receives the
signal, a "beep" can be heard, then the RUN indicator
lights up.
Changing modes during operation, sometimes the unit does not response at once. Wait 3 minutes.
Wait 3 minutes before restarting the appliance.
the temperature of the indoor heat exchanger rises.
During heating operation, air flow is not discharged at the beginning. After 2 5 minutes, the flow will be discharged until
1
3
4
2
FAN ON/OFF
TEMP
SLEEP SWING MODE
CAN SET TIMER
HEATER
Operation instructions
Operation modes
ONLY

Operation instructions
8
I FEEL
HI
h
LOW
5
SWING
ON/OFF
TEMP
SLEEP
FAN
MODE
SET TIMER
HEATER
Do not turn the air vanes manually, or malfunction may occur. If that happens, turn off
the unit first and cut off the power supply, then restore power supply again.
Dew may be form and drip from air inlet when the unit operates at COOLING or DRY mode in
a high-humidity condition (higher than 85%).
After the unit has been used for a long time, the air inlet may be covered with dust, just wipe it
off with a soft cloth.
It is better not to allow the air vanes tilt downward for a long time at COOLING or DRY operation
mode to prevent dew from forming and dripping down.
5
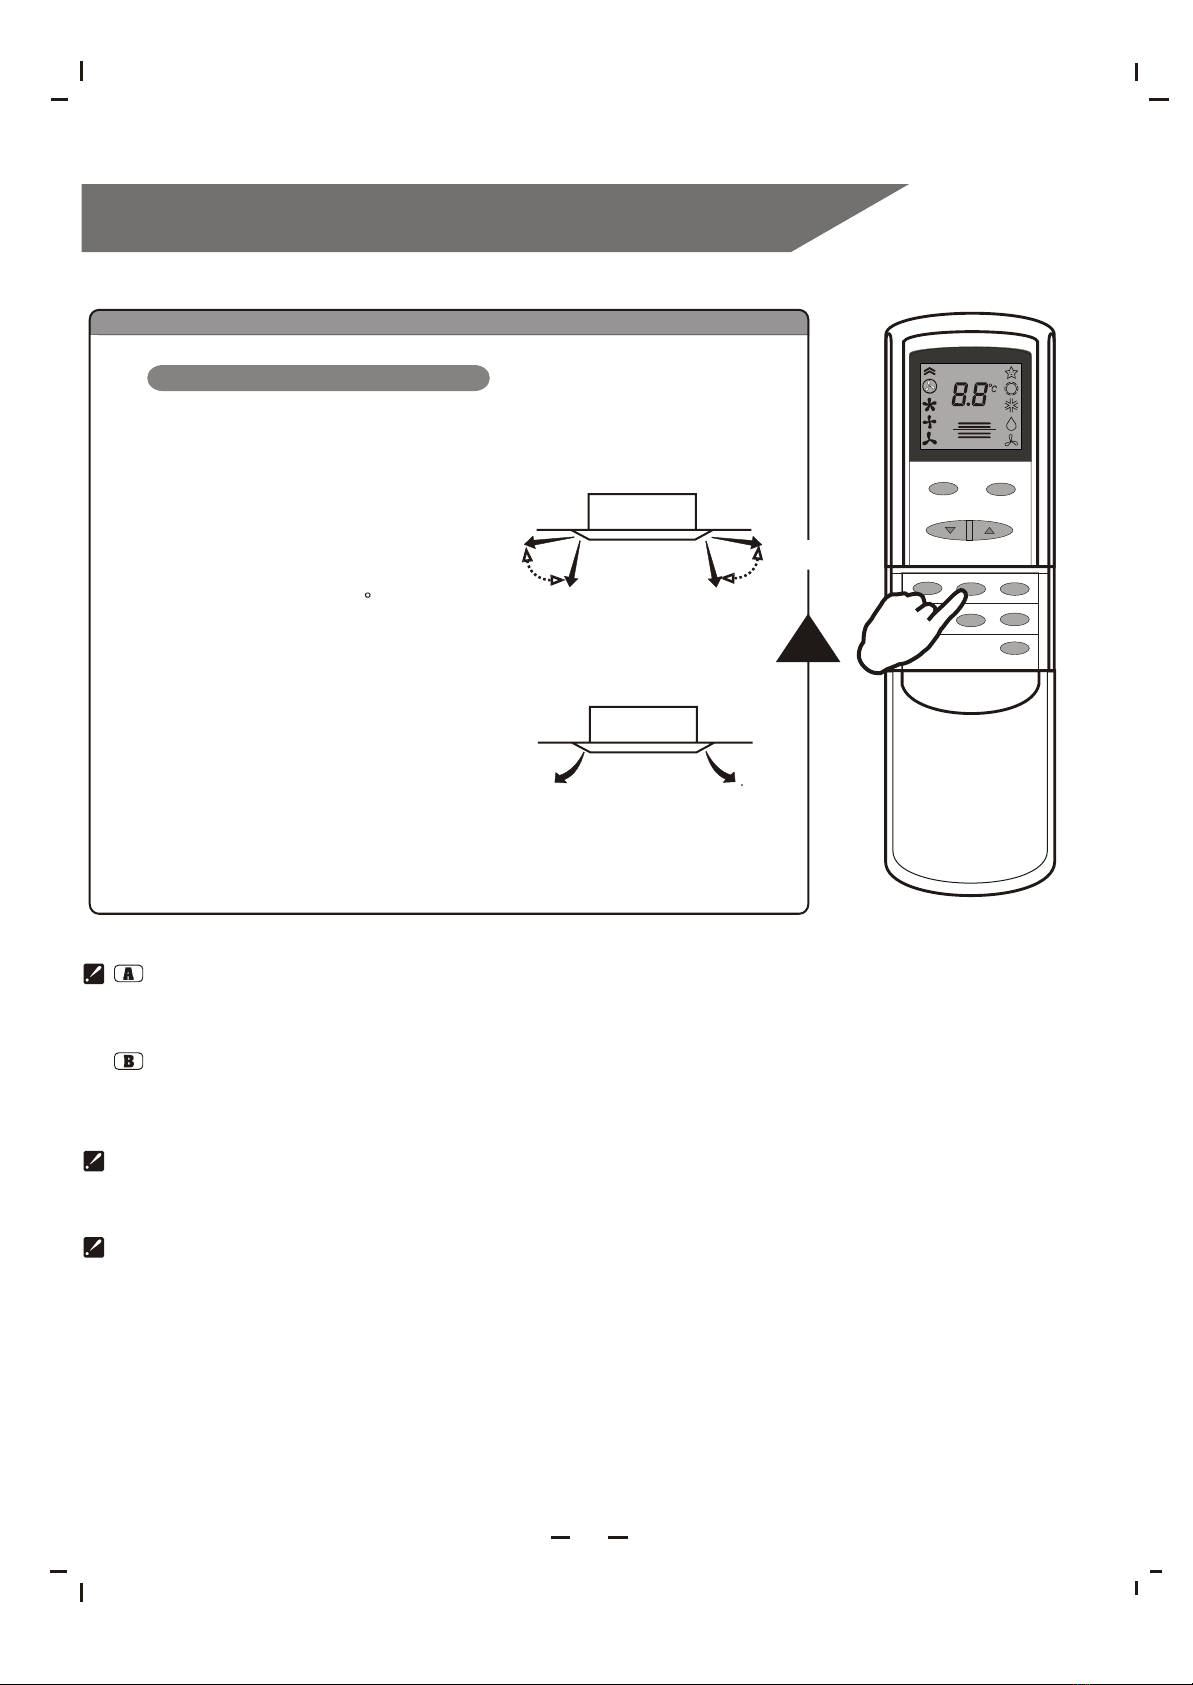
Vertical airflow control
Press the SWING button of the remote controller to control
the swinging and stopping of air vanes.
Swinging airflow:
Fixed airflow:
Press the SWING button once, the
fan motor starts to operate, and the
air vanes swing vertically.
Press the SWING button when the
airflow reach your desired direction,
the fan motor stops operating, and
the air vanes stop swinging too.
(desired direction) (desired direction)
Airflow direction control

Operation instructions
9
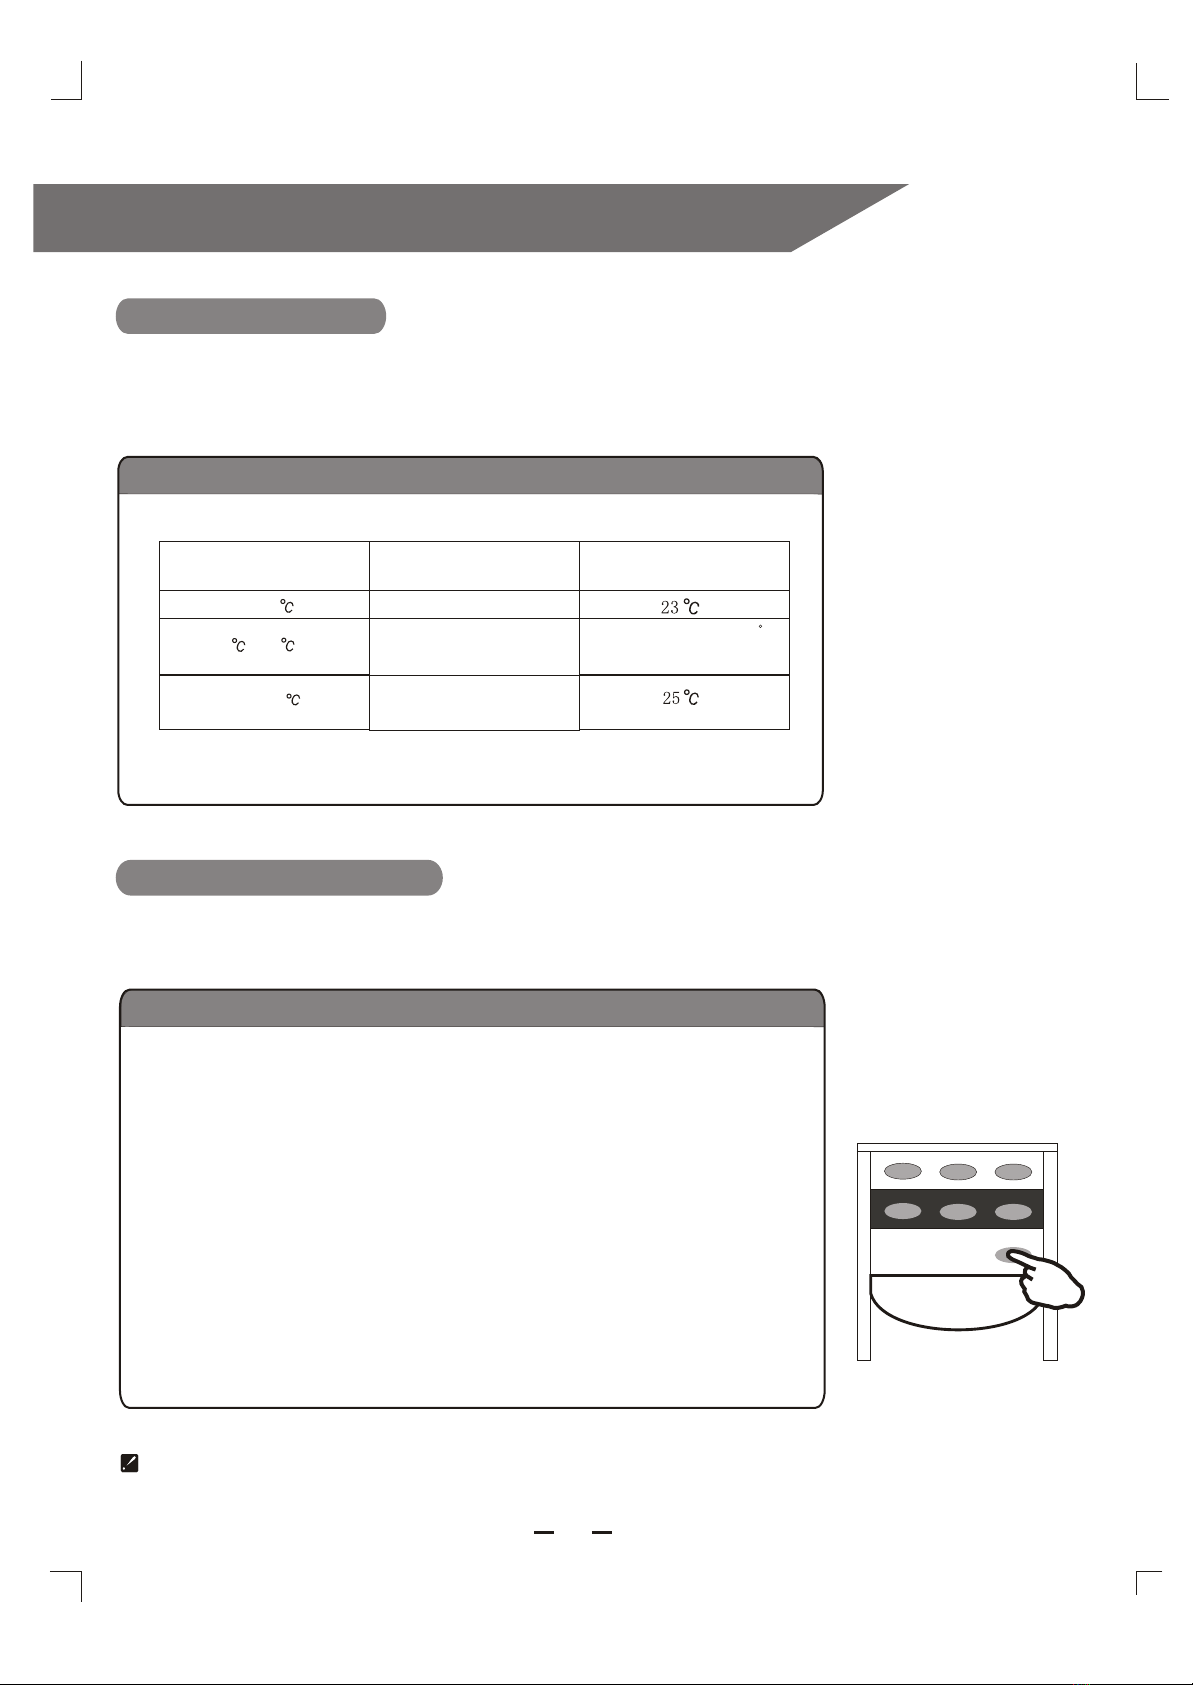
Room temperature Set temperature
21 ~25
Above 25
below 21
"I FEEL" mode
Electric heating mode
When you feel still not warm enough or need heat faster in heating mode,
use the electric heater as an assistance.
Operation mode
HEATING
DRY
COOLING
When you do not want to use the electrical heater, it is recommended to switch off
power supply of the electrical heater for safety.
Use remote controller to set electrical heating mode.
Press the "HEATER" BUTTON in heating mode. The HEATER indicator
on the indoor unit lights on, and the electric heater starts to function.
(When temperature reaches a certain point, the electric heater will stop
automatically, and restart once temperature decreases to a certain point.
Press the "HEATER"button in electric heating mode to cancel.
The HEATER indicator lights off, the unit returns to heating mode without
assistance of the electric heater.
Press the "ON/OFF" button, then choose the "I FEEL" mode by pressing "MODE" button.
The air conditioner will select heating, cooling or dry mode automatically and determine
set temperature and fan speed automatically according to room temperature.
Room temp decrease1.5 C
after running 3 minutes
Relation among operation mode, set temperature and room temperature
How to use the electric heater in heating mode
TIMER
HEATER
SET
CAN
MODE
SLEEP SWING

Operation instructions
10
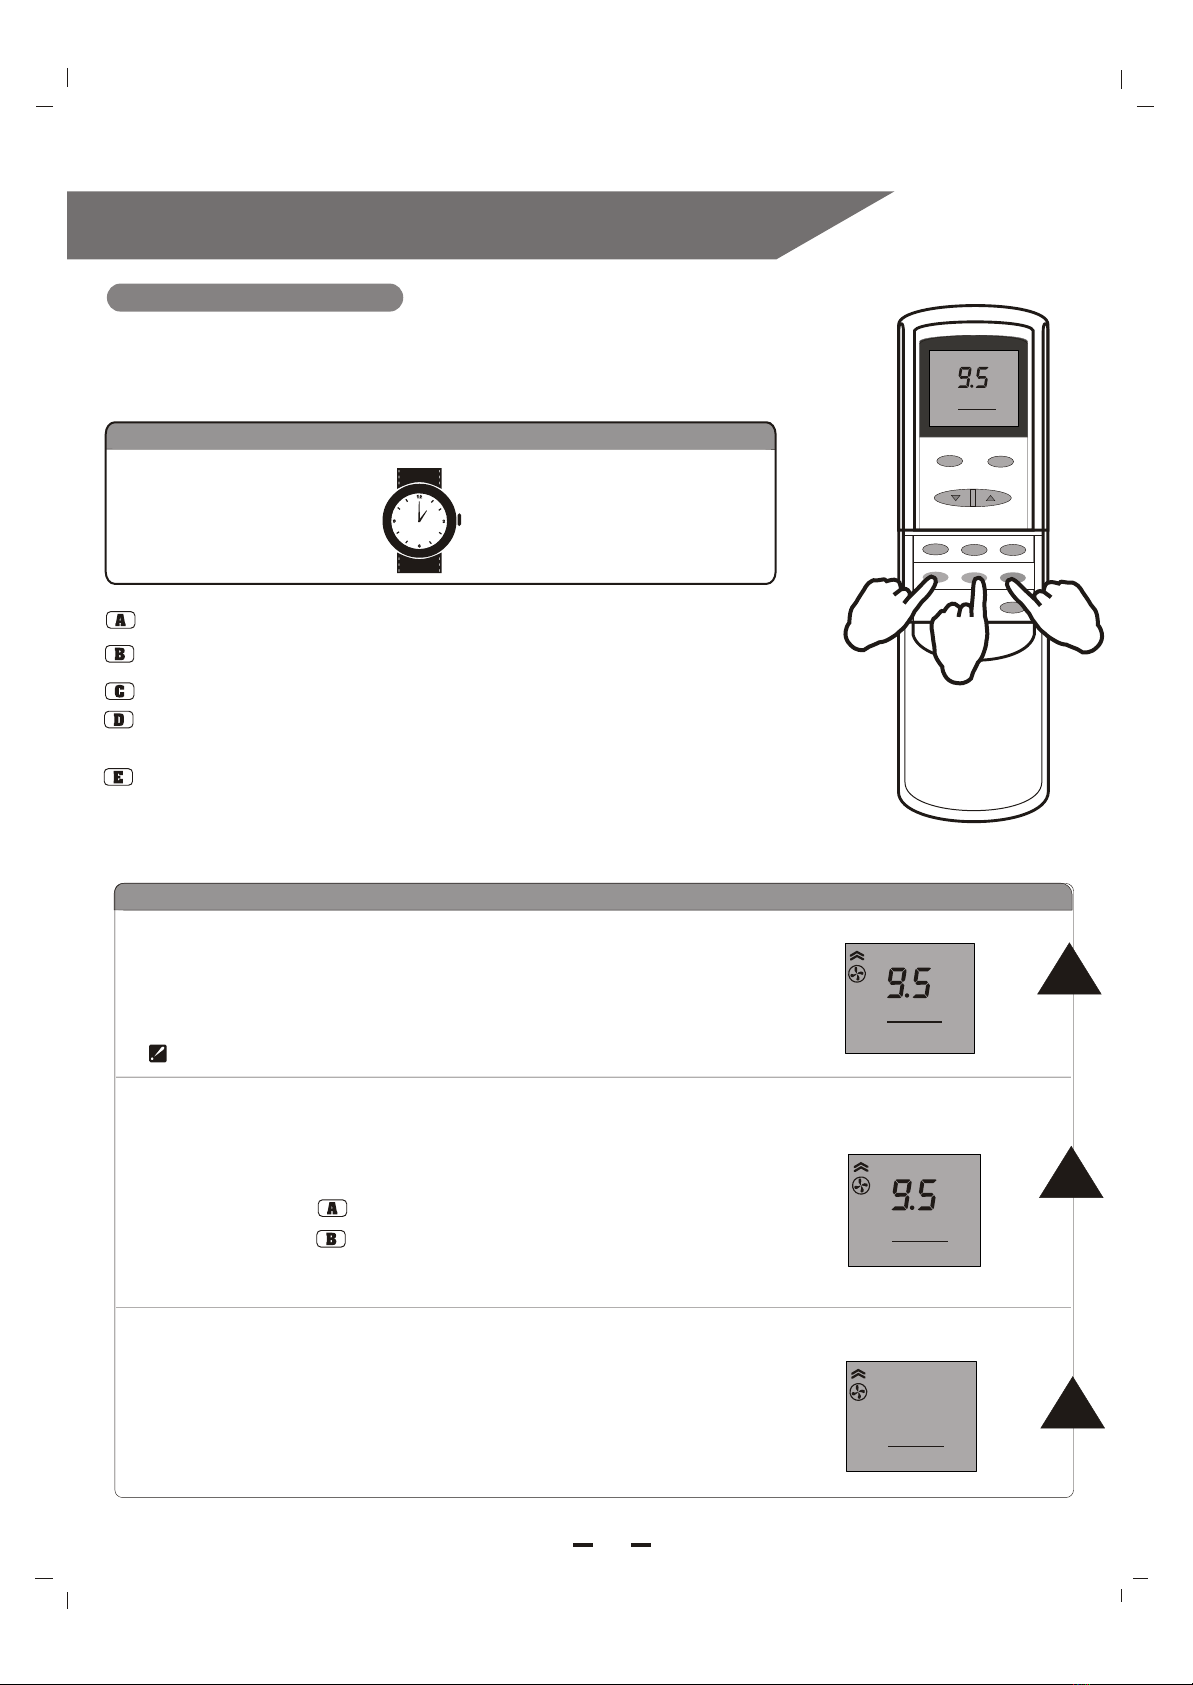
Timer-setting
Example: set an operation after 9.5 hours
Timer operation mode
I FEEL
I FEEL
I FEEL
HI
HI
HI
h
h
LOW
LOW
LOW
I FEEL
HI
h
LOW
1
32
It is convenient to set the timer on with "TIMER" button when you go out in the morning
to achieve a comfortable room temperature at the time you go home. You can also set
timer off at night to enjoy a good sleep.
Setting a switch-on
timer when the
appliance is off.
Setting a switch-off timer
during operation.
Press the TIMER button, "h" flashes on the LCD, then you can set the timer.
Each time the button is pressed, the set time increases by half an hour within 10 hours;
increases by one hour beyond 10 hours.
The timer range can be set is 0.5 hour to 24 hours.
As time goes by, LCD displays the remained time.
The previous set time is stored and the next set time begins with the previous set one.
On- timer and off-timer can not be set at the same time.
The TIMER indicator on the front panel lights up when timer is in use, and lights off
when it is finished or canceled.
The room may not reach your desired temperature within the preset time because of
different size of room.
Set the operating mode, temperature and indoor fan speed first, then
press the "TIMER" button until "9.5h" appears.
Point the remote controller at the signal receiving section of the indoor unit,
press the "SET" button when the letter "h" flashes.
A "beep" can be heard:
Timer indicator on the indoor unit lights up.
Letter "h" stops flashing.
To cancel the set timer: press the "CAN" button, a "beep" can be heard
and the timer indicator on the indoor unit lights off.
FAN ON/OFF
TEMP
SLEEP SWING MODE
CAN SET TIMER
1
1
3
2
Table des matières
Autres manuels MaxiCool Climatiseur