Luxor TUTV2500 Manuel utilisateur

USER MANUAL
TUTV2500
Digital TV Recorder

Turn on/o sound
(on the TV).
Displays the TV
listings screen.
Navigationinmenus
and programmes
(UP/DOWN for
channels,LEFT/RIGHT
for time).
Takes you from
delayedTVinmemory
to live TV.
Rewind and -24Hr in
the TV listings.
Stop recording or
playback.
Current programme
information.
Controls the Audio & Video
signals sent to the TV.
Used to select the
corresponding colour
optionshownonthescreen.
Turns the DTR (or TV)
on or o.
Sets the remote
control to TV mode.
Displays the recorded
programmes screen.
Displays the
DTR main menu.
UP / DOWN channel
or page (in menus).
Chooses the
highlighted option
or conrms your
selection. Also
activates Quicknd
(fast channel
selection).
Navigates back up
from menus.
Fast forward and
+24Hr in the TV
listings.
Pause / Play a
recording or pause
live TV.
Top half is Pause
Bottom half is Play
Make an instant
recording of a current
programme by pressing
and holding for 3
seconds.
Access digital
text services.
Subtitles on or o.
Enter channel
numbers or
information
into menus.
Enter channel numbers or
information into menus and
“swap” between tuners and
hard disk drive.
Controls the
TV sound level.
Setstheremotecontrol
to DTR mode.
“Quick” key to the
Top Up TV services.

3
Contents
Getting Started
Using Your DTR
Setting Up
Information
Index
4 Introduction
5 Quick Start Guide
11 Basic Functions
12 Basic Operation
13 Using the Quick TV Guide
14 Using the Menus
15 Using the Programme Guide
17 Top Up TV Anytime
19 Using your Programme Library
21 How to make Recordings
23 Additional DTR Functions
24 Scan For Channels
25 Customise your DTR
26 Customising Top Up TV Anytime
27 Recording Preferences, Messages
28 Child Lock, Channel Lock, Favourites
29 Languages, Help
30 Troubleshooting
34 Accessories
35 Product Details
36 Further Connections
37 Remote Control
38 Safety Information
41 Functions
42 Technical Specications
44 Terms & Conditions
46 Digital Switchover
47 Index

4
Introduction
Congratulations on your choice of this state-of-the-art Digital Television
Recorder (DTR). We hope you will enjoy all the new features this technology
brings to your home for many years. Your DTR is going to revolutionise the
way you watch TV.
You can pause live TV, for example while you answer the phone and then
resume watching where you left o. You can also record two dierent
channels at the same time. Delayed viewing, fast-forward and rewind
functions allow you to play and replay the sports action without having
to worry about the rest of the game which is still being recorded. These
features could make you lose track of time, but fortunately the LIVE TV
button brings you back to the present instantly.
We’re sure that you want to get started. On the following pages are a quick
start guide to help you set the DTR up in just six easy steps. On page 11
there is a guide on Using Your DTR Remote Control. There are detailed
explanations for each step later on in the manual and on page 44 you will
nd the terms and conditions covering your DTR.
If you need any further information about your DTR, or want to see more
information about the programmes currently on Top Up TV, then just visit
topuptv.com
Note: This product can be upgraded from software updates broadcast over
the air to your DTR. Top Up TV reserves the right to transmit software updates
that it would consider appropriate in order to improve the functionality of
the product, without degrading the quality level.

Quick Start Guide
A Quick Start Guide to setting up your
Top Up TV+ Digital TV Recorder
First things rst
Be sure you can receive Digital Terrestrial TV (Freeview) services in your area.
If you are not sure, you should ask your retailer to check your postcode for you
or try one of the following:
•Textyourpostcodeto83331 (standard rates apply)
•Visitwww.freeview.co.ukorwww.digitaluk.co.uk
•CallFreeviewon08708 809980
Getting Started
5

6
6 quick and easy steps to get you up and running
Step 1 – Unpack your DTR
Unpack your DTR and check you have all the following accessories:
• Remotecontrol
• Mainslead
• RemotecontrolTVset-upcodes(loosesheet)
• 2 x AA batteries to place in your remote control (refer to page 37)
Please record the CAN number from the label on your DTR below
Please write your viewing card number below
IMPORTANT: Disconnect the power to all your existing equipment.
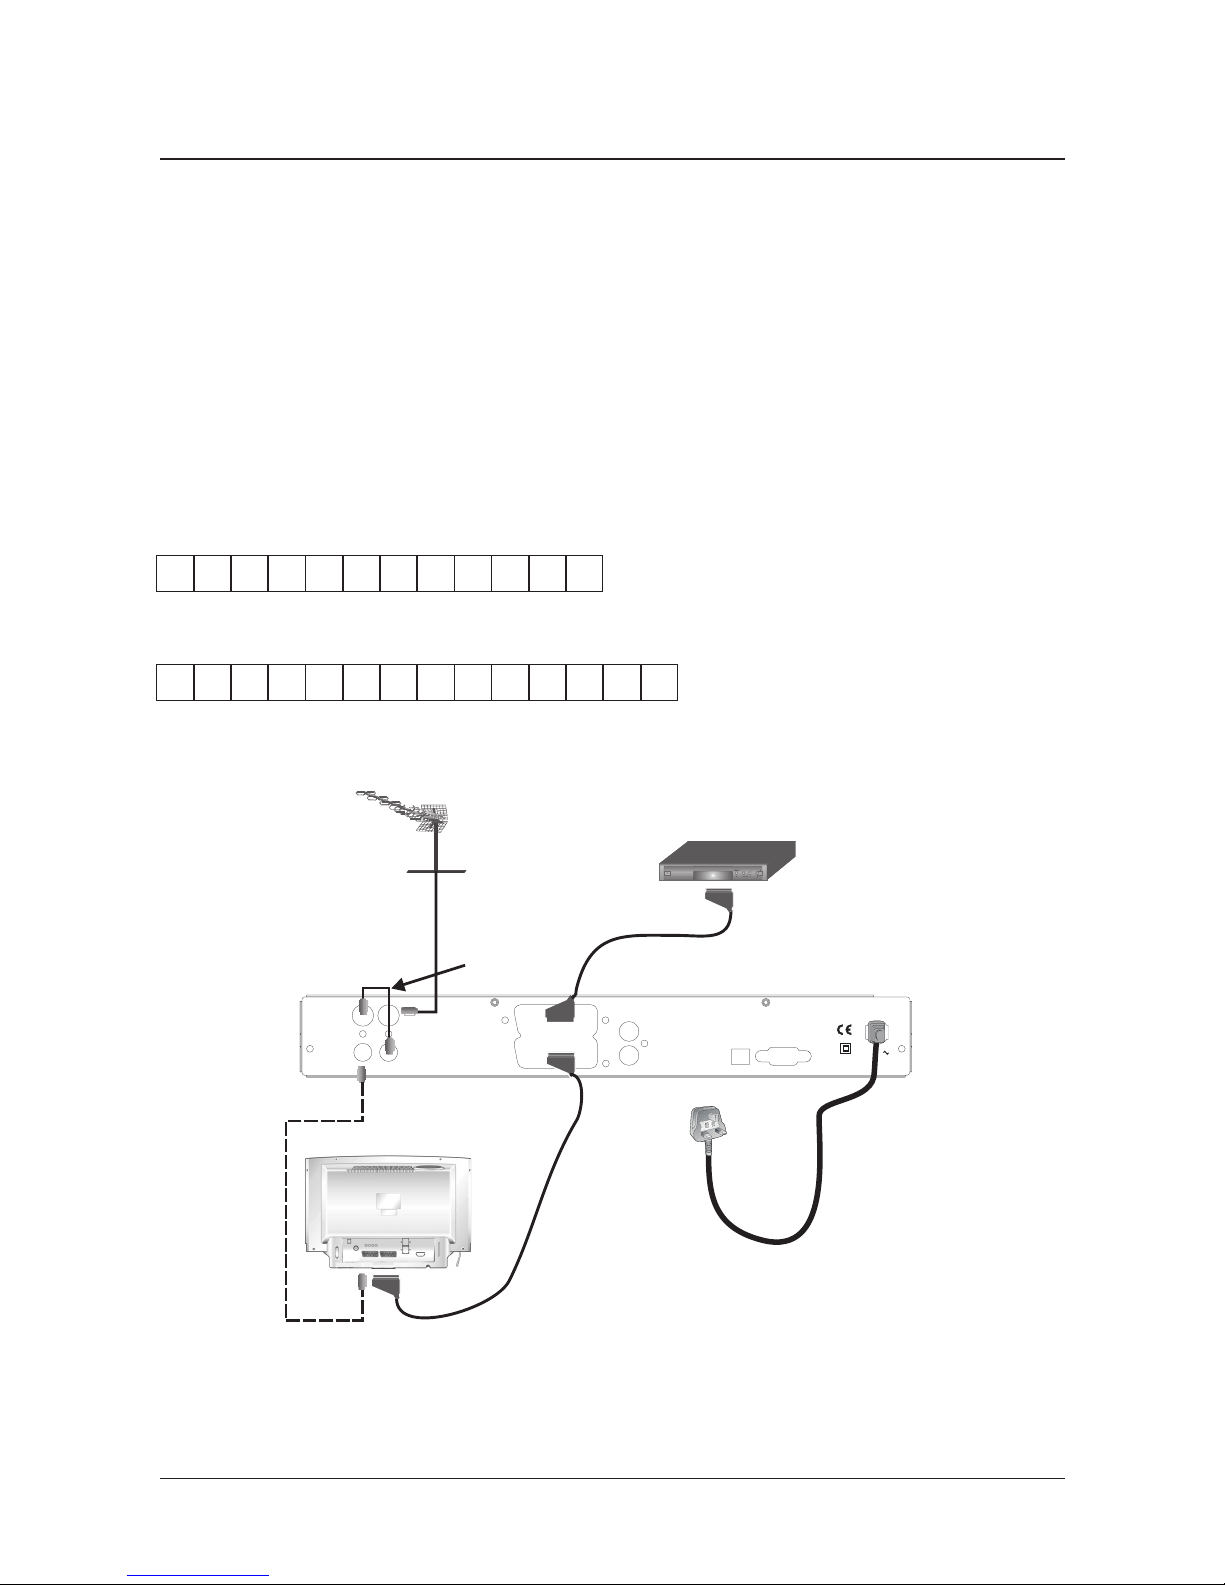
Now place your DTR where you want to keep it and connect it to your TV as
shown in the diagram, by following these simple instructions:
Step 2 – A typical installation
RS 232OPTICAL OUT
AC IN
LEFT
RIGHT
TV SCART
AUX SCART
35024495
ANTENNA 2
OUT
ANTENNA 2
IN
ANTENNA 1
OUT
ANTENNA 1
IN
VCR
DO NOTREMOVE
TV Aerial
HDMI
TV

AUnplug the aerial cable from your VCR (or TV) and plug it into the
Aerial In socket of your DTR.
BUsing the scart lead, connect the TV SCART socket on your DTR to
the AV1/EXT1/AUX1 scart socket at the back of your TV.
CAnd lastly, connect the mains lead to the Mains Input socket on your DTR
and switch on at the mains. Reconnect the power to all your existing
equipment and turn your TV on.
When you plug your DTR into the power supply, a red light and the message
PLS WAIT will be displayed. This will be followed by WELCOME TO TOP UP
TV+, the HDD symbol will ash for about 45 seconds. You must wait for the
HDD symbol to stop ashing and the display to go dim before pressing any
buttons.
Step 3 – Your DTR is ready to scan for channels
Press the DTR button on your remote. The button will momentarily ash.
This will conrm that the remote control is working correctly. Now wait for
the light on the front of your DTR to turn from red to green.
Your TV should now automatically
switch to the DTR input and display the
image shown. If this does not happen,
using your TV remote, manually select
the TV SCART input to which you have
connected your DTR. Refer to your TV
handbook if required, but it is likely that
the TV remote button will be labelled
‘AV’ or have this symbol
Once you can see the image on screen displayed here, and have ensured all
connections are correct, press on your remote control.
7
Getting Started

8
Step 4 – Channel Scan
Youwillseethisscreenshowingthatyour
DTR is now searching for all available
channels.
In the event that your DTR does not nd
anychannels,orhasmissedsome,seethe
section on what to do if your Installation
fails, on page 10.
When your DTR has successfully found all channels, your DTR will search for
and install the extended 14 day Programme Guide software. Please note
that when you start to use the extended guide after installation, that this
may take up to 24 hours to fully populate.
Step 5 – Parental Control
You will now be prompted to set up
the Parental Control PIN for your DTR.
For Top Up TV subscribers, this controls
who will have access to the extra
programmes, which are downloaded
automatically to your DTR every night.
The Parental Control PIN will not
control or restrict access to Freeview
programmes (your default PIN is 0000.)
If children have access to your DTR, it is advisable to select the maximum
appropriate viewing certication now, in order to restrict access. E.g. by
selecting 12, you will restrict access to programmes rated 15 or higher.
Once you have completed this step, press on your remote.
For more parental control options please refer to page 28.

9
Step 6 – Top Up TV Anytime set up
With Top Up TV Anytime you’ll get up to 600 carefully selected programmes
downloaded to your Top Up TV+ DTR every month. That’s up to 150 extra
programmes available at any one time on top of your normal Freeview
channels. You can also upgrade to PictureBox which gives you an additional
30 movies a month or take Setanta Sports, a must-have for sports fans.
Press OK
Using your DTR remote control, now switch to channel 5 and check you are
gettingapicture.Ifyouarenotgettingapictureonchannel 5,please refer to the
Troubleshooting section for help.
To activate the extra channels available from Top Up TV, please refer to your
welcome pack and the included viewing card instructions for full details. Once
you have called us to activate your subscription, you will need to leave your DTR
on channel 5for around 30 minutes. This will ensure that your DTR receives your
subscription activation successfully.
It may take up to 48 hours for your rst Top Up TV Anytime programmes
to appear in your DTR library, but you will be able to watch your Freeview
channels right away.
Getting Started

10
To ensure the best operation of your DTR, we recommend that you leave
your DTR in STANDBY whenever it is not in use. Note that turning the
power o at the mains will prevent your DTR from receiving Top Up TV
programmes.
Iftheinstallationfails,checkthepointsbelowandtrytorescan
for channels again.
• Checkthatalltheconnectionshavebeenmadeasshowninthe
diagram on page 6 and the power is switched on to all of the
equipment.
• Checkthatthebatteriesintheremotecontrolareintherightwayround
and press the DTR button. Check that the DTR button ashes when pressed.
• MakesuretheTVaerialisconnecteddirectlytoyourDTR(1st in chain).
• CheckanysignalboostersareDigitalTVcompatibleandswitchedon.
• Repeattheinstallationbyfollowingthechannelscaninstructionson
page 8 of the main user manual.
Iftheinstallationstillfails,pleaserefertotheTroubleshooting
guide and/or the help pages on the website topuptv.com
You may also call Top Up TV on 08444 159 159 for further
assistance.
If your viewing card has not been inserted into the DTR for 7days after receipt,
then you may need to call Top Up TV on 08444 158 158 to reactivate the card.
Table des matières
Autres manuels Luxor DVR