LumiRing AIR-CR Manuel utilisateur

AIR-CR
MANUAL
July 2023
Fw. v. 1.107Instr 1.1
2nd generation

2
CONTENTS
Introduction
Default Device Settings
Device Specifications
Device Dimensions
Wire Designation
Installation Recommendations
Ethernet Network (Connection Diagram)
Wiegand Reader(Connection Diagram)
Open Supervised Device Protocol Reader (OSDP) (Connection Diagram)
Exit Button (Connection Diagram)
Door Sensor & Magnetic Lock
Connecting to Device
Login
Quick Start
System
Nretwork
Main
OSDP
Maintenance
For Notes
3
3
4
5
6
7
8
9
10
11
12
13
13
14
15
16
18
20
21
22
AIR-CR

This document provides detailed information on the AIR-CR
Controller device structure and steps for installing and, connecting it.
It also includes instructions for preventing or troubleshooting many
common problems.
This guide is for informational purposes only, and in the event of any
discrepancies, the actual product takes precedence.
All instructions, software, and functionality are subject to change
without prior notice.
The latest version of the manual and additional documentation can
be found on our website or by contacting customer support.
The user or installer is responsible for complying with local laws and
privacy regulations when collecting personal data during the use of
the product.
AIR-CR_(serial number)
192.168.4.1
192.168.1.100
none
admin
admin
Enabled
Enabled
Disabled
Disabled
30 minutes
Wiegand
26 bit
34 bit
Introduction
Default Device Settings
3AIR- CR
•Wi-Fi device name when searching
•Access Point (AP) Wi-Fi IP address of the device
• Ethernet IP address of the device
•Wi-Fi password
•Login
•Password
•RFID 125 kHz
•RFID 13.56 MHz
•Copy protection
•Bluetooth
•AP Wi-Fi timer
•Wiegand or Open Supervised Device Protocol
(OSDP) sending method
•Wiegand format 125 kHz
•Wiegand format 13.56 MHZ

Communications
•Wi-Fi
• Ethernet
• Bluetooth
• Wired interfaces
802.11 b/g/n 2.4 GHz
With the RJ-45 adapter (10/100Mbit)
Bluetooth® 5 (LE)
Wiegand/OSDP via RS-485
12 - 24 VDC +/- 10 %
0.5 A (6 W)
0.13 A (1.56 W)
0.5 A (6 W)
Yes
Yes
Electrical characteristics
• Input voltage
• Operation current (MAX) 12 VDC
• Operation current (AVG) 12 VDC
•Switchable output current (MAX) 12 VDC
•Output short-circuit protection
•Power supply reverse polarity protection
Device info
• Model
• Processor
•Over-the-air (OTA) update
•Built-in web server
•Support for 125 kHz identifiers
•Support for 13.56 MHz identifiers
•Support for copy protection for MIFARE
Classic mini/1K/4K identifiers
AIR-CR
ESP32-S3
Yes
Yes
EM Marine
MIFARE DESFire; MIFARE Plus; MIFARE Ultra
Light; MIFARE Classic mini/1K/4K;
MIFARE Classic EV1 1K/4K; NFC Tag
Yes
2
1
Physical connections
• Inputs
• Outputs (open collector) 0.5 A
3280 ft (1000 m)
328 ft (100 m)
33 ft (10 m)
33 ft (10 m)
Work distance
• RS-485 *
• Wiegand
• Wi-Fi 2.4 GHz (open space)
• Bluetooth (open space)
Device Specifications
4AIR- CR
Physical characteristics
•Housing material
•Mounting method
•Dimensions (diameter, height)
•Weight
ABS plastic UL94 V-0
Wall mount
2.36" x 0.67" (60 x 17 mm)
(mounting ring) 2.36" x 0.86" (60 x 22 mm)
1.59 oz (45 g)
Environmental requirements
•Operating temperature
•Ingress Protection rating
-22°F ~ 158°F (-30°C ~ 70°C)
IP65
* See general specifications for RS485 interface.

Device Dimensions
0.67"
3.375"
125, 65535
5AIR-CR
2.125"
2.36"
RFID CARD

Red
Blue
Black
Green
Orange
Purple
Pink
White
Yellow
Brown
Gray
Black
Green
White
Orange
Yellow
+VDC
GND Lock
GND
Green LED
Red LED
DPS
Exit Button
RS-485 A+
RS-485 B-
Data 0
Data 1
GND
TX-
TX+
RX-
RX+
Wire Designation
6AIR-CR
The manufacturer reserves the right to modify the external pin assignment and their placement, as well as the appearance of the device
without prior notice.
These changes may be made to improve functionality, ergonomics, or to comply with technical requirements and standards.
Users are advised to consult the latest versions of technical documentation and instructions before using the device.
Red
Blue
Black
Green
Orange
Purple
Pink
White
Yellow
Brown
Gray
Black
Green
White
Orange
Yellow
+VDC
GND Lock
GND
Green LED
Red LED
DPS
Exit Button
RS-485 A+
RS-485 B-
Data 0
Data 1
GND
TX-
TX+
RX-
RX+
AIR-CR
AIR-R

Installation
It is best to avoid installing the device on metal surfaces, as this may
reduce the card reading distance, WI-Fi connection quality, and
Bluetooth connectivity.
If installing on a metal surface is necessary, use the reinforced plastic
mounting base that is supplied with the device.
Wiegand connection
The length of the communication line through the Wiegand interface
must not exceed 328 ft (100 m).
This interface is susceptible to external sources of interference. We do
not recommend running it directly parallel to power cables or near
electric lights.
It is recommended that the Wiegand communication line be routed
at least than 1.64 ft (0.5 m) away from any power cables.
If the communication line is longer than 16.4 ft (5 m), UTP 5E cable is
recommended.
Connecting OSDP
The OSDP uses an RS-485 interface that is designed for long-distance
communications. It operates at ranges up to 3,280 ft (1,000 m) with
good resistance to noise interference.
The OSDP communication line should be laid as far away as possible
from power cables and electric lights. A UTP 5E or FTP 5 twisted pair
cable should be used as the OSDP communication line (if possible,
ground the shield at one end). To ensure reliable system operations, it
is best to use one power source for the controllers and a separate one
for the actuators.
The power supply line wires for the reader should be kept as short as
possible to avoid a significant voltage drop across them.
After cabling, ensure that the power supply voltage to the reader is at
least 12 VDC with the locks switched on.
Installation Recommendations
7AIR-CR
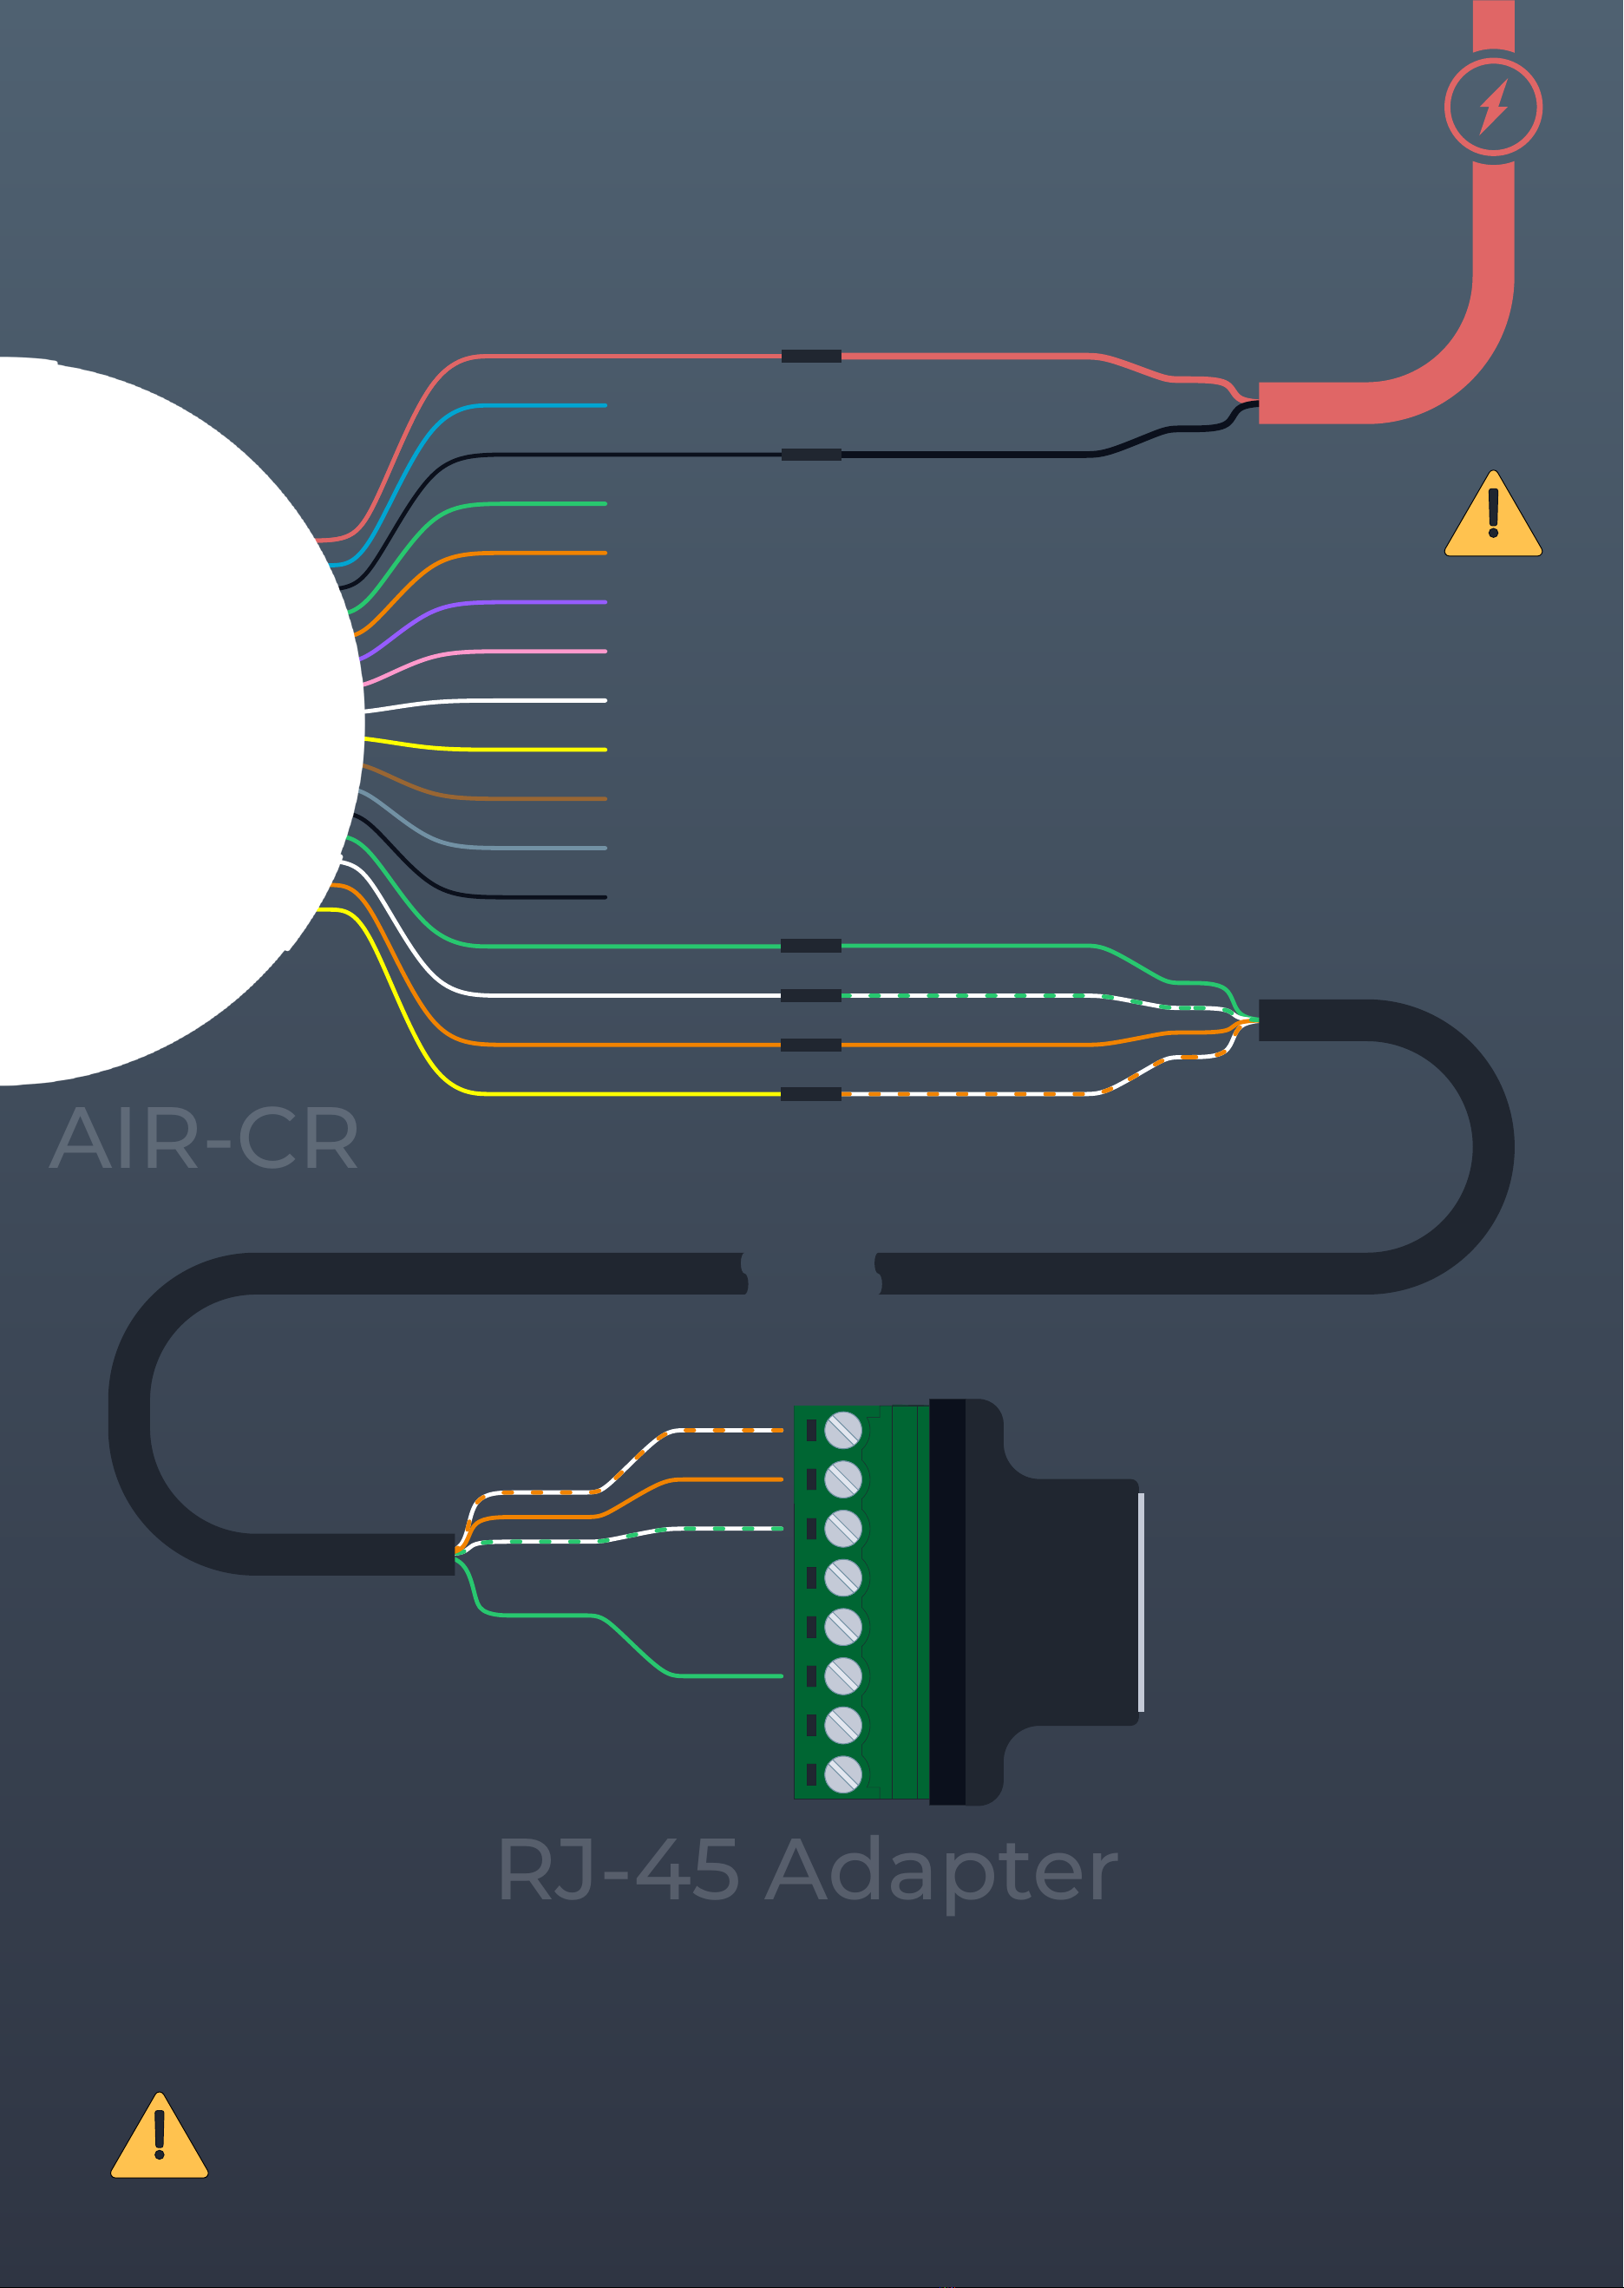
Ethernet Network
8AIR-CR
Cable length up to 325 feet
Warning
Make sure that the power supply voltage
meets the recommended requirements.
1
2
3
4
5
6
7
8
Connection Diagram
+VDC
GND
TX-
TX+
RX-
RX+
+VDC
GND
G
W.G
O
W.O
W.O
O
W.G
4
5
G
7
8
W.O
O
W.G
B
W.B
G
W.Br
Br
white-orange
orange
white-green
blue
white-blue
green
white-brown
broun
Red
Blue
Black
Green
Orange
Purple
Pink
White
Yellow
Brown
Gray
Black
Green
White
Orange
Yellow
AIR-CR
RJ-45 Adapter
Warning
The voltage level at the power supply and at the Controller may differ depending on the cable length and the resistance of the conductor.
Use a separate power supply to connect the reader if the cable is longer than 165 feet or the voltage at the end of the line is less than 10
volts.
BE SURE TO CONNECT THE GND OF THE CABLE FROM THE CONTROLLER TO THE GND OF THE AUXILIARY POWER SUPPLY!
DO NOT USE POWER SUPPLIES WITH DIFFERENT VOLTAGE LEVELS!
Use a multimeter in the VDC measurement mode to verify that the power supply voltage meets the recommended requirements.

9AIR-CR
Warning
The voltage level at the power supply and at the Controller may differ depending on the cable length and the resistance of the conductor.
Use a separate power supply to connect the Controller if the cable is longer than 165 feet or the voltage at the end of the line is less than
10 volts.
BE SURE TO CONNECT THE GND OF THE CABLE FROM THE CONTROLLER TO THE GND OF THE AUXILIATY POWER SUPPLY !
DO NOT USE POWER SUPPLIES WITH DIFFERENT VOLTAGE LEVELS !
Use a multimeter in the VDC measurement mode to verify that the power supply voltage meets the recommended requirements.
Wiegand Reader
Connection Diagram
+VDC
GND
G LED
R LED
Data 0
Data 1
Red
Blue
Black
Green
Orange
Purple
Pink
White
Yellow
Brown
Gray
Black
Green
White
Orange
Yellow
Red
Black
Green
Orange
Brown
Gray
White
Black
Yellow
W. + BR BR
W. + W.GO
W.B
B
O
G
AIR-R
AIR-CR

10AIR-CR
Warning
OSDP Reader
Connection Diagram
+VDC
GND
OSDP+
OSDP-
GND
Red
Blue
Black
Green
Orange
Purple
Pink
White
Yellow
Brown
Gray
Black
Green
White
Orange
Yellow
Red
Black
White
Black
Yellow
W. + BR BR
W. + B B
G
W. W.G+ O
O
AIR-R
AIR-CR
The voltage level at the power supply and at the Controller may differ depending on the cable length and the resistance of the conductor.
Use a separate power supply to connect the reader if the cable is longer than 165 feet or the voltage at the end of the line is less than 10
volts.
BE SURE TO CONNECT THE GND OF THE CABLE FROM THE CONTROLLER TO THE GND OF THE AUXILIARY POWER SUPPLY!
DO NOT USE POWER SUPPLIES WITH DIFFERENT VOLTAGE LEVELS!
Use a multimeter in the VDC measurement mode to verify that the power supply voltage meets the recommended requirements.
Autres manuels LumiRing Contrôleurs


