LOOMIA LEL TECH PACK Manuel utilisateur

TECH PACK - VERSION 1
LEL Heating

DRAPABLE CIRCUITRY FOR AN
ENCHANTED WORLD.
TABLE OF CONTENTS
LEL HEATING PANEL
LEL OVERVIEW
SEW TABS
SEW WINGS
BUTTON INTERCONNECT
ADAPTER CABLE
LAYERING OPTIONS
SUGGESTED FABRICS
CO-BRANDING LABELS
HANG TAG INSTRUCTIONS
CARE LABELING
FIBER CONTENT DISCLOSURES
USER MANUAL GUIDELINES
PACKAGING AND POS
3
4
5
6
8
9
10
10
11
12
12
12
13
14

Heating LEL Tech Pack
©2019 LOOMIA www.LOOMIA.com
LEL HEATING
PANEL
The LOOMIA Electronic Layer (LEL) is a
drapable circuit that can be sewn into a
garment to add heating functionality.
Each Heating LEL purchase comes complete
with the following items:
1.) Heating LEL
2.) Battery
3.) Adapter Cable
4.) POS Pouch
5.) Instruction Manual
6.) LOOMIA Sales Tags
3
SEW TABS
HEATING
CIRCUITRY
INTERCONNECT
BATTERY
ADAPTER CABLE

Heating LEL Tech Pack
©2019 LOOMIA www.LOOMIA.com
LEL
INTEGRATION
OVERVIEW
LELs are designed to t in a wide assortment
of garment styles and sizes by using our
sew tab (on the LEL) and sew wing (on the
garment) system. The heating LEL is secured
to the jacket by sewing the sew tabs to the
sew wings along the indicator marks, shown
here as a dotted line.
(See Sew Tabs on pg. 5 and Sew Wings on
pg. 6 for more information)
4

Heating LEL Tech Pack
©2019 LOOMIA www.LOOMIA.com
SEW TABS
Our wire-free LEL is designed for
quick integration. This is possible
because of our sew tab and sew
wing system.
What is a Sew Tab?
A sew tab is a safe area of the LEL where
there are no conductive elements. You can
sew through these marked areas (marked
with cut-out arrows) to attach the LEL to a
wing inside of the garment.
How to Use Sew Tabs
Sew tabs should be sewn to sew wings
(in the garment, covered on pg. 6) with a
mid-sized stitch from one cut-out arrow to
another. Make sure to back stitch to secure
the LEL. DO NOT sew through the element,
or though areas where there are no sew
tabs.
Do NOT sew in this
area
Sew Tab
Running Stitch
Double Running Stitch
Zigzag Stitch
KEY
RECOMMENDED STITCH TYPES
5
SEW FROM TAB A
TO TAB B
SEW FROM TAB A
TO TAB B
A
A
A
A
B
B
B
B
DO NOT SEW
THROUGH HEATING
CIRCUITRY

Heating LEL Tech Pack
©2019 LOOMIA www.LOOMIA.com
Sew Tab
Running Stitch
Double Running Stitch
Zigzag Stitch
KEY
RECOMMENDED STITCH TYPES
Sew Wing
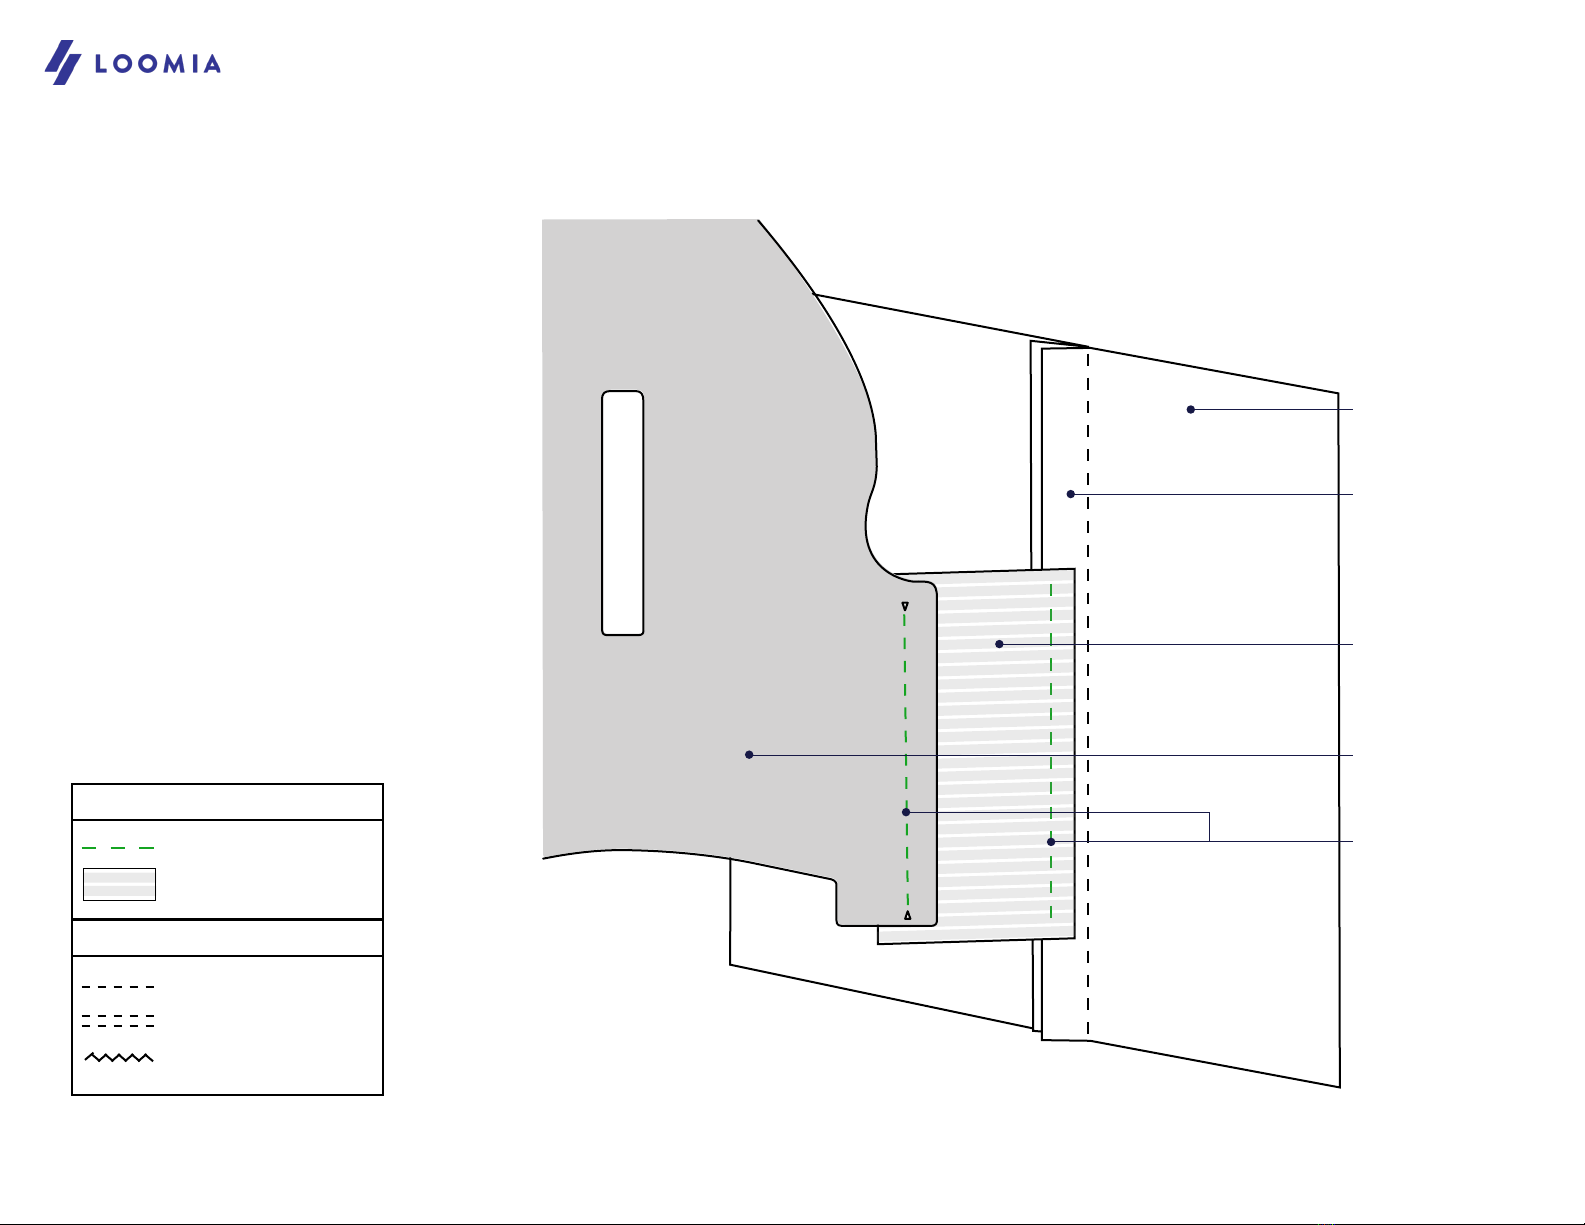
SEW WINGS
The LEL’s sew tabs are attached to
sew wings inside the garment to
provide exible sizing.
What is a Sew Wing?
Sew wings are a simple modication that
can be added to any jacket in order to
easily integrate the LEL. The wings can
be included as either part of the jacket
pattern, or as additional pieces sewn into
the seam allowance of the jacket. We
have an additional piece pictured here. We
recommend attaching sew wings to the
seam allowance of the garment shell, not the
lining.
Sew wings should be located at the nape of
the neck at the right hip and at the left hip.
For different sizes, the sew wings will need
to be wider to reach the LEL. During your lab
process, we will work with you to develop
the proper wing size and location.
6
INSERT SIDE WINGS AT
SIDE SEAMS. THE WINGS
SHOULD BE SIZED TO
CENTER THE PAD ON THE
BACK
DISTANCE FROM HEATING PAD
TO THE NAPE IS DEPENDENT
ON GARMENT SIZE. THE PAD
SHOULD CENTERED ON THE
BACK.
Heating LEL Tech Pack
©2019 LOOMIA www.LOOMIA.com
SEW WING
+ SEW TAB
INTEGRATION
For production, the LEL should be attached
to sew wings before the lining is closed. We
DO NOT recommend attaching the LEL to
sew wings before the garment has been
“ipped” to have right sides out. Aggressive
handling of the LEL to invert the garment can
cause damage to the LEL
HOW TO USE SEW TABS - Sew tabs should
be sewn to sew wings (in the garment,
covered on pg. 6) with a mid-sized stitch
from one cut-out arrow to *-another. Make
sure to back stitch to secure the LEL. DO
NOT sew through the element, or though
areas where there are no sew tabs.
Sew Tab
Running Stitch
Double Running Stitch
Zigzag Stitch
KEY
RECOMMENDED STITCH TYPES
Sew Wing
7
“WING” INSERT OF
VARIABLE WIDTH
SEWING LINES
GARMENT SHELL OR
OUTER LAYER
GARMENT SEAM
ALLOWANCE
LEL PANEL

Heating LEL Tech Pack
©2019 LOOMIA www.LOOMIA.com
3. INSULATION
“BUTTON”
INTERCONNECT
The interconnect is where the
adaptor cable and battery pack plug
into the LEL.
The Interconnect has been designed to
work like a button. A button hole must be
integrated into the garment to expose the
Interconnect for the user. The button hole can
be machine sewn, faced, piped or bound. For
additional support, the hole can be glued to
the LEL to ensure that the interconnect does
not get lost between the lining and the outer.
Buttonhole Specs & Notes
With a French button hole, we highly
recommend gluing the button hole to the
interconnect for extra support. All button
holes should be about 1.8” long. We do
not recommend thick piping for the button
hole as it may be too large to sit within the
interconnect
1.8”
BUTTONHOLE NOTES
8
A French or chorded
buttonhole holds the
gasket rmly in place.
Epoxy resin may be use
for addition security
Button holes should be
1.8” long.
MATERIAL LAYERS IN
ORDER OF APPLICATION
Completed AssemblyPre Assembly
1. LINING WITH
BUTTON HOLE
2. LEL PANEL
4. GARMENT
SHELL OR OUTTER
LAYER

Heating LEL Tech Pack
©2019 LOOMIA www.LOOMIA.com
Adapter Cable
The adaptor cable is an accessory
to the LEL that allows the LEL to be
powered by any 2.4A output off the
shelf battery pack.
We recommend attaching the
adaptor cable to the jacket using a
pouch for POS (further explained on
pg. 14)
9
MAGNETIC CONNECTOR
THAT PAIRS WITH THE
INTERCONNECT (ON
THE LEL AND IN THE
GARMENT)
USB MALE CONNECTOR
TO PLUG INTO A 2.4 A
OUTPUT BATTERY PACK
ON/ OFF SWITCH
ALLOWS THE USER TO
CONTROL THE LEL

Heating LEL Tech Pack
©2019 LOOMIA www.LOOMIA.com
LAYERING
OPTIONS
We always want the LEL to be as close to
the skin as possible. When assembling a
LEL enabled garment, ensure that the LEL is
placed just behind the garment lining.
SUGGESTED
FABRICS
GARMENT OUTER SHELL:
- Heavyweight Wool
- Thinner Fabric Quilted with Insulation (like
Thinsulate)
LINING:
- Lightweight fabrics with more open woven
or knit structures
ADDED INSULATION:
- Padded Insulation like Thinsulate or
Primaloft
10
3. ADDED
INSULATION
1. LINING WITH
BUTTON HOLE
2. LEL PANEL
4. GARMENT
SHELL OR
OUTTER LAYER
MATERIAL LAYERS IN
ORDER OF APPLICATION
Table des matières
Manuels Chauffage populaires d'autres marques

oventrop
oventrop Regucor Series Manuel utilisateur

Blaze King
Blaze King CLARITY CL2118.IPI.1 Manuel utilisateur

ELMEKO
ELMEKO ML 150 Manuel utilisateur

BN Thermic
BN Thermic 830T Manuel utilisateur

KING
KING K Series Mode d’emploi

Empire Comfort Systems
Empire Comfort Systems RH-50-5 Guide de démarrage rapide


Empire Heating Systems
Empire Heating Systems WCC65 Manuel utilisateur

Wetekom
Wetekom 92 86 43 Manuel utilisateur

Desa
Desa SPC170-F Manuel utilisateur

Watlow
Watlow Watrod Electric Tubular Heaters Manuel utilisateur

Haverland
Haverland ECO-DRY GPS Series Manuel de la liste des pièces

Stelpro
Stelpro ASILVC2060 Series Manuel utilisateur