Looki DoorEye Plus Manuel utilisateur

Quick guide
The camera picture shown in this manual is for illustration
purpose only. Actual product may vary due to product
enhancement.
Looki DoorEye Plus

1. Inbegrepen in het pakket
2. Structuur van het product
3. Chime
4. Beschrijving
5. Installatie-instructies
6. Modus 1: Batterij-installatie
7. Modus 2: AC-installatie
8. Connect
9. Download de app
10. Apparaat toevoegen
11. FAQ
12. Functies Inleiding
13. Hoe de Chime te gebruiken
14. Technische Parameters
15. Chime installatie
16. Belangrijke informatie
Content/Inhoud/Inhalt/Contenuto/Contenu/Contenido
1. Included In The Package
2. Product Structure
3. Chime
4. Description
5. Installation Instructions
6. Mode 1: Battery Installation
7. Mode 2: AC Installation
8. Connect
9. Download The App
10. Add Device
11. FAQ
12. Functions Introduction
13. How To Use The Chime
14. Technical Parameters
15. Chime Pairing
16. Important Information
4
5
5
6
7
7
7
8
8
8
9
10
11
11
11
12
13
14
14
15
16
16
16
17
17
17
18
19
20
20
20
21
1
ENGLISH
DUTCH

22
23
23
24
25
25
25
26
26
26
27
28
29
29
29
30
31
32
32
33
34
34
34
35
35
35
36
37
38
38
38
39
1. Im Paket enthalten
2. Produktstruktur
3. Glockenspiel
4. Beschreibung
5. Einbauanleitung
6. Modus 1: Einbau der Batterie
7. Modus 2: AC-Installation
8. Verbinden Sie
9. Die App herunterladen
10. Gerät hinzufügen
11. FAQ
12. Funktionen Einführung
13. Verwendung des Glockenspiels
14. Technische Parameter
15. Innere Glocke-Paarung
16. Wichtige Informationen
1. Incluso nel pacchetto
2. Struttura del prodotto
3. Chime
4. Descrizione
5. Istruzioni per l'installazione
6. Modalità 1: Installazione della batteria
7. Modo 2: Installazione AC
8. Collegare
9. Scaricare l'applicazione
10. Aggiungi dispositivo
11. FAQ
12. Funzioni Introduzione
13. Come usare la suoneria
14. Parametri tecnici
15. Accoppiamento della suoneria
16. Informazioni importanti
2
GERMAN
ITALIAN

1. Inclus dans le paquet
2. Structure du produit
3. Carillon
4. Description
5. Instructions d'installation
6. Mode 1 : Installation de la batterie
7. Mode 2 : Installation du CA
8. Connectez-vous à
9. Télécharger l'application
10. Ajouter un dispositif
11. FAQ
12. Introduction aux fonctions
13. Comment utiliser le carillon
14. Paramètres techniques
15. Appariement des carillons
16. Informations importantes
1. Incluido en el paquete
2. Estructura del producto
3. Campanilla
4. Descripción
5. Instrucciones de instalación
6. Modo 1: Instalación de la batería
7. Modo 2: Instalación de CA
8. Conectar
9. Descargar la aplicación
10. Añadir dispositivo
11. PREGUNTAS FRECUENTES
12. Funciones Introducción
13. Cómo utilizar el timbre
14. Parámetros técnicos
15. Emparejamiento de campanas
16. Información importante
3
FRENCH
SPANISH
40
41
41
42
43
43
43
44
44
44
45
46
47
47
47
48
49
50
50
51
52
52
52
53
53
53
54
55
56
56
56
57

A x 2 B x 2
D x 1
Included In The Package1
4
1. Looki DoorEye
Plus 2. Chime 3. Pin
4. USB cable 5. Double-sided
tape 6. Instruction
manual
7. Screwdriver 8. Screws(3 kinds)
11. Power adapter
(Optional)
9. Battery
10.N/C Plate

Product Structure2
5
Lens
Microphone
Reset
Indicator light
Speaker
Volume button
Ringtone button
Pairing button
PIR
Speaker
Micro USB
Doorbell button &
Status light
External
power port
Charging
indicator
SD card
slot
Note:
Ensure the battery is inserted correctly into the battery
compartment to prevent short circuit.
Chime

Description3
6
AC 12~24V
Press the button to activate the doorbell
• Red light solids on: The camera or internet has
encountered a problem.
• Red light blinking: Wait for the camera to
connect to WiFi (flickers slowly) Connect to WiFi
(flickers quickly)).
• Blue light solids on: The camera is working
correctly.
Captures sound for your video.
Supports local SD card up to 128GB. Please format
the SD card in the “LookiLife” App before first-time
use.
Insert pin into the reset hole for 5 seconds to
restore default setting.
• Red indicator solids on: Battery is charging.
• Blue indicator solids on: Charge complete.
Power Port
Doorbell
button
Status light
Microphone
SD card slot
Reset
Charging
indicator

7
or
tape
tape
Installation Instructions4
Battery InstallationMode 1
AC InstallationMode 2
Kindly consider the suitable mode of power for your home before
installing the doorbell.
1. Mark screws position
on the wall using the
mounting bracket as
a template.
2. Drill holes on the
wall with an electric
drill, then insert the
provided nail
expansion screw.
4. Install the doorbell
into the mounting
bracket.
5. Secure with a screw
and tighten with a
screwdriver.
3. Fix the mounting
bracket with the
provided screws or
tape (No need for
screws if using tape).
1. Mark screws position
on the wall using the
mounting bracket as
a template.
2. Drill holes on the
wall with an electric
drill, then insert the
nail expansion
screws provided.
3. Connect the wire and
tighten with a
screwdriver.
Be careful
with the
power!
12-24V AC
or
tape
tape
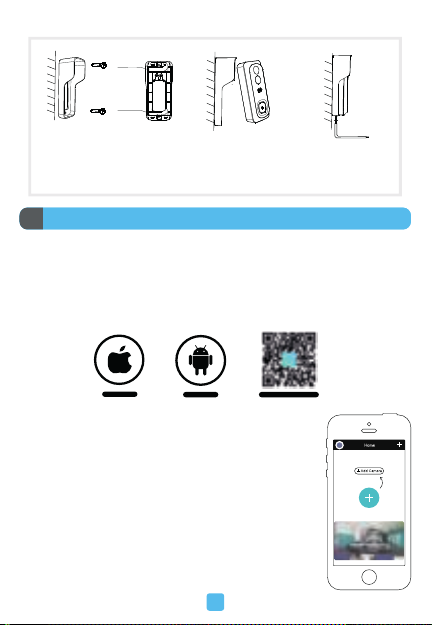
Android
IOS Download App(IOS&android)
Connect5
8
Download The App
Supports
Add Device
LookiLife App is available for both iOS and Android OS. Scan the QR
code below or search for “LookiLife” in your Google Play Store or App
Store to download the App, then install.
Log into the LookiLife App, select “Add Device”, and add
the smart doorbell to the App according to the
on-screen prompts.
Make sure the smart doorbell is close to the router
during the configuration process.
NOTE:
1. The camera does not support the 5GHz WiFi, only
2.4GHz WiFi network
2. If you need to reconfigure the WiFi network, please
press and hold the “RESET” hole for 5 seconds using a
pin. The device will restart and the indicator light will
be flashing red.
4. Fix the mounting bracket on
the wall with the provided
screws or tape (No need for
screws if using tape).
5. Install the doorbell
into the mounting
bracket.
6. Secure with a screw
and tighten with a
screwdriver.

FAQ6
9
Q: The camera cannot be previewed properly.
A: Check if the network is weak. If yes, place the router close to the
smart doorbell for better reception. If it still cannot preview, reset the
camera and add again.
Q: After resetting the device, why is the camera still in the device list?
A: Resetting the device only resets the camera’s network configura-
tion, not the App configuration. You must log into the App to delete the
camera.
Q: How to switch the camera network to another router.
A: Firstly, remove and reset the device on the App, then configure the
new network for the device again through the App.
Q: The device does not recognize the SD card.
A: Please power off the device and remove the SD card, then insert it
again correctly. Check if the SD card is working normally and whether
it is in FAT32 format. Note: When the network is unstable, the App might
prompt that the SD card cannot be recognized.
Q: Why I can't get the notifications on my cell phone App?
A: Please check if the App is running in the background of your phone,
and the relevant notification functions are enabled. Message
notification and authority confirmation must be activated on your
mobile phone.
Table des matières
Langues :


