Logik L22FPS10 Manuel utilisateur

Food Processor
Instruction Manual
L22FPS10
L22FPS10_IB_final110218.indd 1 18/02/2011 12:12 PM

L22FPS10_IB_final110218.indd 2 18/02/2011 12:12 PM

Contents
Unpacking.......................................................................................................4
Before Using for the First Time ......................................................................5
Product Overview...........................................................................................5
Operation. .......................................................................................................6
Mounting the Food Processing Bowl and the Safety Screw Cap ..................... 6
Knife Blade ........................................................................................................................... 6
Slicing / Shredding Plate................................................................................................. 7
Beater..................................................................................................................................... 7
Fitting the Lid on the Processing Bowl ...................................................................... 7
Built-in safety lock............................................................................................................. 8
Feed Tube and Pusher......................................................................................................8
Blender .................................................................................................................................. 9
Cleaning ........................................................................................................11
Blender quick-clean operation...................................................................................11
Hints and Tips ...............................................................................................12
Processing Quantities ..................................................................................13
Specication .................................................................................................15
Safety Warnings............................................................................................16
L22FPS10_IB_final110218.indd 3 18/02/2011 12:12 PM

4
Safety Screw Cap
(P.N. : 002396983)
Processor Bowl
(P.N. : 502647513)
Beater
(P.N. : 002396953)
Blender Lid
(P.N. : 002396923)
Shaft
(P.N. : 502647473)
Processor Lid
(P.N. : 502649873)
Food Pusher
(P.N. : 002260553)
Slicing / Shredding Plate
(P.N. : 502647483)
Blender Jar
(P.N. : 502647243)
Filler Cap
(P.N. : 002241073)
Knife Blade
(P.N. : 502647463)
Instruction Manual
(P.N. : L22FPS10-002)
Thank you for purchasing your new Logik Food Processor.
We recommend that you spend some time reading this instruction manual
in order that you fully understand all the operational features it offers. You
will also find some hints and tips to help you resolve any issues.
Read all the safety instructions carefully before use and keep this
instruction manual for future reference.
Unpacking
Remove all packaging from the unit. Retain the packaging. If you dispose of it please do so
according to local regulations.
The following items are included:
If items are missing, or damaged please contact Partmaster (UK only).
Tel: 0844 800 3456 for assistance.
Food Processor
Instruction Manual
L22FPS10
L22FPS10_IB_final110218.indd 4 18/02/2011 12:12 PM

5
Before Using for the First Time
1. Remove all packaging including the plastic blade covers from the knife blade. The
plastic blade cover should be kept to protect knife blade.
2. Retain the packaging. If you dispose of it please do so according to your local
recycling regulations.
3. Wash the parts: see Cleaning.
Product Overview
Blender Lid
Filler Cap
Pusher
Safety Interlock
Safety Interlock
Safety Screw Cap Slicing / Shredding Plate Beater Knife Blade
Processor Bowl
Feed Tube
Processor Lid
Blender Jar
Motor Unit
Safety Interlock
PULSE/OFF/LOW/
HIGH Control
L22FPS10_IB_final110218.indd 5 18/02/2011 12:12 PM

6
Operation
The food processor bowl will only operate with the safety screw cap attached to
the motor unit. The blender will only operate with the processor bowl attached
to the motor unit see the table below.
Mounting the Food Processor
Bowl and the Safety Screw Cap
Mount the processor bowl on the motor unit
by turning the handle in the direction of the
arrow until you hear a click. Mount the safety
screw cap to the motor unit.
To Operate
Food Processor
Blender
The cutting edges of the blade are very
sharp. Avoid touching them!
1. Place the knife blade down onto the centre post
inside the processor bowl.
2. Put the ingredients in the processor bowl. Pre-cut
large pieces of food into pieces of approx. 3x3x3cm.
Put the processor lid on the processor bowl.
3. Put the pusher in the feed tube.
4. Turn the control to PULSE position (HIGH or LOW for continuous operation).
Hold the PULSE position for about 2-3 seconds and check your results. Repeat for
desired consistency. It is better to use several short operations rather than a single long
one unless mixing ingredients that require longer processing times.
After you have finished food processing, turn the control to OFF position. Allow the
Knife Blade to stop running.
Carefully remove the Knife Blade from the processor bowl. Unlock the processor bowl
by turning the handle to the left, and lift the processor bowl off.
Knife Blade
The knife blade can be used for chopping, mixing,
blending and pureeing.
L22FPS10_IB_final110218.indd 6 18/02/2011 12:12 PM

7
Never process hard ingredients like ice cubes. Cutting edges are very sharp.
Avoid touching them!
When you have to cut large amounts of food, process only small batches at a
time and empty the processor bowl regularly between batches.
Slicing / Shredding Plate
1. Put the processor bowl on the motor unit, turn the handle to lock into place and fit the
shaft onto the centre post.
2. Place the slicing / shredding plate onto the shaft.
3. Put the processor lid on the processor bowl.
4. Put the ingredients in the feed tube. Pre-cut large chunks to make them fit into the
feed tube.
5. Fill the feed tube evenly for the best results.
6. Select the preferred processing speed on the control.
7. Press the pusher lightly onto the ingredients in the feed tube.
Beater
You can use the beater to whisk eggs, egg whites, instant puddings and cream only.
1. Put the processor bowl on the motor unit and turn it to the left until you hear a ‘click‘.
2. Fit the beater onto the centre post.
3. Put the ingredients into the processor bowl, put the processor lid on the processor
bowl and turn it until it’s locked and you hear a click.
4. Select your preferred process speed by turning the control.
Fitting the Processor Lid on the Processor Bowl
Put the processor lid on the processor bowl. Turn
the processor lid in the direction of the arrow until
you hear a click (this requires some force).
L22FPS10_IB_final110218.indd 7 18/02/2011 12:12 PM

8
Feed Tube and Pusher
1. Use the feed tube to add liquid and/or solid
ingredients. Use the pusher to push solid ingredients
through the feed tube.
2. You can also use the pusher to close the feed tube in
order to prevent ingredients from escaping through
the feed tube.
M
A
X
F
I
L
L
• Control the chopping time to prevent the food from becoming too finely
chopped.
• Do not let the appliance run too long when you are chopping (hard) cheese.
The cheese will become too hot, start to melt and turn lumpy.
• Do not use the blade to chop very hard ingredients like coffee beans,
turmeric, nutmeg and ice cubes, as this may cause the blade to get blunt.
If food sticks to the blade or to the inside of the processor bowl:
• Turn the appliance off.
• Remove the processor lid from the processor bowl.
• Remove the ingredients from the blade or from the wall of the processor
bowl with a spatula.
• The processor bowl can only be used without the blender attached to the
motor unit. If you use the unit without the blender, the safety screw cap must
be fitted to the motor unit.
• The food processor can only operate when the safety screw cap is attached
to the motor unit. The processor bowl will not operate if the blender jar is
attached to the motor unit.
Built-in safety lock
(For both Food Processor and Blender)
The motor unit, the processor bowl and the processor lid have
been provided with lock and unlock marks. The appliance will
only function if the lock mark on the motor unit and the lock
mark on the safety screw cap are aligned properly.
Make sure that the lock mark on the processor lid and the lock
mark on the processor bowl are aligned properly.
L22FPS10_IB_final110218.indd 8 18/02/2011 12:12 PM

9
Blender
The blender is intended for:
• Blending fluids, e.g. dairy products, sauces, fruit juices, soups, mixed drinks, sweet teas
and shakes.
• Mixing soft ingredients, e.g. pancake batter or mayonnaise.
• Pureeing cooked ingredients, e.g. for making baby food.
• The blender can only operate with the food processor bowl attached to the motor unit.
1. To attach the blender jar, remove the safety
screw cap.
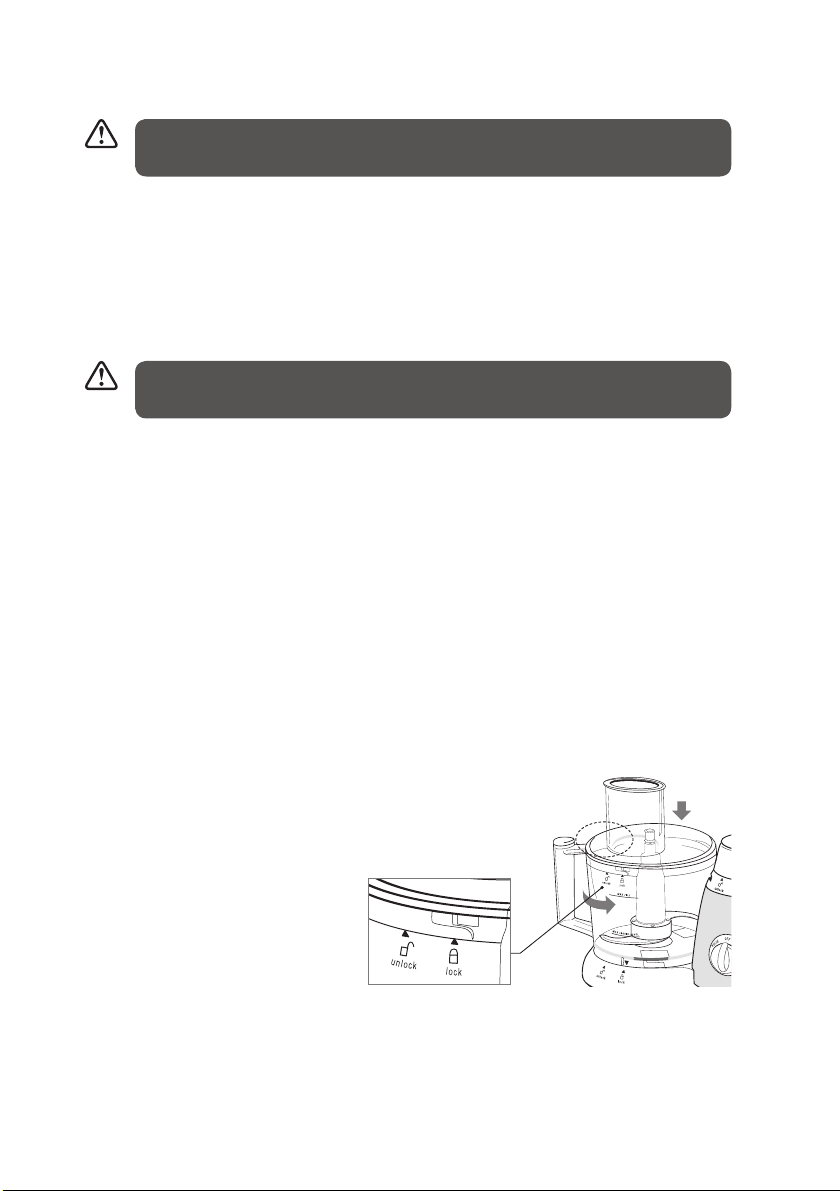
2. Mount the processor bowl on the motor unit by
turning the handle in the direction of the arrow
until you hear a click.
3. Mount the blender jar onto the motor unit by
turning it in the direction of the arrow until it is
firmly fixed.
4. Put the ingredients in the blender jar.
5. Close the blender lid before you start processing.
6. Select your preferred blending speed. The blender
will start to operate. During the blending process
the speed can be adjusted by turning the control.
The blender cannot be used without the
processor bowl attached to the motor unit.
• Pour the liquid ingredients into the
blender Jar through the hole in the
blender lid.
• Hot liquids (not boiling) and hot foods
can be processed in the blender jar.
• Be sure to process small amounts of
liquids - 2 cups or less at a time. Larger
amounts may leak from the blender jar.
• The longer you let the appliance run
(maximum 3 minutes), the finer the
blending result will be.
• Pre-cut solid ingredients into smaller pieces before putting them in the blender jar. If
you want to prepare a large quantity, process small batches instead of trying to process
a large quantity at once.
• Hard ingredients e.g. soy beans for soy bean milk, must be soaked in water before they
are processed.
• Crush ice cubes by placing the ice cubes in the jar, close the blender and use the pulse
function.
L22FPS10_IB_final110218.indd 9 18/02/2011 12:12 PM

10
If ingredients stick to the wall of the blender jar:
1. Switch the appliance off and unplug it.
2. Open the blender lid.
3. Use a spatula to remove the ingredients from the wall of the blender jar.
4. Keep the spatula at a safe distance from the blades (approx. 2 cm).
• Never open the blender lid while the appliance is still running.
• Never use your hands to reach into the blender jar.
• If you are not satisfied with the results, let the appliance run briefly using the PULSE
function. You can also achieve a better result by stirring the ingredients with a spatula
(not while the blender is running), or by pouring some of the contents out in order to
process a smaller amount.
• In some cases the ingredients are easier to blend if you add some liquid e.g. lemon
juice when blending fruits.
L22FPS10_IB_final110218.indd 10 18/02/2011 12:12 PM
Table des matières
Autres manuels Logik Robot culinaire


