LocknCharge Wall Cage 10 Manuel utilisateur
USER INSTRUCTIONS
LocknCharge Wall Cage 10
ENG
TRK
ESP
PRT
FRA
DEU
ITA
www.pclocs.com.au www.lockncharge.com

LocknCharge Wall Cage 10
Congratulaons on your purchase.
Follow these instrucons for easy and fast set-up of your Wall Cage - 10 Bay.
PC Locs, LocknCharge and the Padlock device are Trademarks of IWS Global Pty Ltd.
Copyright IWS Global Pty Ltd, May 2014.
Disclaimer.
This informaon is the intellectual property of IWS Global Pty Ltd and may not be distributed, duplicated
or copied in part or full without the wrien permission. Since the use of this informaon, the equipment
connected and the condions by which any IWS Global product is used is beyond the control of IWS Global,
it is the obligaon of the owner and/or user to determine the correct and safe use of any equipment and
product. To the extent that the law permits, any liability which may be incurred as a result of the use or
future use of a product manufactured or sold by IWS Global is limited to the cost of repairing or replacing the
failed product or component at the discreon of IWS Global either within, or outside of warranty periods,
and does not extend to any loss or damage which may be caused as a consequence of misuse or failure of
the equipment or product or the informaon contained herein. IWS Global shall not in any event be liable for
economic loss of prots, indirect, special, bodily injuries or consequenal damages.
INSTRUCTION MANUAL
STEP 1.
Decide the posion to install the Wall Cage taking into account the following:
• Ensure power leads will reach to a nearby power point outlet. In the event that you need to use
extension cords (not supplied) from the Wall Cage to the power point, we suggest you use two, one
from each power board in the Wall Cage into a double power point.
• Ensure no cables or pipes are located in the wall where the mounng holes will be drilled.
Secon A - Mounng the Wall Cage - 10 Bay.
Tools required:
• 17mm spanner or socket (for shear nuts)
• 13mm socket for brass nut on Dynabolts
• 10mm masonry drill bit
• Pencil
• Hammer
• Hammer drill
• Level
Tools required:
• 4x 75mm Dynabolts
• 4x shear nuts
• 4x washers
WARNING: THIS WALL CAGE IS DESIGNED FOR INSTALLATION ON A SOLID CONCRETE WALL USING 4 X M8
DYNABOLTS. FOR OTHER TYPES OF WALL CONSTRUCTION YOU SHOULD SEEK VERIFICATION ON SITE BY A
QUALIFIED STRUCTURAL ENGINEER AS TO THE WALL’S SUITABILITY AND STRENGTH.
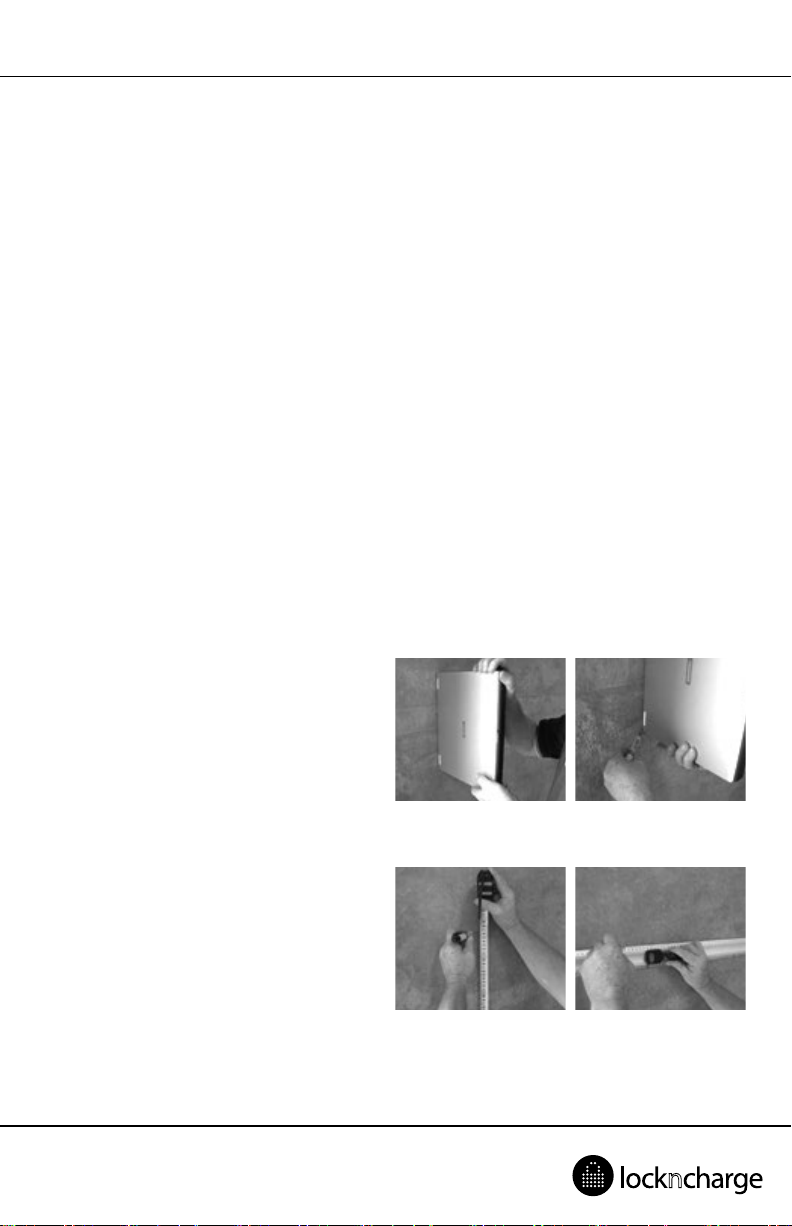
STEP 2.
Hold one of your devices against the wall at a
comfortable height. We suggest around 1.0m to
1.1m above the oor. Mark the underside of the
laptop on the wall.
STEP 3.
Measure 460mm above the devices base mark
and mark the wall again. This will be the line of
the top two Dynabolts. Now mark a 430mm long
horizontal line on the wall using a spirit level, or
measure the distance from the oor to the top
mark and make another mark that same distance
from the oor along the wall and draw the
430mm line along those two marks.

LocknCharge Wall Cage 10
STEP 4.
Now mark two marks on the horizontal line
390mm apart. These are the locaons for the
two top Dynabolts. Drill the holes using your
hammer drill and the 10mm masonry bit.
STEP 5.
Knock the two top Dynabolts into the holes using
your hammer and ghten the Dynabolt nuts
slightly to secure the bolts, and remove the nuts
leaving the exposed thread. Locate the Wall Cage
on the top two Dynabolts and replace the nuts.
Hand ghten the nuts to secure the cage for a
moment.
STEP 6.
Mark the wall through the boom two holes in
the cage and either drill the holes with cage in
place or remove the cage and drill the two holes
where you have marked the wall. Locate the
boom two Dynabolts in these boom holes.
STEP 7.
Replace all of the Dynabolt nuts ONE AT A TIME
so that the cage is safely secured to the wall with
the supplied M8 sheer nuts - cone facing the wall
and M8 washers. Tighten the sheer nuts rmly
unl the hex head breaks o. This ensures secure
placement of the Wall Cage.

INSTRUCTION MANUAL
Secon B - Fixing the power board in place.
STEP 1.
Having unpacked the un-switched power boards
locate the right hand board in the clip and run
the lead through the le hand clip and out
through the hole to the le. Ensure the lead is
hard up against the inside wall of the clip. Fit the
le hand board into the clip and run its lead out
through the hole to the le. If it beer suits your
charger plugs, the boards can be installed the
other way around with leads exing to the right.
STEP 2.
The power boards should be heard to ‘click’ into
place in the clips if they are ed correctly. If
the lead from the right hand power board is laid
in the boom of the le hand clip it will NOT
allow the le hand power board to fully clip into
place. Remove the board and ensure the lead is
posioned hard up against the wall of the clip.
Re-t the le hand power board.
STEP 3.
In the unlikely event the power boards do not ‘click’ into posion and they appear a lile loose, the sides of
the clips can be slightly squeezed together to reduce the gap. Re-t the power boards.

LocknCharge Wall Cage 10
Warranty
PC Locs/LocknCharge warrants the product to be free of defects in design, materials, assembly and crasmanship
for a period of twelve months from the date of purchase to the original retail purchaser. Evidence of original
purchase will be required to obtain warranty service.
In the event that a defect, malfuncon or failure occurs or is discovered during the warranty period,
PC Locs/LocknCharge will repair or replace, at its opon, the products which in the reasonable judgment of PC
Locs/LocknCharge are deemed defecve. All transportaon costs shall be borne by the owner and the risk of
loss shall be upon the party iniang the transportaon.
The warranty does not apply to any product that has been subject to misuse, tampering, neglect, or accident or as
a result of unauthorized alteraons or repairs to the product. The warranty is in lieu of all warranes expressed or
implied, including the implied warranes of merchantability and tness for a parcular purpose which are expressly
excluded or disclaimed. In no event will PC Locs/LocknCharge, their directors, ocers, employees, or agents be
liable for any harm, consequenal, incidental, third party, special or indirect damages whatsoever arising out of the
use or inability to use the products even if PC Locs/LocknCharge has been advised of the possibility of such damages.
PC Locs/LocknCharge obligaon is strictly and exclusively limited to the replacement or repair of any defecve
products. Some states do not allow the exclusion or limitaon of incidental or consequenal damages, so the
above limitaon or exclusion may not apply to you.

INSTRUCTION MANUAL
Compliances and Approvals

www.pclocs.com.au www.lockncharge.com

BEDIENUNGSANLEITUNG
LocknCharge Wall Cage 10
ENG
TRK
ESP
PRT
FRA
DEU
ITA
www.pclocs.com.au www.lockncharge.com

LocknCharge Wall Cage 10
Herzlichen Glückwunsch zu Ihrem Kauf.
Folgen Sie diesen Anweisungen für eine einfache und zügige Inbetriebnahme.
PC Locs, LocknCharge und die Padlock-Vorrichtung sind Marken der IWS Global Pty Ltd. Copyright
IWS Global Pty Ltd, Mai 2014.
Haungsausschluss
Diese Informaonen sind geisges Eigentum von IWS Global Pty Ltd. Sie dürfen ohne vorherige schriliche
Genehmigung weder teilweise noch vollständig verteilt, reproduziert oder kopiert werden. Da die Nutzung
dieser Informaonen, die angeschlossenen Geräte und die Einsatzbedingungen für IWS Global-Produkte
sich außerhalb der Kontrolle von IWS Global benden, obliegt die richge und sichere Nutzung aller Geräte
und Produkte der Verantwortung der jeweiligen Eigentümer bzw. Anwender. Innerhalb der gesetzlichen
Vorschrien ist jede Haung als Folge des Gebrauchs oder des späteren Gebrauchs eines Produkts, das durch
IWS Global hergestellt oder verkau wurde, begrenzt auf die Kosten der Reparatur oder des Austausches
des fehlerhaen Produkts oder einer fehlerhaen Komponente im Ermessen von IWS Global innerhalb
oder außerhalb der Garanezeit. Eine Haung für eventuelle Verluste oder Schäden infolge unsachgemäßer
Handhabung oder eventueller Fehler von Geräten, Produkten oder hier gegebenen Informaonen ist
ausgeschlossen. IWS Global haet in keinem Fall für wirtschaliche Verluste durch entgangene Gewinne,
indirekte oder spezielle Körperverletzungen oder Folgeschäden.
Table des matières
Langues :
Manuels Sûr populaires d'autres marques


Honeywell
Honeywell 2077D - 1.21 Cubic Foot Anti-Theft Safe Manuel utilisateur

Hornady
Hornady SnapSafe Trunk Safe II Manuel utilisateur

SPORTS AFIELD
SPORTS AFIELD SA-HD5-BIO Manuel utilisateur

Honeywell
Honeywell 5912 Manuel utilisateur

Phoenix
Phoenix FS1280F Manuel utilisateur

Phoenix
Phoenix SS0992K Fiche d'information produit


