Lenoxx CD114BL Manuel utilisateur

Model: CD114BL CD114BR | Batch: PR4802
Home Entertainment System
Carefully read all instructions before use and save for future reference.

CAUTION
SAFETY INSTRUCTIONS
The images used in this manual are to illustrate the operation method and
product structure of the item. In case there are minor discrepancies between
the physical product and the illustrations, please consider the physical item as
the accurate reference.
To reduce the risk of fire or electric shock, do not expose this product, its
power cord and remote to rain or moisture; do not use it anywhere near water
or where water splashes or drips; do not touch the plug with wet hands.
If liquids enter the device, unplug it immediately, clean, and dry it thoroughly.
Then, have it checked for damage by a qualified technician or contact the
after-sales support.
Read and understand this entire manual before using this product. Keep these
instructions for future reference.
1) This product should be operated only by the type of power source
indicated on the marking label or in this instruction manual.
2) Protect the power cord from being walked on or kinked, especially at its
both ends.
3) Do not overload the wall power outlet or extension cords as this can result
in a risk of fire or electric shock.
4) Never push objects of any kind into this product through openings as they
may touch dangerous voltage points or short-out parts as that could result in a
fire or electric shock.
5) Never spill liquid of any kind on the product.

PREPARATIONS FOR USE
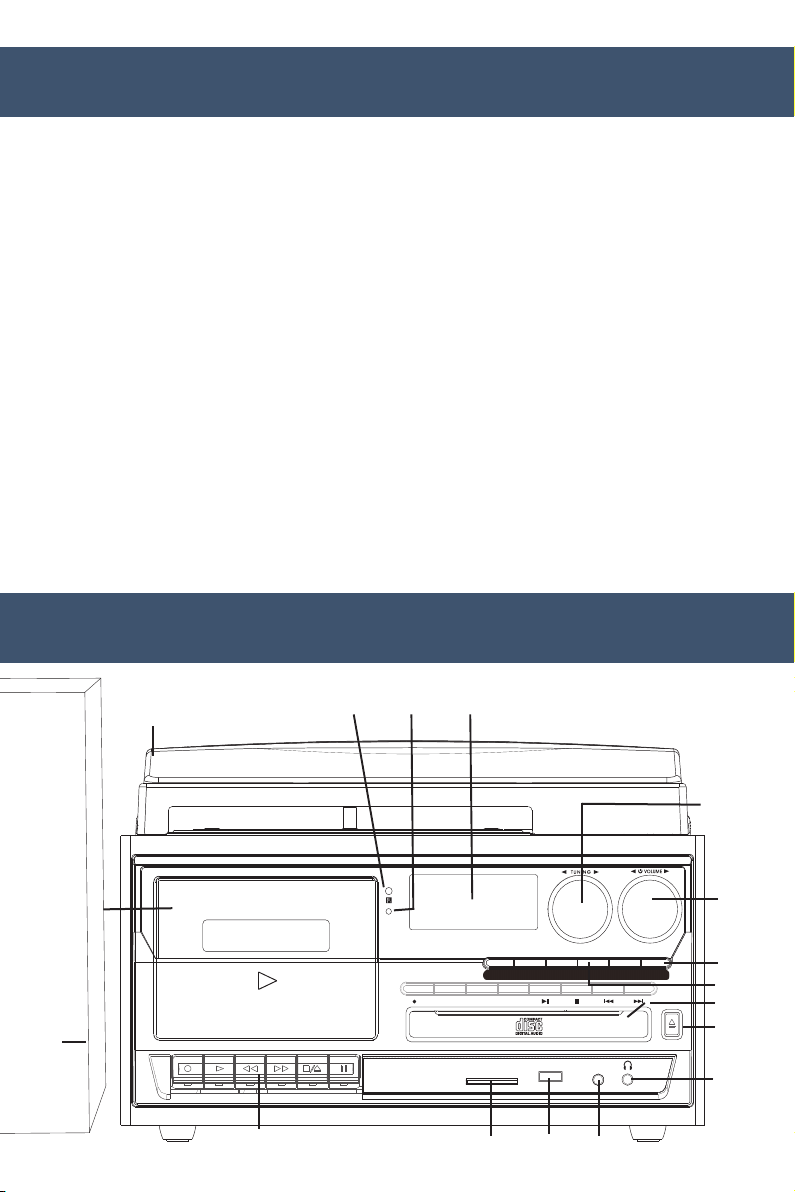
LOCATION OF CONTROLS & INDICATORS
• Carefully remove the unit from the carton and box and remove all
packing material from the unit.
• Unwind the AC power cord and extend it to its full length.
• Unwind the FM Antenna wire and extend it to its full length when
necessary.
• Place the unit on a stable, level surface, convenient to an AC outlet, out
of direct sunlight, and away from sources of excess heat, dust, moisture,
humidity or strong magnetic fields.
• Remove the opaque white plastic stylus cover from the phonograph
stylus by sliding it forward and down.
• Remove the twist-tie that was used to secure the tonearm during
shipment.
• Release the tonearm lock lever.
• Connect the plug to your AC outlet.
REC PLAY REW F.F STOP/EJ PAUSE
FM
AM
PHONO/AUX CD/USB/SD BT TAPE
STANDBY
REC DEL PROG REPEAT OPEN
CLOSE
FUNCTION SELECT
MULTI AUDIO RECORDER / PLAYER
SD/MMC USB AUX- IN
1
2
3
4
567
8
9
10
11
12
13
14
151617

PHONOGRAPH
BACK PANEL
1. Dust Cover
2. Cassette Door
3. Speaker
4. Cassette Controls
5. Bluetooth Indicator Light
6. Stanby Light
7. LCD Display Screen
8. Tuning Knob
9. Power Switch & Volume Knob
10. Function Selector Button
11. CD/USB/SD Playback
Control Button
12. CD Door
13. CD Door Open/Close Button
14. 3.5mm Headphone Jack
15. Aux-in
16. USB
17. SD/MMC card slot
18. 45 RPM Adaptor
19. Lift Lever
20. Auto Stop Control
21. Tonearm Lock
22. Speed Selector (33/45/78
rpm)
23. Tonearm
24. RCA Line Out Jack
25. FM Wire Antenna
26. AC Power Cord
18
19
20
21
22
23
LI NE OU T
FM AN T
RL
AC~
24 2 5 26

REMOTE CONTROL
Listening to radio
1) Power Button (Device On/Off)
2) Record Button
3) Equaliser
4) Play/Pause Button
5) Repeat Button
6) Program Button
7) Delete Button
8) CD Open/Close
9) Function Mode Button
10) Rewind Button
11) Forward Button
12) Stop Button
13) Mute Button
NOTE: The remote control works with CD/USB/SD modes.
EQ
POWER
-
+
REC DEL
REP MUTE
PROG
-
-
-
-
TUNING
FOLDER
MODE
VOLUME
OPERATING INSTRUCTIONS
1. Press the volume knob to turn the equipment on.
2. Use the function selector to select AM or FM mode.
3. Turn the tuning knob to tune into a radio station.
4. Adjust the volume knob to your desired volume level.
5. AM reception: the receiver has a built-in AM bar antenna. If reception is
weak, slightly rotate or reposition the unit to improve AM reception.
6. FM reception: the receiver has a built-in FM wire antenna at the back.
For best reception, completely unravel and extend this wire.

Phono operation
1. Open the dust cover and press the volume knob to power on.
2. Use the function selector to select PHONO mode.
3. Set the speed selector to the appropriate position: 33, 45 or 78,
depending on the record to be played.
4. Set the auto stop control to ON if you want the turntable to stop turning
when it has reached the end of the record. If the switch is set to OFF, the
turntable will continue turning at the end of the record.
5. Place the record on the turntable (use the 45 RPM adaptor, if required).
6. Move the lift lever towards the back to raise the tonearm from the arm
park, then slowly move the arm to the record. The turntable will start
rotating.
7. Move the lift lever towards the front, the tonearm will gently drop onto
the record and playback will start.
8. To stop playback, move the lift lever towards the back to raise the
tonearm. The turntable will still be rotating but the record will stop
playing. To continue playback, move the lift lever towards the front.
9. To play a different piece on the record, move the lift lever towards the
back, move the raised tonearm to the start of the piece and then move
the lift lever towards the front to lower the tonearm and start playback.
10. To adjust the volume level, turn the volume knob to the right or left.
11 . At the end of the record, move the lift lever towards the back to raise the
tonearm and move it back to the tonearm park, and then move the lift
lever towards the front to lower the arm onto its rest.
12 . Alternatively, lift the tonearm off the record and return it to the arm rest
manually.
13 . When you have finished playing records, engage the tonearm lock to
protect it from accidental movement. Press the volume knob to switch the
unit off.
14 . NOTE: Should your record stop before the last track finishes, set the auto
stop control to OFF. Your record will now play to the end, but you will
have to stop the turntable rotation manually. (Return the tonearm to its
rest manually and if the turntable is still rotating, switch off the unit. Then,
set the auto stop control back to ON.)

Phono encoding
Cassette operation
1. Set the function button to PHONO mode and then insert a memory
device (USB drive, SD or MMC card).
2. Put your record onto the turntable and get it ready for playback.
3. Press the record REC button. It will take about 3 - 4 seconds to read the
memory device, then the USB or SD icon will be flashing on the LCD
display.
4. Press the skip up or skip down button to select the desired mode (USB
or SD) for encoding, then press the record REC button again to confirm.
(You can skip this step if only a USB drive or an SD/MMC card is
inserted.)
5. The system will start the encoding mode after a few seconds.
6. Lower the tonearm to start playback of the record. During encoding, the
USB or SD icon will be flashing on the display.
7. To finish encoding, press the stop button. The display will show “END”
and return to PHONO mode.
NOTE:
The recording speed is 1:1. Recording will take as long as playing the
record. The recording format is preset at MP3 bit rate 128 kbps.
REC
PLAY
REW
F.F
STOP/EJ
PAUSE
TURNTABLE CD RADIO USB SD CASSETTE SYSTEM
USB I SD I CASSETTE RECORDALE
FM AM PHONO/AUX CD/USB/SD BT TAPE
STANDBY
REC DEL PROG REPEAT OPEN
CLOSE
FUNCTION SELECT
MULTI AUDIO RECORDER / PLAYER
SD/MMC USB AUX- IN

1. Press the volume knob to turn on the power.
2. Select the TAPE function to set the unit to tape mode.
3. Press the Stop/Eject button to open the cassette door.
4. Insert the prerecorded cassette into the cassette tray and press the play
button.
5. To fast forward, press the fast forward button. To stop fast forwarding,
press Play button or Stop/Eject button. Press the Play button to play.
6. To rewind, press the Rewind button in. To stop rewinding, press Play
button or Stop/Eject button. Press the Play button to play.
7. To stop the playback, press the Stop/Eject button once. To eject the
cassette, press the Stop/Eject button again.
Note: Remove the cassette from the cassette holder when it is not in use.
Recording from RADIO / PHONO / AUX IN / CD / USB / SD to
TAPE:
1. While playing the source (RADIO / PHONO / AUX IN / CD / USB /
SD), press the “Tape EJECT” button to open the tape door.
2. Insert a blank tape into the Cassette Dock.
3. Close the tape door securely.
4. Simultaneously press the “RECORDER” and “PLAYER” buttons to prepare
for recording.
5. Now, begin playing the songs or content you wish to record onto the
tape.
6. If you need to pause the recording, press the “PAUSE” button. Press it
again to continue recording.
7. To stop the recording, press the “STOP” button.
NOTE:
When the tape reaches its full-end during recording, the “RECORDER &
PLAYER” buttons will automatically key-up.

Cassette encoding
1. Set the function button to TAPE mode and then insert a memory device
(USB drive, SD or MMC card).
2. Press the record REC button, it will take 3 - 4 second to read the memory
device, then the USB or SD icon will be flashing on the LCD display.
3. Press the skip up or skip down button to select the desired mode (USB
or SD) for encoding, then press the record REC button again to confirm.
(You can skip this step if only a USB drive or an SD/MMC card is
inserted.)
4. The system will start the encoding mode after a few seconds. Insert your
cassette into the playback slot. During encoding, the USB or SD icon will
be flashing on the display.
5. To finish encoding, press the stop button. The display will show “END”
and return to TAPE mode.
NOTE:
The recording format is preset at MP3 bit rate 128 kbps. The recording speed
is 1:1. Recording will take as long as playing the cassette.
1. Press the CD/USB/SD Button once to set the unit to CD mode.
2. Press the Open/Close button to open the CD tray and put the CD in the
tray with the labeled side facing up.
3. Press the Open/Close button again to close the tray. The LCD display
will show “READING” for a few seconds, then the first track on the CD
will automatically start playing. If it is a blank CD or an unrecognizable
CD, it will show “ERROR”.
IMPORTANT!
Ensure that you insert the cassette in the correct direction.
To prevent damage to the cassette, it is highly recommended to remove it
from the equipment after playing.
CD operation
Autres manuels pour CD114BL
2
Ce manuel convient aux modèles suivants
2
Table des matières
Autres manuels Lenoxx Système de cinéma maison


