Lazy Camping Lazy Tent Manuel utilisateur

Anleitung/Manual
Lazy Camping –Lazy Tent
Thank you for choosing a Lazy Tent from Lazy Camping.
Before you begin, take a moment to familiarize yourself with these instructions and the parts included.
On page 2 you will find a list of all parts, quantities and tools needed.
Please read first
Important notes
It is essential that all Lazy Camping products are properly and securely mounted and attached to your
vehicle. Improper attachment can result in an accident and cause serious bodily injury or death. You are
responsible for mounting and securing all Lazy Camping products to your vehicle. Attachments must be
inspected before use and products must be checked regularly for adjustment, wear and damage. Therefore,
you must read and understand all instructions and cautions before mounting or using Lazy Camping
products. If you do not understand all the instructions and cautions, or if you have no manual experience
and you are not thoroughly familiar with the assembly procedures, you should have the product installed
by a professional assembler or other qualified persons.
120
Minutes
2
Persons
Ausführliches YouTube Video
zum
Lazy Tent –Aufbau

Materialliste
Bag 1
•4x end caps for mounting rail (+2x spare)
•18x M8 screws for mounting rail
•18x washer M8
•18x spring washer M8 for mounting rail
•18x slot nuts M8 for mounting rail (already in
the rail)
Bag 2
•16x sleeve screw M4 (+2 spare)
•16x sleeve nut M4 (+2 spare)
•16x spring washer M4 (+2 spare)
•16x washer M4 (+2 spare)
Bag 3
•18x screws 30 mm M5 (+2)
•2ox washers M5 (is not needed)*
•18x spring washers M5 (+2 spare)
•18x lifting nuts M5 (+2 spare)
01
Tips from the pro: Well sorted is half
assembled!
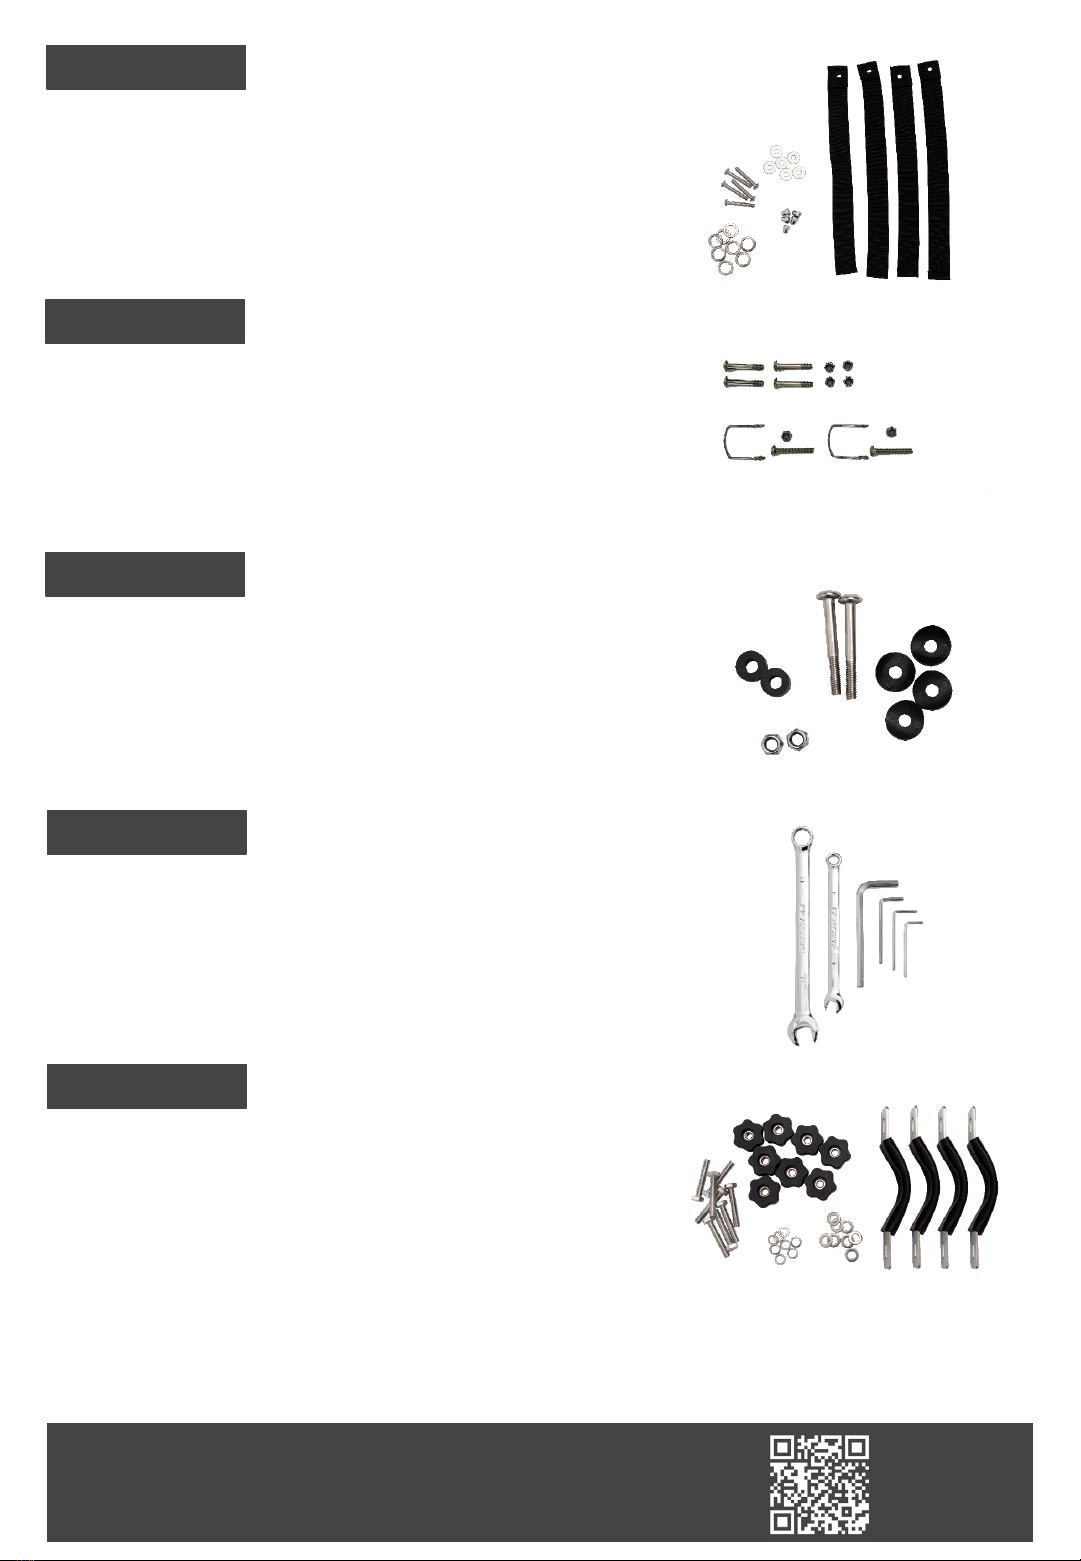
Bag 4
•6x fully threaded screws 35 mm M5 (+2 spare)
•6x lifting nuts M5 (+2 spare)
•6x washer M5 (+2 spare)
•6x spring washer M5 (+2 spare)
•4x fabric straps (spare)
Bag 5
•2x fully threaded screws 50 mm M8
•4x half threaded screws 45 mm M8
•6x lock nut M8
•2x connecting bracket for canopy bar
Bag 6
•2x half threaded screws M8 60 mm (+2 spare)
•2x lock nut M8 (+2 spare)
•2x spacers (+1 spare)
•4x spacers (+2 spare)
Bag 7
•13 mm combination wrench
•8 mm combination wrench
•1x M8 Allen
•1x M5 Allen
•2x M4 Allen
Bag 8
Mounting set consisting of:
•4x mounting bracket
•8x screws M8 45 mm
•8x spring washer M8
•8x washer M8
•8x star grip screw
2102
Tips from a pro:
*really not needed

Material
•4x frame connector caps
•2x Mounting bracket
•2x outer frame short
•2x outer frame long
•7x inner laths
•2x outer laths
•2x long brackets
•1x canopy bracket
•4x short bars
•2x short bars with hole
•2x Gas springs
•1x telescopic ladder
•1x ladder bag
3
Detailed YouTube video
Lazy Tent -Assembly 03

Material
•2x Mounting rail
•1x Outer tent
•1x PVC cover
•2x PVC cover belt
•2x Shoe bags
•1x Inner tent
•4x Hard foam panel
•1x Opening rope
Detailed YouTube video
Lazy Tent -Assembly 04

Step 1
Screw the outer frame together
Place the two long outer frames opposite each
other so that you can connect them to the short
frames. The outer frame with the silver
retaining screw is the rear frame..
You need:
•2x Outer frame
•2x Inner frame
•4x frame connection caps
•16x sleeve screw M4
•16x washer M4
•16x spring washer M4
•16x sleeve nut M4
CONSTRUCTION
Tools
•2x Allen key small M4
Repeat the step until you have inserted all screws. Then take the two M4 Allen keys and tighten
the screws. (One Allen key locks from the inside and the other one tightens).
The connecting caps are inserted into the
respective frames to connect all four parts.
Each side is secured with 2 screws each (16 pieces in total)
Insert the sleeve bolt including washer and spring washer* from the inside through the frame and
connect it from the outside with the sleeve nut and tighten it only by hand for the time being.
Tips from a pro:
*Sequence = sleeve screw -washer - spring
lockwasher 05

Step 2
Install the slatted frame
You need:
•2x outer laths, each with 2 additional holes in
the front area
•7x inner slats
For the connection outer slats:
•2x outer laths
•4x screw 35 mm M4
•4x washer M4
•4x spring washer M4
•4x lifting nut M4
•4x connecting lug
For the connection inner slats:
•7x inner laths
•14x screw 30 mm M4
•14x spring washer M4
•14x nut M4
•8 mm wrench M4
Tools
•8 mm open-end wrench
•5s Allen wrench
Slide the two outer laths with the pre-punched holes into the outer frame.
Make sure that the two holes point to the front.
Now slide the remaining laths into the frames,
always leaving three holes free.
Leave 3 holes free Leave 3 holes free
Tips from the pros:
Don't give up!
06

Connect the outer frames to the outer laths in the very first hole. Before inserting the lifting nut
and spring washer at the bottom, place a connecting tab between each.
1. Insert fully threaded screw 35 mm from the inside to the outside.
2. Place connecting tab over it
3. Washer
4. Spring washer
5. Lift nut
Connect the inner laths to the outer frames and tighten
the lifting nuts
1. Pass through fully threaded screw 30 mm from the
inside to the outside
2. Spring washer
3. Lift nut.
View from below
5
4
3
2
1
1
2
3
View from below
Assembled slatted frame
Tips from a professional:
Spring washer = snap ring
07

Step 3
Attach the mounting rails
You need:
•2x mounting rail
•18x M8 screws for mounting rail
•18x washer M8
•18x spring washer M8 for mounting rail
•18x slot nuts M8 for mounting rail
(already in the rail)
Tools
•1x Allen key M8
Place the mounting rails under the tent so that
the outer sides are flush with the frame. Slide
the sliding blocks into the correct position so
that they are under the holes.
Now connect the mounting rails to the battens.
Make sure that you have an equal overhang on
both sides. Choose the inner hole of the laths to
get 80cm width.
Slide the sliding block to the correct position.
Then insert the screw from above into the hole of the inner lath.
1. Washer M8
2. Spring washer M8
3. Screw M8
Repeat this step 18 times and tighten the screw with the 8 mm Allen
key.
1
2
3
Tips from the pro: flush -make sure the
rails don't peek over the frame on the left
or right side. 08

Step 4
Die Befestigungswinkel anbringen
You need:
•2x mounting bracket
•4x fully threaded screw 30 mm
•2x fully threaded screw 35 mm
•6x spring washer
•2x washer
•6x lifting nuts
Tools
•8 mm open-end wrench
•4 mm Allen
Mount the connecting brackets to the outer
frame with the 35mm screw. You will find 2
punched holes in each of the two outer laths
and a pre-punched hole on the frame.
Position the angles so that they point outward
and the tip points forward. Then first fasten the
35 mm screw in the right and left outer frame.
1. Pass screw 35mm from the inside to the
outside
2. Washer
3. Spring washer
4. Lift nut
Repeat the step without washer with the 2
screws 30 mm each to connect the outer
laths to the angle.
1. Pass screw 30mm from the inside to
the outside
2. Spring washer
3. Lift nut
1
2
3
View from below
4
35 mm
screw
30 mm
screw
Tips from a pro: The connecting brackets
are then used for the tent poles!
09


