Kylin KY-1D6 Manuel utilisateur


2
Kylin Sauna User Manual www.kylinaustralia.com.au
Thank you so much for purchasing the Kylin Infrared Sauna! Please take the
time to carefully read through this manual. Keep this manual and your
proof of purchase for future reference and service calls. Welcome to reach
our team if you have any questions about your infrared sauna!
You can scan the below QR code to download a
digital Kylin sauna instruction manual.

3
Kylin Sauna User Manual www.kylinaustralia.com.au
Table of Content
TABLE OF CONTENT ............................................................................................3
SAFETY INSTRUCTIONS .......................................................................................4
ELECTRICAL REQUIREMENTS ...............................................................................5
INSTALLATION INSTRUCTIONS ............................................................................6
INSTALLATION GUIDE FOR 1 PERSON SAUNA KY-1D6 .........................................7
OPERATION.......................................................................................................12
USAGE GUIDE....................................................................................................13
A REMINDER WHEN HAVING YOUR SAUNA ......................................................14
SAUNA BENEFITS ..............................................................................................16
SAUNAS AND CONTRAINDICATIONS .................................................................17
TROUBLESHOOTING..........................................................................................20
WARRANTY INFORMATION ..............................................................................21

4
Kylin Sauna User Manual www.kylinaustralia.com.au
Safety instructions
1.
Excessive sweating may cause stains on wood and damage to
electrical appliances. Please use one or two towel placed on
the bench and on the floor heater to absorb sweat when using
the sauna.
2.
Indoor sauna room is not waterproof, please do not spray water
in the interior or exterior of sauna.
3.
Do not use liquid cleaners or aerosol cleansers on the interior or
exterior of the sauna. Only use a damp cloth for cleaning.
4.
Use of chemicals will damage the wood and any natural protection
layer inherent in the wood.
5.
To reduce the risk of injury, do not allow children to use the sauna
unless they are closely supervised at all times.
6.
Persons with health conditions or using medications
should consult their physicians before using sauna.
7.
Excessive temperatures have a high potential for causing fetal damage
during the early months of pregnancy. Pregnant or possibly pregnant
women should contact their physician prior to using the sauna.
8.
Persons using medications should consult a physician before using the
sauna since some medications may induce drowsiness while others may
affect heart rate, blood pressure, and circulation.
9.
Please exit immediately if you feel uncomfortable, dizzy or sleepy.
10.
WARNING
: The use of alcohol, drugs, or medications prior to
or during the sauna session may lead to unconsciousness.
11.
Remove all jewelry before you enter the sauna.
12.
Never sleep inside the sauna while the unit is in full operation.
13.
Do not attempt any repair without consulting the manufacturer first.
Unauthorized repair attempts will void manufacturer’s warranty.

5
Kylin Sauna User Manual www.kylinaustralia.com.au
Electrical Requirements
Please follow all instructions carefully. Each sauna will require a dedicated circuit
when plugged in an outlet according to the image below. A dedicated circuit
requires that no other appliance should share the outlet/circuit with the sauna.
Failure to comply with this requirement may cause electrical interruption and
diminished performance. It is recommended that a qualified electrician install an
extra dedicated electrical socket for proper sauna functionality and to avoid any
potential electrical hazards. Please make sure the sauna is properly grounded.
Serious injury may result if proper electrical requirements are not met. Should
you have any questions, please do not hesitate to contact the supplier.
Power Plug
For 1-2 person infrared sauna: Australia 10A power plug
For 3-4 person infrared sauna: Australia 15A power plug
10A power plug
15A power plug

6
Kylin Sauna User Manual www.kylinaustralia.com.au
Installation Instructions
Please read the following directions carefully. The sauna installation may require
a minimum of 2 people. You should not try to install the sauna on your own as
damage will easily occur.
Caution
1- No plumbing or plumbing fixtures should be placed in the sauna.
2- Install the sauna on a completely level surface.
3- Keep all liquids away from the heating panels.
4- Keep the sauna away from any potential hazards including any water
source or liquids. Select a dry suitable location for the sauna installation.
5- Indoor sauna room is best placed indoors such as bathroom, pool area,
or it can be placed outdoors where only fully covered areas, such as on
a deck, terraces or balconies to protect it from the rain, moisture and
other elements in order to maintain the naturally untreated Canadian
Hemlock finish.
6- Do not expose the heater elements to any water source or liquids as it
may cause electrical shock.
7- Flammable objects and corrosive chemical substances should be kept far
away from the sauna.
8- Do not plug any other appliances into the outlet sharing with the
infrared sauna.
Your infrared sauna will come packaged in one or more boxes. Please make sure
that you open the boxes face up. And be mindful of the fragile parts and glass
enclosed during the opening process.
7
Kylin Sauna User Manual www.kylinaustralia.com.au
Installation Guide for 1 Person Sauna KY-1D6
This content is the instruction for the 1-person model KY-1D6, the structure may
vary from different models. Please refer to the correct article for a specified
model.
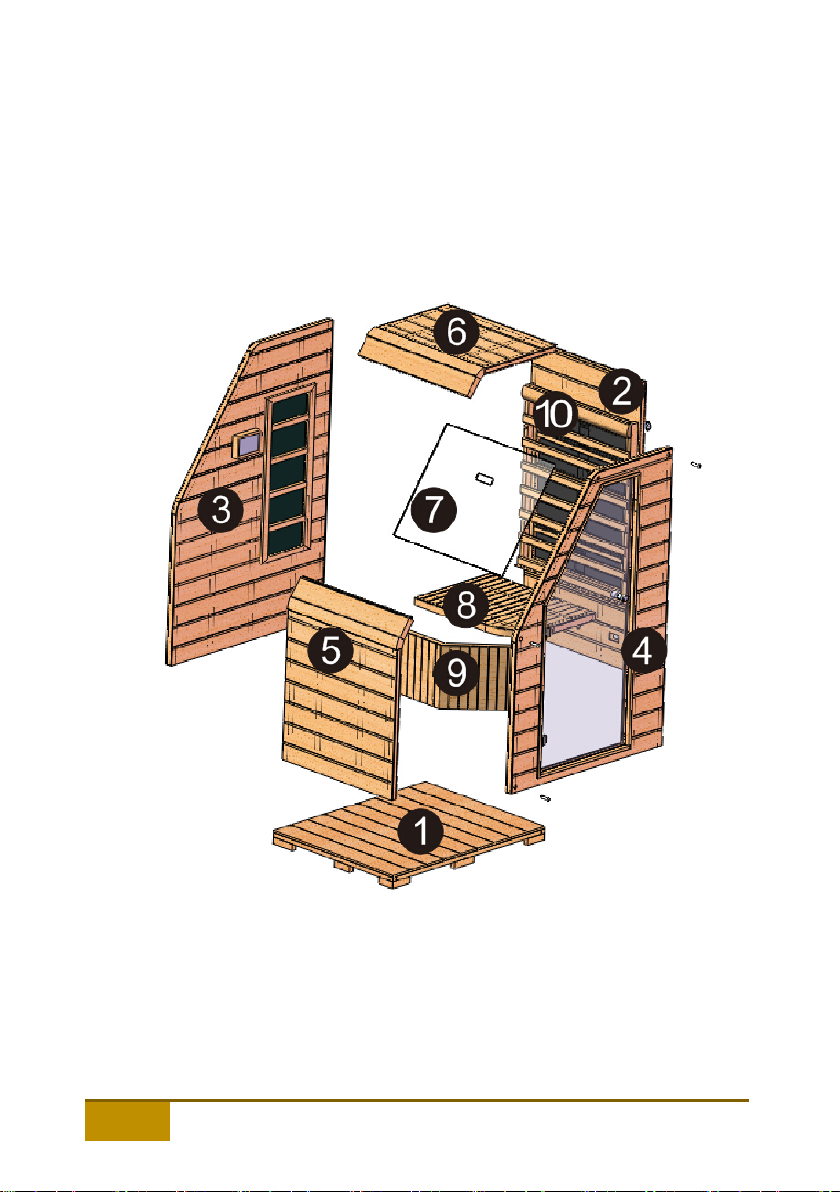
Structure and Components
1- Floor panel 2- Rear panel 3- Left side panel 4- Right side panel
5- Front panel 6- Top panel 7- Glass window 8- Sitting bench
9- Sitting baffle 10- Backrest

8
Kylin Sauna User Manual www.kylinaustralia.com.au
1. Floor Panel
Place the floor panel flat on the desired location. Make sure to leave a space
around the side walls for one person to stand and install the side panels. And
make sure to confirm the front side and the back side. (Figure B-1)
Figure B-1: Floor Panel
2. Rear Panel
Align the rear panel with the floor panel’s corresponding battens; make sure both
panels are in line.
Figure B-2: Rear Panel

9
Kylin Sauna User Manual www.kylinaustralia.com.au
3. Side Panels
Align the left panel with the floor panel’s corresponding battens. Make sure the
left panel fits flush into the back panel. (Figure B-3). Using buckles in the corner
to connect both panels. Do the same way for the right and the back panel.
(Figure B-3: Back Panel and Left Panel)
4. Sitting Bench
Slide the sitting baffle down vertically into the slot within the back and right panel
and fix the position. Then slide the sitting bench on it horizontally and fix it with
screws. Then fixes the backrest onto the back panel with screws. (Figure B-4)
(Figure B-4: Sitting Baffle and Bench)

10
Kylin Sauna User Manual www.kylinaustralia.com.au
Notes:
•During the process of installing the sitting bench, make sure that all
wires (mentioned below) and connecting plugs pass through the
corresponding holes in the rear panel. (Figure B-5)
•Connect all wires and connectors to the appropriate sockets on the
rear panel. Make sure all plugs are securely connected.
(Figure B-5: Connecting Wires)
5. Front Panel
Align the front panel with floor panel’s corresponding battens, and then screw it
with the left board respectively. (Figure: B-6)
(Figure B-6: Front Panel)
Table des matières


