Kogan KGNDRVCA Manuel utilisateur


Safety Information
9. Do not defeat the safety purpose of the polarized
or grounding - type plug. a polarized plug has two
blades with one wider than the other. A grounding
type plug has two blades and a third grounding
prong. The wide blade or third prong is provided
for your safety. If the provided plug does not fit
into your outlet, consult an electrician for
replacement of the obsolete outlet.
The lightning flash with arrowhead symbol
within an equilateral triangle is intended to
alert the user to the presence of uninsulated
"dangerous voltage" within the product's
enclosure that may be of sufficient
magnitude to constitute a risk of electric
shock to persons.
10. Protect the power cord from being walked on or
pinched particularly at plugs, convenience
receptacles, and the point where they exit from
the apparatus. If the power cord is damaged, it
must be repaired by a qualified repairer.
11. Only use attachments/accessories specified by
the manufacturer.
12. Use only with the cart, stand, tripod, bracket or
table specified by the manufacturer, or sold with
the apparatus. When a cart is used, use caution
when moving the cart/apparatus combination to
avoid injury from tip-over.
13. Unplug this apparatus during lightning storms or
when unused for long periods of time.
14. Refer all servicing to qualified service personnel.
Servicing is required when the apparatus has
been damaged in any way, such as power-supply
cord or plug is damaged, liquid has been spilled
or objects have fallen into the apparatus, the
apparatus has been exposed to rain or moisture,
does not operate normally, or has been dropped.
15. The apparatus shall not be exposed to dripping or
splashing and no objects filled with liquids, such
as vases, shall be placed on the apparatus.
16. The mains plug or an appliance coupler is used
as the disconnect device, the disconnect device
shall remain readily operable.
17. Please read Rating Labels at the back of the
Sender and Receiver for power input and other
safety information.
The exclamation point within an equilateral
triangle is intended to alert the user to the
presence of important operating and
maintenance (servicing) instructions in the
literature accompanying the appliance.
WARNING: TO REDUCE THE RISK OF FIRE OR
ELECTRIC SHOCK, DO NOT EXPOSE THIS
APPLIANCE TO RAIN OR MOISTURE.
IMPORTANT SAFETY INSTRUCTIONS
To reduce the risk of electrical shock, fire, etc.:
1. Read these instructions.
2. Keep these Instructions.
3. Heed all Warnings.
4. Follow all instructions.
5. Do not use this apparatus near water.
6. Clean only with dry cloth. For stubborn stains,
use a soft cloth dampened with a weak solution of
mild detergent and water. Dry the apparatus
immediately afterwards with a clean cloth. Do not
use abrasive clothes, thinners, alcohol, or other
chemical solvents, because they may damage the
finish or remove the panel lettering.
7.Do not block any ventilation openings. The
ventilation shall not be impeded by covering the
ventilation openings with items, such as
newspapers, table clothes, curtains, etc.
8.Do not install near any heat source such as
radiators, heat registers, stoves, or other
apparatus (including amplifiers) that produce heat.

Contents
Package Content 2
Internet Radio Quick start Guide 3
What you need before you can use your Internet Radio ......................................................3
Unit Top and Back Overview..............................................................................................4
Unit Front Overview............................................................................................................5
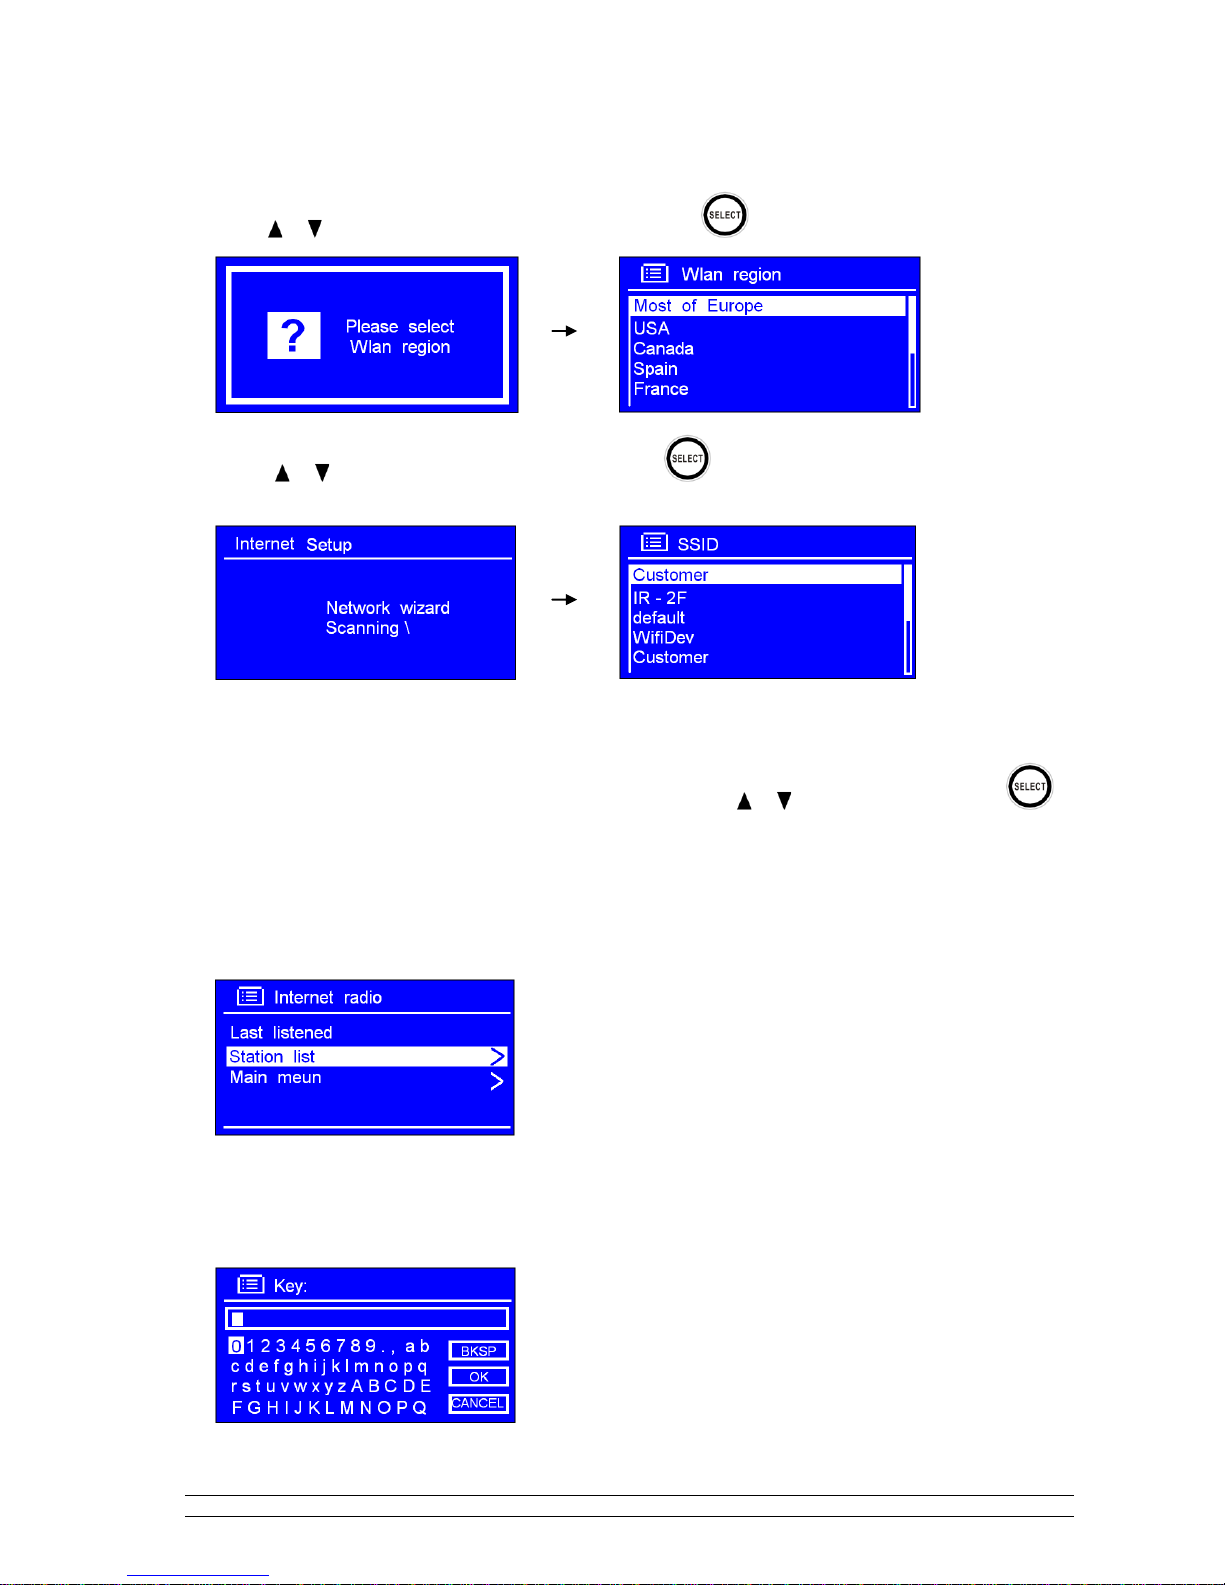
Setup Wizard .......................................................................................................................6
Select a Station through Podcasts ......................................................................................16
Get Access Code................................................................................................................16
Add Station to ‘My Favourites’ .........................................................................................17
Add Station to ‘My Added Stations’.................................................................................18
Changing the Station Information......................................................................................19
Station Updates..................................................................................................................19
Music Player Mode............................................................................................................20
DAB Mode ........................................................................................................................21
FM Mode...........................................................................................................................24
Setting Station Presets .......................................................................................................25
Selecting a Preset Station...................................................................................................25
iPod Mode..........................................................................................................................26
AUX IN Mode...................................................................................................................27
Sleep Function ...................................................................................................................28
Setting Clock .....................................................................................................................29
Daylight Savings................................................................................................................30
Setting Alarm.....................................................................................................................31
General Operation 34
Return to Main Menu.........................................................................................................34
Adjust Volume Level.........................................................................................................34
Browse Station Information...............................................................................................34
System settings 35
Equaliser............................................................................................................................35
Network setup....................................................................................................................35
Contrast (Setting Backlight Level) ....................................................................................36
Language ...........................................................................................................................37
Factory Reset.....................................................................................................................38
Software Updates...............................................................................................................39
Enter Setup Wizard............................................................................................................40
SW Version and Radio ID .................................................................................................40
Appendix 41
Step 1: Set Up Media Sharing in WMP 11........................................................................41
Step 2: Play Music on the Internet Radio ..........................................................................42
Set Up Media Sharing in MAC OS....................................................................................43
Troubleshooting 44
Specification 45

2
Package Content
Main unit
Remote

3
Internet Radio Quick start Guide
What you need before you can use your Internet Radio
LAN Setting:
Spare Ethernet port on your modem router (an ADSL or Cable broadband internet connection is
highly recommended).
Wireless LAN Setting:
A wireless access point (Wi-Fi) connected to your broadband Internet connection.
If your wireless network is configured to use Wired Equivalent Privacy (WEP) or Wi-Fi Protected
Access (WPA) data encryption then you need to know the WEP or WPA code so you can get the
Internet Radio to communicate with the network.
If your wireless network is configured for trusted devices you will need to enter the Radio‟s MAC
address into your wireless access point‟s configuration settings. To find the Radio‟s MAC address
use menu items as follows:
Main menu System settings Network View settingsMAC Address
To enter the MAC address into your wireless access point, you must read the instructions
supplied with the wireless access point.
Before you continue, make sure that your wireless access point is powered up and connected to your
broadband internet connection, or your LAN cable is connected.

4
Unit Top and Back Overview
Unit Top Overview
Unit Back Overview

5
Unit Front Overview
keys
All mode
Press to turn Radio on/off.
(Or when alarm is coming, press to cut it off.)
Press to adjust volume level.
Press to access main menu and other options.
DAB and FM mode use only: press to scan stations.
Music player and iPod mode use only:
Press or to change tracks, Press to play or pause.
Press and hold to store preset stations.
Press to load the stored stations.
Press to display Queue information,
(in AUX IN mode, this button is out of service)
Press to change modes between Internet, Music player, DAB, FM, iPod and AUX IN mode
in turn.
Press or to scroll left and right. Press or to scroll up and down.
(Press to return to previous menu page.)
Press to confirm.
(Or when alarm is active, press to Snooze)

6
Setup Wizard
Step 1 - Power up
1. Connect to your Internet Radio to a power point and ensure the power LED is lighting up. Extend the
antenna.
2. When connected to power, device can be switched on or off by pressing . For initial use, it will
ask you to follow the „Setup wizard‟.
Step 2 –Setup wizard
1. Continue above as show. Press to confirm „YES‟, and then press or to your preferred hour
format. Press to confirm. While cursor point to „Update from Network‟, and then press
to confirm.
2. Press or to your local „timezone‟, and then press to confirm. Press or to select the
„Daylight saving‟status, and then press to confirm.

7
3. Press or to your local „WLAN region‟, and then press to confirm.
4. Press or to your preferred network „SSID‟, press to confirm. Radio will save this WiFi
access point in memory.
Note: In some cases radio may find more than one network. Press or to your favourite one, press to
confirm.
5. If your network is not configured to request a password (WEP/WPA), radio will connect to the network
and display:
6. If a WEP/WPA key (password) is required, radio will ask you to input the WEP/WPA code and display
the password entry screen as follows:

8
Press or to cycle through the alphanumeric character list, press to select an appointed
character.
Note: WEP/WPA pass codes are case-sensitive.
If you make a mistake while entering your password, select „ ‟ to delete a
character.
Note:a.> = Backspace.
b.> Method for selecting , or : while cursor points to ‘ ’, press , and you
can select , then press you can select or in turn.
c.> If you select , you will be returned to previous track.
d.> Radio will automatically save the WEP/WPA password you have entered.
e.> After selecting the final character of your password, press or to , and then press
to confirm.
7. Press to exit.
The WiFi setup is complete!
Table des matières
Autres manuels Kogan Radio


