Kodak WMS801 Manuel utilisateur

KODAK Motion Sensor WMS801
For detailed user manual, please download
from our website :
www.be-connected.com
Quick Installation Guide
Kurzanleitung
Guía de Instalación Rápida
Manuel d’installation
Snelstartgids

TWO YEARS LIMITED WARRANTY
LIZ INVEST (the “Company”) warrants the KODAK Security
Camera, KODAK Smart Alarm System and KODAK Accessories
(the “Product”), and only the Product, against defects in materials
and workmanship under normal use for a period of two-years
from the date of purchase by the original purchaser (“Warranty
Period”).
• When a Product is replaced, any replacement item becomes
your property and the replaced item becomes Company
property.
• When a product is replaced, this does not extend the warranty
duration. The warranty only starts when the first product was
originally purchased and will end within two years after the
purchase of the original/first product.
• Any products purchased from other distributors, retail stores, or
online stores must be returned to the original purchased place
within the warranty period. Please contact your reseller for
warranty services.
• It is your responsibility to backup any information, data, or other
items you may have stored on the Product. LIZ INVEST will not be
responsible for any such damage or loss.
• For any technical support, visit our website www.be-connect-
ed.com to download complete user manuals, views installation
videos or check FAQ. You can contact us through

Authorized representative:
David Haddad, President
David Haddad
24-Apr-2017
MAINTENANCE, CLEANING AND RECYCLING
- Always unplug the product from the mains before carrying out
any maintenance.
- Never use abrasive or corrosive substances to clean the
products.
- Use a soft, slightly damp cloth.
- Never use an aerosol to spray the product as this may damage
the internal workings.
to which conformity is declared:
EN61000-3-2:2006 +A2: 2009 ; EN61000-3-3: 2013
EN 301 489-1 V1.9.2; EN 301 489-3 V1.6.1
EN300 220-1 V2.4.1; EN300 200-2 V2.4.1
EN60950-1: 2006+A11: 2009 + A1:2010 + A12: 2011 + A2:2013
EN62321:2009
References to the relevant harmonised standards used or
references to the other technical specifications in relation
This logo indicates that devices which are no longer in
use must not be disposed of as household
waste.They are likely to contain hazardous substances
which are dangerous to both health and the
environment.Return the equipment to your local
distributor or use the recycling collection service
provided by your local council.
Liz Invest SAS, 10 Route de Lalande, 33450 Montussan,
FranceDeclare under our own responsibility that the
product WMS801 complies with :
EMC Directive
Low Voltage Directive
Red Directive
RoHS Directive
(2004/108/EC)
(2006/95/EC)
(1995/5/EU)
(2011/65/EU)

GETTING STARTED EN
PLEASE READ THESE INSTRUCTIONS CAREFULLY
BEFORE USING THIS PRODUCT AND KEEP THIS MANUAL
FOR FUTURE REFERENCE.
This Motion Sensor is only compatible with KODAK
Security App and KODAK Connect App.
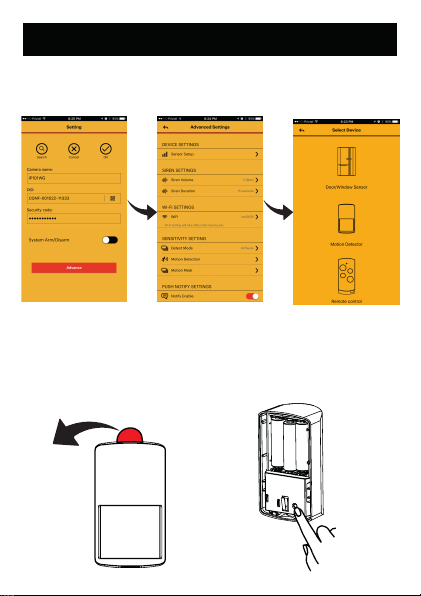
Pair the Motion Sensor with KODAK Connect :
1. Launch the KODAK Connect App.
2. Tap the '+' icon to addnew device.
3. Choose «MotionSensor»andname it.
To be Followed on step 4
EN
Pair the Motion Sensor with KODAK Security
1. Launch the KODAK Security App.
2. Under Camera Advanced Setting, tap «Base Settings».
3. Choose «Sensor Set up», press «+» and select the device.
4.a Auto Pairing Method :
After pressing «pair» button on
the application, remove the
insulating plastic tab to send
out the pairing signal orremove
and reinstall the battery.
4.b Manual Pairing Method :
After pressing «pair» button on
the application, press the
'Pairing' button located inside
the battery compartment.

1.Installing the Motion Sensor :
Use the double-sided tape to fix the motion sensor onto
the wall.
Note :
To conserve battery power, the Motion Sensor will
be temporarily deactivated for 2 mins after every
trigger event. This is also good for controlling the
unnecessary push notifications receiving on your
mobile device.
Please read the following items before installation
to ensure maximum coverage of a monitored.
ENHOW TO INSTALL
Mounting :
The thick double-sided tapes
are for flat wall mount use.
The thin double-sided tapes
are for corner install use.

1.
and entry points where intruders may likely
passing through.
2 / 2.5 meters
2. The Motion Sensor monitors movements up to 10
meters away, with 110 degrees detection angle. Make
sure the Motion Sensor is angled facing with the least
obstructions for best coverage.
3. It is recommanded to
place the Motion Sensor
in the corner of the
room and between2 to
2.5 meters from the
floor.
ENHOW TO INSTALL
10 meters
110 degrees detection angle

1. Starten Sie die “KODAK Security App” oder “Kodak
Connect App”.
2. Tippen Sie auf das <+> -Icon und fügen Sie den neuen
Sensor folgendermaßen hinzu:
I. KODAK Connect App: Home / Gerät hinzufügen
II. KODAK Security App: Erweiterte / Sensor-Einrich-
tung / Sensor hinzufügen
3. Wählen Sie <Bewegungsmelder> und geben Sie ihm
einen Namen.
Einrichtung überprüfen: Wenn das Koppeln abgeschlossen
ist, drehen Sie den Bewegungsmelder zur Wand hin, wo keine
Bewegungen erfasst werden und warten Sie einige Minuten,
bis der Sensor die Bedingungsanalyse abgeschlossen hat.
Wedeln Sie mit der Hand vor dem Sensor und Sie erhalten
eine Benachrichtigung auf Ihr Mobilgerät, falls die App und
der Sensor korrekt installiert wurden.
4. a.Automatisches
Koppeln:
Isolierende Schutzfolie
entfernen, um das
Koppel-Signal zu senden
4. b.Manuelles Koppeln:
Batterie entfernen und
wieder einsetzen. Drücken
Sie die <Pairing>
-Taste auf der
Rückseite der
bewegungsmelder,
um das Koppel-
Signal zu senden.
DE
So richten Sie den Bewegungsmelder ein

HINWEISE:
• Der Bewegungsmelder entdeckt Bewegungen in bis zu 10
Metern Entfernung in einem 110-Grad-Winkel.
• Es empfiehlt sich, den Bewegungsmelder in der Ecke des
Raumes und 2 bis 2,5 Meter vom Boden entfernt anzubrin-
gen.
• Für weitere Informationen besuchen Sie bitte unsere
Website www.be-connected.com/support/.
• Dieser Bewegungsmelder ist nur kompatibel mit der KODAK
Security App und KODAK Connect App.
• Automatisches Koppeln ist zum erstmaligen Koppeln
gedacht; bitte nutzen Sie Manuelles Koppeln, wenn Sie die
isolierende Schutzfolie vor dem Einrichten und dem
Zurücksetzen des Systems (alle Einstellungen zurücksetzen)
bereits entfernt hatten.
• Um die Batterie zu schonen, wird der Bewegungsmelder
nach jedem Trigger-Ereignis für 2 Minuten deaktiviert.
So installieren Sie den Bewegungsmelder
Bringen Sie das doppelseitige Klebeband oder die Halterung
an, um den Bewegungsmelder an der Wand zu befestigen.
Breite doppelseitige Klebestreifenzum
flachen Anbringen an der Wand
Schmale doppelseitige Klebestreifen
zum Anbringen in einer Ecke
DEHINWEISE:

1. Inicie la aplicación “KODAK Security” o“Kodak
Connect”
2. Toque el ícono <+> para agregar un Nuevo sensor con
el siguiente paso:
I. Aplicación KODAK Connect: Inicio / Agregar
dispositivo
II. Aplicación KODAK Security: Avanzado / Configura-
ción de sensor / Añadir sensor
3. Escoja <Detector de movimiento> y póngale un nombre
Verificando la Configuración: Después de completar el
emparejamiento, ubique el sensor de movimiento sobre la
pared donde el movimiento no pueda ser detectado, espere
unos minutos a que el sensor complete el análisis de
condición. Agite su mano frente del sensor y usted recibirá
una notificación de alerta del dispositivo móvil si usted ha
instalado la aplicación y el sensor de manera correcta.
4. a.Método de Empareja-
miento Automático:
Remueva la pestaña
plástica aislante para
enviar la señal deempareja-
miento
4. b.Método de Empareja-
miento Manual:
Remueva y reinstale la batería.
Presione el botón
<pairing> en la
parte posterior
de la sensor
de movimiento
para enviar la
señal de
emparejamiento.
ES
Configuración del Sensor de Movimiento
Table des matières
Autres manuels Kodak Accessoires

Kodak
Kodak D-31 Manuel utilisateur

Kodak
Kodak i5800 Scanner Manuel utilisateur

Kodak
Kodak PPS600 Manuel utilisateur

Kodak
Kodak KAF-4320 Guide d'installation

Kodak
Kodak 70 Manuel utilisateur

Kodak
Kodak WSP801 Manuel utilisateur

Kodak
Kodak WDS801 Manuel utilisateur

Kodak
Kodak PPS100 Manuel utilisateur

Kodak
Kodak i30 Manuel


