KM H-K1 Manuel utilisateur

KM GROUP
(INTERNATIONAL) HOLDINGS CO.LTD
INSTRUCTION
MANUAL
KM Group (Japan) Co.Ltd
Japan Address: 1-14-27 Onna,Atsugi-shi,Kanagawa,Japan.243-0032
Tel : (81)50-3050-0609
Fax : (81)46-225-0360
E-Mail : km-jp@w3.dion.ne.jp
KM Technology (ShenZhen) Co.Ltd
China Factory Address : 2/F, BlockB NO.2 He Zhou An Le Industrial
Park,Xi Xiang Town, Baoan Shen Zhen, Guang Dong, China.
Tel : (86)755-27478892
Fax : (86)755-29655092
KM Group (International) Holdings Co.Ltd
KM RC Factory Co. Ltd
Hong Kong Address: Unit D, 12/F, Bold Win Ind’l Bldg.,
16-18 Wah Sing Street, Kwai Chung, N.T., Hong Kong
Tel : (852)3568 8058 Fax : (852)3568 8078
E-Mail : marketing@km-group.com.hk
Home-Page : www.
Home-Page : www.km-rc.com
KM Group (Thailand) Co.Ltd
Thialand Address : 78 Seri 4, Seri Suanluang, Prakanong 10240 Bangkok, Thailand
Tel : (66)8183 82378
E-Mail : pattayarc@gmail.com
www.km-rc.com

P. 2P. 1
BEFORE YOU START
KM H-K1 is a high quality pure racing 1/10 GP touring car and it’s not a toy!
Please follow the below steps before you start:
1. Keep out of children when you open the box
2. Beginners or rst builders should seek the advice of experienced modelers about the important points for assembly
3. Read throught the instruction manual carefully before opening the part’s plastic bag
4. Check all parts to nd out if there are missing parts
5. Follow the steps and orders in the instruction manual for assembly
6. If you nd out missing parts,defective parts or any problems in the open box condition,please contact your local
dealers or KM distributors immediately
Assembly Tips
1. Self-tapping screws cut threads into the plastic parts when being tightened.Do not use excessive force
when tightening the self-tapping screws because you may strip out the thread in the plastic.
2. Make sure all screws are properly tightened.Check them periodically.
3. Clean all ball-bearings to make sure them move very easily and freely.Check them periodically
4. The free movement of the moving parts is very important for the car performance
5. Seek advice from experienced drivers.
Safty Precautions
1. Keep out of children when operating the car
2. Be very careful when using tools or sharp accessories
3. Be careful when assembly because some parts may have sharp edge
4. Always switch on your transmitter before you switch on your receiver in the car.Always switch off
the receiver before switch off your transmitter
5. Always check the brakes/throttle/steering before starting your engine
6. Only operating outdoor since exhausts and fuel vapors are noxious to health
7. Keep hands and objects away from the engine and tune pipe after running the car because of
the extremely high temperature,only can touch it until it’s cool down
8. Never smoking when operating the car because the fuel is highly inammable
9. Do not run the car near real car,road,animals and people
10. Always disconnect the receiver battery after running
11. Only use model fuel for running the car
To prevent any serious personal injury or damage
to the public,please be responsible when operating the car!
Customer support
If you have any difculties,problems,or questions,please do not hesitate to
contact our KM distributor in your country or e-mail to: [email protected].
Also,please visit our web-site: www.km-rc.com to nd the latest news,set-up information,new option parts,and many more.
Note
■ We will be continually up-grading the H-K1 to even higher performance,the exact specications of the kit may vary.
We KM do reserve all right to change any specication without prior notice.
■ Now, please enjoy our 1/10 Scale Super Luxury Full Option 4WD GP Touring Car H-K1,
and wish you get all the great race results with the Pure Free Fighting (K1) Machine!!!

P. 2
►TOOLS &EQUIPMENT INCLUDED
►TOOLS REQUIRED
►EQUIPMENT REQUIRED
Transmitter
Foam Tyres Tape
KM Manifold &
Exhaust (KMP-2653S)
Bodyshell
( KMB-1668 )
Shock Pliers
( KMR -A035 )
20ml
60000 Silicone Oil 20ml
30,0000 Silicone Oil
Battery Charger
Air Filter
( KMR -A023 )
20ml
500 Silicone Oil
Hex. Wrench 1.5/2.0/2.5/3.0mm
( KMR-H15,H20,H25,H30 ) Nut 7.0mm (KMR-N70)
Ball End Hex 2.5/3.0mm
(KMR-B25,B30)
Phillips 4.0mm (KMR-F40)
Fuel Bottle
( KMR -A038 )
Clutch Nut Tool
( KMR -A033 )
Fuel Gun
(KMR-A001V3)
Glowplug Wrench
( KMR - GW01 )
Threadlock Glue
Receiver & Personal
Transponder Steering &
Throttle Servos Engine Starter Box &
Battery Pack Glowplug lgniter
Body Reamer
( KMR - BR01 )
Flywheel Tool &
Pinion Tools
( KMR -A036 )

P. 4
P. 3
1
2
3
4
5
5
1. FRONT GEAR DIFFERENTIAL
HK200 — Front Diff. Case
EVO2-201 — EVO2 Front Diff. Cover
EVO2-202F — EVO2 Red Steel Front Diff. Joint
HK203 — Big Bevel Diff. Gear
HK204 — Small Bevel Diff. Gear
HK205 — Diff. Shaft
HK207 — Big Bevel Diff. Gear Shims
HK208 — Small Bevel Diff. Gear Shims
x 1
x 1
x 2
x 2
x 4
x 2
x 2
x 4
HK209 — Outside Diff. Joint Shims
HK210 — Diff. Gear O-Ring
HK211 — Diff. Case O-Ring
EVO2-460-24T-P — EVO2 Plastic Front Diff. Pulley-24T
HK487 — D2 x 9.7 Pin
HK936 — FH M2 x 6
HK939 — FH M2.5 x 8
x 2
x 2
x 1
x 1
x 2
x 4
x 4
► Item No. ► Description ► Quantity ► Item No. ► Description ► Quantity
5
6
6
STEP ❺ - ❻
HK205
HK487
HK208
HK204
HK487
EVO2-202F
HK209
HK200
HK210
HK207
HK203
HK204
HK208
HK208
HK211
HK939
HK936
HK209
EVO2-202F
EVO2-460-24T-P
EVO2-201 HK210
H K 2 0 7
H K 2 0 8
BAG 1
Front Diff. Full Set
EVO2-218

P. 5
1. FRONT GEAR DIFFERENTIAL
12
3
4
5
6
STEP ❺ DETAIL
Use tweezers
to insert pin
CUTAWAY VIEW
+OIL
TIP
Fill in the silicone oil
up to the top of the
diff pins. DO NOT fill
the oil to the top of
the case.
!
+OIL
!
After disassembling the differential the large
O-ring may have an increased size and may
be more difficult to re-stall. We recommend
either replacing the O-ring or carefully
inserting the O-ring in the diff cover.
P. 4
Follow this order to
finish tightening the
screws.
Tighten the screws equally
but do NOT tighten them
completely.
❶
❹❷
❸
❶
❹
❷
❸
( FH M2 x 6 )
( FH M2.5 x 8 )

P. 6
P. 5
2. REAR GEAR DIFFERENTIAL
HK220 — Rear Diff. Case
HK221 — Rear Diff. Cover
EVO2-202R — EVO2 Red Steel Rear Diff. Joint
HK203 — Big Bevel Diff. Gear
HK204 — Small Bevel Diff. Gear
HK205 — Diff. Shaft
HK207 — Big Bevel Diff. Gear Shims
x 1
x 1
x 2
x 2
x 4
x 2
x 2
HK208 — Small Bevel Diff. Gear Shims
HK209 — Outside Diff. Joint Shims
HK210 — Diff. Gear O-Ring
HK211 — Diff. Case O-Ring
HK487 — D2 x 9.7 pin
HK939 — FH M2.5 x 8
x 4
x 2
x 2
x 1
x 2
x 4
EVO2-202R
HK939
HK209
HK487
HK221
HK210
HK211
HK207
HK203
HK205
HK204
HK203
HK208
HK208
HK220
EVO2-202R
HK487
2
1
3
4
5
6
► Item No. ► Description ►Quantity ► Item No. ► Description ► Quantity
HK209
HK210
HK207
HK204 HK208
BAG 2
5
6
STEP ❺-❻ DETAIL
Rear Diff. Full Set
HK228

P. 7
2
1
3
4
5
6
+OIL
1
2
3
4
+OIL
STEP ❺ DETAIL CUTAWAY VIEW
!
After disassembling the differential the large O - ring
may have an increased size and may be more difficult
to re-stall. We recommend either replacing the O - ring
or carefully inserting the O - ring in the diff cover.
Tighten the screws
equally but do
NOT tighten them
completely.
Follow this order
to finish tightening
the screws.
2. REAR GEAR DIFFERENTIAL
P. 6
TIP
Fill in the silicone oil up
to the top of the diff pins.
DO NOT ll the oil to the
top of the case.
Remove the nozzle of the
silicone oil bottle to allow
easy lling of the diff.
!
Rear Diff. Full Set
( FH M2.5 x 8 )

P. 7
3. FRONT SHOCK x2
HK301 — Shock Absorber
HK302 — Alum. Upper Shock Cap
HK303 — Shock Head Ball End
HK304F — Front Shock Piston
HK305F — Front Shock Shaft
HK306 — Alum. Shock Body
HK307 — O-Ring Slims
HK308 — Alum. Spring Adj Nut
HK309 — Alum. Lower Shock Cap
HK310F — Front Lower Spring Cap
x 1
x 1
x 1
x 1
x 1
x 1
x 2
x 1
x 1
x 1
HK311 — Shock O-Ring
HK312 — Shock Piston Shim
HK313 —Adj. Nut O-Ring
HK321 — Front Shock Spring
HK536B — Link Plastic 17.5mm
HK850S — Ball Universal 5.8mm Hex (Short)
HK850L — Ball Universal 5.8mm Hex (Long)
HK905 — BH M3 x 12
HK951 — M2.5 Nut
x 2
x 1
x 1
x 1
x 1
x 1
x 1
x 1
x 1
HK536B
HK310F
HK321
HK309
HK308
HK313
HK307
HK306
HK312
HK311
HK951
HK300F
HK305F
HK850S
HK304F
HK301
HK302
HK303
HK850L
BAG 3
BAG 4
ASSEMBLED VIEW
1 2 3 4
+OIL
!
!
!
!
!
NOTE THE LENGTH
NOTE DIFFERENT
► Item No. ► Description ►Quantity ► Item No. ► Description ► Quantity
NOTE DIFFERENT
NOTE DIFFERENT
NOTE THE LENGTH

P. 8
4. REAR SHOCK x2
HK536B HK310R
HK331
HK309
HK308
HK313 HK307
HK306
HK312
HK311
HK300R
HK951
HK305R
HK850S
HK304R
HK301
HK302
HK303
HK850L
HK301 — Shock Absorber
HK302 — Alum. Upper Shock Cap
HK303 — Shock Head Ball End
HK304R — Rear Shock Piston
HK305R — Rear Shock Shaft
HK306 — Alum. Shock Body
HK307 — O-Ring Slims
HK308 — Alum. Spring Adj. Nut
HK309 — Alum. Lower Shock Cap
HK310R — Rear Lower Spring Cap
x 1
x 1
x 1
x 1
x 1
x 1
x 2
x 1
x 1
x 1
HK311 — Shock O-Ring
HK312 — Shock Piston Shim
HK313 —Adj. Nut O-Ring
HK331 — Rear Shock Spring
HK536B — Link Plastic 17.5mm
HK850S — Ball Universal 5.8mm Hex (Short)
HK850L — Ball Universal 5.8mm Hex (Long)
HK902 — BH M3 x 6
HK951 — M2.5 Nut
x 2
x 1
x 1
x 1
x 1
x 1
x 1
x 1
x 1
BAG 5
BAG 6
ASSEMBLED VIEW
1 2 3 4
+OIL
!
!
!
!
!
NOTE THE LENGTH
NOTE DIFFERENT
► Item No. ► Description ►Quantity ► Item No. ► Description ► Quantity
NOTE DIFFERENT
NOTE DIFFERENT
NOTE THE LENGTH
P. 9
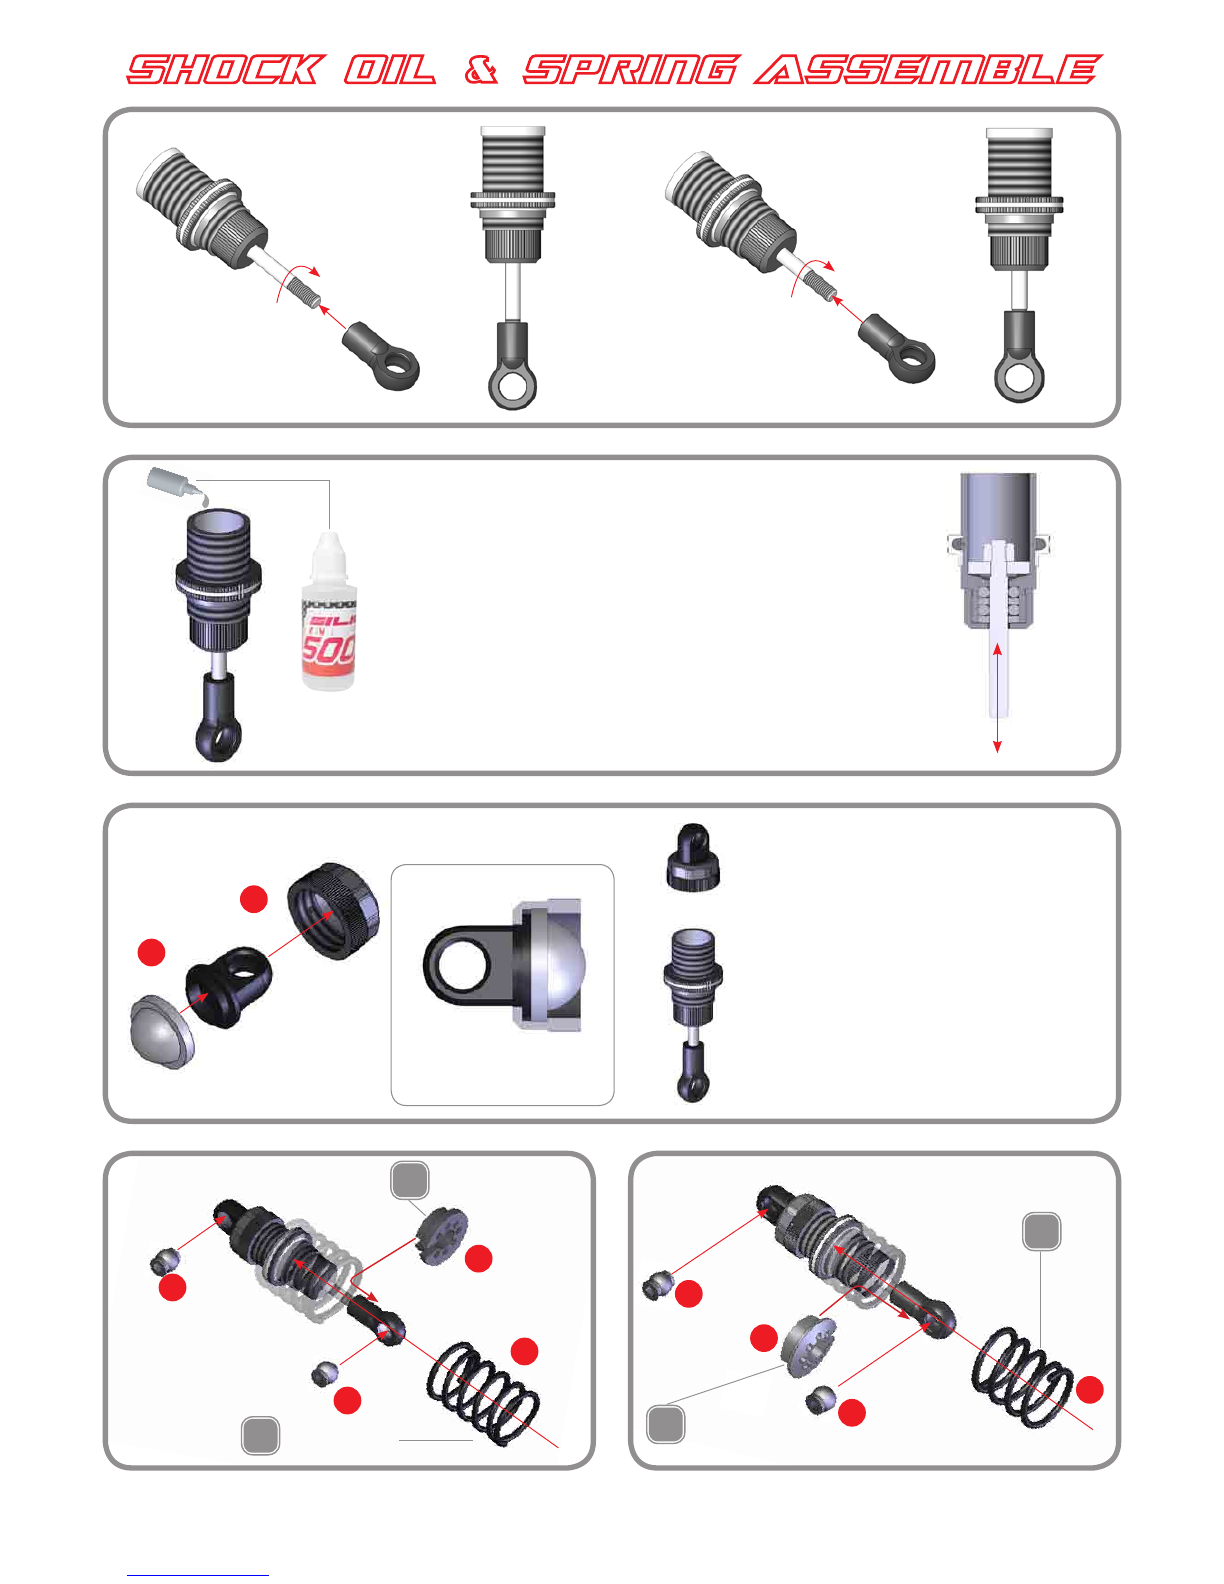
SHOCK OIL &SPRING ASSEMBLE
SHOCK OIL FILLING
❶ Fully extend the piston rod so the piston is at the bottom of the shock body.
❷ Hold the shock upright and slightly overll the shock body with shock oil.
❸ Let the oil settle and allow air bubbies to rise to the top. Slowly move
the piston up and down until no more air bubbies appear. Add shock oil
as necessory.
❹ Pull the piston rod most of the way out of the shock body. Let the shock
rest for 5 minutes to allow the air bubbles to escape.
* When installing the shock cap assembly on the shock
body, some oil will leak out.... this is normal.
* Fully tighten the cap and clean off any excess oil.
* After the shock is assembled, the shock rod will push
itself out of the shock body fairly quickly.
❶ Insert the shock ball end into
the shock cap.
❷Insert the absorber properly
into the slot.
CUTAWAY VIEW
# 500 Silicone Oil
1
1
1
2
2
33
33
2
Rear Shock Front Shock
Front Shock
Rear Shock
!
!
!
!
NOTE DIFFERENT
NOTE DIFFERENT
NOTE DIFFERENT
NOTE DIFFERENT
Autres manuels pour H-K1
2
Ce manuel convient aux modèles suivants
1
Table des matières
Autres manuels KM Jouet


