KlisLite 40IR-OSD Manuel utilisateur

with OSD MENU
(On-Screen Display)
OPERATION MANUAL
For Box camera, Dome camera & Waterproof IR camera
(OSD Menu Optional)
Thanks for purchasing our product, before operating the unit, please read the
instructions carefully and keep this manual for future reference.
KLIS Lite COLOR CAMERA

Table of Contents
■Features
1. Features------------------------------------------------------------ 1
2. Cautions ----------------------------------------------------------- 2
3. Configurations---------------------------------------------------- 3
4. Menu Contents--------------------------------------------------- 5
5. Settings------------------------------------------------------------- 6
6. Specifications----------------------------------------------------- 16
Horizontal Resolution 450/520 TV Lines
Clear image quality has been achieved by
employing a SONY CCD, which provides a
horizontal resolution of 450 or 520 TV lines.
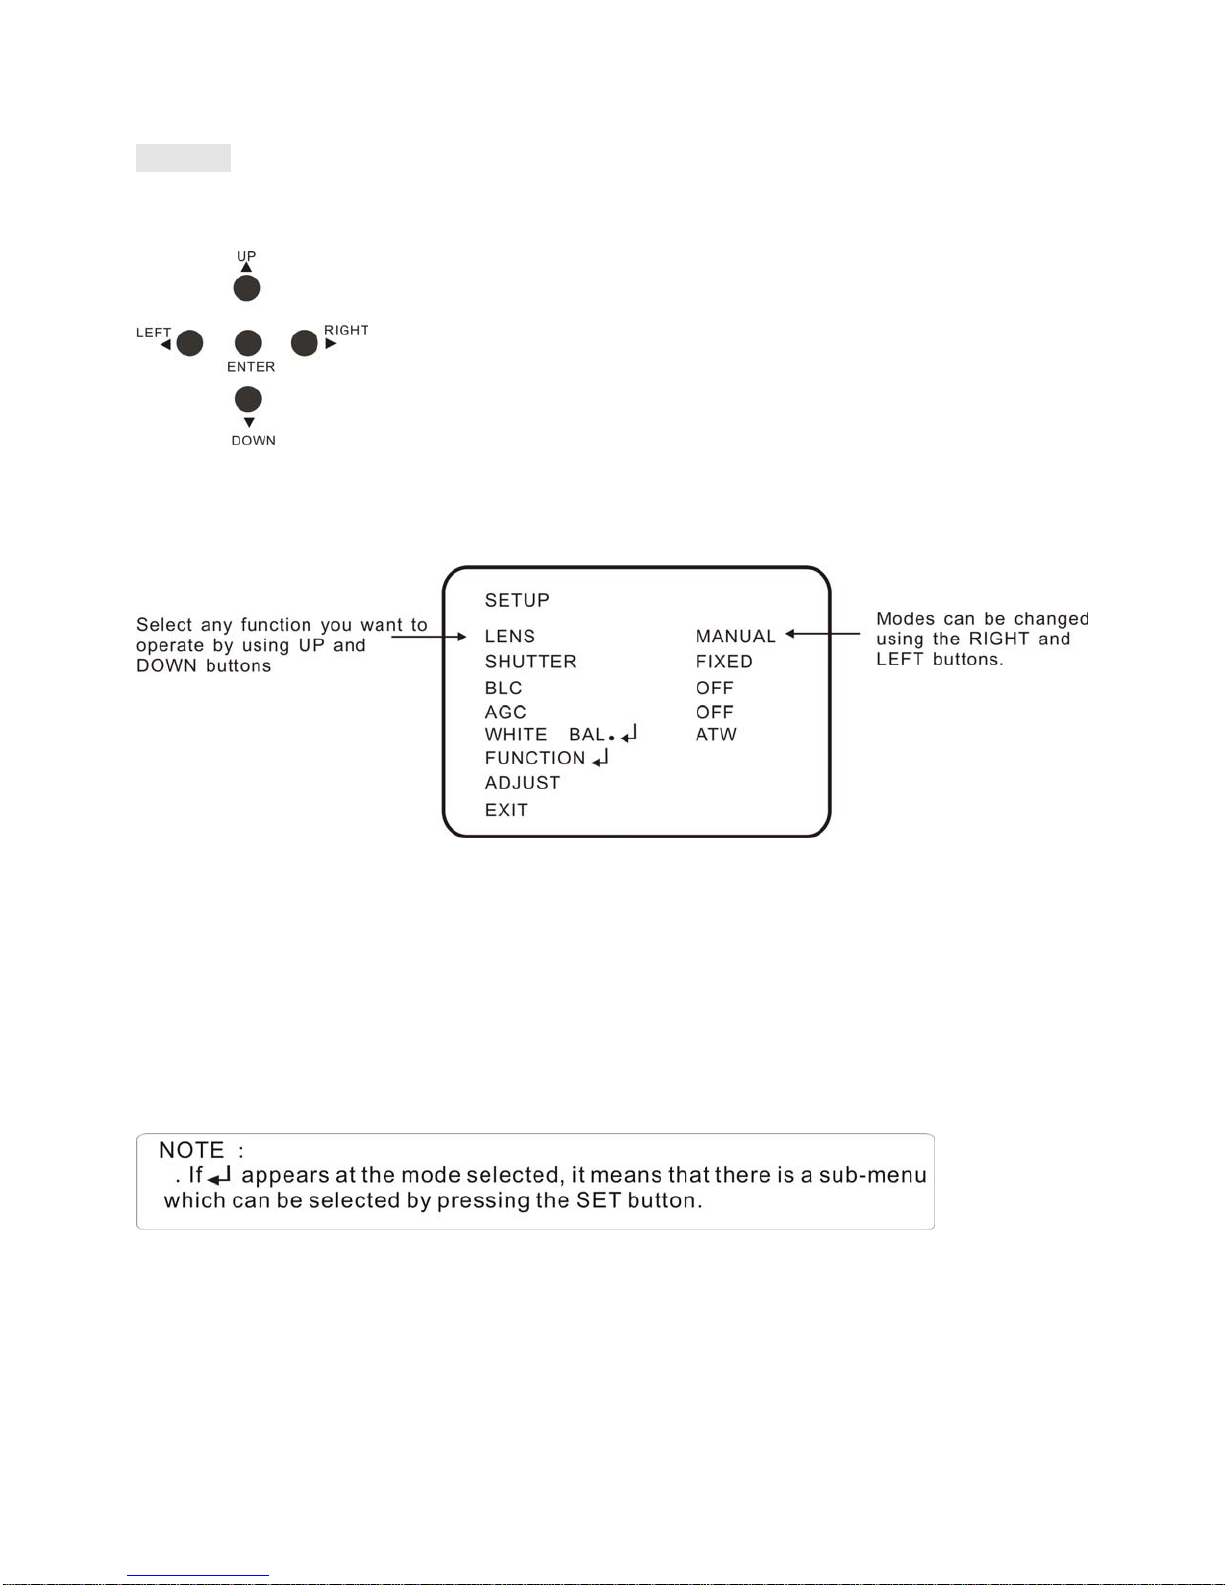
OSD Menu
The camera can be controlled by the On-
Screen Display Menu
Privacy Function
Unique Privacy function, the privacy function
can conceal up to 4 areas where you do not
wish to appear on the screen.
Motion Detection
Unique Motion Detection function, this function
allows you to detect the motions in the selected
area, when any motion is detected, the
selected area will alarm by flickering on the
screen.
DNR (Digital Noise Reduction)
The amount of low illuminance noise has been
significantly reduced, and the signal-to-noise
ratio (S/N ratio) as well as horizontal resolution
have been improved, resulting in a clear and
sharp image even in the dark.
Manual adjust the electronic shutter
User can manually adjust the electronic shutter
between 1/50(60)~1/100,000(120,000) second.
Day & Night Switch
The camera has a function of Day/Night
Method, it provides Color image in full light
condition (Day) and provides B/W image in low
light condition (Night) to reach the best effect.
Additional Functions
The camera has Mirror function as well as
manually adjusting picture quality function
(Such as Contrast/Sharpness/Color etc.).

Cautions
1. Before installing and operating the unit, please read the manual carefully.
2. Precision components are contained in the camera, so please avoid violent vibration during the
course of transit, maintenance and installation. For the sake of safety, please do not connect to
power before installation completion.
3. Please abide by all the electric codes when using the unit.
4. Do not use corrosive or abrasive detergent for cleaning. Use lens paper or cotton stick with
alcohol to clean the sensor board.
5. Under no circumstances to direct the camera to the sunlight or strong light sources, in order to
avoid any damage to the lens and sensor.
6. Do not use the camera in situations beyond the rated operating temperature (-10~50ºC),
humidity (less than 85%) or power source.
7. In times of malfunction, do not attempt to dismantle and service the camera by yourself .
Please refer to qualified serving personnel to repair or contact our technical department to solve
the problems.
Notice:
Please make sure that the power satisfies the normal specification before connecting
the camera.

Configurations 1--Box Camera
Figure 1: Rear panel of box camera
1. Video Out: Composite video signal output
2. PL: Power indicator
3. Power input (DC 12V, please use regulated DC12V power supply.)
DC12V:connect Positive(+) and Negative(-) polar to the corresponding power terminals.
4. Auto Iris Connector (on the side)
5. DC and Video Drive Auto Iris Lens select switch.
Select the correct position of switch to match the Auto Iris Lens on the camera.
6. Button: Press these buttons to enter and adjust the menu.
7. LEVEL: Adjust Basic level for DC drive Lens
Auto Iris Connector
Figure 2: Auto iris Connector Jack
Pin Video Drive DC Drive
1 Power Damp-
2 Null Damp+
3 Video signal Drive+
4 Ground Drive-

Configurations 2--Dome Camera
Remove the dome cover first, the setting buttons are on the back panel of the camera
module.
Figure 3: Setting buttons of Dome camera
Configurations 3--Waterproof IR Camera
Remove the rear cover of the camera with anti-clockwise, the setting buttons will appear,
the rest of two screws are for adjusting zoom and focus of the varifocal lens inside.
Figure 4: Setting buttons of Waterproof IR camera

Menu Contents
SETUP MENU
LENS MANUAL
VIDEO
DC
SHUTTER AUTO
FLK
FIXED
MANUAL
BLC ON
OFF
AGC ON
OFF
WHITE BAL. ATW
AWB
FIXED
MANUAL
FUNCTION CAMERA ID
MIRROR
DAY NIGHT
MOTION
PRIVACY
GAMMA
LANGUAGE
RESET
ADJUST CONTRAST (0~255)
SHARPNESS (0~31)
CB_GAIN (0~255)
CR_GAIN (0~255)
EXIT

Settings
Settings can be made by the 5 buttons ENTER/UP/DOWN/LEFT/RIGHT.
1. Press the Enter button, the SETUP menu will display on the monitor.
2. Select a menu item from the list available by the UP or DOWN button.
3. Press the LEFT or RIGHT button to change mode.
* When the LEFT or RIGHT button is pressed, available values and modes will be displayed.
Please keep pressing the button until you get to the right mode.
4. Select 'EXIT' and then press the ENTER button to finish the setting.

1. LENS
This function is used to adjust the brightness of the screen.
1. When the SETUP menu is displayed on the screen, select 'LENS' by the UP or DOWN button.
2. Select the type of the lens setting by pressing the LEFT or RIGHT button.
MANUAL:When use Manual iris lens for the camera, please select
MANUAL.
DC: When use DC drive auto iris lens for the camera, please select DC.
VIDEO: When use Video drive auto iris lens for the camera, please select VIDEO.
DC LENS OPERATION
2. SHUTTER (Condition and Speed Control)
Auto or manual control can be selected.
1. When the SETUP menu is on the screen, select 'SHUTTER' by the UP or DOWN button.
2. Select the shutter mode by pressing the LEFT or RIGHT button.
AUTO: Auto control of the shutter speed is enabled. The shutter speed is controlled
automatically according to the brightness of the scene.
FIXED: Select fixed shutter speed from 1/50, 1/250,1/500,1/2000,1/5000,1/10,000, 1/100,000.
FLK: Select 'FLK' mode when flickering occurs on the screen due to an imbalance between
NOTICE:
• When using an auto iris lens on the box camera, please select the correct Auto iris lens selection
switch on the back of the camera (See No.5 in Figure 1), please select DC or VIDEO to match DC
drive or Video drive lens on the camera.
• For dome camera, the default is DC drive lens.
• The brightness of the screen can be adjusted in DC mode. The brightness can be adjusted within
the range of 0~255. The optimum level of brightness for the user can be achieved by adjustment.

illumination and frequency. PAL Model:1/100, NTSC Model: 1/120.
MANUAL: The shutter speed can be controlled manually.
3. Choose RETURN and press the ENTER button when the settings are completed.
3. BLC (Backlight Compensation)
When there is a strong backlight behind the object, clear images of the background as well as the
object can still be obtained by using the BACKLIGHT function.
1. Select 'BACKLIGHT' on the SETUP menu by the UP or DOWN button.
2. Select the value required by pressing the LEFT or RIGHT button.
OFF: BLC function is disabled.
ON: If select BLC ON, you can manually set BLC on part of the image or the whole image.
Select BLC AREA and press ENTER to enter Area setting, choose the area where you want to
set BLC manually and press ENTER to confirm the area (Once ENTER is pressed, the color of
the choosing area will change), repeat this step to choose the other areas. After finishing setting
the area, press ENTER button for 1second to the below menus:
1) ALL CLEAR: Clear all of the BLC setting.
2) ALL SET: Manually set BLC for the whole image
3) RETURN: Press RETURN back to the area setting.
4) EXIT: Return to the BLC RATIO menu after the area is set, menu, manually adjust
BLC Ratio from 0-63 grade.

4. AGC (Auto Gain Control)
1. Select 'AGC' on the SETUP menu by the UP or DOWN button.
2. AGC OFF: Turn off the AGC function.
3. AGC ON: Select the value required by pressing the LEFT or RIGHT button. The level of gain
increase makes the picture brighter but the level of noise will also increase.
Adjust the AGC Gain Grade from 0~255
5. WHITE BAL. (White Balance)
1. Select 'WHITE BAL' on the SETUP menu by the UP or DOWN button.
2. Select the required mode by the LEFT or RIGHT button.
Ce manuel convient aux modèles suivants
1
Table des matières


