
Keywish Hummer-Bot-1.0 Manuel utilisateur

Hummer-Bot-1.0
Instruction Manual
V.2.0
1
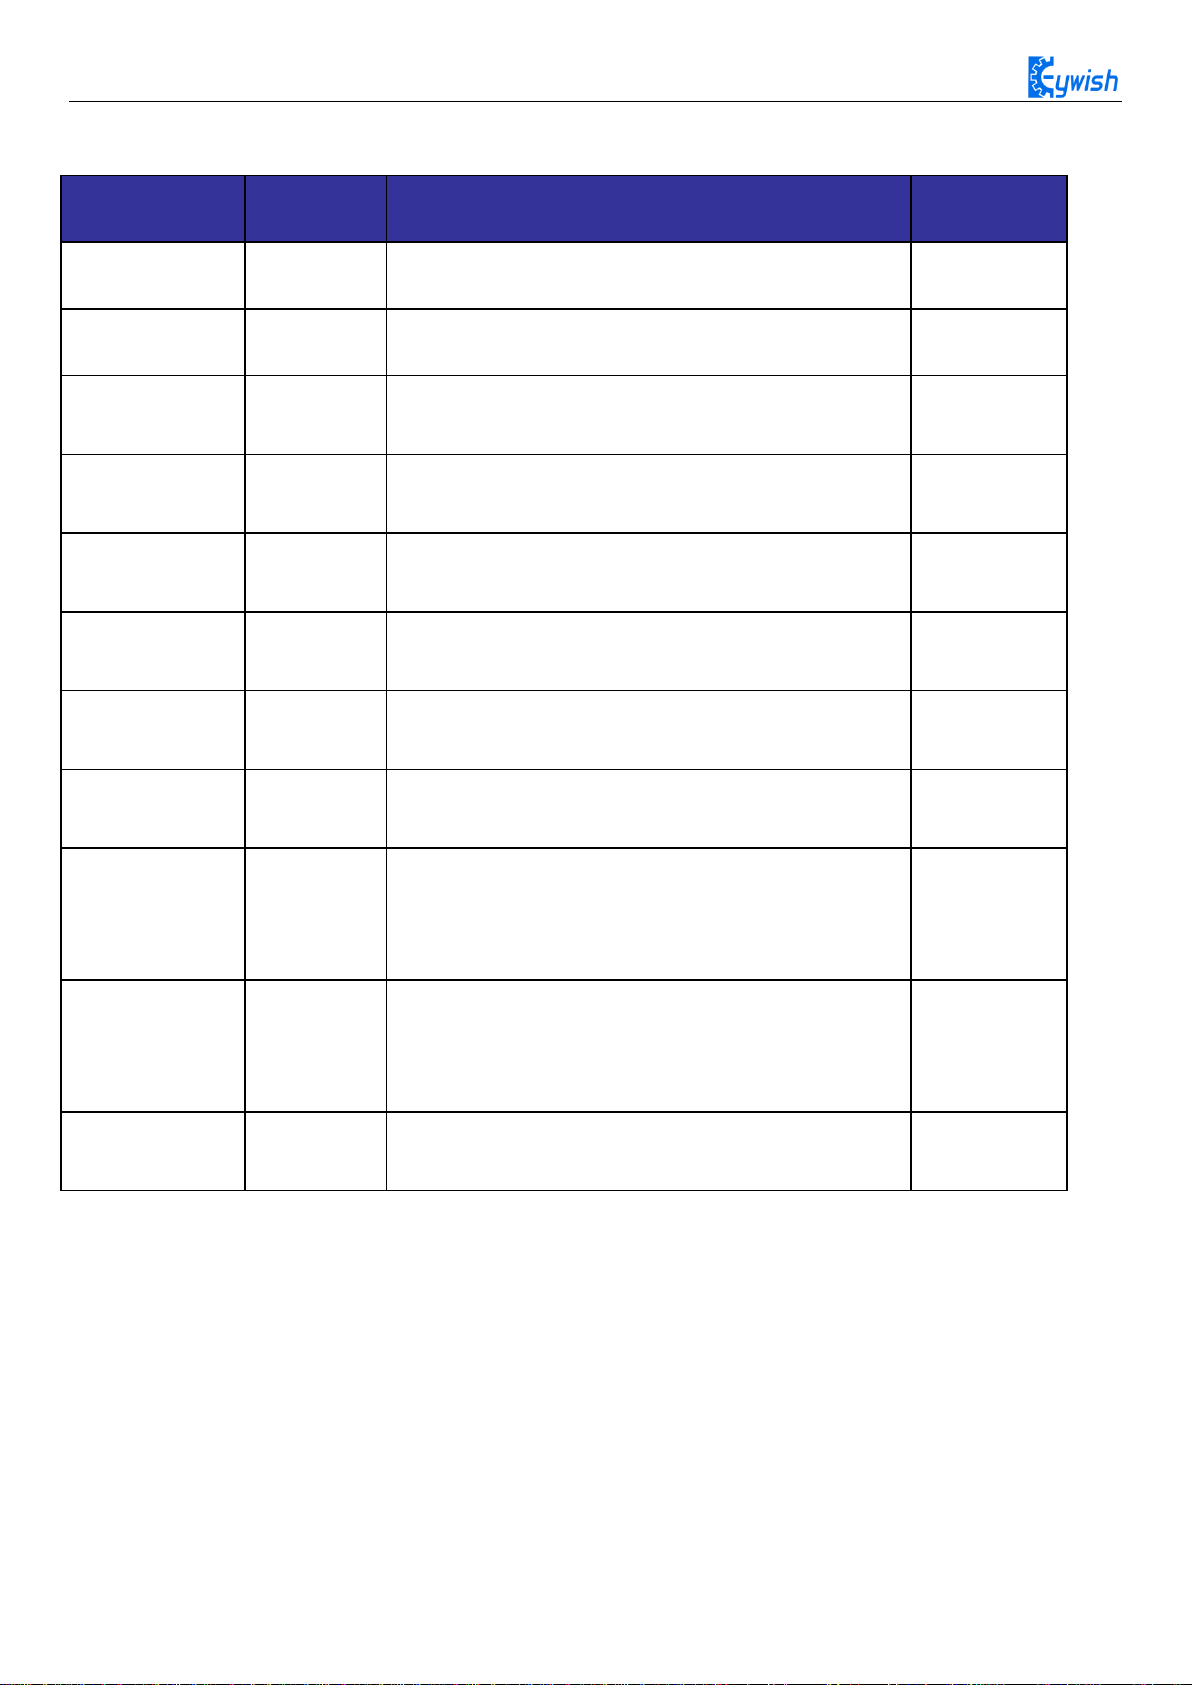
Data
Version
Description
Author
2017/9/16
V-1.0
Create
Baron.li
2017/9/23
V-1.1
modify
Ken.chen
2017/10/18
V-1.2
Review
Ken.chen
2017/11/15
V-1.3
Review
Zach.zhou
2017/12/8
V-1.4
Review
Baron.li
2018/3/11
V-1.5
Modifyir/blutooth module
Ken.chen
2018/4/20
V-1.6
Add device instructions
Baron.li
2018/5/3
V-1.7
Add installation details picture
Baron.li
2018/6/26
V-1.8
1. Fix Servo lib conflict with pwm
2. Review and fix some error
Luna/ken
2019/1/2
V-1.9
1. Installation modification
2. Bom modification
Carl
2019/1/9
V-2.0
Install and modify the acrylic sheets
Carl

2
Table Of Contents
Chapter1 Introduction........................................................................................................................................1
1.1 Writing Purpose...................................................................................................................................1
1.2 Product Introduction ............................................................................................................................1
Chapter2 Preparations........................................................................................................................................3
About Arduino uno r3................................................................................................................................3
2.1 Development environment Arduino IDE.............................................................................................4
2.1.1 Install the IDE...........................................................................................................................4
Chapter3 Experiments......................................................................................................................................13
3.1 Assembly of the Car...........................................................................................................................13
3.1.1 Motor installation....................................................................................................................13
3.1.2 Wheel and drive module installation ......................................................................................16
3.1.3 Tracking module installation ..................................................................................................19
3.1.4 Lower acrylic plate copper column installation and motor wiring.........................................21
3.1.5 Keywish Uno R3 board installation.......................................................................................23
3.1.6 Battery box installation...........................................................................................................24
3.1.7 Servo installation ....................................................................................................................25
3.1.8 Infrared obstacle avoidance module installation.....................................................................27
3.1.9 Voltage display module and DC head installation..................................................................28
3.1.10 Infrared remote control receiver installation.........................................................................30
3.1.11 Overall assembly...................................................................................................................31
3.1.12 Expansion board wiring diagram..........................................................................................32
3.2 Hummer Bot Module experiment......................................................................................................34
3.2.1 Walking Principle of the Car ..................................................................................................34
3.2.2 Infrared Obstacle Avoidance ..................................................................................................41
3.2.3 Infrared Tracing ......................................................................................................................52
3.2.4 Ultrasonic Obstacle Avoidance...............................................................................................62
3.2.5 Infrared Remote Control.........................................................................................................76
3.2.6 Mobile Phone Bluetooth Control............................................................................................88
3.2.7 PS2 Handle (Optional)............................................................................................................98

1
Chapter1 Introduction
1.1 Writing Purpose
The purpose of this manual is to create a fast, practical and convenient development learning platform
for the vast number of electronic enthusiasts and let them grasp the Arduino and its extended system design
methods and design principles, as well as the corresponding hardware debugging methods.
This manual will lead you to learn every function of "Hummer-Bot" step by step and open a new
"Hummer-Bot" journey for you. It is divided into two parts:
1. Preparation chapter, which mainly introduces the use of common Arduino development software and
some downloading and debugging skills.
2.Experiment chapter, which contains hardware and software. The hardware part mainly introduces the
functions and principles of each module; the software part mainly introduces each part of the program.
This manual is a specifications for "Hummer-Bot" , the file whose format is PDF which is in the CD
along with our product requires the corresponding software to open. It contains detailed schematic diagrams
and complete source codes for all instances, the codes won't have any mistake under our strict test. In
addition, the library files used in the source codes are put into the corresponding path, you only need to see
corresponding phenomenon of the car and personally experience the process of experiment by downloading
the source codes to Arduino via the serial port emulator.
This manual is very suitable for students and electronic enthusiasts to learn, all course videos will be
synchronized to https://github.com/keywish/keywish-hummer-bot,please real-time synchronization of the
latest information
1.2 Product Introduction
"Hummer-Bot" is a multifunctional car based on the Arduino UNO and L298N motor. Compared with
the traditional car, "Hummer-Bot" is also equipped with wireless control (Bluetooth, infrared, WIFI and so
on); ultrasonic; infrared. It can trace and avoid obstacles automatically, of course, makers can also
automatically control the car with wireless and make full use of each module, as well as integrate all kinds
of related sensors to make the car more intelligent, which is more challenging. "Hummer-Bot" has various
types of information, technical manuals, routines, etc., which can teach you step by step. Each electronic fan
can use it easily to achieve their desired function.
Product Features
◆Three groups of black line infrared tracing module
◆Two groups of infrared obstacle avoidance module
◆Ultrasonic obstacle avoidance
◆Four DC motor drive
2
◆Two 3000mZh, 3.7V rechargeable lithium battery with longer endurance
◆Remaining capacity of battery real-time detection
◆Infrared remote control
◆Bluetooth app control
◆PS2 handle control (optional)
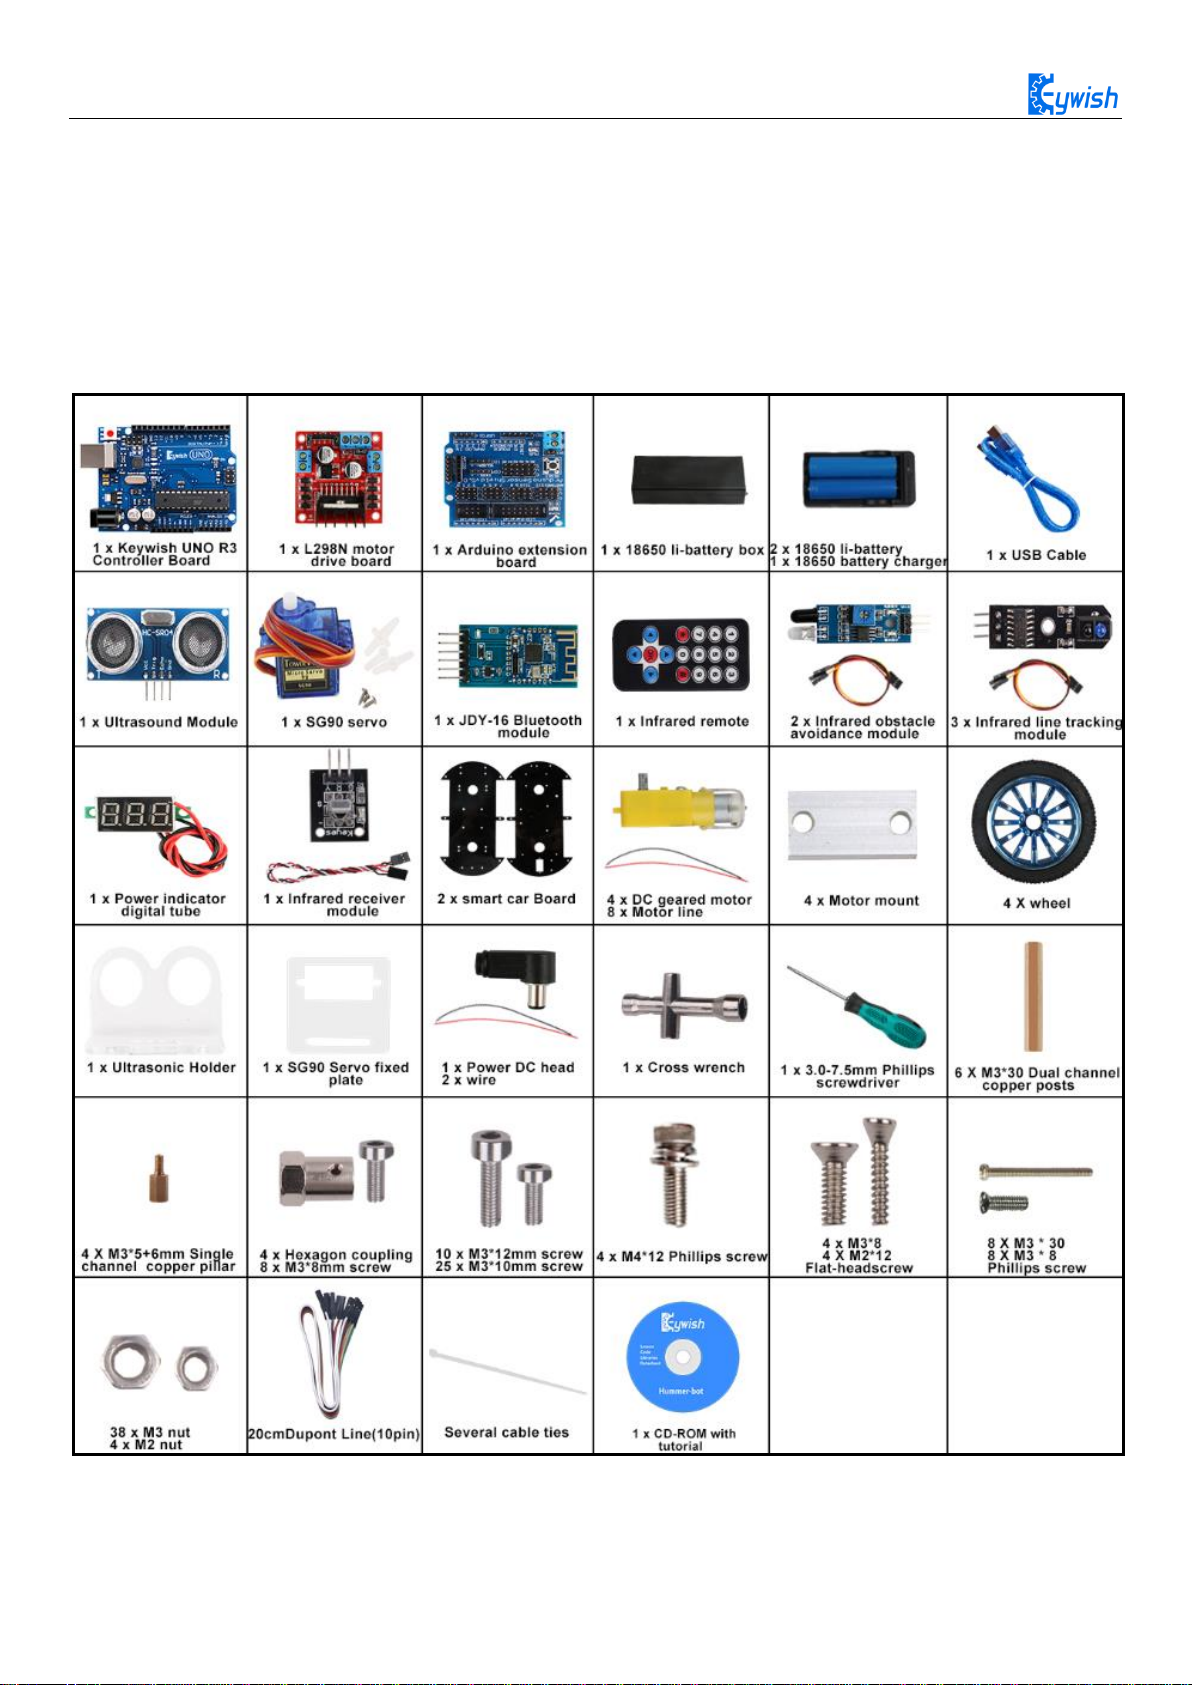
Product Device List

3
Chapter2 Preparations
About Arduino uno r3
In "Hummer-bot", we used the Arduino uno r3 as the main control board, which has 14 digital input/output
pins (6 of which can be used as PWM output), 6 analog inputs, and a 16 MHz ceramic resonator, 1 USB
connection, 1 power socket, 1 ICSP head and 1 reset button. It contains everything that supports the
microcontroller; You just need to connect it to a computer via a USB cable or start with an AC-DC adapter
or battery.
Technical specifications:
Working voltage: 5V
Input voltage: USB powered or external 7V~12V DC input
Output voltage: 5V DC output and 3.3V DC output and external power input
Microprocessor: ATmega328 (Chip data sheet is in the documentation)
Bootloader:Arduino Uno
Clock frequency: 16 MHz
Support USB interface protocol and power supply (without external power supply)
Support ISP download function
Digital I/O port: 14 (4 PWM output ports)
Analog input port: 6
DC Current I/O Port: 40mA
DC Current 3.3V Port: 50mA
Flash memory: 32 KB (ATmega328) (0.5 KB for bootloader)
SRAM :2 KB (ATmega328)
EEPROM:1 KB (ATmega328)
Size:75x55x15mm
4
2.1 Development environment Arduino IDE
2.1.1 Install the IDE
AduinoIDE is an open source software and hardware tool written by open source software such as Java,
Processing, and avr-gcc. It is an integrated development environment that runs on a computer. It can write
and transfer programs to the board. The major feature of the IDE is cross-platform compatibility for
Windows, MaxOSX, and Linux. Only a simple code base is needed, and the creators can create personalized
home internet solutions through the platform, such as remote home monitoring and constant temperature
control and so on.
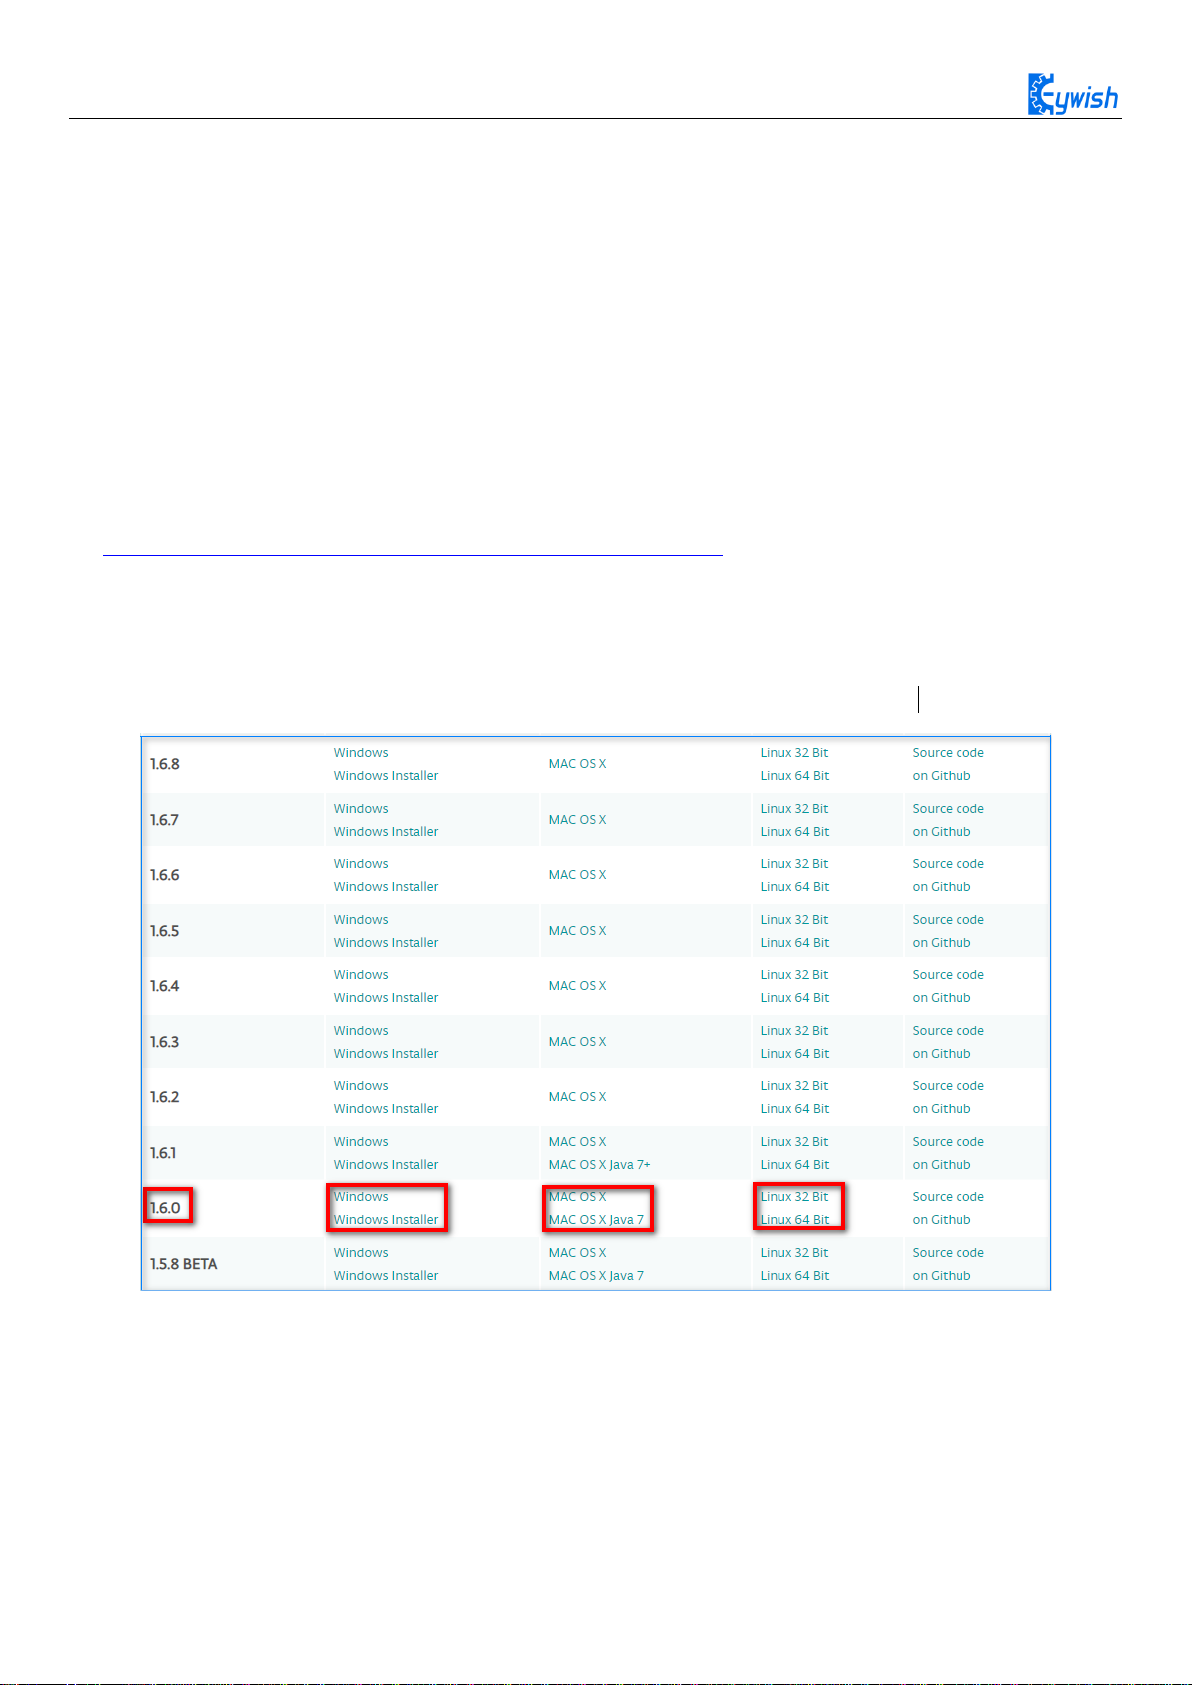
In this tutorial, we use the version is 1.6.0, download address
is:https://www.arduino.cc/en/Main/OldSoftwareReleases#previous,After opening the link, we can see the
interface as shown in Figure 2.1.1. In this interface, we can see the different versions of the IDE and
different operating environments. Everyone can download according to their own computer system, of
course, There will be a downloaded installation package on our companion CD, but only the Windows
version, because this tutorial is all running under Windows system.
Figure 2.1.1 ArduinoIDE download interface
After the downloading, we will get a compressed package as shown in Figure 2.1.2. The compressed
package will be decompressed. After decompression, the files in Figure 2.1.3 are extracted. The “drivers” is
the driver software. When the “Arduino.exe” is installed, it will be Install the driver automatically. Because
the installation of "arduino.exe" is very simple, it will not be explained here. It is recommended to exit the
anti-virus software during the installation process, otherwise it may affect the installation of the IDE. After

5
the installation is complete, click "arduino.exe" again to enter the IDE programming interface.
Figure 2.1.2 Arduino IDE Installation Package
Figure 2.1.3 Extracted files
When finish the installation of the IDE,we need to connect to the Arduino mainboard,click“My
Computer”→“Properties”→“Device Manager”→“Viewing Ports (COM and LTP)”,If you can see
as the Figure 2.1.4
Figure 2.1.4 Driver installation success interface
That indicates the driver has been installed successfully. At this time we open the IDE, select the
corresponding development board model and port in the toolbar to use normally. If you see Figure 2.1.5, it
means that the computer does not recognize the development board and you need to install the driver
yourself.

6
Figure 2.1.5 Driver is not successfully installed interface
Note:
1)If you connect the controller board to the computer, the computer does not respond. Right-click "My
Computer" and select Open Device Manager then find viewing port (com & lpt). If there is no com or lpt, or
only an unknown device, there is a problem with the controller board or the USB cable.
2)Right-click "My Computer" and select Device Manager, find the viewing ports (COM and LPT). If there
is a yellow Arduino UNO exclamation point, this means you need to install the driver yourself.
3)If you install the driver again and again, it eventually fails. Please uninstall the driver and re-install>
install the driver automatically> restart the computer.
2.1.2 Install Driver
1、If your computer is a Windows 7 system
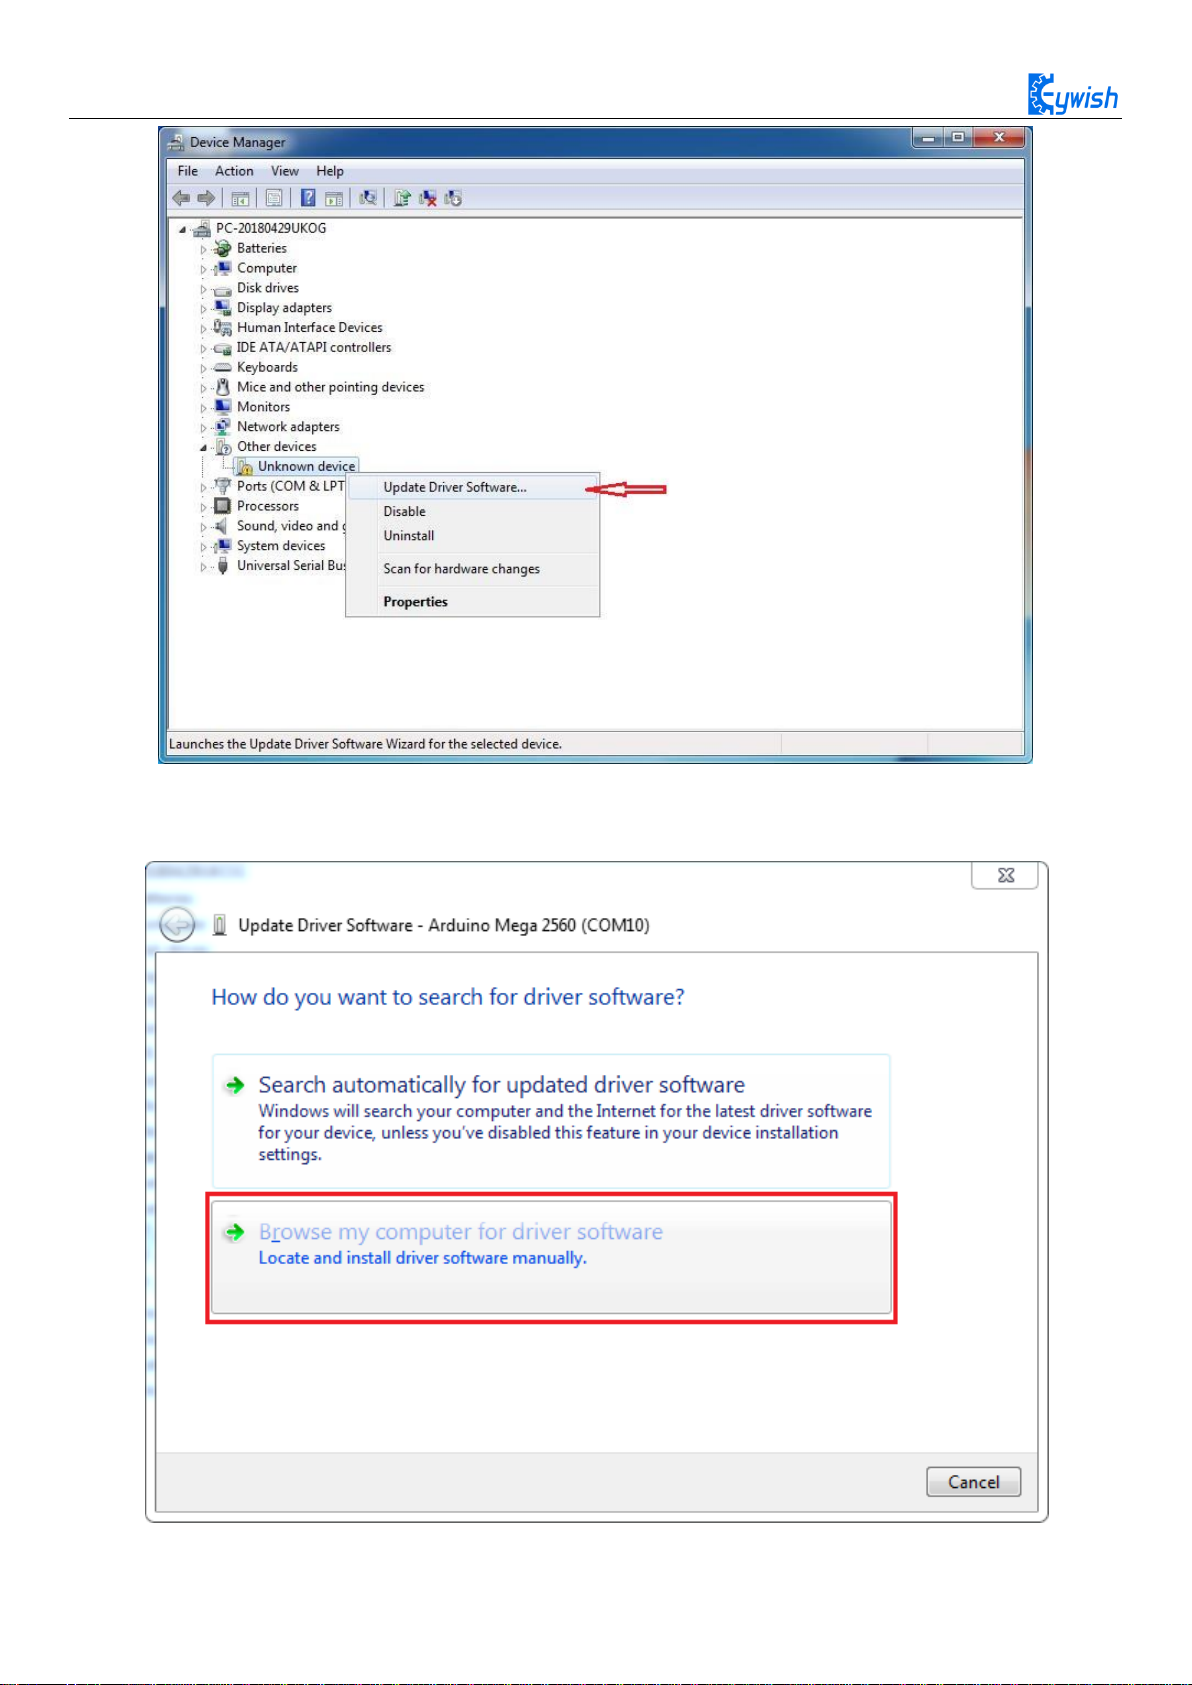
1)Right-click on "My Computer" and open the Device Manager, find viewing the ports (COM and LPT). At
this point you will see a "USB Serial Port", right-click "USB Serial Port" and select the "Update Driver
Software" option.
7
Figure 2.1.6 Updated Driver Interface
2)Next, select the "Browse my computer for driver software" option.
Figure 2.1.7 Driver Update Selection Screen
Table des matières
Autres manuels Keywish Robotique


Manuels Robotique populaires d'autres marques

STEMCenter USA
STEMCenter USA Pi-Bot v2.00 Manuel utilisateur

SunFounder
SunFounder PiDog Manuel utilisateur

Universal Robots
Universal Robots UR5 Manuel utilisateur

Universal Robots
Universal Robots E Series Manuel utilisateur

YASKAWA
YASKAWA MOTOMAN-MPL80 II Manuel utilisateur

EFORT
EFORT ECR5 Manuel d'instructions


