KBO Tornado Step-Thru Manuel utilisateur

Owner's Manual
www.kbobike.com
Tornado Step-Thru


Content
Home Page
About Manual
Product Speci�ication
Product Structure
Assembly Instructions
Recommended Torque Values
Display Features
Routine Operation
Driving Range
Parking Storage and Transport
Basic Battery Charging Tips
Bicycle Care
Basic Troubleshooting
Warranty Info
Additional Warranty Terms
Warranty Card
1
2
3
4
5
10
11
12
13
14
15
16
17
18
19
20
···································································································································
································································································································
·························································································································
····························································································································
························································································································
················································································································
·····························································································································
····························································································································
································································································································
················································································································
···················································································································
··································································································································
························································································································
································································································································
··················································································································
·······························································································································

Home Page 1
Thank you for your purchase!
This manual contains details of the product, information on its operation and maintenance, and other helpful tips for owners. Read it carefully
and familiarize yourself with the KBO Tornado Step-Thru before using it to ensure safe use and prevent tragic accidents. Be sure to retain this
manual as your convenient KBO Tornado Step-Thru information source.
NOTICE: To prevent your KBO Tornado Step-Thru from being stolen and cannot be found, it is suggested that you record the Serial
Number of your bike(Near the left crank connection).

About Manual 2
All information in this manual should be carefully reviewed and if you have any questions you should contact KBO Bike immediately. The notes
contained within the manual and marked by this dialogue balloons symbol should also be given special care. Users should also pay special
attention to information marked in this manual beginning with NOTICE.
Because it is impossible to anticipate every situation or condition which can occur while riding, this manual makes no representations about
the safe use of bicycles under all conditions. There are risks associated with the use of any bicycle which cannot be predicted or avoided, and
which are the sole responsibility of the rider. You should keep this manual, along with any other documents that were included with your
bicycle, for future reference, however all content in this manual is subject to change or withdrawal without notice. Visit www.kbobike.com to
download the latest version. KBO Bike makes every effort to ensure the accuracy of its documentation and assumes no responsibility or liability
if any errors or inaccuracies appear within. Assembly and �irst adjustment of your KBO Bike require special tools and skills and it is
recommended that this should be done by a trained bicycle mechanic if possible.

Product Speci�ication 3
Battery
Derailleur
Speed
Pedal Assist
48V 13Ah Lithium Battery Front Fork Front Suspension Fork
500W Geared Motor Bike Frame 6061 Aluminum
LCD Display 160mm Brakes
6-speed 54.6V 2A
20 mph 6 Speed
Intelligent 5-level Pedal Assist Shimano
Twist Throttle 26’’x4’’ Tires
6 Hours 72 lbs
5'1" - 6'2" 92 lbs
Package
Dimensions
Package Weight
Model
Dimensions
61.5''x12.2''x33.1'' 75.4''x48.9''x27.6''
Brake
Charger
Freewheel
Shifter
Tires
Product Weight
Motor
Display
Throttle
Charging Time
Recommended
Rider Heights

Product Structure 4
Handle
On/Off
LCD Display
Shimano Shifter
Throttle
Brake Lever
LED Rear Light
Rear Rack
Saddle
Frame
Stem
1
2
3
4
5
6
7
8
9
10
11
Battery
LED Head Light
Front Fork
Front Brake
Tire
Pedal
Controller
Derailleur
Motor
Rear Brake
Crank Set
12
13
14
15
16
17
18
19
20
21
22
1
2
3
4
5
6
910 11
12
13
14
15
16
1718
19
20
22
21
87

Assembly Instructions 5
NOTICE: The following assembly steps are only a general guide to assist in the assembly of your KBO Bike and is not a complete or
comprehensive manual of all aspects of assembly, maintenance and repair. We recommend you consult a certi�ied bike mechanic to
assist in the assembly, repair and maintenance of your bike. For detailed instructions, please view the KBO Tornado Step-Thru
assembly video found at www.kbobike.com.
Open the bike box, with the help of another person capable of safely lifting a heavy object, remove the ebike from the bike box, and fully remove
the packaging material protecting the bike frame and components. Keep the packaging materials in case you want to ship the bike. Remove the
small box from the bottom of the bike box and carefully set out the contents.
◆ Unpack the bike
◆ Install the handlebar:
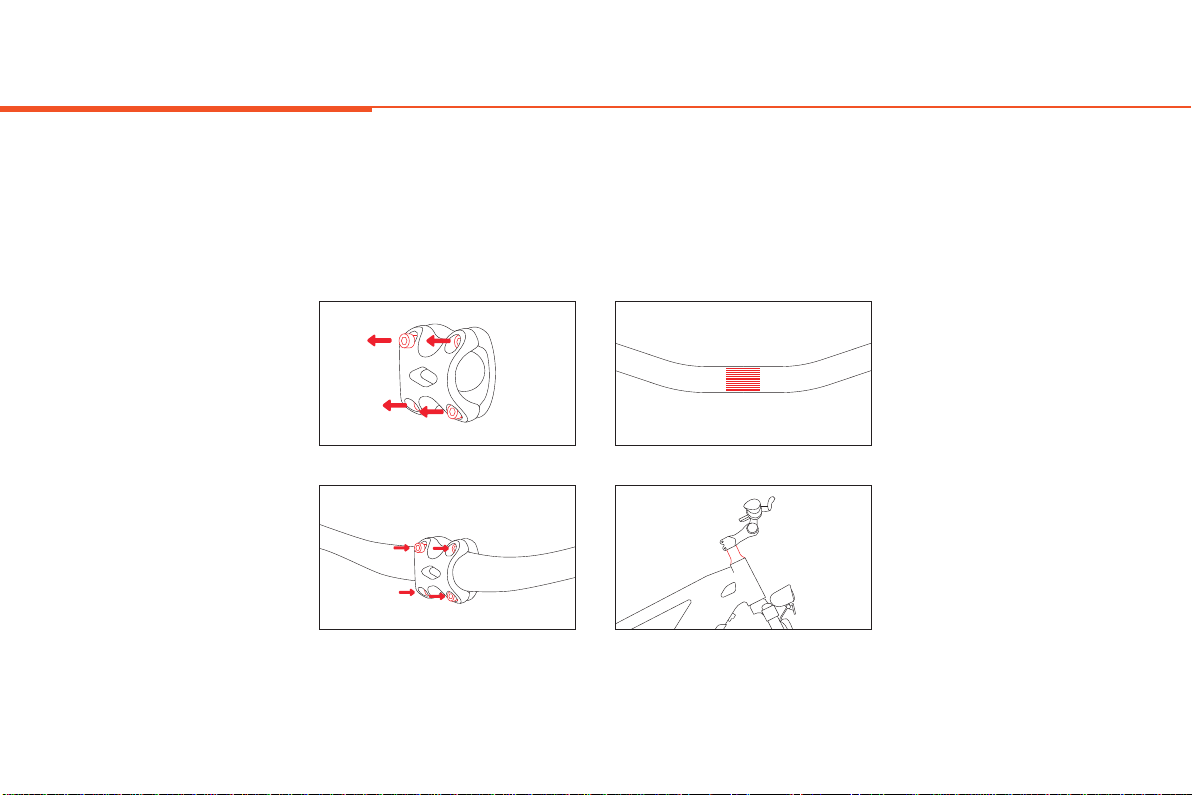
Assembly Instructions 6
Orient the handlebar properly. The brake levers should face forward and the shifter should be on the right side. Trace the brake housing from
the left brake lever to the brake caliper and make sure the bundle of cables is not twisted. Remove the four screws from the stem, ensuring the
linear markings on the handlebars are centered and handlebars are adjusted to a comfortable position. Finally, tighten the screws with the
assembly tool.

Assembly Instructions 7
◆ Install the front wheel
Remove the plastic axle guards from the front wheel being sure not to touch the brake rotor set. Open the quick skewer and remove the
thumb nut and cone spring. Carefully lower the fork and ensure the brake rotor goes into the caliper.
Next align the dropouts with the axle of the wheel hub to make sure the fork dropouts are fully seated on the axle. Install the quick
skewer starting from the brake rotor side of the wheel and then push the quick release skewer through the hub. Keep two cone springs
pointed towards the wheel hub. Tighten the thumb nut until the quick release lever is held in line with the axle.
Use a 15mm wrench to tighten the bolts on both sides of the axle, and install the two thumb nuts by pressing them tightly.
Step 1:
Step 2:
Step 3:
Table des matières
Autres manuels KBO Vélo


