König SASWDB301 Manuel utilisateur

SAS-
WDB301/401
MANUAL (p. 2)
ANLEITUNG (S. 6)
MODE D’EMPLOI (p. 10)
GEBRUIKSAANWIJZING (p. 14)
MANUALE (p. 18)
MANUAL DE USO (p. 22)
MANUAL (p. 26)
HASZNÁLATI ÚTMUTATÓ (o. 30)
KÄYTTÖOHJE (s. 34)
BRUKSANVISNING (s. 38)
NÁVOD K POUŽITÍ (s. 42)
MANUAL DE UTILIZARE (p. 46)
ΕΓΧΕΙΡΙΔΙΟ XPHΣHΣ (σελ. 50)
BRUGERVEJLEDNING (s. 54)
VEILEDNING (s. 58)
ИНСТРУКЦИЯ (62 стр.)
KILAVUZ (s. 66)
KASUTUSJUHEND (lk. 70)
NÁVOD (s. 74)
ROKASGRĀMATA (lpp. 78)
NAUDOJIMO VADOVAS (82 p.)
PRIRUČNIK (str. 86)
РЪКОВОДСТВО (p. 90)
INSTRUKCJA OBSŁUGI (str. 94)
PRIROČNIK (str. 98)
Wireless Doorbell

ENGLISH
2
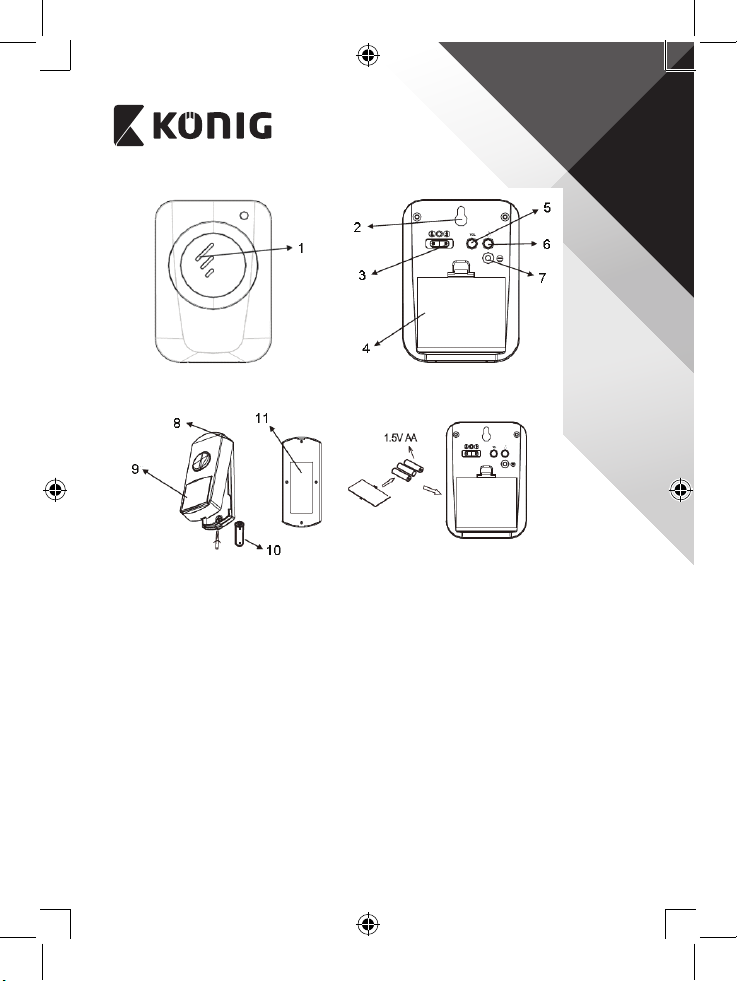
1. High quality loudspeaker.
2. Mounting hole.
3. Ring option switch: ring only, or LED ash only, or combination of ring and
ash.
4. Battery compartment.
5. Volume switch.
6. Tune selection switch.
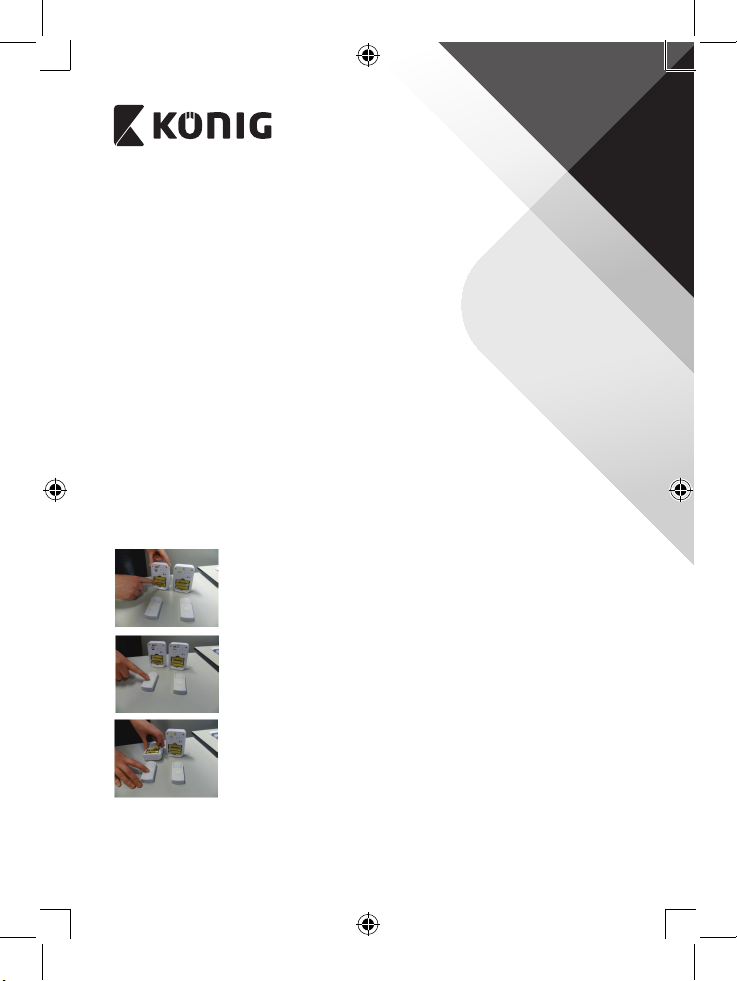
7. Hold the code-matching button on the receiver and push the button on the
receiver at the same time. Release the code-matching button as soon as the
bell rings. Then release the button of the transmitter accordingly. With this,
the code-matching of the doorbell set is nished.
8. Insert the fastening tab of the top cover into the slot of the base.
9. Press here by hand to x the top cover onto the base.
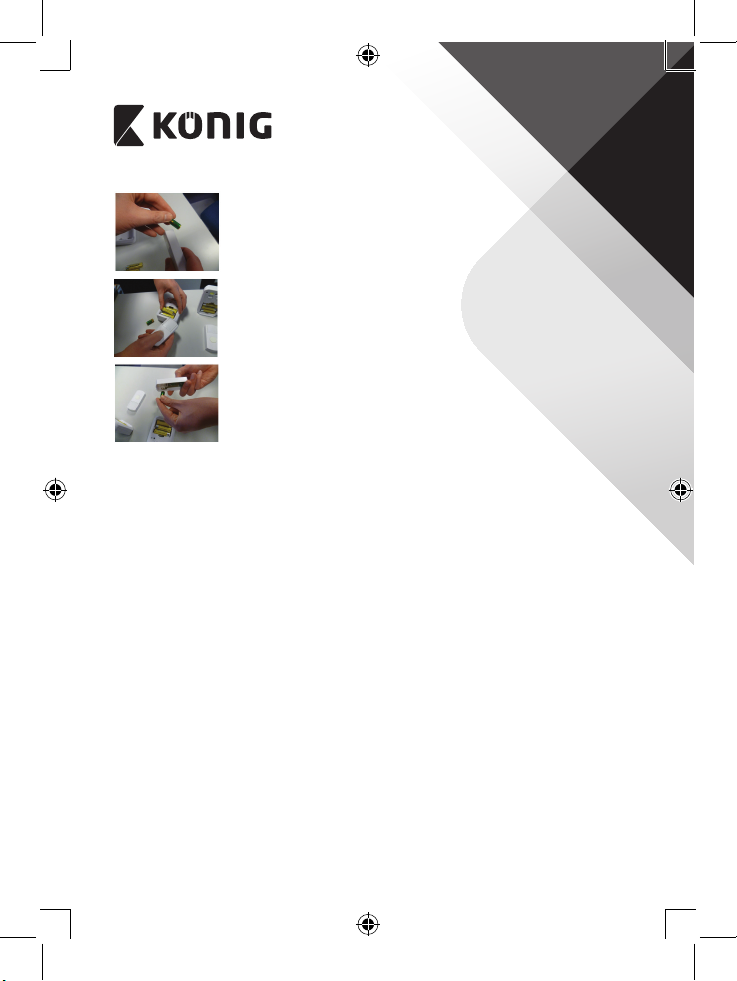
10. Use a small screwdriver and carefully open this cover on the base unit.
Insert a battery into the battery compartment in the correct polarity.
11. Use the double-sided tape to attach the unit to the desired place.
ENGLISH
3
Specications:
SAS-WDB301
* 36 melodies for your selection
* Battery operated (3x AA and 1x V23GA)
* 100 meter reach
* Double blister packing
* Indicator light
* Waterproof transmitter
SAS-WDB401
* 36 melodies for your selection
* Battery operated (2x AA and 1x CR2032)
* 80 meter reach
* Double blister packing
* Indicator light
* Waterproof transmitter
Supplement instructions
SAS-WDB301
Follow the steps below to set the channel of several doorbells to 1 bell button
or to set a dierent channel from your neighbours.
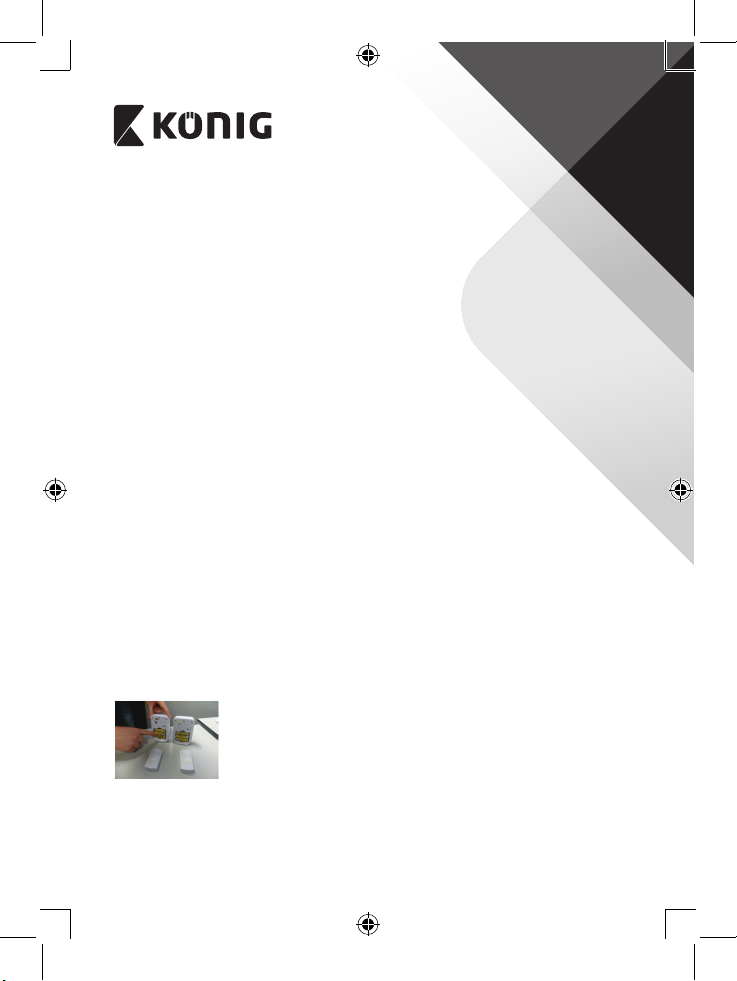
First remove the back plate of the battery compartment
of main unit and bell button.
Press and hold the bell button.
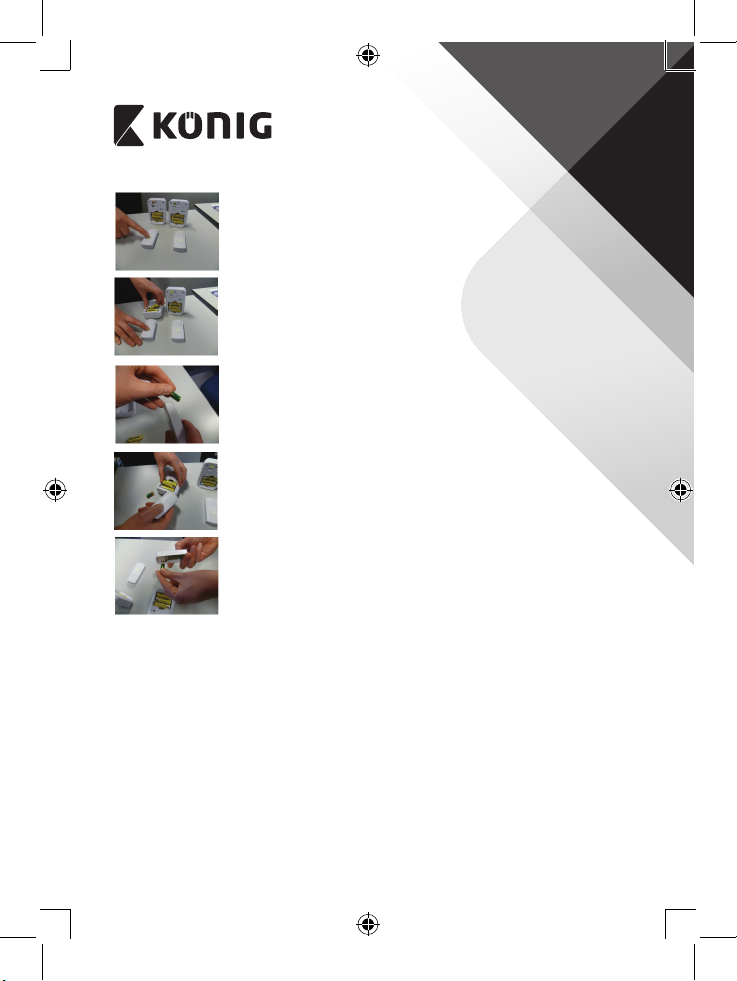
Keep pressing the bell button and remove the batteries
from the main unit.
ENGLISH
4
Keep pressing the bell button and now also remove the
batteries from the bell button.
Keep on pressing the bell button and insert the batteries
back into the main unit.
Keep on pressing the bell button and insert the batteries
back into the bell button.
Now the channel of the doorbell is changed.

ENGLISH
5
Maintenance:
Clean only with a dry cloth.
Do not use cleaning solvents or abrasives.
Warranty:
No guarantee or liability can be accepted for any changes and modications of the product or damage caused due to
incorrect use of this product.
General:
Designs and specications are subject to change without notice.
All logos brands and product names are trademarks or registered trademarks of their respective holders and are hereby
recognized as such.
This manual was produced with care. However, no rights can be derived. König Electronic can not accept liability for any
errors in this manual or their consequences.
Keep this manual and packaging for future reference.
Attention:
This product is marked with this symbol. It means that used electrical and electronic products should not be
mixed with general household waste. There is a separate collections system for these products.
This product has been manufactured and supplied in compliance with all relevant regulations and directives, valid for all
member states of the European Union. It also complies to all applicable specications and regulations in the country of
sales.
Formal documentation is available upon request. This includes, but is not limited to: Declaration of Conformity (and
product identity), Material Safety Data Sheet, product test report.
Please contact our customer service desk for support:
via website: http://www.nedis.com/en-us/contact/contact-form.htm
via telephone: +31 (0)73-5993965 (during oce hours)
NEDIS B.V., De Tweeling 28, 5215 MC ’s-Hertogenbosch, THE NETHERLANDS

DEUTSCH
6
1. Lautsprecher.
2. Befestigungsloch.
3. Klingeloption Umschalter: nur Klingelton, oder nur die LED blinkt, oder eine
Kombination aus Klingelton und LED.
4. Batteriefach.
5. Lautstärkeregler.
6. Melodie-Wahlschalter.
7. Halten Sie am Empfänger die Kodierungstaste gedrückt und drücken Sie
gleichzeitig die Taste am Klingeltaster. Lassen Sie die Kodierungstaste los,
sobald der Klingelton ertönt. Lassen Sie dann die Taste am Klingeltaster los.
Damit ist die Kodierung der Türklingel eingestellt.
8. Einlegen Batterie für Klingeltaster. Führen Sie den Riegel der Abdeckung in
den Schlitz des unteren Gehäuses ein.
DEUTSCH
7
9. Drücken Sie mit Ihrer Hand, um die Abdeckung mit dem unteren Gehäuse
zu verschließen.
10. Verwenden Sie einen Schraubenzieher und önen Sie vorsichtig den Deckel
am unteren Gehäuse.
Legen Sie eine Batterie der richtigen Polarität entsprechend in das
Batteriefach ein.
11. Befestigen Sie den Klingeltaster mithilfe des doppelseitigen Klebebands an
einem Ort Ihrer Wahl.
Technische Daten:
SAS-WDB301
* 36 Melodien zur Auswahl
* Batteriebetrieben (3x AA und 1x V23GA)
* 100 Meter Reichweite
* 2x Blisterverpackung
* Kontrollleuchte
* Wasserfeste Sendereinheit
SAS-WDB401
* 36 Melodien zur Auswahl
* Batteriebetrieben (2x AA und 1x CR2032)
* 80 Meter Reichweite
* 2x Blisterverpackung
* Kontrollleuchte
* Wasserfeste Sendereinheit
Zusätzliche Anleitungen
SAS-WDB301
Folgen Sie den nachstehenden Schritten, um den Kanal für mehrere Türklingeln
für 1 Klingelknopf oder einen anderen Kanal als Ihre Nachbarn einzustellen.
Önen Sie zunächst das Batteriefach der Klingel und des
Klingelknopfes.
DEUTSCH
8
Halten Sie den Klingelknopf gedrückt.
Halten Sie den Klingelknopf weiterhin gedrückt und
nehmen Sie die Batterien aus der Klingel.
Halten Sie den Klingelknopf weiterhin gedrückt und
nehmen Sie auch die Batterien aus dem Klingelknopf.
Halten Sie den Klingelknopf weiterhin gedrückt und
setzen Sie die Batterien in die Klingel zurück.
Halten Sie den Klingelknopf weiterhin gedrückt und
setzen Sie die Batterien in den Klingelknopf zurück.
Der Kanal Ihrer Türklingel ist nun umgestellt.
DEUTSCH
9
Wartung:
Nur mit einem trockenen Tuch säubern.
Keine Reinigungs- oder Scheuermittel verwenden.
Garantie:
Es kann keine Garantie oder Haftung für irgendwelche Änderungen oder Modikationen des Produkts oder für Schäden
übernommen werden, die aufgrund einer nicht ordnungsgemäßen Anwendung des Produkts entstanden sind.
Allgemeines:
Design und technische Daten unterliegen unangekündigten Änderungen.
Alle Logos, Marken und Produktnamen sind Marken oder eingetragene Marken ihrer jeweiligen Eigentümer und werden
hiermit als solche anerkannt.
Diese Bedienungsanleitung wurde sorgfältig verfasst. Dennoch können daraus keine Rechte und Pichten hergeleitet
werden. König Electronic haftet nicht für mögliche Fehler in dieser Bedienungsanleitung oder deren Folgen.
Bitte bewahren Sie Bedienungsanleitung und Verpackung für spätereVerwendung auf.
Achtung:
Dieses Produkt ist mit diesem Symbol gekennzeichnet. Es bedeutet, dass die ausgedienten elektrischen
und elektronischen Produkte nicht mit dem allgemeinen Haushaltsmüll entsorgt werden dürfen. Für diese
Produkte stehen gesonderte Sammelsysteme zur Verfügung.
Dieses Produkt wurde hergestellt und geliefert in Übereinstimmung mit allen geltenden Vorschriften und Richtlinien,
die für alle Mitgliedsstaaten der Europäischen Union gültig sind. Es entspricht allen geltenden Vorschriften und
Bestimmungen im Land des Vertriebs.
Eine formale Dokumentation ist auf Anfrage erhältlich. Diese beinhaltet unter anderem, jedoch nicht ausschließlich:
Konformitätserklärung (und Produktidentität), Sicherheitsdatenblatt, Testreport des Produkts.
Wenden Sie sich bei Fragen bitte an unseren Kundendienst:
per Internet: http://www.nedis.de/de-de/kontakt/kontaktformular.htm
per Telefon: Niederlande +31 (0)73-5993965 (während der Geschäftszeiten)
NEDIS B.V., De Tweeling 28, 5215 MC ’s-Hertogenbosch, NIEDERLANDE
FRANÇAIS
10
1. Haut-parleur de haute qualité.
2. Trou de xation.
3. Interrupteur d'option de sonnerie : sonnerie uniquement ou voyant
lumineux clignotant uniquement, ou une combinaison des deux.
4. Compartiment de pile.
5. Interrupteur de volume.
6. Interrupteur de sélection de mélodie.
7. Maintenez le bouton de code d'association avec le récepteur et enfoncez
le bouton du récepteur simultanément. Relâchez le bouton de code
d'association dès que la sonnerie s'enclenche. Puis relâchez le bouton de
l'émetteur en conséquence. À l'aide de cette procédure, la conguration du
code d'association du carillon de porte est achevée.
8. Insérez l'onglet de xation du couvercle supérieur dans la fente de la base.
9. Appuyez ici avec une main pour xer le couvercle supérieur à la base.
Ce manuel convient aux modèles suivants
1
Table des matières
Langues :
Autres manuels König Accessoires


