
JVC RV-S5B Manuel utilisateur

.
POWERED WOOFER SYSTEM
RV-S5B
INSTRUCTIONS
ENGLISH
LVT2395-002A
[E]
Auto power save function
0When no operation is done in certain situations for
15 minutes, the System turns off automatically.
This function is on at the initial setting. For details,
refer to p. 15.
In this manual...
0In this manual, “iPod” means iPod, iPod touch,
iPhone and iPad device. When iPod touch,
iPhone or iPad device is specifically referred to,
“iPod touch”, “iPhone” or “iPad” is used.
0In this manual, “file” and “track”, “folder” and
“group” are used interchangeably.
Installation
Caution: Proper Ventilation
To avoid risk of electric shock and fire, and to prevent
damage, locate the apparatus as follows:
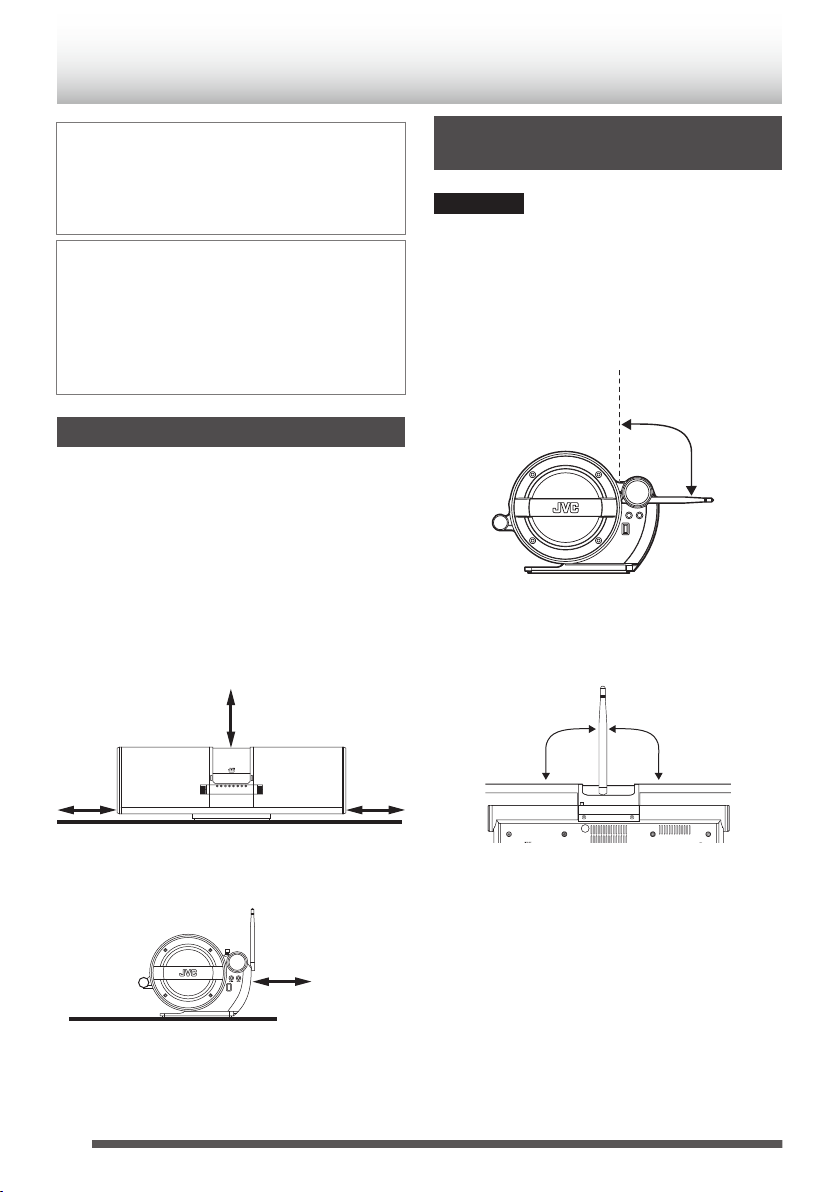
1 Front: No obstructions and open spacing.
2 Sides/ Top/ Back: No obstructions should be placed
in the areas indicated by the dimensions in the
illustration.
3 Bottom: Place on a level surface.
Front view
.
15 cm
15 cm
15 cm
Side view
.
15 cm
Rear of the System
Notes on installation
0Select a place which is level, dry and neither too hot
nor too cold–between 5˚C and 35˚C.
Adjustable range for the Wi-Fi
antenna
CAUTION
0Do not turn the antenna over the adjustable range to
avoid damaging the antenna.
0Turn the antenna upright before operation.
Vertical adjustable range
The antenna is turned 90°degrees from the center of
the vertical position to the System.
.
90°
Horizontal adjustable range
The antenna is turned 90°degrees to the right and left
side from the center of the horizontal position to the
System.
.
90° 90°
2
Introduction

Introduction ..................................... 2
Installation ........................................................... 2
Adjustable range for the Wi-Fi antenna ............... 2
Preparation ...................................... 4
Accessories ........................................................ 4
Carrying the System ............................................ 4
Preparing the remote control ............................... 4
Inserting batteries into the main unit .................... 5
Part names ....................................... 6
Front ................................................................... 6
Rear .................................................................... 8
Side ..................................................................... 8
Display ................................................................ 9
Remote control .................................................. 10
Connections .................................. 12
Connecting headphones ................................... 12
Connecting the AC power cord ......................... 12
Basic operations ........................... 13
Turning on/off the System ................................. 13
Setting the clock ................................................ 13
Getting started .................................................. 13
Adjusting the super woofer volume ................... 14
Using the sound mode ...................................... 14
Changing the display information ...................... 14
Changing the brightness of the display ............. 15
Activating/deactivating the Auto Power Save
(A.P.S.) ............................................................. 15
Listening to an AirPlay / DLNA
device ............................................. 16
About AirPlay .................................................... 16
About DLNA ...................................................... 16
Direct Connection to the System (Direct Wireless
Connection) ...................................................... 17
Connection via a Wireless LAN Router (SSID
Connection) ...................................................... 18
Connection via iPod touch/iPhone/iPad connected
to the System (Login Sharing) ........................... 20
Adding AirPlay / DLNA Devices to the Same Wi-Fi
Network as the Main Unit .................................. 21
Navigating on AirPlay / DLNA Devices
.................... 22
Setting the Network Standby ............................. 23
AirPlay / DLNA Auto Switch .............................. 23
Setting the menu ............................................... 24
Listening to BLUETOOTH device
......................................................... 26
Registering a BLUETOOTH device ................... 26
Navigating the BLUETOOTH Device ................ 27
Listening to iPod ........................... 28
Connecting iPod ................................................ 28
Compatible iPod ................................................ 29
Viewing video/picture from iPod ........................ 29
Playing back ...................................................... 30
Listening to a USB device/SD card
......................................................... 32
Connecting a USB device ................................. 32
Inserting an SD card .......................................... 32
Playing back ...................................................... 33
Random playback ............................................. 34
Repeat playback ............................................... 34
Using browser display ....................................... 34
Using the Favorite folder ................................... 35
Listening to an external device ... 37
Connecting an external device .......................... 37
Listening to an external device .......................... 37
Listening to FM .............................. 38
Searching for stations ....................................... 38
Presetting stations ............................................ 39
PTY search ....................................................... 39
Setting the timer ............................ 40
Sleep Timer ....................................................... 40
Daily Timer ........................................................ 40
References ..................................... 42
Playable files ..................................................... 42
About DLNA Devices ........................................ 42
Maintenance ..................................................... 43
Trademarks ....................................................... 43
Troubleshooting ................................................ 44
Specifications .................................................... 46
3
Contents

Accessories
Check that you have all the following items, which are
supplied for the System.
0AC power cord x 1
0Remote control x 1
0Lithium coin battery x 1
(The battery has already been installed in the
remote control when shipped from the factory)
If any of these items are missing, contact your dealer
immediately.
Carrying the System
Be sure to hold both handles when you carry the
System.
If you carry the System by only one handle, the other
end may drag on the ground and be damaged.
.
Carrying handle
NOTE
0Remove USB device or iPod from the System.
0Disconnect all the cords from the System.
0The System is not waterproof or dust proof.
Preparing the remote control
When you use the remote control for the first time, pull
out the insulation sheet.
If the range or effectiveness of the remote control
decreases, replace the battery.
To replace the battery in the remote control
Insert the battery into the remote control by matching
the polarities (+ and –) correctly.
.
Lithium coin battery (CR2025)
NOTE
0The included battery is for checking system
operation. Replace it with a new one as soon as
possible.
CAUTION
0Danger of explosion if the battery is incorrectly
replaced.
0Replace only with the same or equivalent type.
0Store the battery in a place where children cannot
reach. If a child accidentally swallows the battery,
consult a doctor immediately.
0To prevent the battery from overheating, cracking,
or starting a fire:
- Do not recharge, short, disassemble or heat the
battery, or dispose of it in a fire.
- Do not leave the battery with other metallic
materials.
- Wrap the battery with tape and insulate when
throwing away or saving it.
- Do not poke the battery with tweezers or similar
tools.
0Dispose of the battery in the proper manner,
according to federal, state, and local regulations.
4
Preparation

Inserting batteries into the main
unit
Match the polarities (+ and –) of the batteries.
.
R14 (SUM-2)/C (14D) x 10
(not supplied)
Battery compartment
NOTE
0Store the batteries in a place where children cannot
reach. If a child accidentally swallows a battery,
consult a doctor immediately.
0The power will not be supplied through the batteries
when the power is supplied through the AC outlet on
the System.
0The battery is consumed more quickly than usual
when operating the System continuously or
operating it in a cold place.
0When the power is supplied using the batteries,
STANDBY/TIMER LED will turn off when the
System is turned off (on standby).
CAUTION
0To avoid battery leakage or explosion, handle
batteries properly.
0When you do not use the System, remove the
batteries from the battery compartment.
0Dispose of batteries in the proper manner,
according to federal, state, and local regulations.
0Do not mix with batteries of different types or with
new and old ones.
0Do not attempt to charge any batteries other than
rechargeable ones.
0Discard leaky batteries immediately. Battery
leakage can cause skin burns or other personal
injuries.
0If chemicals leak onto the System, clean the System
completely.
When the power is supplied using the
batteries...
0The backlight is set to dark.
0The STANDBY/TIMER LED goes off when the
power is off.
0Powering on by the remote control is not available.
0The battery is consumed more quickly on the
network standby mode than normal standby mode.
0The video output setting of iPod (Video Out) is not
changeable.
0The daily timer is not available.
5

Front
.
123456
7890-=~ !
A[A STANDBY/ON] button
Switches the power on and off.
B[STANDBY/TIMER] LED
Lights in red when the System is turned off while the
power is supplied using the AC power cord.
Lights in umber when the daily timer is activated.
Goes off when the System is turned on.
CDock for iPod
Connect your iPod.
DDisplay
Displays various information.
ERemote control sensor
When using the remote control, point at this part.
F[SOURCE] button
Switches the source.
G[SUPER WOOFER] +/- knob
Changes the level of the super woofer.
H[MENU] button
Displays network setting by pressing and holding
the button.(“NETWORK”)
Selects upper folder. (“NETWORK”, in DMP mode)
Switches the standby mode.
Displays menu of iPod. (“iPod”)
Shows file browser display. Returns to upper
directory in file browser mode.
(“USB”, “SD”)
I[K]/[J] button
Puts the clock forward/backward at clock and daily
timer setting.
Selects next/previous folder and file. (“NETWORK”
, in DMP mode)
Selects next/previous item in menu of iPod. (“iPod”)
Selects next/previous folder (group).
(“USB”, “SD”)
6
Part names

Selects next/previous preset number.
(“TUNER FM”)
J[SET] button
Selects the item. (Clock/Timer setting,
“NETWORK”, “iPod”, “USB”, “SD”)
Changes the audio input level from the external
device. (“AUDIO IN”)
Switches the video output setting of iPod while the
system is turned off (pressing and holding). (“iPod”)
K[I/W] button
Switches play and pause. (“NETWORK”, “AirPlay”
, “BLUETOOTH”, “iPod”, “USB”, “SD”)
Switches to the last source and playback is started
while the system is turned off (except “AirPlay”).
Put iPod in sleep mode by pressing and holding the
button. (“iPod”)
L[o] button
Stops playback. (“BLUETOOTH”, “USB”, “SD”)
Displays the clock while the system is turned off.
Starts PTY search. (“TUNER FM”)
M[S]/[T] button
Selects next/previous file (track). Activates fast
forward/reverse by pressing and holding the
button. (“NETWORK”, “AirPlay”, “BLUETOOTH”,
“iPod”, “USB”, “SD”)
Selects upper/lower frequency. Scans upper/lower
frequency by pressing and holding the button.
(“TUNER FM”)
N[VOLUME] +/– knob
Changes the volume level.
"iPod": Depending on the type of iPod, iPod may
operate differently.
“NETWORK”: Depending on your device, it may
operate differently.
7

Rear
.
1243
A[VIDEO OUT] connector
Connect a monitor using a composite video cable
to view picture/video from iPod connected to the
dock for iPod on a monitor display.
BBattery compartment
Insert batteries for outdoor use, etc. (p. 5)
Wire Antenna
If a FM broadcast is hard to listen to, extend the wire
antenna from the battery compartment. Looking for
a better reception state, stick a wire antenna on the
wall or a pole.
CSD card slot
Insert a SD card for playback.
D[AC IN] jack
Connect the supplied AC power cord.
Side
ACarrying handle
Hold both handles when you carry the System.
BFM telescopic antenna
Adjust length, angle and direction to obtain the best reception.
CWi-Fi antenna
Turn the antenna upright before operation.
D[AUDIO IN] jack
Connect an external device.
E[PHONES] jack
Connect headphones.
FUSB connector
Connect iPod/iPhone or a USB device.
6
5
4
21
3
8

Display
.
54
2
1
6
3
ASource indicator
Indicates the current source by the picture icon.
: “NETWORK”
: “AirPlay”
: “BLUETOOTH”
: “iPod”
: “USB”
: “SD”
: “TUNER”
: “AUDIO IN”
BTimer indicator
Indicates currently active timer by the picture icon.
: Sleep timer
: Daily timer
CSound mode indicator
Indicates current sound mode by the picture icon.
: Beat
: Pop
: Clear 1
: Clear 2
: Flat
DSource
Shows the current source.
EPlayback information
Indicates the conditions of each source.
: “Repeat 1” (“iPod”, “USB”, “SD”)
: “Repeat” (“iPod”, “USB”, “SD”)
: “Random” All tracks are played once in
a random order. (“iPod”, “USB”, “SD”)
: “Repeat Random” All tracks are played
repeatedly in a random order. (“iPod”,
“USB”, “SD”)
: Indicates the range of the repeat/
random playback is within the current
folder. (“iPod”, “USB”, “SD”)
“iPod” : Appears when connecting iPod to the
[USB] connector. (“USB”)
“MP3” : Indicates that the file type of the current
track is MP3. (“USB”, “SD”)
“WMA” : Indicates that the file type of the current
track is WMA. (“USB”, “SD”)
“ST.” : Indicates that the current reception
condition is “Stereo”. (“TUNER FM”)
“MONO” : Indicates that the current reception
mode is “Monaural”. (“TUNER FM”)
: Indicates that the current condition of
Wi-Fi connection.
FText display
Shows the text information of each source.
9

Remote control
.
A[A](STANDBY/ON)
Switches the power on and off. (p. 13)
B[DISPLAY]
Switches the display information. (p. 14)
CSource buttons
([AirPlay I/W], [NETWORK I/W],
[BLUETOOTH I/W], [iPod I/W], [USB I/W],
[SD I/W], [TUNER/AUDIO IN])
Switches to the selected source and playback
starts (except [AirPlay I/W]).
Switches play and pause. (“AirPlay”, “NETWORK”
(p. 22), “BLUETOOTH” (p. 27), “iPod” (p. 30),
“USB”, “SD” (p. 33))
Switches the source between tuner and audio in.
(“TUNER FM” (p. 38), “AUDIO IN” (p. 37))
D[CLOCK/TIMER]
Sets the clock and daily timer. (p. 13, p. 40)
E[SLEEP]
Sets the sleep timer. (p. 40)
F[APS]
Switches APS (Auto Power Save) function on and
off. (p. 15)
G[CANCEL]
Cancels the previous operation.
Deletes the file (track) from the Favorite list. (“USB”
, “SD” (p. 36))
H[REPEAT/FM MODE]
Switches repeat mode. (“iPod” (p. 31), “USB”,
“SD” (p. 34))
Switches the reception condition between
monaural and auto. (“TUNER FM” (p. 38))
10
Autres manuels pour RV-S5B
1
Table des matières
Autres manuels JVC Système stéréo

JVC
JVC UX-S59 Manuel utilisateur

JVC
JVC SP-PCX290 Manuel utilisateur

JVC
JVC UX-M3R Manuel utilisateur

JVC
JVC UX-LS5V Manuel utilisateur

JVC
JVC UX-G60 Manuel utilisateur

JVC
JVC MF-33L Manuel utilisateur

JVC
JVC LVT1358-001A Manuel utilisateur

JVC
JVC UX-5000 Manuel utilisateur

JVC
JVC HX-Z1 Manuel utilisateur

JVC
JVC KD-R422 Mode d’emploi

JVC
JVC NX-D2 Manuel utilisateur

JVC
JVC EX-A5 Manuel utilisateur

JVC
JVC UX-D327B Manuel utilisateur

JVC
JVC UX-G50J Manuel utilisateur

JVC
JVC XU-301BKJ Manuel utilisateur

JVC
JVC UX-GN9V Manuel utilisateur

JVC
JVC CA-UXF3B Manuel utilisateur

JVC
JVC UX-G70 Manuel utilisateur

JVC
JVC CA-UXEP25 Guide de configuration

JVC
JVC EX-A1 Manuel utilisateur


