Jung Smart Control 10 Manuel de l'opérateur

Product documentation
ALBRECHT JUNG GMBH & CO. KG
Volmestraße 1
58579 Schalksmühle
GERMANY
Tel. +49 2355 806-0
Fax +49 2355 806-204
www.jung.de
Smart Control 10, 15, 19
Ref.-no.: SC 10.1
SC 15.1
SC 19.1
07/2020

Page 2 of 24SC 10.1, 15.1, 19.1
Table of Contents
Table of Contents
1 Installation and commissioning......................................................................3
1.1 Safety instructions and structure of the device........................................................ 3
1.1.1 Safety instructions.......................................................................................................................... 3
1.1.2 Structure of the device................................................................................................................... 3
1.2 Function........................................................................................................................ 3
1.2.1 Intended purpose........................................................................................................................... 3
1.2.2 Product characteristics................................................................................................................... 3
1.3 Installation .................................................................................................................... 4
1.3.1 Information for electrically skilled persons ..................................................................................... 4
1.3.2 Installation and electrical connection ............................................................................................. 4
1.4 Commissioning ............................................................................................................ 5
1.4.1 Settings – Menu overview.............................................................................................................. 5
1.4.2 Opening the settings menu............................................................................................................ 5
1.4.3 Changing the default language...................................................................................................... 6
1.4.4 Selecting the current date and time ............................................................................................... 6
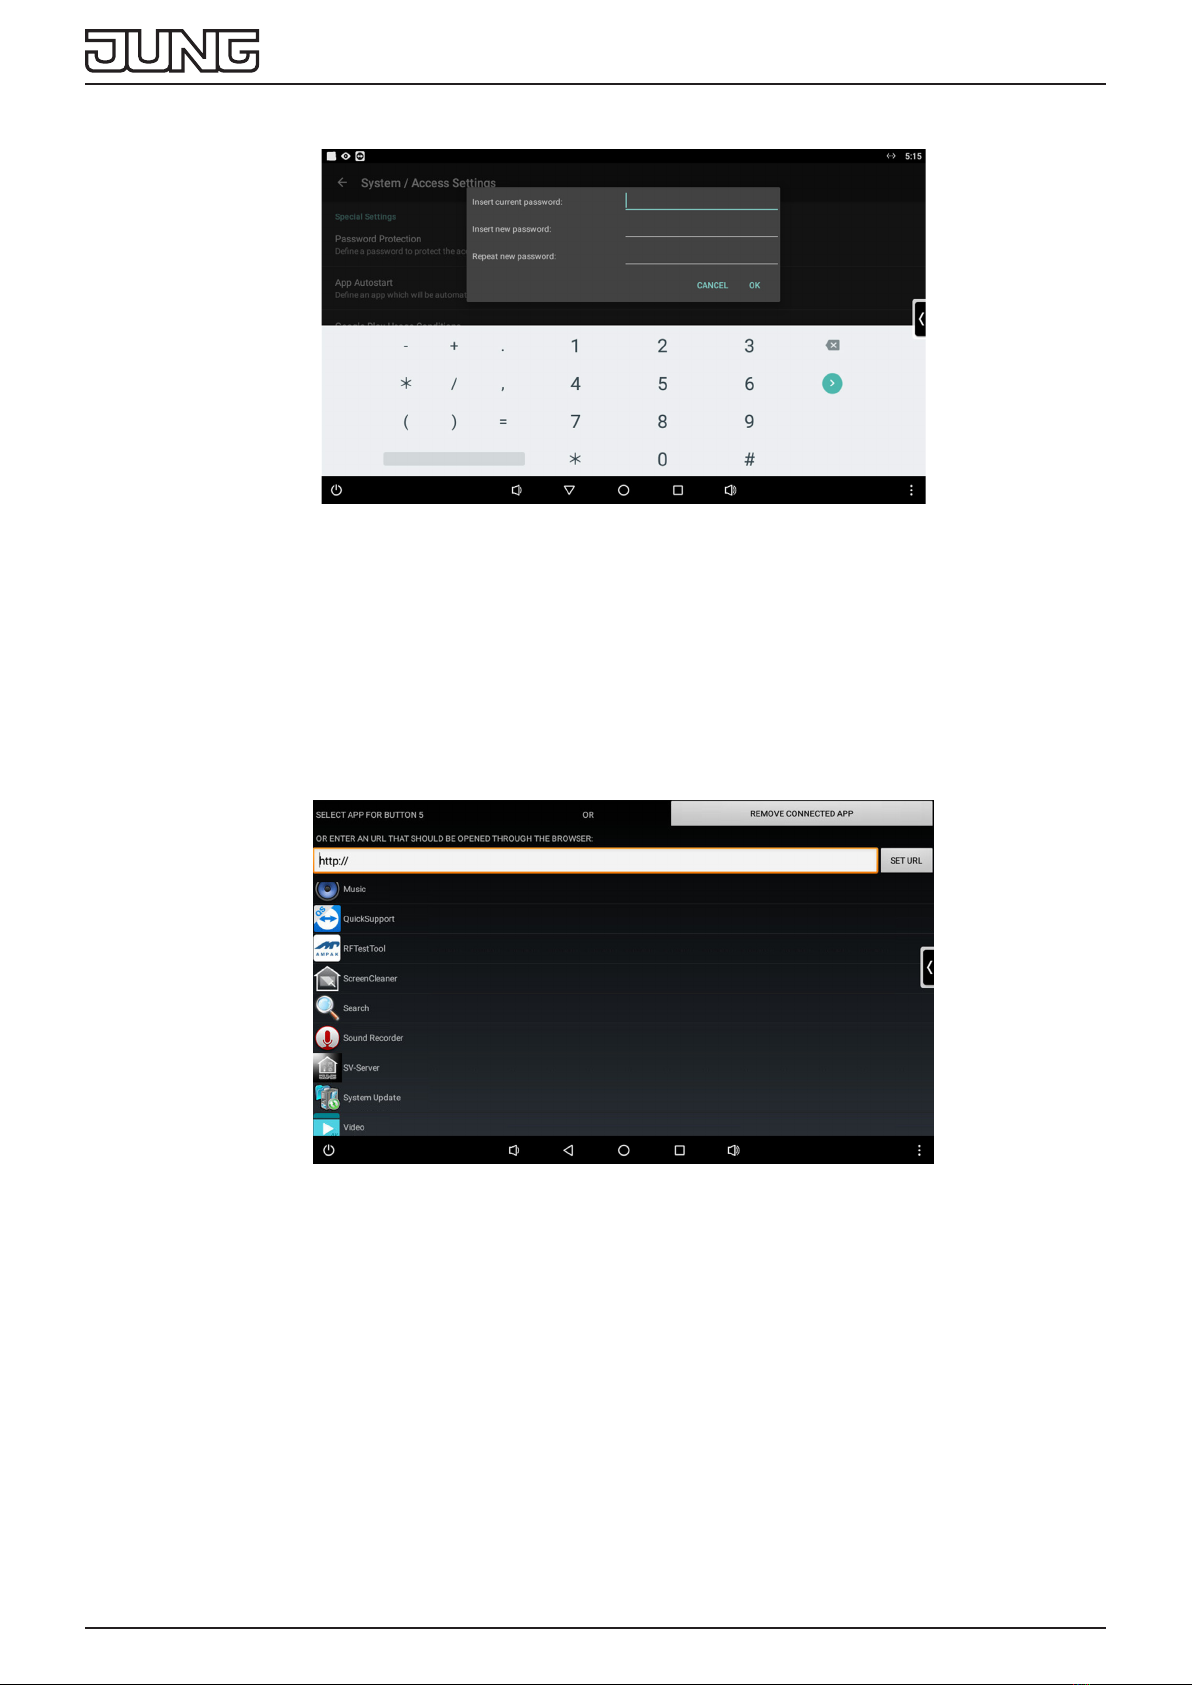
1.4.5 Changing the default password ..................................................................................................... 7
1.4.6 Creating app shortcut in main menu.............................................................................................. 7
1.4.7 Updatingthermware.................................................................................................................... 8
2 Connections, operating controls and indicator lights..................................9
2.1 Operating controls device front side ......................................................................... 9
2.2 Connections device rear side ..................................................................................... 9
3 Operationandconguration .........................................................................10
3.1 Control elements........................................................................................................10
3.1.1 Opening the status bar.................................................................................................................10
3.1.2 Opening the side bar....................................................................................................................10
3.2 Device settings........................................................................................................... 11
3.2.1 Settings – Menu overview............................................................................................................11
3.2.2 Menu area “General / Design settings”........................................................................................11
3.2.3 Menu area „Power / Lock screen settings“ ..................................................................................16
3.2.4 Menu area „System / Access settings“.........................................................................................18
3.3 Operation via apps in the main menu ......................................................................19
3.4 Apps for building automation...................................................................................19
3.5 Appconguration ......................................................................................................20
3.5.1 App “JUNG Abfallkalender“..........................................................................................................20
3.5.2 App “System Update“...................................................................................................................22
3.6 Installation of extra apps from app store ................................................................23
4 Cleaning ..........................................................................................................24
5 Technical data.................................................................................................24
6 Accessories ....................................................................................................24
7 Warranty ..........................................................................................................24

Page 3 of 24SC 10.1, 15.1, 19.1
Installation and commissioning
1 Installation and commissioning
1.1 Safety instructions and structure of the device
1.1.1 Safety instructions
Electrical devices may only be mounted and connected by electrically skilled persons.
Seriousinjuries,reorpropertydamagepossible.Pleasereadandfollowmanualfully.
Dangerofelectricshock.Alwaysdisconnectbeforecarryingoutworkonthedeviseorload.
Theseinstructionsareanintegralpartoftheproduct,andmustremainwiththeendcustomer.
1.1.2 Structure of the device
Fig. 1: Structure of the device
1 Flush-mounted recessed box
2 Smart Control
3 Design cover left
4 Design cover right
1.2 Function
1.2.1 Intended purpose
- Operation and visualisation of system statuses and information on building automation
- for installation in walls
1.2.2 Productcharacteristics
- KNX visualisation in combination with Visu Pro Server (ref.-no.: JVP-SERVER-H..)
- KNX visualization in combination with Smart Visu Server (ref.-no.: SV-SERVER-INT)
- Pre-installed iHaus-Server-App; iHaus-KNX connection via IP router (ref.-no.: IPR 200 REG,
IPR 300 SREG) or IP interface (ref.-no.: IPS 200 REG, IPS 300 SREG)
- Door call function only in combination with Siedle Smart Gateway SG 650-.. or SG 150-..
- Pre-installed weather page
- Display of up to six IP camera images
- Cleaning function
- Smart Gateway with integrated image storage
- Capacitive touchscreen
- Fanless, without rotating parts
1
2
3
4

Page 4 of 24SC 10.1, 15.1, 19.1
Installation and commissioning
1.3 Installation
1.3.1 Information for electrically skilled persons
DANGER
Electric shock from touching live parts in the installation environment.
An electric shock can be fatal.
Beforeworkingonthedevice,disconnectthepowerandcoverlivepartsinthearea.
1.3.2 Installation and electrical connection
DependingontheSmartControldimensionsitmustbeinstalledinvariousush-mountedrecessedboxes:
SC 10.1 SC 10 EBG
SC 15.1 SC 15 EBG
SC 19.1 SC 19 EBG
Ensurehorizontalorientationwheninstallingtheush-mountedbox:
Theush-mountedboxmustebeexactlyorientatedinthewall.
• Connect LAN (PoE+).
• Connect optional power supply.
Only SC 19.1: Always connect power supply, no Power over Ethernet possible.
• PlaceSmartControlinush-mountedbox.
SlightlypushdownbothholdingclampsontheuppersideofSmartControltoplaceitinush-mounted
box.
• Tightenallfourlockingscrews(5)underleftdesigncoverandrightdesigncover.(g.2)
Fig. 2: Locking screws under design covers
• Attach both design covers.
5
5
5
5

Page 5 of 24SC 10.1, 15.1, 19.1
Installation and commissioning
1.4 Commissioning
After connecting the device you must change the default settings for commissioning your device.
1.4.1 Settings–Menuoverview
- General / Design settings
- Select language
- Set time / date
- Power / Lock screen settings
- System / Access settings
- Password protection
1.4.2 Opening the settings menu
Fig. 3: Settings
• Select JUNG-logo in main menu (JUNG Launcher).
Password input opens.
• Enter password.
The default password is “0000“.
Settings menu opens.

Page 6 of 24SC 10.1, 15.1, 19.1
Installation and commissioning
1.4.3 Changing the default language
Fig. 4: General / Design settings – Select language
iThe default language is English.
• Open settings menu.
• Select menu “General / Design settings“.
• Select submenu “Select language“.
• Select “Select language”.
Available languages are shown.
• Select language.
Default language is changed.
1.4.4 Selecting the current date and time
Fig. 5: General / Design settings – Set date / time
• Open settings menu.
• Select menu “General / Design settings“.
• Select submenu “Set date / time“.
• Change settings:
- autom. date & time: activated (date and time are applied by selected timezone)
- autom. time zone: deactivated (device does not detect location, timezone must be selected manually)
- Select time zone (e.g. GMT+2)
- 24-hour format: activated

Page 7 of 24SC 10.1, 15.1, 19.1
Installation and commissioning
1.4.5 Changingthedefaultpassword
Fig. 6: System / Access settings – Password protection
• Open settings menu.
• Select menu “System / Access settings“.
• Select submenu “Password protection“.
Password input opens.
• Enter current and new password.
• Conrmpasswordswith“OK“.
Default password is changed.
1.4.6 Creating app shortcut in main menu
Fig. 7: App shortcut
• Touch and hold area/tile in main menu.
Google Play request opens.
• Cancel request.
App list is shown.
• Select app.
Request about symbol and name opens.
• Change symbol and name or use default settings.
App shortcut is shown in main menu.

Page 8 of 24SC 10.1, 15.1, 19.1
Installation and commissioning
1.4.7 Updatingthermware
Fig. 8: SystemUpdate–Updatermwareviainternetconnection
Requirements:
- Internet connection
- App “System Update“ in main menu
• Select app “System Update“.
App starts.
• Select „Check online for updates“.
Firmware is updating automatically.

Page 9 of 24SC 10.1, 15.1, 19.1
Connections, operating controls and indicator lights
2 Connections, operating controls and indicator lights
2.1 Operating controls device front side
Fig. 9: Operating controls device front side
Name Function
1 Speaker for playing signal tones
2 SDHC card reader for reading memory cards
3 Microphone for door communication
4 Home button to get back to main menu
5 Reset button for restarting the device
2.2 Connections device rear side
Fig. 10: Connections device rear side
Name Function
6 USB OTG Mini USB connection for maintenance work
7 DC 12 ... 32 V connection for optional external power supply
8 LAN (PoE+) network connection and power supply
9 USB 2.0 (2 x) connection for USB devices
1
2
4
3
5
98
6
7

Page 10 of 24SC 10.1, 15.1, 19.1
Operationandconguration
3 Operationandconguration
3.1 Control elements
Foroperationandcongurationofthedevicecontrolelementsareavailable.
The control elements are not shown in every menu or app.
Fig. 11: Control elements
Name Function
A Status bar display of time
display of status messages from started apps
B Side bar list with app shortcuts from main menu (JUNG Launcher)
C Navigation bar contains basic control elements
1O/Restart forrestartingorswitchingothedevice
2 Quieter for increasing the volume
3 Back leads back to the previous menu
4 Main menu leads directly to the main menu (JUNG Launcher)
5 App overview opens an overview of all started apps
6 Louder for decreasing the volume
7 Context menu opens the context menu of the shown app
3.1.1 Opening the status bar
• Swipe from the top side of the touchscreen to the middle of it.
Status bar opens.
3.1.2 Opening the side bar
• Swipe from the right side of the touchscreen to the middle of it.
Side bar opens.
41
C
B
A
2 3 5 6 7
Ce manuel convient aux modèles suivants
5
Table des matières
Autres manuels Jung Panneau de contrôle


