Ironton 58252 Manuel utilisateur

READ & SAVE THESE INSTRUCTIONS
Air-Operated 1:1 Oil Pump
With Extension Kit –4.8 GPM
Owner’s Manual
WARNING: Read carefully and understand all ASSEMBLY AND OPERATION
INSTRUCTIONS before operating. Failure to follow the safety rules and other basic safety
precautions may result in serious personal injury.
Item #58252

Page 2 of 19
Thank you very much for choosing an Ironton™product!
For future reference, please complete the owner’s record below:
Serial Number/Lot Date Code: ________________________________
Purchase Date: ____________________________________________
Save the receipt, warranty, and this manual. It is important that you read
the entire manual to become familiar with this product before you begin
using it.
This pump is designed for certain applications only. Northern Tool and
Equipment is not responsible for issues arising from modification or
improper use of this product such as an application for which it was not
designed. We strongly recommend that this product not be modified
and/or used for any application other than that for which it was designed.
For technical questions, please call 1-800-222-5381.

Page 3 of 19
Table of Contents
Intended Use..........................................................................................................................................4
Packaging Contents..............................................................................................................................4
Technical Specifications ......................................................................................................................4
Important Safety Information...............................................................................................................4
Specific Operation Warnings...............................................................................................................6
Main Parts of Pump...............................................................................................................................8
Assembly Instructions..........................................................................................................................9
Parts List..............................................................................................................................................10
Parts List..............................................................................................................................................12
Before Each Use..................................................................................................................................13
Operating Instructions........................................................................................................................13
After Each Use.....................................................................................................................................13
Maintenance ........................................................................................................................................14
Troubleshooting..................................................................................................................................14
Parts Diagram......................................................................................................................................15
Parts List..............................................................................................................................................16
Replacement Parts..............................................................................................................................17
Limited Warranty.................................................................................................................................18

Page 4 of 19
Intended Use
The Ironton Air-Operated 1:1 Oil Pump can be used to transfer lubrication oil, waste oil, and antifreeze
liquids.
Packaging Contents
Part#
Description
Quantity
1701001
Air-operated pump
1
ET10000
Extension tube
1
Technical Specifications
Property
Specification
Compression ratio
1:1
Operating pressure (psi)
70-115
Max. fluid pressure (psi)
115
Air consumption (min)
@115psi/3.6CFM
Max. free flow rate (min)
4.8 gallon
Suction tube diameter
1-5/8''
Suction tube length (inch)
10-5/8''
Air inlet connection
1/4'' NPT female
Oil outlet connection
Male 1/2''
Max. viscosity oil delivered
SAE80
Temperature oil delivered
-50-122°F
Noise level (dB)
82
Important Safety Information
⚠WARNING
Read and understand all instructions. Failure to follow all instructions may result in serious injury
or property damage.
The warnings, cautions, and instructions in this manual cannot cover all possible conditions or
situations that could occur. Exercise common sense and caution when using this tool. Always be
aware of the environment and ensure that the tool is used in a safe and responsible manner.
Do not allow persons to operate or assemble the product until they have read this manual and
have developed a thorough understanding of how it works.
Do not modify this product in any way. Unauthorized modification may impair the function and/or
safety and could affect the life of the product. There are specific applications for which the product
was designed.
Use the right tool for the job. DO NOT attempt to force small equipment to do the work of larger
industrial equipment. There are certain applications for which this equipment was designed. This
product will be safer and do a better job at the capacity for which it was intended. DO NOT use
this equipment for a purpose for which it was not intended.
Industrial or commercial applications must follow OSHA requirements.

Page 5 of 19
⚠WARNING
This product may contain chemicals known to the state of California to cause cancer, birth defects,
or other reproductive harm.
Some dust created by power sanding, sawing, grinding, drilling, and other construction activities
contains chemicals known to the state of California to cause cancer, birth defects, or other
reproductive harm. Some examples of these chemicals are:
lead from lead-based paints,
crystalline silica from bricks and cement and other masonry products, and
arsenic and chromium from chemically-treated lumber.
Your risk from these exposures varies, depending on how often you do this type of work. To
reduce your exposure to these chemicals: work in a well-ventilated area, and work with approved
safety equipment, such as dust masks that are specially designed to filter out microscopic
particles.
Handling power cords on corded products may expose you to lead, a chemical known to the state
of California to cause cancer and birth defects or other reproductive harm. Wash your hands after
handling.
⚠WARNING
WORK AREA SAFETY
Inspect the work area before each use. Keep work area clean, dry, free of clutter, and well-lit.
Cluttered, wet, or dark work areas can result in injury. Using the product in confined work areas
may put you dangerously close to cutting tools and rotating parts.
Do not use the product where there is a risk of causing a fire or an explosion; e.g., in the presence
of flammable liquids, gases, or dust. The product can create sparks, which may ignite the
flammable liquids, gases, or dust.
Do not allow the product to come into contact with an electrical source. The tool is not insulated
and contact will cause electrical shock.
Keep children and bystanders away from the work area while operating the tool. Do not allow
children to handle the product.
Be aware of all power lines, electrical circuits, water pipes, and other mechanical hazards in your
work area. Some of these hazards may be hidden from your view and may cause personal injury
and/or property damage if contacted.
⚠WARNING
PERSONAL SAFETY
Stay alert, watch what you are doing, and use common sense when operating the tool. Do not use
the tool while you are tired or under the influence of drugs, alcohol, or medication. A moment of
inattention while operating the tool may result in serious personal injury.
Dress properly. Do not wear loose clothing, dangling objects, or jewelry. Keep your hair, clothing

Page 6 of 19
and gloves away from moving parts. Loose clothes, jewelry, or long hair can be caught in moving
parts. Air vents on the tool often cover moving parts and should be avoided.
Wear the proper personal protective equipment when necessary. Use ANSI Z87.1 compliant safety
goggles (not safety glasses) with side shields, or when needed, a face shield. Use a dust mask in
dusty work conditions. Also use non-skid safety shoes, hardhat, gloves, dust collection systems,
and hearing protection when appropriate. This applies to all persons in the work area.
Do not overreach. Keep proper footing and balance at all times.
Remove keys or wrenches before connecting the tool to an air supply, power supply, or turning on
the tool. A wrench or key that is left attached to a rotating part of the tool may cause personal
injury.
Secure the work with clamps or a vise instead of your hand when practical. This safety precaution
allows for proper tool operation using both hands.
⚠CAUTION
PUMP USE AND CARE
Do not force the pump. Products are safer and do a better job when used in the manner for which
they are designed. Plan your work, and use the correct product for the job.
Check for damaged parts before each use. Carefully check that the product will operate properly
and perform its intended function. Replace damaged or worn parts immediately. Never operate the
product with a damaged part.
Do not use a product with a malfunctioning switch. Any power tool that cannot be controlled with
the power switch is dangerous and must be repaired by an authorized service representative
before using.
Disconnect the power/air supply from the product and place the switch in the locked or off position
before making any adjustments, changing accessories, or storing the tool. Such preventive safety
measures reduce the risk of starting the tool accidentally.
Store the pump when it is not in use. Store it in a dry, secure place out of the reach of children.
Inspect the tool for good working condition prior to storage and before re-use.
Use only accessories that are recommended by the manufacturer for use with your product.
Accessories that may be suitable for one product may create a risk of injury when used with
another tool. Never use an accessory that has a lower operating speed or operating pressure than
the tool itself.
Keep guards in place and in working order. Never operate the product without the guards in place.
Do not leave the tool running unattended.
Specific Operation Warnings
⚠WARNING
To prevent serious injury or property damage, read and understand owner's manual before
operating.

Page 7 of 19
Wear ANSI Z87.1 compliant goggles and other protective gear while operating.
Do not exceed the maximum working air pressure of 115 PSI.
Never point the dispenser at people or animals.
Do not use the pump near open flames. Do not smoke during this operation.
When not in use, disconnect the air supply air to the pump.
Inspect before each use; check that all connections are tight and secure.
Never use if parts are damaged or broken; replace damaged or broken parts before operating.
Use only original parts when repairing the pump.
Always disconnect the air supply after use so that oil can't leak out in case one of the pump's
components should break.
The compressed air must be filtered to avoid dust and moisture into pump.
Do not use with any liquid besides the intended oil, lubricants, or antifreeze liquids. See owner's
manual for intended oil.
Disconnect air hose and relieve air pressure before servicing.
Always dispose of oil and other liquids according to local waste authority guidelines.
Not for use by or around children.
Page 8 of 19
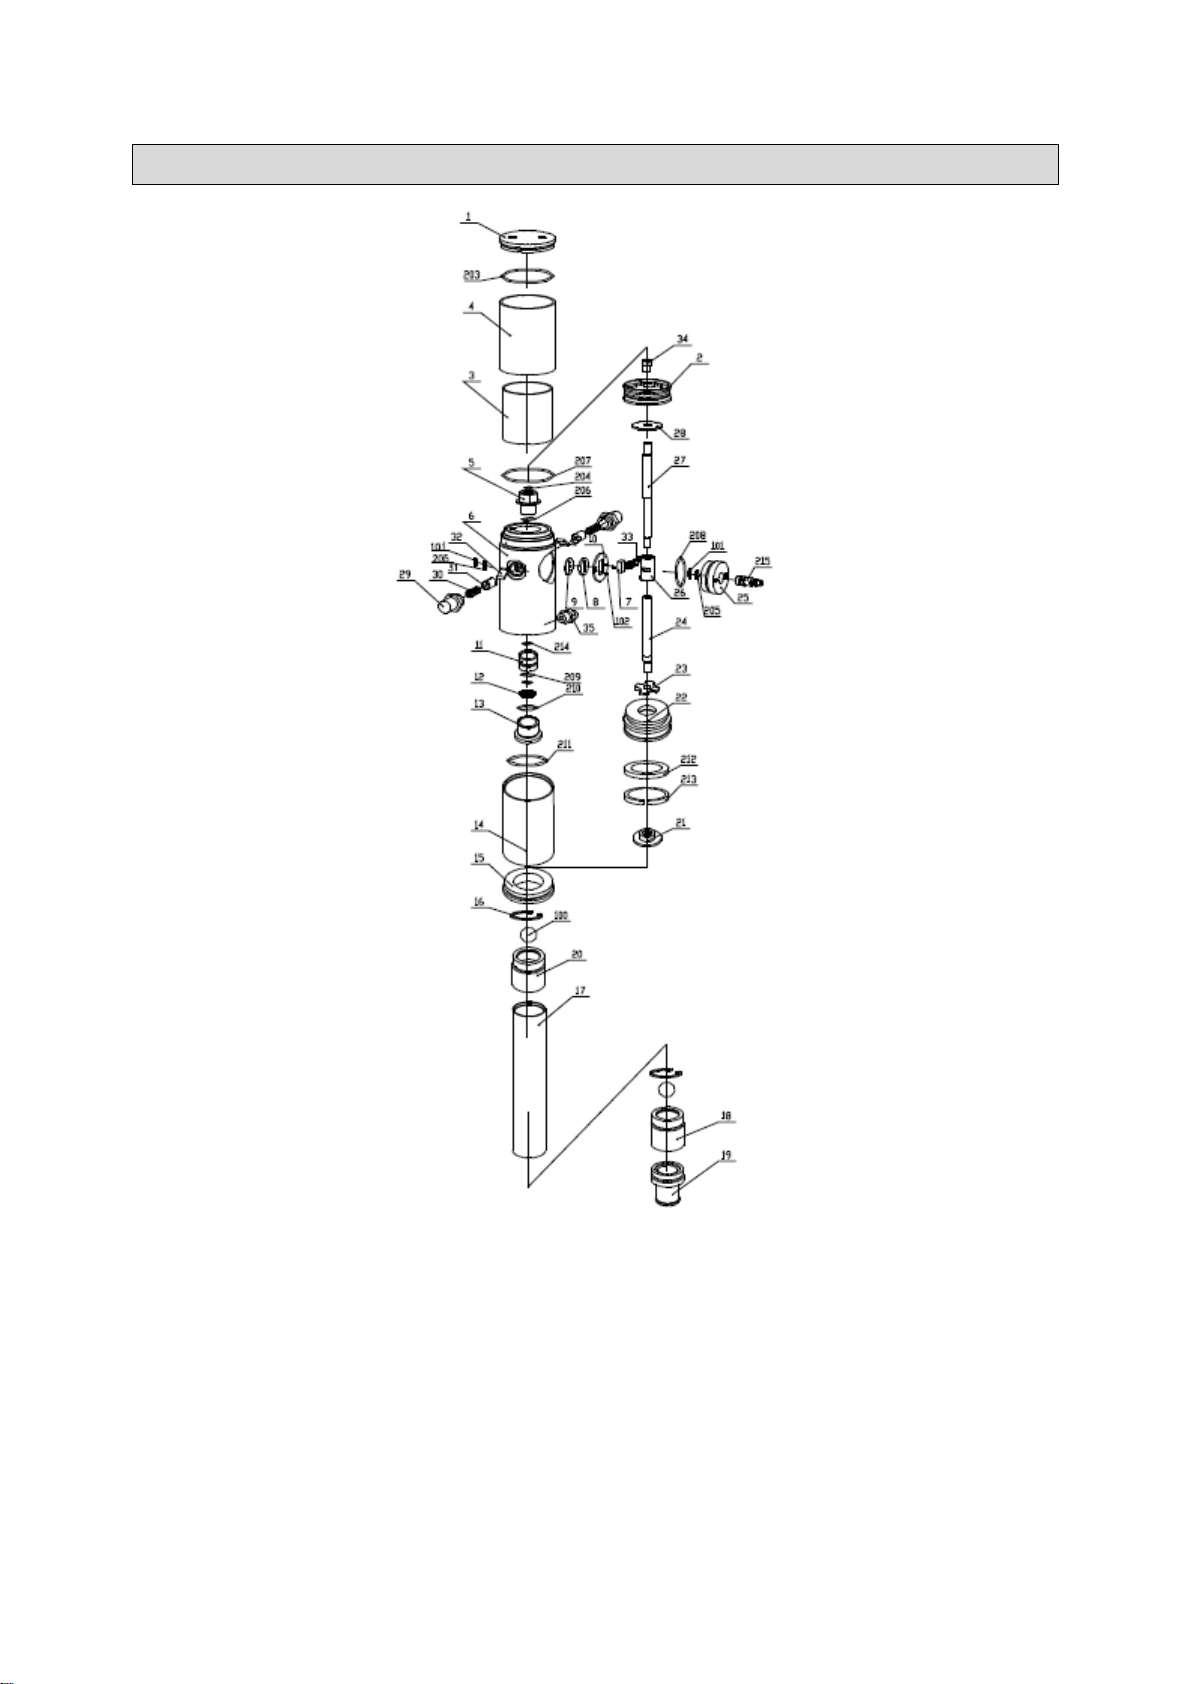
Main Parts of Pump
Page 9 of 19
Assembly Instructions
DIRECTLY FIT PUMP INTO DRUM
•Insert the suction tube of pump into the drum and secure with ring nut. Suitable for commercial
drums with 57 diameter hole and threading 2'' BSP.
•Fit an oil delivery tube for oil outlet of the air operated pump using only high quality tubes
(normally 1/2'' or 3/4'', according to DIN-SAE norms), by means of 1/2'' BSP threading fitting.
•Oil delivery pistol: connect delivery tube with delivery pistol using suitable pipe fittings, and point
the pistol in the desired area.
•Air inlet connection is 1/4'' quick plug (or 1/4'' NPT female) in all versions.
•Compressed air connection (to be supplied by the customer) should be done using suitable
tubes.
•A pressure regulator to keep the pump's working pressure at the best possible level (max 5-8
bar) between the pump and the compressed air line.
•A cut-off switch can enable the operator to stop the pump at any given moment by cutting the air
supply off between the pump and the compressed air line.
•Switch on all switches.
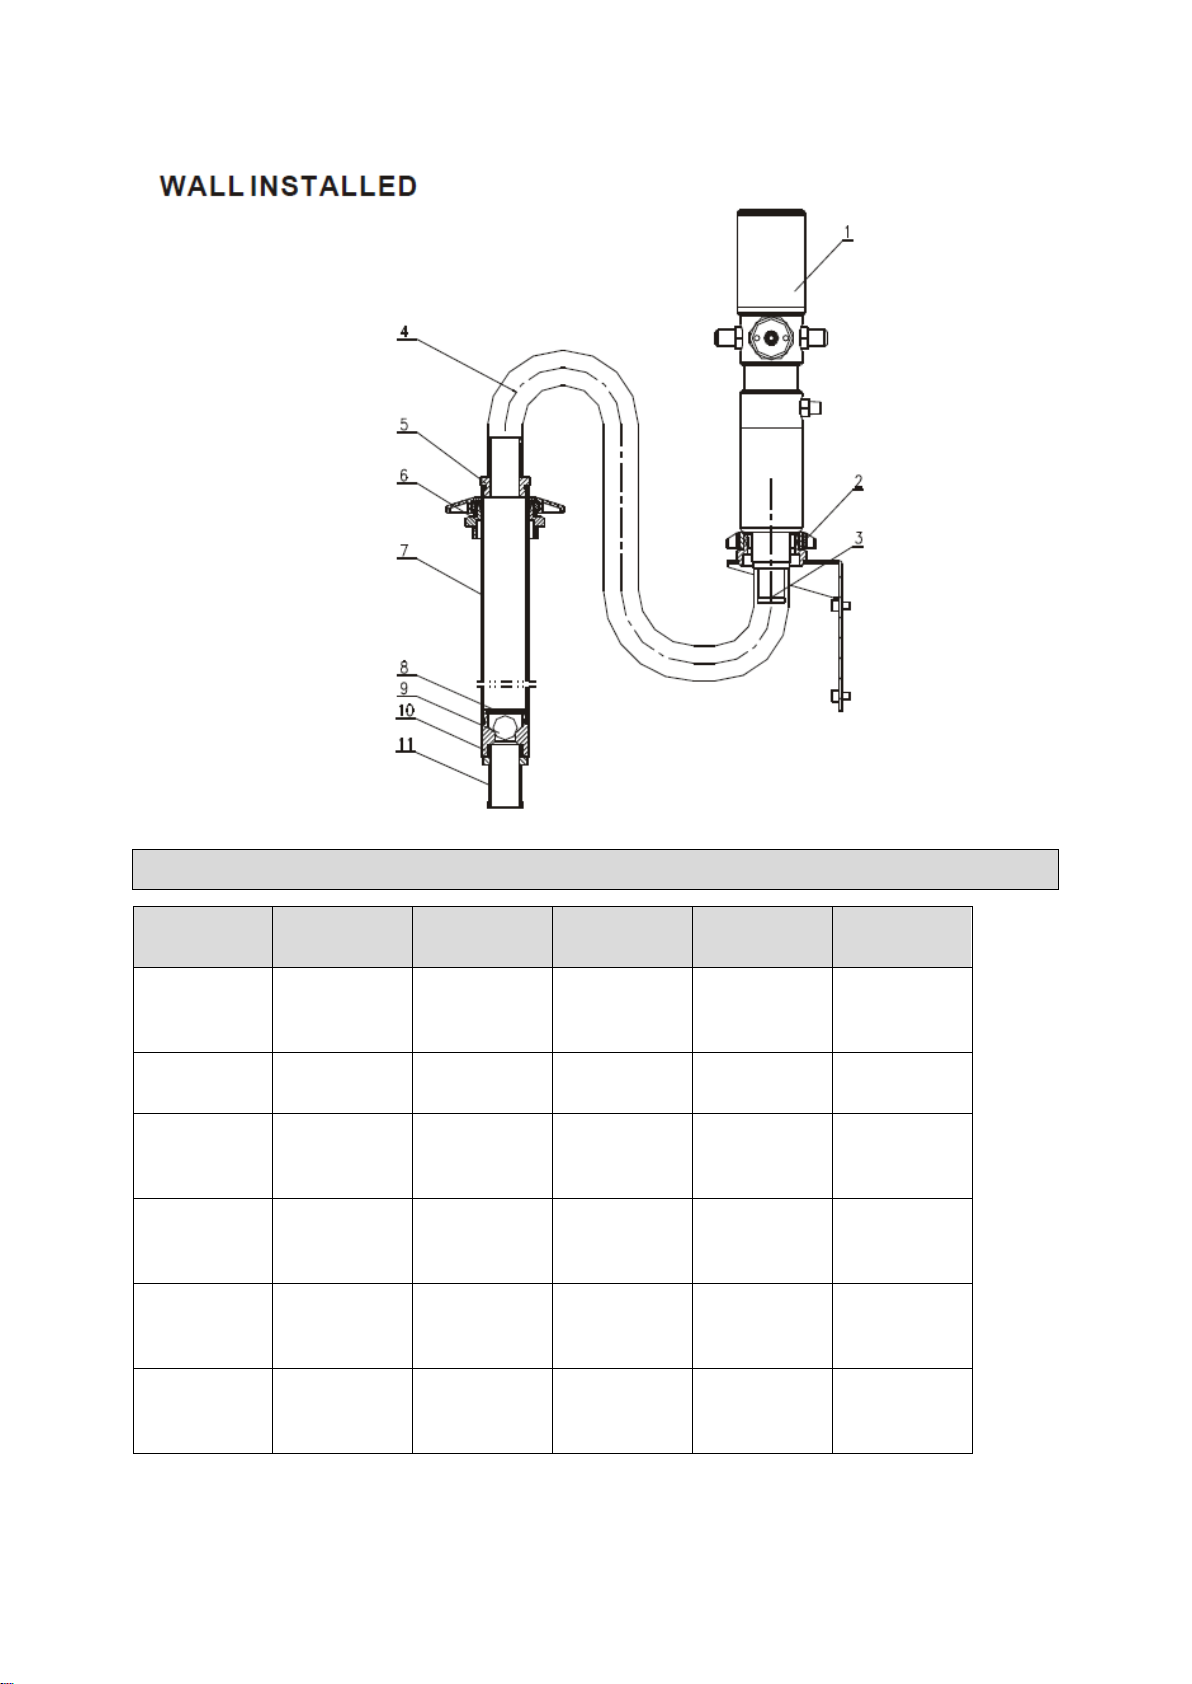
Page 10 of 19
Parts List
Part#
Description
Quantity
Part#
Description
Quantity
1
Oil pump
1
7
Rigid suction
tube
1
2
Wall bracket
1
8
Spring circlip
1
3
Pump
adapter
1
9
Ball
1
4
Flexible
suction hose
1
10
Valve seat
1
5
Suction hose
adapter
1
11
Filter
1
6
Bung
adapter
1
Table des matières
Autres manuels Ironton Pompe à eau


Manuels Pompe à eau populaires d'autres marques


Sykes AmeriPumps
Sykes AmeriPumps GP100M Guide de dépannage

DUROMAX
DUROMAX XP WX Series Manuel utilisateur

BRINKMANN PUMPS
BRINKMANN PUMPS SBF550 Manuel utilisateur

Franklin Electric
Franklin Electric IPS Manuel utilisateur

Xylem
Xylem e-1532 Series Manuel utilisateur

Milton Roy
Milton Roy PRIMEROYAL Manuel utilisateur