ioSafe 220+ Manuel utilisateur

ioSafe 220+
User Manual

A8-7220-00 Rev. 1.0
©2022 CRU Data Security Group, LLC. ALL RIGHTS RESERVED.
This User Manual contains proprietary content of CRU Data Security Group, LLC (“CDSG”) which is protected by copyright, trademark,
and other intellectual property rights.
Use of this User Manual is governed by a license granted exclusively by CDSG (the “License”). Thus, except as otherwise expressly
permitted by that License, no part of this User Manual may be reproduced (by photocopying or otherwise), transmitted, stored (in a
database, retrieval system, or otherwise), or otherwise used through any means without the prior express written permission of CDSG.
Use of the full ioSafe 220+ product is subject to all of the terms and conditions of this User Manual and the above referenced License.
CRU®, ioSafe®, Protecting Your Data™, and No-Hassle™ (collectively, the “Trademarks”) are trademarks owned by CDSG and are
protected under trademark law. This User Manual does not grant any user of this document any right to use any of the Trademarks.
Kensington®is a registered trademark of Kensington Computer Products Group. Synology®is a registered trademark of Synology, Inc.
This document does not grant any user of this document any right to use any of the Trademarks.
Product Warranty
CDSG warrants this product to be free of significant defects in material and workmanship for a period of two (2) years from the original
date of purchase. CDSG’s warranty is nontransferable and is limited to the original purchaser.
Limitation of Liability
The warranties set forth in this agreement replace all other warranties. CDSG expressly disclaims all other warranties, including but not
limited to, the implied warranties of merchantability and fitness for a particular purpose and non-infringement of third-party rights with
respect to the documentation and hardware. No CDSG dealer, agent, or employee is authorized to make any modification, extension,
or addition to this warranty. In no event will CDSG or its suppliers be liable for any costs of procurement of substitute products or
services, lost profits, loss of information or data, computer malfunction, or any other special, indirect, consequential, or incidental
damages arising in any way out of the sale of, use of, or inability to use any CDSG product or service, even if CDSG has been advised
of the possibility of such damages. In no case shall CDSG’s liability exceed the actual money paid for the products at issue. CDSG
reserves the right to make modifications and additions to this product without notice or taking on additional liability.
FCC Compliance Statement: “This device complies with Part 15 of the FCC rules. Operation is subject to the following two
conditions: (1) This device may not cause harmful interference, and (2) this device must accept any interference received, including
interference that may cause undesired operation.”
This equipment has been tested and found to comply with the limits for a Class A digital device, pursuant to Part 15 of the FCC
Rules. These limits are designed to provide reasonable protection against harmful interference when the equipment is operated in a
commercial environment. This equipment generates, uses, and can radiate radio frequency energy and, if not installed and used in
accordance with the instruction manual, may cause harmful interference to radio communications. Operation of this equipment in a
residential area is likely to cause harmful interference in which case the user will be required to correct the interference at this own
expense.
In the event that you experience Radio Frequency Interference, you should take the following steps to resolve the problem:
1. Ensure that the case of your attached drive is grounded.
2. Use a data cable with RFI reducing ferrites on each end.
3. Use a power supply with an RFI reducing ferrite approximately 5 inches from the DC plug.
4. Reorient or relocate the receiving antenna.

Table of Contents
1. Introduction ............................................................................................................................ 4
1.1. Activate Warranty and Data Recovery Service Protection ................................................ 4
2. General Information ................................................................................................................ 5
2.1. Warnings and Notices ................................................................................................... 5
2.2. Package Contents ........................................................................................................ 6
2.3. Identifying Parts ........................................................................................................... 7
2.4. LED Behavior ............................................................................................................... 8
3. Hardware Installation ............................................................................................................... 9
3.1. Tools and Parts for Drive Installation .............................................................................. 9
3.2. SATA Drive Installation .................................................................................................. 9
3.3. Connecting the ioSafe 220+ ......................................................................................... 14
4. Install Synology DiskStation Manager ...................................................................................... 15
5. Connect and Log in to Synology DiskStation Manager .............................................................. 17
6. Product Support and Data Recovery Service ........................................................................... 19
6.1. Activate Data Recovery Service Protection ................................................................... 19
6.2. ioSafe No-Hassle Warranty .......................................................................................... 19
6.3. Data Recovery Procedure ............................................................................................ 19
6.4. Contact ioSafe Support ................................................................................................ 20
ioSafe 220+ User Manual 3

1. INTRODUCTION
This User Manual shows you how to set up and maintain the ioSafe 220+, a fireproof and waterproof
two-bay network-attached storage (NAS) storage device, powered by Synology DSM.
The ioSafe 220+ ensures seamless business continuity with Synology DSM, Synology's prize-winning
operating system. The ioSafe 220+ also protects your data while fully submersed underwater for up to 72
hours and in temperatures up to 1550° F for 30 minutes, ensuring that your data stays protected through
floods and fires.
1.1. ACTIVATE WARRANTY AND DATA RECOVERY SERVICE
PROTECTION
Make sure to register your product to ensure you receive notices of product updates and are fully protected
by our hardware warranty and Data Recovery Service (if applicable).
Register your product to activate your Data Recovery Service protection plan and warranty by visiting
iosafe.com/activate.
ioSafe 220+ User Manual 4

2. GENERAL INFORMATION
2.1. WARNINGS AND NOTICES
Please read the following before handling this product.
IMPORTANT
If a hard drive inside the ioSafe 220+ ever fails, do not replace it without consulting the
complete User Manual first.
We’ve made the drive replacement procedure very easy to follow, but if you don’t follow it
you might accidentally erase your data!
Download the User Manual from iosafe.com/support/product-manuals and consult it to be
safe!
1. Before starting any type of hardware installation, ensure that all power switches have been turned off
and all power cords have been disconnected to prevent personal injury and damage to the hardware.
2. Do not drop the product, submit it to impact, or pierce it.
3. The circuit boards within this product are susceptible to static electricity. Proper grounding is strongly
recommended to prevent electrical damage to the product or other connected devices, including the
computer host.
4. Avoid placing this product close to magnetic devices, high voltage devices, or in an area exposed to
heat, flame, direct sunlight, dampness, moisture, rain, vibration, shock, dust, or sand.
5. To avoid overheating, this product should be operated in a well-ventilated area.
6. Remove the drives before transporting the product to prevent damage to the drive interfaces.
ioSafe 220+ User Manual 5

2.2. PACKAGE CONTENTS
Check the package contents to verify that you have received the items below. Please contact ioSafe if any
items are missing or damaged (see Section 6.4: Contact ioSafe Support, page 20).
ioSafe 220+ Qty. 1
Magnet Qty. 1 Screws Qty. 9
Power Supply Qty. 1 Power Cord Qty. 1
Ethernet Cable Qty. 1 Allen Wrench Qty. 1
ioSafe 220+ User Manual 6

2.3. IDENTIFYING PARTS
Front
Power
Switch
Copy From
USB Button
USB
Type A Port
LED Status
Indicators
Rear
System Fan
Power In
USB
Type A Port
LAN
Port 2
LAN Port 1
ioSafe 220+ User Manual 7
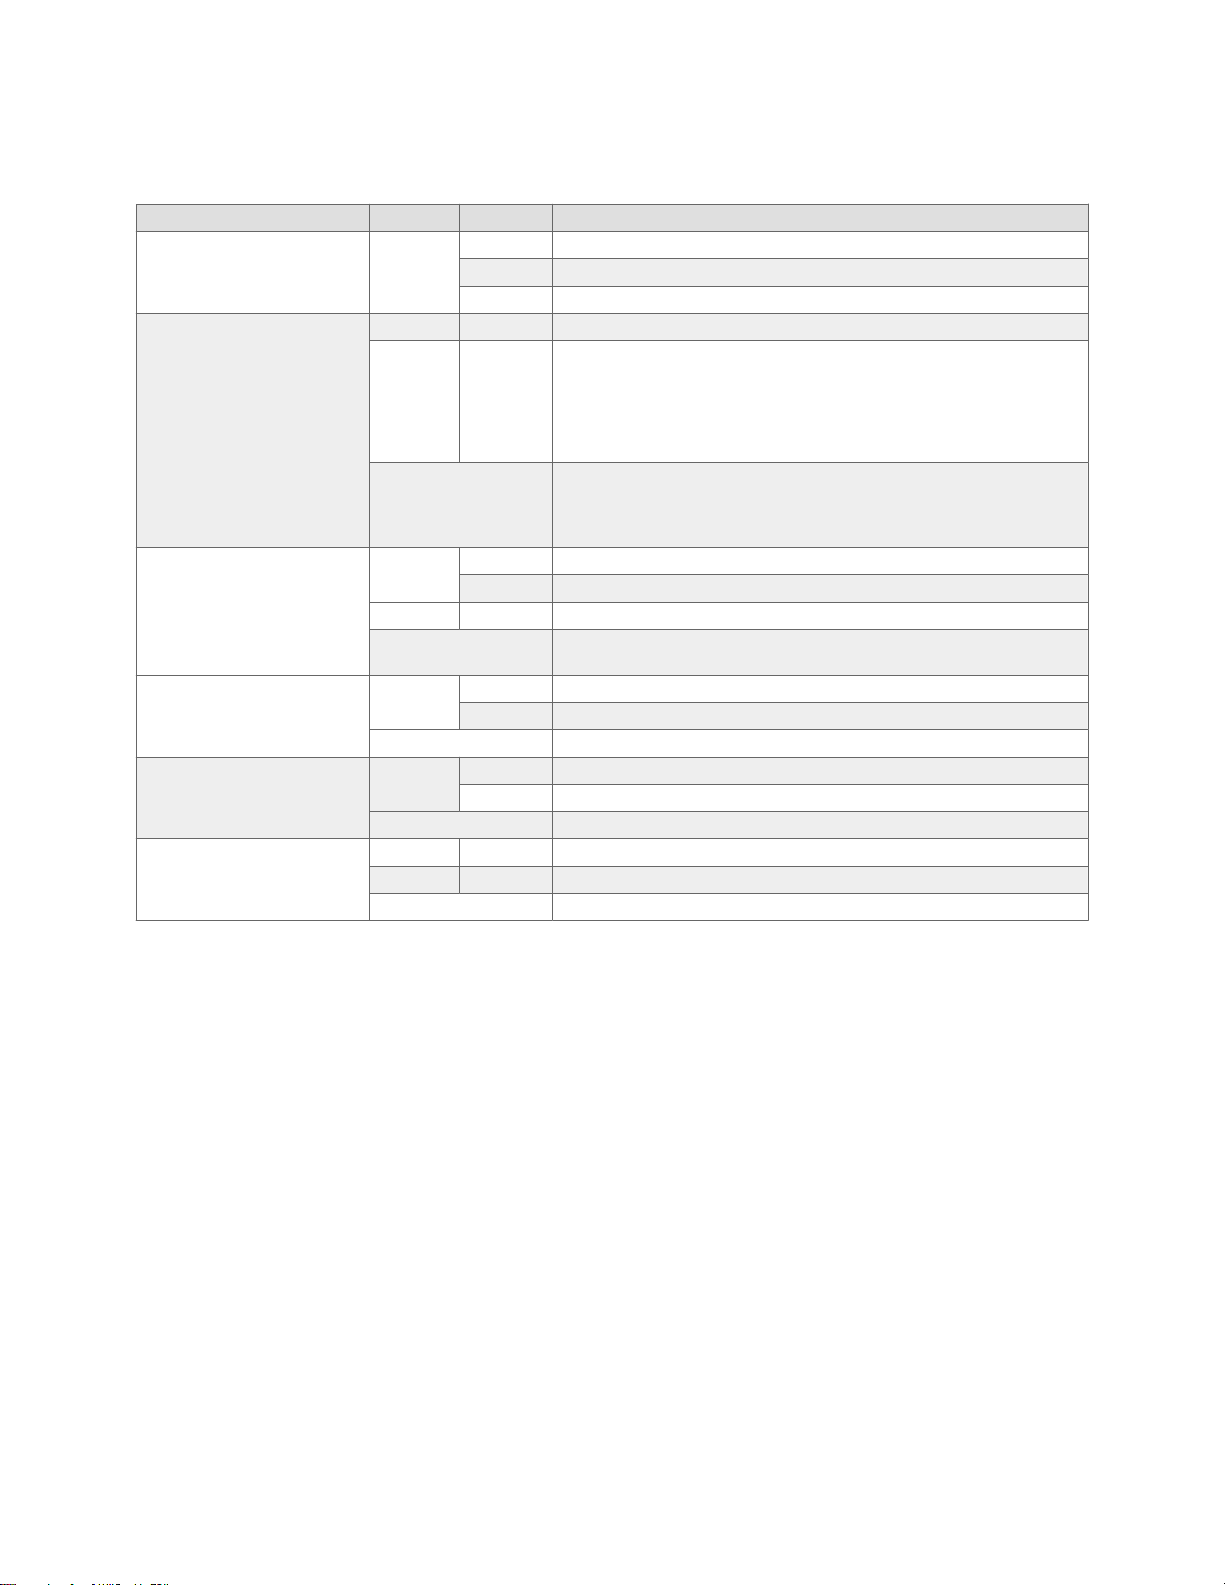
2.4. LED BEHAVIOR
LED Name Color State Description
Power Blue
Static Indicates that the unit is powered on.
Blinking The unit is booting up or shutting down.
Off The unit is powered off.
Status
Green Solid The unit is operating normally.
Orange Blinking
Indicates one of the following states:
• Volume degraded
• Volume crashed
• Volume not created
• Synology DSM is not installed
Off
Indicates one of the following states:
• The drives are in hibernation
• The drives are not installed
Drive Activity LEDs #1-2
Green Static The corresponding drive is ready and idle.
Blinking The corresponding drive is being accessed.
Orange Solid Indicates a drive error for the corresponding drive.
Off No internal drive installed in the corresponding drive bay, or the drive is in
hibernation.
Copy Green Static The attached peripheral device has been detected.
Blinking Data is being copied from the peripheral to the unit.
Off No peripheral device detected.
Top Rear LAN LEDs #1-2 Green Solid The network is connected.
Blinking Indicates that network activity is happening.
Off There is no network connected or the Ethernet cable is disconnected.
Bottom Rear LAN LEDs #1-2
Green Solid 1 Gbps connection
Orange Solid 100 Mbps connection
Off 10 Mbps connection or no network detected
ioSafe 220+ User Manual 8

3. HARDWARE INSTALLATION
3.1. TOOLS AND PARTS FOR DRIVE INSTALLATION
• A Phillips screwdriver
• 3mm hex tool (included)
• At least one 3.5-inch or 2.5-inch SATA drive (please visit iosafe.com/support/hardware-compatibility for a
list of compatible drive models)
WARNING
If you install a drive that contains data, the system will format the drive and erase all
existing data. Please back up any important data before installation.
3.2. SATA DRIVE INSTALLATION
1. Use the included 3mm hex tool to remove the screws on the top and bottom of the front cover. Then
remove the front cover.
ioSafe 220+ User Manual 9

2. Remove the waterproof drive cover with the 3mm hex tool.
3. Remove the drive trays with the 3mm hex tool.
ioSafe 220+ User Manual 10
Table des matières
Manuels Sûr populaires d'autres marques


Honeywell
Honeywell 2077D - 1.21 Cubic Foot Anti-Theft Safe Manuel utilisateur

Hornady
Hornady SnapSafe Trunk Safe II Manuel utilisateur

SPORTS AFIELD
SPORTS AFIELD SA-HD5-BIO Manuel utilisateur

Honeywell
Honeywell 5912 Manuel utilisateur

Phoenix
Phoenix FS1280F Manuel utilisateur

Phoenix
Phoenix SS0992K Fiche d'information produit


